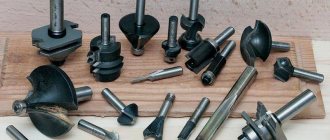
- Application of tapes
- Typology of paintings
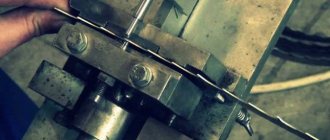
- Saw maintenance
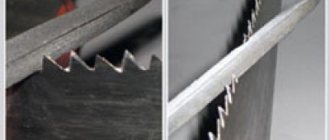
- Features of breeding tape webs
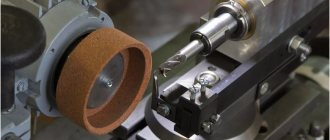
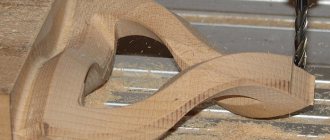
- How to properly sharpen a blade? Method 1: Full profile sharpening
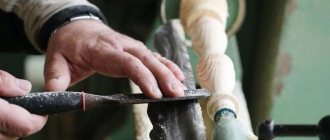
- Method 2: Sharpening the tooth edges
A properly sharpened band saw for metal and wood is the key to productivity and long service life of the tooling. As a rule, such services are provided by special organizations, but if you know the sequence of actions and features of the process, you can sharpen a saw that has become dull on your own.
Characteristics
Band saws have three distinctive features. They are made only from special grades of tool steel, which ensures high strength and wear resistance of the teeth. Russian manufacturers usually use steel grades 9HF and B2F, while foreign companies prefer the C75 series. In any case, the hardness of the material must be at least 45.
The cutting width of a band saw blade is much narrower than its counterparts. As mentioned above, this is a key factor when processing fine wood and commercial timber.
The saws are capable of processing parts of any length and diameter without any problems. At the same time, a properly sharpened band saw ensures high production productivity.
It should be clarified that the reliability of hole saws is due to the heterogeneity of the material from which the blade is made.
In particular, the body of the sawing tool is usually made of spring steel, which has incredible tensile strength and dynamics. For the manufacture of cutting edges, steel grades with a high content of tungsten and cobalt are used. Individual parts of the tape are welded with high frequency currents. Tools made using this technology can be used for cutting metal.
How to choose sharpening equipment?
It is quite difficult to choose a high-quality sharpening machine, but there are more and more truly high-quality tools on the modern market. With the advent of automatic tools for sharpening saws, the quality of the process has also increased, since the human factor in such a process is reduced to a minimum, which means that incorrect angles of sharpened teeth or knocking down of the sinuses are eliminated.
Among the high-quality machines, we can highlight models from several brands.
- "Cedar". One of the most common and famous brands. This tool refers to a fully automatic machine, which uses work through an installed program. This also implies constant monitoring and use of coolant for normal operation. “Cedar” is quite easy to use and is suitable even for novice craftsmen. Setting the angle manually is also not difficult; just loosen the two special bolts located on the back of the tool and adjust the screw near the base to the angle you need. The tool also has a blade speed regulator.
More modern variations allow the use of diamond sharpening wheels.
- "Taiga" . The brand is no less famous than the previous one, has almost the same characteristics, and its operation is even a little simpler. The angle and speed of the blade feed can also be easily adjusted on the tool.
This machine can be used for both wide and narrow band saws.
- "AZU-02" . The most modified of all previous machines. All models have a special device for automatic coolant supply. There are several switches on the tool that allow you to fully control the operation of the sharpening machine. All models also use diamond discs, which speed up the work process and improve its quality.
On the AZU-02 you can also adjust the speed modes of movement of the web, which also greatly simplifies the process.
- "PZSL 30/60 pro" . Modern, fully automatic machine with high sharpening speed. A special cooling oil is used to cool this machine. To work with such a machine, no professionalism is required; during the work you will only need superficial control, since the machine turns off itself when turning one circle of saw teeth.
- "PZSL 10/2" . Automatic narrow band saw machine, suitable for both wood and metal saws. This unit, like the previous one, is oil cooled. The process is fully automated, the master’s task is only to install the desired process and introduce the canvas into the machine, then the machine itself will do all the work.
- Astron (A-1) . Full-profile borazone machine, the process of working with such a unit is fully automated. The machine grinds the entire saw blade in 1 full pass. For sharpening, a CBN disc is used, which is of high quality and durability. Setting up the process is very easy and does not require high professionalism.
There are a huge number of different saw sharpening machines on the modern tool market; the most basic and popular sharpening machines are listed above.
DIY grinder: drawings with dimensions + assembly instructions
During development, special attention is paid to the configuration of the rollers, the method of fastening the product and the optimal power of the power unit. Read more about this.
Making rollers
Particular attention should be paid to the manufacture of the main drive roller, which acts as a pulley! It should be quite massive. This will avoid unnecessary jerking during the starting torque due to the presence of inertia at rest. The speed gradually reaches the desired values. If we take into account the use of a standard motor in the drive design, with a slip of no more than 9%, at a rated speed of 1500 rpm, the speed will not exceed 1400 rpm maximum.
Steel or cast iron are not suitable for making the main part because the motor will be stressed when starting up or will not be able to turn the overly heavy workpiece at all.
There are two options to solve this problem:
- Manufacturing a hollow steel roller to reduce weight according to the principle: larger diameter - deeper cavity. The exact dimensions can be calculated from a reference book, but special accuracy is not required.
- Second option: make a duralumin roller of grade D16 and higher.
It is recommended to make an end groove on the pulley, the dimensions of which will be identical to the dimensions of the belt intended for use. This will help prevent uncontrolled belt slippage if the rollers are not positioned correctly in the plane of rotation.
It is recommended to do the same with the remaining rollers, including the tensioner. The use of duralumin for their manufacture will eliminate the work of grinding cavities to regulate weight.
The degree of roughness of the roller surface is of no small importance. Recommended limit values: Ra1.25-Ra2.5. Increased roughness will lead to premature wear of the belt base, and roughness below the specified limit will contribute to unnecessary slippage during long-term operation.
The rollers must be installed using sealed bearing sets based on self-aligning bearings with a fixed outer ring. With this installation, abrasive or other particles cannot get on the roller shaft. When choosing bearings, it is necessary to take into account the correspondence of their bearing parameters to the maximum speed of the power unit.
The rollers can be secured with regular cotter pins or with a shoulder on one end of the shaft, as required by the standard. The drive shaft must have a keyway in common with the drive shaft.
Motor and turntable
When planning to assemble a belt grinding machine with your own hands, you should pay special attention to the choice of unit. The most commonly used engine is 0.75 kW (although up to 1.5 kW is not prohibited) with a rotation speed of 1500 to 3000.
Please note that the belt may not be able to withstand high speeds. As a rule, engine power is selected based on planned operations on the assembled machine. If rough work predominates, with a high load on the drive, a more powerful control unit is installed, but with a lower number of revolutions, and if only surface grinding is required, the parameters remain within the above limits.
The grinding process is characterized by significant contamination in the form of microscopic dust particles, so the motor must be of a closed type with its own fan. It is better to ignore the recommendations of “experts” on using a motor from a used washing machine.
To design a homemade grinder, you will need dimensional drawings; in addition, it is good to think about safety and ease of use on the assembled device. It requires:
- Rotating table.
- Pressure plate on the back of the belt for support.
To accomplish the first task, the stage bracket must be movable, capable of being rotated 90 degrees and fixed at the extreme points. Recommended table thickness: at least 15 mm, preferably duralumin.
The machine frame, sanded near the bearing surface, is suitable for the bearing surface.
Do-it-yourself grinder from an angle grinder: drawings
Drawing of an angle grinder with dimensions for self-assembly
This is one of the simplest DIY grinders. The design of such a mechanism is primarily intended for cleaning weld seams. However, if it is firmly fixed to the table, it can be successfully used as a sharpener for sharpening cutting tools or knives, axes, etc.
Grinder for drill
A drill-grinder is a special accessory that can be made in several stages. There are hundreds of options for what this could be. We chose a non-standard model.
To work, you will need a shaft with gears, bearings and sheet metal.
| We cut out two plates measuring 110 × 250 mm. | |
| We drill the necessary holes on each of the plates. | |
| This part will supply bearings for adjustment. | |
| Then take the "stud" and cut it to 120mm. | |
| We install homemade rollers on the studs and fasten them with bolts. | |
| Pull the tape and secure it on the other side. | |
| We make the basis for attaching the grinder. | |
| We attach the grinder to the frame and fix the drill with clamps. | |
| Don't forget to cut a corner for easy attachment of the knife when sharpening. |
These grinders can help sharpen knives or flat parts.
When to sharpen a circular saw
There are very definite signs by which one can judge the condition of the instrument. Saw sharpening is necessary when the following clearly appears:
- During operation, smoke appears, a specific smell of burnt wood, the casing covering the saw teeth begins to heat up quickly.
- When moving the tool along the workpiece, you need to apply significant effort, as if pushing the saw forward.
- After cutting the material and visually inspecting the sawn edge, black deposits or many chips, fiber burrs, and chipped areas are visible.
- When you carefully examine the saw teeth through a magnifying glass, you can see that the cutting parts have rounded edges rather than sharp ones.
How to properly sharpen a band saw for a band sawmill! Master Class!
All this requires immediate cessation of work, otherwise there is a high risk of damage to the material and wear of the circular saw to a state where sharpening will no longer help it.
Use of machines
Using a special machine, circular saws are sharpened very easily and quickly. The main thing is that there is no need to monitor the angle of the disk feed. Once it has been set, the operator only has to move the teeth into the processing area and lightly press the tooth plane against the rotating diamond disk.
Sharpening a band saw efficiently and quickly
This equipment can be used to sharpen carbide-tipped circular saws and conventional circular saws. The simplest machine for sharpening operations of circular saws has the following structural elements:
- An electric drive with a grinding disc fastening system is a stationary part of the equipment.
- The stand, which moves along the guides, is responsible for feeding the saw blade into the processing area.
- A saw blade clamp on a stand, which is designed to hold the blade in a constant position when it is fed to the sharpening disk.
READ How to Remove Carburetor Husqvarna Saw
Pay special attention! Discs with different types of teeth require an individual approach to sharpening. When the front edge is beveled, it is fed into the processing area at an angle to the horizontal, for which one edge of the stand is raised accordingly.
If you have additional questions about saw sharpening or you have experience in carrying out such operations, please respond in the comments! Your comments are important to us!
The process of constructing private houses and various buildings will be quite complex without the use of a circular saw. It is significantly better than many wood saws because it surpasses them in accuracy and cleanliness of the cut.
Due to the fact that this tool is actively used, it wears out quite quickly, and therefore sharpening circular saws with your own hands becomes extremely necessary.
Self-sharpening
Many home craftsmen do an excellent job of sharpening circular saws without a special machine. Most owners of circular saws have long been accustomed to sharpening saw blades on the fly, using an ordinary file or other available sharpening tools. However, this method is very inconvenient and traumatic. In addition, when sharpening by hand, you can accidentally miss individual teeth. Therefore, this method should not be used.
Experienced sawmills usually make a round wooden stand for sharpening saws, on which the saw blade is placed. The operating principle of such mini-machines is approximately the same as the operating principle of industrially produced machines.
Masters believe that before sharpening saw blades should be slightly damp - this makes sharpening much easier. To do this, sharpeners wet the saw blades with water and various chemicals. However, experts say that in fact this method only brings harm. Any liquid corrodes the metal and causes it to corrode, that is, contributes to the appearance of rust.
When sharpening yourself, you need to be careful not to miss a single tooth. Even if only a few teeth have become dull and the rest remain sharp, absolutely all teeth need to be sharpened. It will work correctly only if all sawing elements are sharpened equally.
Sharpening yourself is not as difficult as it seems. How exactly to sharpen a saw, on an industrial machine or on a primitive stand, is up to each home craftsman to choose for himself. However, in any case, it is necessary to strictly observe basic safety precautions and sharpen the teeth as sharply as possible. If you encounter difficulties associated with sharpening a circular saw at home, you should consult a specialist. If you regularly maintain your circular saw, it will serve faithfully for many years.
A disk tool for cutting wood is always useful during construction. A circular saw is convenient because it allows you to quickly cut material with minimal effort and time. As for the quality of the cut, we can say that it is ideal, but only when the saw is in good working order and well sharpened. Otherwise, working with such a tool is even dangerous, so you should sharpen the circular saw.
It is not difficult to determine the need for sharpening: a blunt tool cuts the workpiece poorly, which is immediately noticeable. There are two options here: either take the blade to a workshop, which is not always profitable in terms of time and money, or sharpen the circular saw yourself. This may seem complicated at first glance. But if you delve into the essence of the saw in more detail, it will not be difficult to service the tool at home.
Homemade grinder - making a belt grinder with your own hands
A grinding machine is a belt sanding machine used for dry grinding of metal products, various alloys, wood, artificial stone, plastic and other materials.
Homemade assembly of an angle grinder
The question of how to make a belt grinding machine with your own hands is asked by many home craftsmen, because with the help of such equipment you can perform various technological operations with products made from various materials. Using a belt grinding machine, you can remove burrs, eliminate surface defects, clean rust, remove scale, eliminate the effects of plasma and laser cutting, and clean welds.
Making your own grinder
It would seem that buying branded equipment and using it in your workshop for more than a year is much easier than making it yourself. However, not everyone can afford to pay a decent amount for a production car from a well-known manufacturer. In addition, it is not difficult to make such a machine yourself, which will have the necessary functionality.
Main parts of the machine body with dimensions
To become the owner of a homemade belt sander, you should first sketch out a drawing, and also stock up on a drill, grinder and jigsaw. Some parts for a belt sander will need to be ordered from a lathe, but this is not a problem these days.
It’s better to immediately focus on making an angle grinder that will work in both vertical and horizontal planes - such equipment is highly functional and allows you to process parts at the required angle.
What you need to know about tooth sharpening angles
The geometry of the band saw teeth can be changed in accordance with the characteristics of the material being processed. This is expressed in the shape of the tooth and in the distance between the individual elements of the cutting edge.
The profile of the band saw is determined by the markings applied by the manufacturer. It looks like this:
- HB - has a narrow blade width, so it is ideal for cutting shapes;
- PV is an almost complete analogue of the previous blade, but has a flattened tooth shape;
- KV - profile is used for wide band saws intended for processing coniferous wood;
- NU – a cutting edge with a large pitch of teeth, providing high performance when cutting soft wood;
- AV – used for longitudinal cutting and sawing of hard materials, such as frozen wood;
- PU – wide saw blade for cutting hardwood.
- WM – universal version, designed for sawing soft and hard wood;
The tooth pitch is selected individually, depending on the material. For example, when cutting hardwood and metal, only fine-toothed blades are used to avoid damaging the cutting edge. Soft raw materials and thick-walled materials are processed with saws with large tooth spacing, which speeds up the production process.
Typology of paintings
The basis for the division of saws of this type is the material of manufacture and the elements being processed. In accordance with such aspects, the following types of canvases can be distinguished.
- Wood saws. The key materials for their manufacture are carbon and alloy steels; their hardness reaches 40–45 HRC. All teeth are subject to mandatory hardening with high-frequency currents. It should be noted that this blade material can be used for cutting thin non-ferrous metals or carbon steels.
- Canvases for metal. Such tools are made from high-speed or spring steel (cobalt and tungsten are added to the structure). These saws already carry a strength of up to 69 HRC. To obtain high hardness and broad capabilities, stellite or other types of durable alloys can be welded onto the teeth.
Manufacturing process
To manufacture the power parts of the machine, it is necessary to use sheet metal 10 mm thick. To draw the outlines of such parts for their further cutting, you can use the drawing as a guide. It is not necessary to adhere to exact dimensions, since only the dimensions of those parts that you are going to process on a belt sander will depend on them. You can draw the outlines of the parts on a sheet of metal with a marker and use a grinder and jigsaw to cut them out. It is much easier to cut such parts with a plasma cutter, but not everyone has such equipment at home.
Base, body parts and engine before assembly
To make the base of a homemade grinder more reliable, it is best to use a sheet of metal 12 mm thick for its manufacture. You can use screw connections to assemble the base of the angle grinder, but then you will have to drill a lot of holes, which will greatly weaken the entire structure. Assembling the base of your machine using electric welding will be much easier and more reliable.
Machine base
The semi-circular grooves on the belt sander parts, rotating the platform on which the rollers are located, will take a long time. To make such grooves yourself, you will have to tinker with a drill, cutters and files, and also use a drill. You can make your task much easier if you have a qualified milling machine make these grooves.
Plastic model of the machine: thanks to the rotating group, the angle grinder can be in a vertical position.
It is best to use titanium or duralumin (D16) to make the rollers of your homemade mini-machine. If it is impossible to find gaps from these materials, then steel can also be used, but the rollers must be made as light as possible by choosing metal from their interior. To make the rollers of a homemade machine, you will need the help of a qualified turner, just take care to prepare a drawing for it.
Sharpening machine rollers
The roller of a larger belt grinder, which will be mounted on the electric motor shaft, will still have to be made of steel, since a titanium rod of this diameter is very difficult to find, and duralumin may not withstand significant loads. For the entire homemade machine, you will need to make 4 rollers, the dimensions (diameter) of which are as follows: one drive roller - 150 mm, one tension roller - 100 mm, two small ones - 70 mm. If you plan to make a mini machine, the diameters of the rollers may be smaller.
When assembling a homemade machine with ready-made rollers, it is very important that they lie strictly in one row. Otherwise, you will constantly experience the tape slipping. The width of the rollers depends on the size of sanding belt you will use on your equipment. When making a drawing for the manufacture of rolls, be sure to take into account that they must have a barrel shape, this will ensure reliable retention of the sanding belt on them during operation. To give the rollers this shape, a small chamfer is made from each edge: 1–2 mm.
The finished rolls of your homemade belt sander should have a smooth surface, this must be reported to the turner who will make them. The bearings on which they will rotate must only be of the closed type, otherwise they will quickly become clogged with dust generated during operation of the grinding machine. In order for your homemade equipment to work for a long time and without interruptions, you need to choose bearings that have a class of at least 6a. The rollers of the grinding machine rotate at a high frequency, so the bearings for them must be of the highest quality.
Grinder ready in horizontal position with additional table
Recommendations from experts
- If a tool sharpening machine is used, it should be inspected before use to determine whether the wheel is in the correct position relative to the saw.
- This layer of steel must be removed from the sinuses to ensure that all microscopic cracks are removed.
- If the saw has been used without maintenance for longer than the period allowed by the manufacturer, the amount of metal removed during sharpening should be increased.
- To check the results of the operation, always use the new product as a reference.
The result of incorrect operation is burnt out tool teeth.
- The shape of the teeth is a characteristic developed and tested by specialists. If you change it, you will not be able to process parts efficiently. Based on this, sharpening must be done so that the shape of the teeth and the profile of the blade remain the original ones, manufactured at the factory.
- If all operating and maintenance rules are followed, the band tool will serve you faithfully until its width is worn down to 65 percent of its original size.
There is an opinion among amateur craftsmen that there is no particular need to remove burrs formed during processing. This is fundamentally incorrect, since microscopic cracks may appear on the canvas.
After completing the work, the tape device must be immediately cleaned of tree sap, sawdust, and resin. Before starting maintenance, the tool must be carefully inspected, otherwise the wheel will clog. This will lead to a significant reduction in sharpening efficiency.
Common mistakes
If a person tries to sharpen a saw for the first time, it is difficult for him to fulfill all the requirements and remember the nuances of the technological process. However, violation of these rules leads to the fact that the efficiency of using a band saw is noticeably reduced, the load on the blade increases, which leads to premature rupture.
Professionals recommend avoiding the following mistakes:
- during mechanical sharpening, the abrasive stone is positioned incorrectly relative to the saw profile. In this case, the sharpening of the teeth will be uneven;
- excessive force when contacting the saw and the grinding wheel. As a result, the metal overheats, scale appears, which leads to premature wear of the cutting edge;
- burrs remain on the canvas. After sharpening, all roughness must be eliminated, otherwise microscopic cracks will appear on the metal during operation;
- using your own sharpening angles. Many inexperienced craftsmen believe that only sharpness is important for saw teeth, so they shamelessly violate the geometry of the cutting edge profile recommended by the manufacturer. It is important to understand that the shape of the tooth has been tested over the years; it is useless to try to experiment here.
Instead of a conclusion, we will add that each band saw has a certain resource, so the blade cannot be sharpened indefinitely. Manufacturers guarantee correct operation of the tool until the total width of the blade is reduced to 65% of the original size.
Sources:
https://crast.ru/instrumenty/kak-zatochit-diskovuju-pilu-v-domashnih-uslovijah https://samastroyka.ru/zatochka-pily-po-derevu.html https://ventanaspb.ru/info/ kak-zatochit-cepnuju-pilu-v-domashnih-uslovijah/ https://drevogid.com/instrumenty/pily/zatochka-lentochnoj.html
Basic Information about Band Saws
A band saw is a cutting tool made in the form of a toothed belt with a closed loop. To service it, you will need a special sharpening machine for band saws. In addition, band saws have a number of other significant differences from traditional circular saws. The most significant of these differences is the ability to cut with such a tool with a minimum width. It should be noted that this is especially true when it is necessary to saw valuable wood and blanks made of expensive metals.
Equipment equipped with a band saw can be successfully used to process parts made of different materials and different configurations. This processing is characterized by a minimum amount of waste of the processed material, exceptional cutting quality and high process speed. However, such processing parameters can be achieved provided that the sharpening of band saws on the machine is carried out not only correctly, but also regularly. When servicing a tape tool (especially if you handle it yourself), you should strictly adhere to the recommendations of qualified specialists.
Automatic band saw BOMAR
Tooth geometry
Depending on the characteristics of the material being processed, band saws can be made from different materials and differ in the geometry of the cutting teeth. If we talk about the separation of semi-finished metal products, then the two most common types of steel used for the production of saws are 9HF and B2F. Equipment for sawing wood is equipped with homemade saws, the hardness of which on the HRC scale is at least 45 units.
Band tools for sawing wood are also divided into three types: carpentry, dividing, and for processing logs. Different types of tools naturally have different parameters (blade size, shape and sharpening angle). Harder wood species are processed with a tool with a smaller sharpening angle.
Today, bimetallic band saws are increasingly used to separate hard steel parts. These saws are called bimetallic saws because they are made of two different metals: the cutting teeth are made of steel with a high content of tungsten and molybdenum, and the blade itself is made of spring steels. Of course, such canvases are much more expensive than standard models, since their production requires special equipment in which the connection of two dissimilar metals occurs under the influence of a laser.
Bimetal Band Saw
Application of tapes
The key component of every band saw is the band saw (blade). Band saws are widely used when working with wood, metal, rubber, plastic and various flexible materials.
There are three types of these products.
- Manual tape devices - these machines can be called household ones; they are most often used at home.
- Desktop modifications - these units are often purchased for small industrial facilities, woodworking companies, and workshops.
- Stationary units - such installations are classified as professional; they are used in large industries, factories, factories, large workshops, and so on.
Teeth and sharpening angles
Blade profiles depend on their purpose and the properties of the materials being cut. The main distinctive parameters: sharpening angle, tooth shape, installation distance. Profiles are labeled as follows:
- HB – used for curly or decorative haircuts;
- PV – analogous to NU, but with flattened teeth;
- KV – for soft materials, suitable for wide saws;
- NU – for soft materials, has a large pitch;
- AB – for longitudinal cutting along wood fibers, used for hard grades;
- PU – for hard materials, used for mounting on wide blades.
- WM – universal, for materials of different hardness;
The sharpening angles for band saws are selected as follows:
- from 180 to 220 for dividing lines;
- up to 150 for sawing lumber.
- 350 for joiner's saws.
How to properly sharpen a blade?
According to statistics, more than 80% of device failures occur due to improper sharpening. The need for sharpening is revealed visually - by the appearance of the teeth themselves or by the state of the cut (increased unevenness of the plane).
Stones for sharpening band saw blades are selected based on the hardness of the teeth. Corundum stones are used to sharpen products made of carbon and alloy steel. Bimetal blades require borazone (CBN) or diamond blades. The cutting blade configuration should be determined based on the characteristics of the tool. It can be in the form of a plate, flat, cup, profile.
Before starting work, it is recommended to leave the canvas hanging unscrewed for 10-12 hours.
Conditions for sharpening blades with your own hands:
- Avoid putting excessive pressure on the disc (this can cause annealing);
- the indispensable presence of liquid for cooling;
- checking for clogging;
- ensure the integrity of the height and shape of the tooth section;
- ensure systematic removal of metal according to the cross-sectional shape of the tooth.
In general, despite the abundance of rules and conditions, these devices are quite undemanding in terms of sharpening. They can be operated either using a special sharpener for band blades or manually. In addition, mugs of various configurations and substances can be used for processing.
Before sharpening the blade, it is advisable to familiarize yourself with the basic methods of performing this procedure.
Full profile sharpening
This method is considered to be of particularly high quality and is performed on automatic equipment. The Elborov disc (Borazon), ideally adapted to the configuration, processes the entire interdental cavity along with the corresponding planes of adjacent teeth in one pass. In this case, it is impossible to obtain an incorrect configuration at the base of the teeth.
What can you sharpen with?
A small blade with small teeth can be sharpened with a special needle file or a regular machine attachment. However, such sharpening is very time-consuming and low-productive, and also very often causes a number of saw breakdowns. Taking these problems into account, many craftsmen have long been using an electric sharpening machine, which quite quickly and equally sharpens all the teeth of a band saw.
Such machines are divided into several groups.
- Fully automatic centers , they use a specialized feeding and sharpening program; such machines are used mainly by large workshops for sharpening or restoring large and massive band saws. The process takes place using cooling chemical liquids and under strict control.
- Semi-manual machines with special tool consoles.
- Small automatic centers , in which the step of moving the web is adjusted and the process is controlled.
A sharpening machine is a unit that helps sharpen a saw efficiently using a sharpening wheel. Most often, a specific unit is selected for a certain type of saw.
The machine includes:
- base and external structure;
- tool holder;
- special drives used to move the blade and rotate the grinding wheels.
How to sharpen a band saw correctly
Let us immediately note that in the absence of experience and skills in performing such work, it is better to entrust saw sharpening to professionals. Violation of the geometry of the cutting edge teeth, the appearance of burrs on the metal, or incorrect installation will significantly reduce the service life of the blade.
When deciding to sharpen your band saw yourself, it will be helpful to first familiarize yourself with the key definitions that you may need to know during the process. So, to properly form the cutting edge you will need:
- the height of the teeth is the distance between the highest point and the base;
- pitch - the distance between the teeth, usually ranges from 19-25 mm.
- sharpening angle – depends on the intended purpose of the tool; for example, the recommended sharpening angle for carpentry saws is 35 °, for splitting saws - 18-22, intended for sawing timber - no more than 15 °.
- installation - deviation of the teeth from the plane of the main saw blade;
The sharpening angle is determined by the manufacturer, so when sharpening the saw yourself, it is recommended to adhere to these parameters.
Here are step-by-step instructions that will help you sharpen a closed saw correctly without resorting to the services of specialists.
Wiring
Inserting bandsaw blades into the wood is the first step in restoring the edge profile. During operation, the position of the teeth may change, so until the correct geometry is obtained, there is no point in sharpening the saw part.
The saw can be opened in three ways:
- stripper - the first and second teeth deviate in different directions, the third remains straight. This profile is designed for sawing hard materials;
- wavy - the most complex option, similar in shape to a wave. Here, each tooth is given an individual shape, and such installation is usually performed only in specialized workshops.
- classic - teeth alternately deviate to the right and left;
It should be noted that when setting, not the entire tooth is bent, but approximately 2/3 of the apex. The procedure is carried out on a special band saw. The cost of such a tool is quite high, so buy it if there is a need to adjust several tools. Its availability can become the basis for sharpening activities.
Of course, you will be able to do everything correctly the first time, even on an adjustable machine, it may not work, so at least the profile geometry should remain the same as before starting work.
Sharpening
This is the main step of modern dressing and can be done in two ways.
Full profile saws are sharpened using a CBN wheel mounted in a special sharpener.
This is a fully automated operation used by professionals. The operation of the machine for sharpening band saws for wood is controlled electronically, and the grinding wheel processes the entire band in one pass. The disadvantage of this method is that the CBN wheel is selected individually for the saw profile, therefore, to sharpen different tools, a sharpening element must be present in the assortment.
Teeth sharpening is done manually or using specialized equipment.
This method is used for self-sharpening band saws. Here you can use a regular grinding wheel or file.
In the first case, the sharpness of the teeth can be restored in the shortest possible time, but the work requires certain skills. In the second, painstaking work: 4-5 movements along the edge of each tooth.
Diamond, CBN and aluminum oxide wheels are used for automatic sharpening. It is important to understand that during this procedure, only sharpness is given to the teeth; the geometry created after installing the blade must remain unchanged.
Saw maintenance
To maintain the blades, it is not enough to sharpen the teeth; they also need to be set apart. These two procedures are performed in order of succession: they begin with setting the teeth, and end with sharpening them. This chronology of work must be strictly observed. Dilution is carried out in order to reduce saw friction in the process of cutting a particular material (wood, metal, plastic, etc.). There are several methods of breeding, which depend on what elements need to be obtained after processing and the strength of the starting piece.
Sharpening blades in winter
If everything is clear about sharpening blades under normal conditions, then sharpening in the cold season needs to be said separately. There is a difference in sharpening band saw blades in summer and winter. It consists of changing the degree of sharpening. The permissible angle of inclination in winter should be 90 degrees, in contrast to summer, when the sharpening angle is 120 degrees.
When sharpening a blade on a machine, before starting the process, you need to make sure that the grinding wheel is positioned exactly in relation to the tool.
It is extremely important to remove such a volume of metal from the recesses that all microcracks are reliably eliminated. If the blade operates without normal maintenance longer than the manufacturer allows, the amount of metal removed in one step should be increased. Always use a new blade as a reference to check the sharpening effect.
- The configuration of the teeth is an indicator that has been worked out and adjusted over the years. If operating standards are maintained, the belt will operate properly until the width is reduced to 65% of its original width. When sharpening, the width of the blade decreases.
- There is one completely incorrect piece of advice that says you don’t need to remove abrasion marks after sharpening. If you take this into account, the occurrence of microcracks in the saw is guaranteed;
- At the end of the work, the tape blade must be cleaned of chips and resin, without putting it in a box, and carefully inspected before sharpening. Otherwise, there is a very high risk of contamination of the abrasive discs. And this will certainly lead to a poor-quality sharpening process.
Fabric material and its parameters
Band saws are used for a variety of woodworking projects. Depending on what specific work the blade is performing, the teeth are sharpened at a certain angle, and their angles of inclination also differ significantly.
Band saws are considered a highly specialized tool, which is intended for woodworking as part of a machine or various complexes (sawmills). A special feature of this tool is the blade, which has the shape of a closed tape. Depending on the tasks performed, such saws may have teeth sharpened at different angles, with different inclinations, and to perform some work, the cutting edge must be flat (toothless) and sharply sharpened. These woodworking machines are capable of making neat and thin cuts, so they are often used for finishing work on cutting boards and when working with valuable types of wood. The capabilities of such tools are great - they can make cuts at almost any angle and in any planes, and not just longitudinal-transverse cuts. They have a number of advantages: high speed of woodworking, long service life of cutting edges and tapes (subject to operating rules), evenness, accuracy and symmetry of cutting lines
Types of band saw teeth: a, b – simple triangular; c, d – triangular sparse and with wolf teeth; d, f – rectangular, hypotenuses facing each other and sparse.
In order to keep the tool in working condition and always ready for use and at the same time provide a high-quality cut, you should regularly sharpen the cutting edge and monitor its condition for wear. Otherwise, instead of a short and simple procedure for sharpening the cutting edge, you will have to do a complex and lengthy full sharpening.
For proper maintenance, it is necessary to know the material used to make the tool. Typically, tape blades are made of steel 9ХФ and В2Ф. Their hardness ranges from 47-58 Rockwell points. Such hardness cannot ensure long-term retention of an edge sharpness. Steels with great hardness are extremely rarely used, and it is difficult to sharpen a blade harder than 60 points. An example of a highly hard blade is a blade made from steel 100Х18В4 (or its imported analogue), the hardness of which can reach 100 points. This saw is used for processing metal parts and sheet metal. Steel 100Х18В4 is quite expensive, so only the edge with teeth is made from it (the width of the strip is about 5-7 mm), and they are soldered to the rest of the blade using a laser. It is recommended to sharpen such blades in specialized centers or professional workshops, since sharpening them in a garage is difficult and requires special training and expensive tools.
It is recommended to monitor the degree of edge wear visually, while looking not only at the edge itself, but also at the quality of the cuts. A dull edge makes an uneven cut, possibly jagged, when working. Another way to monitor web condition is to strictly control machine operating time. To do this, the time of cutting the workpiece with a sharp blade and a dull one is recorded and compared with the time of the current work.
Working belt
On a belt sander you can always see a spring, which is necessary to ensure automatic tension of the sander belt. If you use such a spring, changing the tape will be very convenient, and its tension will be adjusted automatically. It must be said right away that you will have to change the tape even when processing the product several times. When processing any metal part, you need to start with a tape with a larger abrasive, gradually changing it to a smaller one.
Very important attention should be paid to the adhesion of the tape. There are options for proper gluing on the Internet, and you can also watch this process on video. To make it, you need to use fabric-based sandpaper. The seam on the braid is made only from one end to the other and must be reinforced, for which a strip of dense fabric is used, placed on the back side of the area to be glued. When gluing the sanding tape, you should only use flexible adhesive and it should be of the highest quality.
For reliable and high-quality gluing of the sanding belt, it must be properly prepared. You can glue the tape using glue for a heat gun - this method can be clearly studied in the video above. For heating, you can use a regular technical hair dryer.
If desired, you can make your homemade grinding machine even more versatile; to do this, it must be equipped with an additional table located on the side of a larger pulley. This allows the parts to be sanded on a belt sharpening machine by pressing them against the sanding belt on the side of the larger pulley. If you decide to make such a table, it will be necessary to provide for the possibility of changing the direction of movement of the sanding belt, which should always move towards the desktop, and not far from it.
A simpler design of an angle grinder can be seen in the video below:
Myths and reality of band sawing.
Part 2.2
Do this several times and check with a protractor what you got.
For clarity, you can combine these sheets. Please note that a data discrepancy of just 0.5° already leads to inaccurate profile grinding.
And an inaccurate connection of the left straight line also leads to a change in the pitch of the saw. Now imagine that the sharpener should do all this not on paper, but on a rotating circle, where it is even more difficult to maintain the exact dimensions. But it is not enough to form it once.
It is necessary that when re-sharpening after sawing, the profile of the end of the wheel should be exactly the same as during the previous sharpening, which is practically impossible. Therefore, it is not so important what quality you sharpen around. Even if you have a very good wheel and you can sharpen a set of band saws for an entire shift without additional profiling, you will almost never be able to repeat exactly the same profile of the end of the wheel the next time you sharpen it, which means you will not be able to accurately sharpen the profile of the saw teeth after its dullness.
Now you understand why accurately shaping the end of a circle profile is not just difficult, but an extremely difficult task. To somehow make its solution easier, you can sharpen with bakelite reinforced circles 3-4mm thick.
But they are difficult to find in the required quality. Therefore, the profile of the circle must be monitored very carefully. Otherwise, this leads to the following changes in the body of the band saw: A change in the radius at the base of the tooth, which entails a change in the pitch and the impossibility of normal sharpening of the saw on the next pass.
The circle begins to unevenly cut into the front edge without touching the back, or vice versa, that is, it becomes impossible to grind the full profile of the saw at once. The sharpener tries to sharpen at least the cutting edges of the teeth in just two or three passes, but at the transition point a microhump or microcavity appears, which leads to the appearance of microcracks, and microcracks that have already arisen during sawing are not removed, which leads to premature rupture of the saw along the body.
Setting up band saw equipment
Correct and high-quality work of carpentry installation directly depends on the settings of the equipment. There is an installation and configuration diagram. First, the wheels are parallel to each other. Next, fluoroplastic washers are installed, which are necessary to prevent vertical displacement.
For the first time, the launch is carried out without guides. At this stage, the smooth start-up and cleanliness of the engine are checked, then a test cut is made with a knife, but with minimal loads. To work with a larger load, a block with guide belts is used. This design consists of two halves that are installed along the line of the cutting blade.
Previously, craftsmen made not only machines, but also cutting blades with their own hands. It is difficult to close a tape assembly into a ring on your own, and this requires at least some initial experience in assembling the machine. Sharpening according to the model is also done manually. You can do all this yourself, saving money, but the modern market is simply filled with all sorts of devices and parts that improve the quality of material processing or make the equipment multifunctional. The main thing in this matter is to remember about safety precautions, because serial or home-made models pose a great danger to human health.
Installation of a band sawmill.
Before installing the band sawmill, it is necessary to prepare the site. The site must be selected on a solid and horizontal place with differences of no more than 3 cm. It is best to install the sawmill on a concrete pad with a thickness of at least 10cm and, upon completion of installation, secure the sawmill frame with anchor bolts with a diameter of 24 mm or more. Before installing the band sawmill, it is necessary to prepare the site. The site must be selected on a solid and horizontal place with differences of no more than 3 cm. It is best to install the sawmill on a concrete pad with a thickness of at least 10cm and, upon completion of installation, secure the sawmill frame with anchor bolts with a diameter of 24 mm or more. To align the band sawmill frame horizontally, there are adjusting bolts located in the corners of the frame halves. The remaining bolts with which the frame rests on the surface of the platform are support bolts. The support bolts are unscrewed after installation is completed and the level is checked. If the surface of the site is soft, it is necessary to place metal plates with a thickness of at least 10 mm under the adjusting bolts. The first stage of installing a band sawmill is quite simple. The sawmill frame consists of two halves, which must be bolted together. When joining and tightening the halves, the guide rails must match and there should be no gaps between them! Then mark the drilling locations for the anchor bolts. Slide the band saw frame, drill holes and return the frame to its place, aligning the mounting holes on the frame with the holes in the concrete. If necessary, place metal plates under the adjusting bolts. You can proceed to the next stage of installing the band sawmill: aligning the frame horizontally. When installing the band sawmill frame horizontally, it is best to use a hydraulic level. A hydraulic level is a flexible transparent hose a couple of meters longer than the length of the frame and with a diameter of 15mm. If you couldn’t find a transparent hose, then insert transparent sleeves with divisions into the ends of the hose; you can use medical syringes of a suitable diameter. There should be no air bubbles in the water hose, otherwise it will be difficult to level, almost impossible. When moving with a hydraulic level, clamp/plug the ends of the hose with your fingers so as not to spill water, but at the time of measurement the ends should be open. First, using a hydraulic level, we determine which of the ends of the band sawmill frame is higher, then which of the edges of the end is higher. We will align it relative to this highest angle of the bed. Alignment should be done only along the top edge of the guide. For convenience, across the frame, at the joint, you can place a flat block or a building level, along the bottom edge of which we set the level. So, the most important stage of installing a band sawmill has been completed. Check the joints of the guides. By unscrewing, lower the support bolts to the surface of the platform, if necessary, placing metal plates. It is better to unscrew the support bolts by hand until they stop, using a wrench; there is a danger of lifting the frame at the location of the support bolt and disturbing the horizontal level. When setting the levels, make sure that the hydraulic level hose does not overlap the frame. For example, if you place the hose around the perimeter when checking corners diagonally, the hose may not be long enough. In this case, drag the hose under the frame of the band sawmill; when setting the levels, the hose should not lie on the frame. We install the stops and log clamps into place. Before installing the saw carriage, it is necessary to clean the guides from preservation. The guides are lubricated with lithol before painting, and the paint will not be difficult to remove. If this is not done, then the paint film applied on top of the lithol will collapse under the pressure of the carriage, stick to the carriage rollers and interfere with the movement of the carriage along the guides. We install the saw carriage with the rollers on the guides and check the smooth running along the guides.
Preparing the device for work
In the process of constant use of a tool, a decrease in the quality of the cutting edge is inevitable. It becomes dull and the width of the teeth decreases. Based on this, sharpening and tuning a wood saw is a necessary part of band saw maintenance.
It should be noted that teeth adjustment must be done before sharpening them, and not vice versa.
Tool layout
Using an adjustable machine.
Embedding is the process of folding the teeth in at the sides. This is necessary to ensure that the saw blade does not get stuck in the workpiece, and also to reduce friction during operation.
There are 3 main types:
- With the classical method, the teeth are bent to the right and left in strict sequence.
- With the stripping method, every third of the teeth remains in their original position. Ideal for tools designed to cut particularly hard wood.
- With a wave setting, each tooth is assigned a different bend size. In this case, the profile of the canvas takes on the shape of a wave. This method is the most difficult.
When setting, you should not bend the entire clove, but only one-third to two-thirds from the top. Manufacturing companies recommend carrying out the operation in such a way that the bending range is 0.3-0.7 mm. The work is carried out using a specialized distribution tool.
Sharpening the saw
Elbor circles of different shapes.
- The need for surgery is determined visually. In this case, it is necessary to pay attention to the condition of the teeth and the quality of the incision walls (for example, their increased roughness).
- Wheels for the tip of a band tool are selected according to the degree of hardness of the teeth. Aluminum oxide discs are required for tool steel attachments. Bimetallic saws are sharpened on borazone or diamond wheels.
- The shape of the emery for tape devices must be selected based on their parameters. Known circles are cup-shaped, profiled, disc-shaped, and flat.
- Before carrying out the operation, it is necessary to unscrew the saw and leave it in this suspended position for about 10-12 hours.
Manual sharpening of saw teeth.
The wood saw sharpening scheme should take into account the following provisions.
- Metal removal along the tooth profile should be uniform;
- It is necessary to suppress excessive pressure from the sharpening device. This may result in annealing;
- The blade profile and tooth height must remain unchanged;
- Liquid cooling must be provided during operation;
- There should be no burrs on the teeth.
The theoretical instructions for sharpening band saws for wood say that this should be done on the front side of the teeth or on the back and front. However, in real life, most specialists and amateur craftsmen perform the operation only from the reverse side, because it is more convenient.
Sharpening methods
Sharpening a band saw for wood can be done in one of the following ways:
- full profile;
- only edges.
Full profile turning has the following advantages:
- operations are carried out with high precision, as they are performed on automated machines;
- specially shaped emery passes the entire surface of the space between the teeth simultaneously with the planes of adjacent cutting edges in one movement;
- tops of regular shape without angularity are formed.
Sharpening of edges can be done in the following ways:
- A machine with a flat abrasive wheel or a special shape is selected, depending on the profile of the cutting edges.
- At home, it is recommended to carry out processing with an engraver or regular sandpaper of suitable sizes. To operate, you will need to wear goggles and gloves.
- In the absence of tools from points 1 and 2, the use of needle files is allowed.