A circular saw is used to cut wood.
Using a hand saw is not always comfortable; using a table allows you to make the sawing process smoother and more accurate.
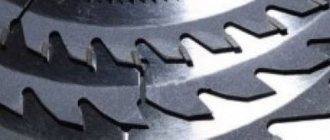
The cutting base has a disc-like plane equipped with an outer edge with teeth. There are models not only of the manual type, but also with the ability to be fixed on the table.
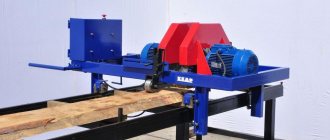
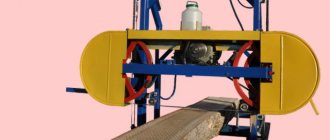
It is difficult to work with large volumes of wood with a regular circular saw, so it is better to place it on a table
There are several ways to acquire the latter for ease of manipulation. You can build a table for a circular saw yourself, strictly following a certain pattern.
Table arrangement for a circular saw
Design requirements
Experienced craftsmen are ready to create a table for a circular table with their own hands without any techniques or drawings. However, certain conditions still need to be taken into account.
The essential requirements include:
- rigidity (stability) of the system;
- flat, smooth surface of the table;
- securely securing the saw;
- the presence of a guard from the cutting disc;
- free access to the start and pause buttons.
The availability of different functions depends on the working conditions and wishes of the specialist. These include the ability to carry out high-quality longitudinal and transverse cuts.
Standard products, of which there are hundreds in shopping centers, are made of stainless steel. This is an excellent material , but next we consider the production of a table for a saw from wood .
Drawings with dimensions for homemade products
There are dozens of drawings and examples of a wide variety of designs online. However, no two homemade machines are alike. Even if they are made according to the same drawing, there will still be any differences in materials, sections, fasteners, and dimensions. Although no one forbids a master to accurately copy any machine. As an example, here are drawings of a simple frame for a circular saw.
Desktop device
The design of a table for a manual circular saw is so elementary that most specialists produce it without preparatory drawings and techniques. This is a dense workbench that is created from wood and plywood.
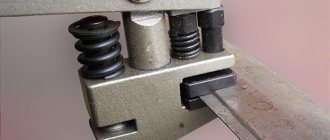
The most durable table bases are made from alloy. They are the heaviest and require the presence of welding skills. Therefore, stands are often made from leftover lumber. A circular saw is attached under the tabletop, and the drive protrudes above it through a specially made slot. The lumber is advanced along the table top and sawn with a disk. For convenience and correct operation, the table is equipped with additional devices: an angular and longitudinal stop.
The tabletop “absorbs” part of the working plane of the disk; the depth of cut will decrease by the thickness of the tabletop. For this reason, it is preferable to choose a circular saw with the largest disk diameter, and a table cover that is thin but rigid.
If you have not purchased an electric saw yet, choose modifications with high power (from 1200 W). They can handle cutting large-sized wood. Holes will be drilled to secure the base. The solid base may burst. For this reason, it is advisable to select a mechanism of a different type.
Table saw
When choosing a circular saw, you need to be guided by the following characteristics:
- Saw power. If the amount of work is quite large, it is advisable to take a tool with a power of at least 1.2 kW.
- Cutting depth. The thickness of the material to be processed depends on this parameter. For hand saws it is 40–70 mm. But when installing it in a table there will be a decrease of around 10 mm.
- Button placement. The design of the sawing table must provide free and safe access to all control buttons, otherwise it will be necessary to modify the control system yourself.
- Rotational speed. For cutting wood, high rotation speed is preferred. This affects the cutting quality. For plastic, for example, this is not very good. Due to the high rotation speed of the circle, the plastic heats up. You need to choose average characteristics. 3-4 thousand rpm will be enough.
Selection of material
To make a circular table with your own hands, you need to remember carpentry skills, have a lot of patience and a small number of materials and devices.
Materials:
- plywood 15-20 millimeters;
- timber 50×50;
- board;
- switch;
- outdoor socket;
- a piece of cable;
- PVA glue;
- varnish;
- self-tapping screws
Devices:
- jigsaw;
- screwdriver;
- drill;
- ruler.
The volume of the countertop will depend on the workshop area. At the same time, it will be uncomfortable to saw large pieces on a small table. If the part fits completely on the working plane, the cut is made smoother and more accurately. The height of the legs is chosen depending on the height of the master.
What is needed to create
To get started, you need to prepare thoroughly.
Materials and tools
A homemade table will require a strong metal or wooden base. Some craftsmen prefer to make tables from aluminum or steel.
It is difficult to work with large volumes of wood with a regular circular saw, so it is better to place it on a table.
Important! The wood must be treated with a special agent that has an antiseptic composition to prevent rotting processes. Materials that will be required during the work process:
Materials that will be required during the work process:
- base, the thickness of which is at least 22 cm;
- beams for strengthening and making a support (you can use 5 pieces of edged board);
- wooden dowels, 10 cm in size (12 pieces or more are required for work);
- wood glue;
- metal fasteners (at least 4 pieces, and the exact number depends on the dimensions and length of the table);
- metal corners in the amount of 10 pieces;
- self-tapping screws
Before work you need to prepare your tools. To make marks, take a pencil or marker, a meter, a tape measure, an electric jigsaw, or a hand-held router. To process wood, you will need a sanding machine, sandpaper of different grit levels, which removes nicks.
A modern jigsaw is equipped with a built-in safety feature, electronic speed controls, and vibration and noise dampers.
You also need a plane, drill and screwdriver. Materials and tools are prepared in advance and placed at the workplace.
Things will go much easier if you use a screwdriver.
Definition of design and construction
To choose a design, you need to decide on the base material. For wooden countertops, sheet species of trees are suitable, which are resistant to rotting processes with proper antiseptic treatment. A special hole is made in the base for the disk.
You can build a table for a circular saw yourself, strictly following a certain pattern.
For a wooden base, use a strong frame of four sawhorses and boards measuring 50x150 mm. It must be stable to ensure safety. Curved or bent sheets of metal are not suitable for work because there is a high risk of injury.
Constructing the element with your own hands allows you to make the saw most suitable for individual conditions.
You can make a simple design or equip it with a removable riving knife. Additionally, disk protection is provided so that work chips do not fly towards the person who will be working at the table. To make miter cuts, you need to add parts to adjust the angle of the blade.
You can adjust the product to the desired size, distribute everything so that it is convenient for you.
For circulation, a table guide carriage is made. It includes the following elements:
- guide bars;
- plywood;
- drank;
- sides for reliable support;
- removable bar.
After choosing the design of the structure, you need to make drawings of the table for the circular saw with your own hands.
A handcrafted model will be one of a kind, which makes it unique.
Drawings and diagrams
Note! The drawing is needed to prevent errors during the work process. First of all, they calculate the dimensions in order to transfer them to cardboard
A hole is made in it that should fit the dimensions of the saw. Before creating a drawing and diagram, you need to buy a cutting tool. Universal holes are not provided in this design, because they will not provide maximum stability, safety and withstand heavy loads
First of all, they calculate the dimensions in order to transfer them to cardboard. A hole is made in it that should fit the dimensions of the saw. Before creating a drawing and diagram, you need to buy a cutting tool. Universal holes are not provided in this design, because they will not be able to provide maximum stability, safety and withstand heavy loads.
Making a table for a circular saw is within the capabilities of every craftsman.
You can leave a little extra space for tools or wooden pieces. Suitable dimensions: 120x120 cm.
An example of a drawing of a table for a circular saw:
There will be no difficulties in the process if you carefully study the issue.
Diagram with detailed description and dimensions:
The table is made taking into account the fact that the hand tool will be installed and secured on the table, thereby turning into stationary equipment.
Table production process
- You need to cut a tabletop of the required size from a sheet of plywood. Markings are applied to the lower area using a metal ruler and pencil. Cut the plywood with a jigsaw, milling the edges if necessary. If the plywood is not laminated, we clean the surface of the table with sandpaper.
- They shift it and make markings from the bottom for attaching a manual circular saw. To do this, remove the disk from the device and place it with the sole in the required place. We make marks on the table top and at the base for fasteners and a hole for the saw blade. Drill holes for the bolts. They will be twisted from above under the tabletop and held in place with nuts at the bottom. Therefore, the holes are countersinked from the edge of the working plane, and the bolt heads are leveled so that they do not protrude.
- If it is planned to cut the material at different angles, the slot for the saw-tooth circle is made in the shape of an inverted trapezoid. For straight sawing, an ordinary groove is made. Before marking the slot and holes for fasteners, you need to apply a saw, adjust the marks and only then cut.
- Draw with a pencil the areas where the stiffening ribs are located. They are made from boards and installed below 8-9 cm from the edge of the tabletop itself. The table legs must be fixed to the ribs. The ribs are secured with self-tapping screws at intervals of 15–25 cm, and in addition they are glued with PVA. Self-tapping screws are screwed on top, under the tabletop, the heads are completely recessed. The ribs are fastened together with self-tapping screws.
- The legs are made of timber or boards, their length will be from 100 to 113 cm. The legs diverging downwards will give significant stability. They are fixed with large bolts twisted on the outside and reinforced with nuts on the inside. Timber ties will strengthen the frame.
- In order to adjust the height of the table, nuts are attached at the bottom into which M14 bolts are screwed. Now you can secure the saw from below by passing the drive into the prepared slot.
- We attach an electrical outlet to the table, run an electrical cable from it and set the switch. Power to the outlet will be transferred from the switch. We stretch the cable from it to the nearest source in the workshop. With the support of the construction screed, we fix the ON-OFF key on the body of the circular saw in a recessed state.
- Let's start producing auxiliary stops. For the stop you will need a number 30 square cut aluminum pipe and 2 screws with wing nuts. We saw off a piece of pipe along the length of the tabletop, making holes for screws 3 cm from the edge. 2 clamps are cut out from pieces of plywood. The system is ready.
- To process across the table, we use a plywood sled. We align them with the edges of the table, press them down and move them along the toothed circle. We cut a hole in the passage area of the circle. Small components can be placed directly inside the slide and sawed. Dust will be removed from under the table, but a significant part of it will still fly upward, so it is good to supplement the device with an upper dust extractor.
Working with a circular saw is very dangerous , for this reason it is necessary to take care of protecting your fingers. Cut a pusher from a piece of wood or furniture board.
Additions to the completed design
Some craftsmen, when assembling a table for a hand-held circular saw according to unique drawings, completely remove the factory safety cover and replace the factory platform with a homemade one. If cutting at an angle is not planned, you can remove all devices for adjusting the tilt of the disk. The electric saw is fixed directly to the new base, which makes it possible to gain a couple of millimeters of cutting depth.
Without an internal casing , it is easier to remove the blade; the electric saw will not become clogged with shavings when working with wet boards. Dismantling will require extra time, but the service life of the motor is preserved and overload is prevented.
Mounting a circular saw
The matter remains small. The circular electric saw is located inside the prepared hole. The sole is secured with bolts , and the gear drive must fit freely into the socket.
The table for the circular saw is almost ready. Now it needs to be treated with a moisture-protecting material, then coated with varnish in several layers (to minimize slipping).
The resulting system can be supplemented with anything at the user’s discretion (safety cover, device for adjusting the tilt of the disk, carriage, etc.).
How to make it yourself - step-by-step instructions
Algorithm (order of actions) when assembling such a machine:
Firstly. You need to decide on the dimensions (length, width, height). When choosing the size of the work table, the size of the main number of workpieces that will have to be cut is taken into account. A large table is not needed for small workpieces. The location in the workshop is also taken into account: how and where to place the machine, whether it will fit.
You can use a ready-made drawing or sketch out a simple sketch for yourself indicating the length and cross-section of the parts.
Example of a wooden frame:
Secondly. The material is selected. An existing or affordable one is used, and the availability of tools for processing it is taken into account.
All blanks are cut to length and assembled.
As an example, the simplest table in the photo:
Basic steps and assembly sequence:
- The frame is being assembled.
- The saw is installed and secured.
- The location of the cut for the disc is tried on and marked on a sheet of workbench.
- The cut is made according to carefully executed, verified markings.
- The desktop is placed and secured.
Note! If the work table material is strong and thick enough, the saw platform can be attached directly to it. In this case, first install the saw on a hand table, and then place the finished unit on the frame.
But it is safer to install the saw on separate supporting angles or strong bars.
More detailed instructions do not make sense, since the fastenings can be made in different ways. To imagine how you can make a simple machine, we suggest watching an interesting video.
The machine in the video is made entirely from disassembled old furniture, that is, from waste material. But it should be taken into account that this is laminated chipboard, most likely of the Soviet type, which was durable. The disadvantage of this material is that it can only be used in a dry room. At high humidity or water ingress, any chipboard is destroyed.
A few words about electronics
A circular saw is electrical special equipment that operates from a 220 V power source. If the user has sufficient knowledge and skill in the field of electronics, he is able to bypass the start and pause keys of the saw, and then move them to a convenient place (usually the outside 1st of the stiffeners).
If the model seems complicated, you need to tighten the start button with a wire, and turn on the special equipment using a power cord. However, this method is bad because it eliminates the possibility of quickly turning off the device in the event of an emergency.
Manufacturing technology
Using 20 mm plywood, you must make a blank for the tabletop, being guided by the selected dimensions. The canvas is marked using a marker and a ruler, and then cut with an electric jigsaw. The edges must be processed with a router. The material is sanded.
On the underside of the tabletop you need to mark for the saw. To do this, the blade is turned over, and the saw should be installed without a disk at the intended location. This way you can mark the parameters of the sole. Using a router, a recess is made in the tabletop in the range of 8 to 10 mm, and it is necessary to follow the seat that was marked in advance.
Safety requirements
- One of the most common causes of injuries when using a circular saw is considered to be a cluttered workplace. In addition, it is important to monitor the stability and strength of absolutely all components of the system, and if there is imbalance, take measures to eliminate difficulties.
- Before connecting the saw, you must make sure that it is well secured. If necessary, tighten the screws/bolts.
- It is strictly forbidden to hold the material close to the cutting site! This is dangerous as knots and chips bounce into the eyes or onto open parts of the body. Be sure to wear glasses before work and clothes with sleeves.
Making your own saw table is not as difficult a task as it might seem. If you have good material at hand, its characteristics are chosen correctly, and the power of the device ranges from 500 to 1000 W, the above instructions will be the basis of the work.
You should not lose sight of the fact that at any stage of table production you should control the accuracy of your own operations. Otherwise, if deviations in size or deformation of the legs appear when the ribs are tightened, it will be very difficult to restore stability. Nevertheless, making a table for a circular table with your own hands is an absolutely realistic task that will take several hours.
Manual version from an angle grinder
A hand-held circular saw is easiest to achieve if you already have a grinder on the farm. All you need to do is make two simple improvements: a sliding stop and an axial handle.
A sliding stop is two pieces of small metal corner located on both sides of the working element: a disk with teeth installed instead of an abrasive wheel. The gap is 3-4 mm on each side. The horizontal edges of the corners must be rounded at the bottom so that they do not cling to the workpiece. The corners must be connected with cross braces at the front and back. Bolts and nuts are suitable for this, and a pack of washers will provide the required clearance.
We put a clamp made of metal tape on the body of the angle grinder; The screw tie of the clamp is located at the bottom. A double-folded strip of sheet metal or galvanized steel with a hole for the rear bolt of the sliding stop is rigidly attached to it. This way the stop is secured at the back. You can make the clamp with the rear support post as one piece, but the thickness of the metal strip must be at least 1 - 1.5 mm. By shifting the washers that provide clearance, equal gaps are achieved between the working body and the sides of the stop.
In the gearbox housing of the angle grinder we make two to four threaded holes for small bolts (M3 - M5). The gearbox must first be disassembled and identified in a place where it can be drilled. These holes are needed to attach a homemade axial handle. When using the standard side handle of an angle grinder, making an even cut will be difficult even for a physically strong man with strong work skills.
The axial handle is made of a metal tube or rod in the form of a horn directed upward and forward, or a transverse bracket the width of a palm with some margin. Do NOT spill the ends with which it will be attached to the gearbox and drill holes in them for the mounting bolts. If the fastening ends are spilled, the handle will bend from effort during operation.
If the handle is in the form of a horn, we splash its far end in a horizontal plane and drill a hole in it for an axle of 4-6 mm with a margin, i.e. 6-10 mm. If the handle is a bracket, under it, in the same holes in the gearbox, we attach a piece of rod or tube protruding forward, and we spill its end and drill a hole in it, as indicated above. Of course, between the rod and the bracket there should be a distance sufficient for ease of work - 100-150 mm.
Now we take a piece of steel bar 4-6 mm. This will be the adjustment rod. We bend one end of it in the form of a loop, slightly splash it, and drill a hole for the front bolt of the stop. By selecting washers at the front end of the stop, we achieve a uniform gap width along its entire length. With a 6 mm rod, you will most likely only need two thin washers, one on each side.
We cut a thread on the “tail” of the rod. The threaded tail will fit into the hole in the handle described in the previous paragraph. One nut is screwed onto it in advance, and a second one after assembly. By loosening and tightening the nuts alternately, you can adjust the depth of the cut. That's it, the hand-held circular saw is ready for work.
Additional Important Information
Carpentry work requires special attention. If you want to make a high-quality and highly reliable table for a circular saw with your own hands, then be well prepared for the work.
Do the following:
- Purchase all the necessary materials and equipment without exception.
- After installing the frame, be sure to install it on a flat plane and check that the cover of the structure does not overhang in any direction.
- It is better to install the table for the circular saw in the area where it will be located in the future in order to eliminate possible problems associated with uneven floors.
- If, due to the rough floor, the table vibrates during operation, then it is necessary to adjust the length of the legs using compacted material or rubber.
- The product tabletop can be either single or folding. In order to form a folding table for a saw, it will be necessary to spend a little more time and the material itself and pay attention to increasing the strength of the frame, which is in a disassembled state.
- The dimensions of the material used to create the table are determined experimentally. Ideally, the level of the design should correspond to the height of the master.
- The hole that will be made in the tabletop must correspond to the dimensions of the specific saw available.
- To extend the service life of all materials used, assembled into a common structure, it is necessary to subject them to treatment with special chemicals that can increase the working properties of wood or metal (for example, protect their surface from rust, rotting, mold, etc.).
- It is better to process wood or iron outdoors, rather than indoors, to avoid poisoning from intense fumes.
Using this article as inspiration, you can make a durable table saw stand for your circular saw.
Features of a circular saw
Knowledge of these features is extremely important; you must take into account the operating modes of the saw, know the type of loads and take all possible measures to strengthen the most important components. Only with this approach can long-term and safe operation of a homemade machine be achieved.
What are the common features of woodworking machinery?
High speed saw teeth. This ensures the quality of sawing. But high speeds of the saw blade cause serious injuries; during the manufacture of the machine, great attention must be paid to safety precautions. All devices available on industrial copies must be installed without fail. Do not think that some of them are superfluous, and you will be able to modernize factory samples for the better. All safety rules are written in the blood of injured people, do not repeat tragic mistakes.
Strength of all nodes
This means the inability to withstand significant static loads, although this is very important. The table can easily absorb large forces of this type, but at the same time vibrate under the influence of even relatively minor dynamic multidirectional loads. This condition does not have a negative impact on safety, but noticeably deteriorates the quality of the cut.
Marks of teeth are noticeable on the surface of lumber, it is difficult to maintain specified linear dimensions, etc.
Fire and electrical safety. Absolutely all electrical devices, motors, starters and other special fittings must be installed in strict accordance with the requirements of the PUE. You need to know that dry sawdust not only burns well, but also forms an explosive mixture at a certain concentration in the air. By the way, burning sawdust is difficult to extinguish; it floats on the water and continues to burn.
There is no need to make the simplest machine at the expense of safety devices; strictly follow the recommendations of the designers. Decide what you need, a woodworking machine or fresh problems?