During welding, a crust of frozen slag forms on the surface of the weld. A welder's hammer helps get rid of it. This must be done, because moisture will get under the frozen slag and cause corrosion, and pores with uncooked areas may remain there. Therefore, every welder has in his arsenal, among other tools, a slag hammer.
Why is it necessary to attach the handle?
The popularity of wooden handles is due not only to their cheapness.
Wood is a lightweight material, and for hammers this is an extremely important parameter. The handle should be light in weight, and his head should be weighty. This is necessary to increase the impact force. Using homemade wooden holders, a person has the opportunity to adjust the tool depending on his anthropometric characteristics, taking into account the thickness of the handle, its length and other dimensions. For normal operation, tools must be kept in perfect order. This is especially necessary if you have to use tools quite often. To drive several nails a couple of times a year, you can use a bad hammer with a dry handle. However, if a hammer is the most necessary tool for a job, then it must be kept in excellent condition. If the instrument is not in proper condition, then you risk not only injuring yourself, but also causing harm to others if its striking part comes off.
It is important to note that on dangling instruments this happens quite often, not only due to wear of the material, but also due to improper seating of the striking part on the holder. In addition, the wood used as a handle is of particular importance.
Is it necessary to beat off the slag?
Some “professionals” believe that it is not necessary to beat off the slag. However, theory and practice prove the need to remove slag and other contaminants from the heat-affected zone - 2 cm on each side of the joint.
Weld joint defects: lack of penetration hidden under slag
are coated with paint after work , and if the slag is not removed, it will soon fall off along with the paint. Therefore, removing slag is a mandatory procedure ; accordingly, the welder will certainly need a hammer.
Basic rules for working with a hammer
A tool that requires special care when handling. Although the force of the blow depends on the type of hammer, even a light head hitting the head at low speed can be fatal.
To avoid this, you need to know the basic operating rules:
- The work can only be done with working tools. The head should fit tightly on the handle. The wooden handle should not be chipped; its length must correspond to the weight of the metal part.
- The firing pin must be intact without chips or cracks.
- The grip should be carried out at a distance of 3-4 cm from the end of the handle.
- Only a straight nail can be used in this work. A small hole is first made for the nail. You can use an awl for this.
- Hammering is done so that the hand performs only vertical movements.
- Transfer the device from hand to hand only in the lowered position. In the same state, the grip is changed.
If at least 1 point is violated, then the master is in danger. The worker may suffer serious or fatal injuries to the head, hand, or fingers.
Dimensions and weight
In one working day, a professional welder makes a large number of connections; the slag crust is knocked off from hundreds of seams. Therefore, a special hammer should have low weight and parameters.
According to the rules, the optimal chisel weight varies in the range of 300-400 grams . This weight does not overload the hand and allows for effective removal of slag. A handle length of about 250-300 mm will be enough for a performer of any level. The length of the metal striker should be 150-200 mm.
Device design
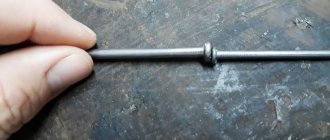
In fact, the structure of a reverse hammer for body repair is quite simple. It consists of a metal rod with a diameter of 10–20 mm and a length of about 50 cm. A steel weight (bushing) is placed on this rod, due to the weight and impacts of which the damaged area of the part is gradually leveled.
On one side, a hook is attached or welded to the rod, with which you can hook onto the mounting loops welded to the body. On the other side, a washer is welded, which prevents the weight from flying off, and serves as a bumper, hitting which the force is transferred to the rod and then the metal surface is leveled under this pressure. If you buy a factory-made reverse hammer, it usually comes with several replacement hooks for grabbing staples of various shapes. There are modifications of such hammers with two and three bushings, which allows you to control the impact force when leveling out dents.
There is another variety on the market - a vacuum reverse hammer for body repair. With the help of such devices, large areas of dents are repaired, and the previous design is suitable for minor damage. Here, suction cups are used as a hook, which eliminates the issue of first removing the old paint layer from the part.
How to use a reverse hammer?
The technology for working with a reverse hammer is as follows:
- Cleaning the damaged area down to bare metal, usually using a sander and sandpaper.
- Using a spotter, staples are welded to the body in various places of damage so that they can gradually be pulled out, restoring the shape of the body part.
- The staples are hooked with a reverse hammer hook.
- Using gentle, not strong movements of the weight, we begin to slowly level the surface, making blows. The main thing here is not to overtighten, so as not to drive the bulge back in later. Using these gradual procedures we pull out the entire area of the damaged part.
- We remove the staples by cutting or unscrewing.
- We clean and degrease the part and you can start applying putty.
One of the main disadvantages of using a classic reverse hammer is the need to remove the old paintwork, even if it was not seriously damaged. In addition, as mentioned above, this method is only suitable for small dents.
Video example of leveling a dent with a reverse hammer.
How to make a homemade reverse hammer?
You can buy such equipment in almost any auto store, and often such a hammer comes complete with other equipment, the same spotter. But due to the simplicity of the design, it will not be difficult to make a reverse hammer with your own hands.
To get started you will need:
- metal rod 50 cm long and about 20 mm in diameter.
- a washer or handle that will serve as a bump stop.
- welding machine and protective equipment: glasses, mask, overalls.
- steel hook.
- weight.
- steel washers, 2 – 3 pcs. with a diameter of 2.5 - 3 mm.
The method for assembling a reverse hammer from these components is as follows:
- We grind and clean the metal rod from rust and burrs.
- We will weld a threaded fastener to the hook, and also grind a thread on the stubble on one side to create a removable connection. As an analogue, you can permanently secure the hook using welding.
- We make a hole inside the weight 1 mm larger than the diameter of the rod so that it can move freely along it. Next, we put it on the rod.
- We weld a handle with a washer against which the weight will hit, transferring the thrust to the rod itself.
At this point, the stage of independent development of a reverse hammer for auto body repair is completed. If desired, you can also make a vacuum version of the tool. But here, instead of hooks and welded staples, a suction cup will be used, which is attached to a wide dent and slowly pulled out.
Body repair is a complex operation that requires certain knowledge, special tools and equipment. One such device is a reverse hammer. This is a simple tool that is easy to make with your own hands. There are many photos and videos for this on the Internet. You can also download a drawing of the simplest version of the device.
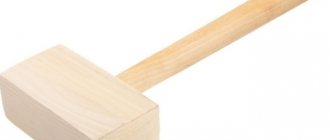
Handle of a plumber's hammer
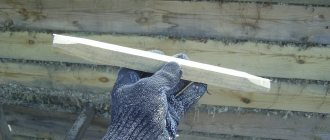
So, let's start by making a handle for a plumber's hammer. First, let's talk about the dimensions: the handle should have an oval cross-section, approximately 250 - 350 millimeters long, tapering smoothly towards the end on which the tool head will be mounted. The best wood for making a handle is beech, oak, birch, maple, hornbeam, ash or rowan. It is considered absolutely unacceptable to make handles from easily scratchy wood: spruce, pine, alder or aspen.
Most often, handles for plumbing hammers are made from birch. To do this, you will need a small board, from which you need to carve the shape of a handle according to the technological map for making a hammer, and then sand it well using construction sandpaper.
If you plan a handle from a thick birch branch, it must be dried in a warm, well-ventilated and shady place. Do not try to dry wood using artificial heat sources: air heaters, electric fireplaces and radiators, because with such drying the wood will inevitably crack and lose its strength.
If the wooden handle for a plumber's hammer is not sufficiently dried, it will dry out over time and decrease in volume. And therefore the head will dangle on it, constantly trying to fly off the hammer handle. To make the handle even smoother, it is recommended to coat it with a special furniture varnish. That's it, the handle for the plumber's hammer is ready, you can move on to the next stage.
How much can you buy it for?
To get an idea of how much a welder’s hammer can cost, several specific models are offered for consideration:
- Bars SV000006758 is a Russian product. The handle is equipped with a coil spring to absorb shock. The weight of the head is 300 g. It costs about 250 rubles.
- ESAB welder’s hammer with a similar design of the gripping element can be bought for the same money (240–300 rubles)
- A product from the same company with a wooden handle sells for 350–400 rubles.
- ESAB SH3 hammer has a welded steel handle. For ease of grip, the latter is equipped with a plastic shell. The price of the tool is about 600 rubles.
- Model SH2 with a bent tip end is slightly more expensive: 750–900 rubles.
- The welder's hammer PICARD PI-0031300, made in Germany, is characterized by increased reliability and ease of use, which is typical for German products. The distinctive features of this tool are: an unusual shape of a pointed tip, a handle made of a solid-rolled pipe of variable cross-section and a fairly large weight of the head - 450 g. It is not surprising that its price is about 1,600 rubles.
HAMMER UPGRADE OPTION
The rubber band holds small nails worse than large ones. The next stage of tuning the hammer is to glue a powerful neodymium magnet into the handle of the tool. It seemed to me that it would be best to place it at the end of the handle. In my supplies I found a round magnet with a diameter of 20 mm and a thickness of 2 mm.
First we make a recess for the magnet. We drill a hole in the end with a diameter of 20 mm and a depth of about 2 mm. It is better to use a Forstner drill for this operation.
Now lubricate the recess with glue. I used a domestic analogue of “Moment”, called “Strength”, a cyacrine adhesive gel that dries instantly.
Apply a little glue to the magnet, insert it into the recess and press for a couple of minutes. The magnet is firmly glued into the handle. Small nails stay on it perfectly during work and do not get lost. If a nail has fallen into a crack in the floor, you can now always get it out using a hammer with a magnet.
Popular manufacturers
ESAB is a Swedish manufacturer offering a full range of products for welders, including hammer models. Tools allow you to perform work efficiently and reliably.
Trade and production company Foxweld provides equipment, tools, and consumables. High-quality products are intended for household and professional work.
Bars is a well-known brand under which a wide range of different products for the welding industry are produced and supplied. Hand tools provide comfort and convenience of work.
How to choose a hammer
It seems that choosing a hammer is not such a problem
In fact, there are a lot of nuances that you should pay attention to during the purchasing process. When choosing a tool for a certain type of work, you need to evaluate the following factors:
- Depending on the functional features, each option has a different type of impact part. Therefore, you need to decide exactly what type of work you need the tool for.
- You need to carefully inspect the handle for chips and more complex damage. A high-quality tool will have a perfectly smooth and dense handle, regardless of what material it is made of.
- Much depends on the design. For example, a steel hammer is made entirely of steel. Therefore, the handle must have appropriate extensions at the head and at the end of the handle. A special coating is provided that will provide a good grip. If the design does not meet such conditions, then the tool will give a huge recoil or vibrate upon impact.
- A heavy tool should have the thickest and longest handle possible. Normally, the length is 38-45 cm. When the length of the handle is shorter, there is a risk of serious injury due to a fracture of the base of the handle during operation.
- The next factor will be the weight of the tool. For everyday use, it is enough to have a hammer weighing 350-450 g. If you need to carry out more serious construction or repair work (dismantling walls, roof repairs), then the weight of the device should be 0.6 - 0.8 kg.
- The requirements for the head in terms of fastening are the most important. The metal part should fit tightly on the handle, not move, deform, or dangle. This aspect can be checked directly during the purchase process by making a few steps.
Choosing is not so difficult if you know and take into account all the nuances during the purchase
You need to pay attention to the structure and fastenings of the tool, its capabilities and functionality
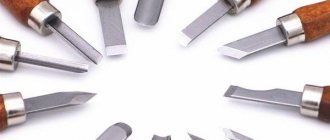
Making axes, handles for hammers, chisels and chisels
Summing up the practical work
1. Analysis and comparison of the results obtained.
2. Analysis of errors during work.
3.Assessment of practical work performance.
VIII. Final part
- Summing up the lesson
What new did you learn in the lesson, what did you learn, where can you apply the acquired knowledge and skills?
What is technical design... Perform sketches and drawings...
Motivating grades for a lesson, putting them in a journal and diaries
IX. Message about preparation for the next lesson
In the next lesson we will study the topic “The sequence of making a mallet.”
Bring: drawing tools. [/td]
Pneumatic return hammer
For assembly you will need:
- pneumatic chisel. Compared to a pneumatic hammer, it has smaller dimensions - the converted device will be convenient to work in the engine compartment of a car;
- metal blanks for manufacturing the device body and plug on a lathe;
- metal fitting for hose;
- grinder, hacksaw, gas and wrenches, measuring tool;
- compressor with a capacity of 250-300 liters of air per minute, air hoses.
- The rubber boot, retaining ring, bushing and spring are removed from the cylinder of the pneumatic chisel - these parts will no longer be needed after the alteration.
- The body and handle are clamped in a vice. Using a gas wrench, the cylinder is unscrewed from the body. You will have to make a significant effort - the cylinder thread in many models is made at a certain angle.
- The impact piston and air valve are removed from the removed cylinder.
- A thread 3-4 cm long is cut on the outer wall of the cylinder from the front cut - the plug will be screwed onto it.
- A bushing for the fitting with a mesh is unscrewed from the handle of the chisel to protect against debris getting inside the device.
- The body of the pneumatic chisel is cut into two parts.
- The details of the internal surface of the case are carefully measured: length, angle and pitch of the thread, location of the air hole, shape of the back wall, etc.
- A detailed drawing is prepared.
- According to the drawing, a new cylindrical body is made on a lathe, the internal profile of which, as well as the location of the air hole, corresponds to the sawn part. When turning on a machine, it is desirable that the sawn body is located nearby - additional measurements may be needed. From the outside of the rear wall, the tail part is turned by turning - a rod 5-7 cm long and 1.5 - 1.6 cm in diameter with thread. Devices for fixing and removing the nozzles will be attached to the shank. A plug is machined separately, the internal thread of which corresponds to that previously cut on the cylinder. This stage of hammer manufacturing is the most critical. The performance of the product and the safety of working with it will depend on the accuracy of manufacturing. Therefore, turning must be carried out by a qualified specialist.
- To increase strength, the manufactured body and plug are hardened.
- A metal sleeve is welded above the air hole on the outside of the housing, the internal thread of which corresponds to the thread of the sleeve with a protective mesh.
- The tail part is cut off from a metal chisel for a pneumatic tool. After placing the cut part into the end of the cylinder, it should be flush with its cut. The bit shank is made of carbide material and can withstand piston impacts.
- A piston is placed inside the cylinder.
- The wide part of the cylinder with the air valve installed on it is screwed into the new housing. To obtain the required torque when tightening, it is advisable to make grooves on the cylinder body for a wrench.
- The cut shank of the chisel is inserted into the upper part of the cylinder and the plug is screwed on. To prevent it from unscrewing during operation, a 6 mm hole is drilled in the housing, a thread is cut and a fixing bolt is tightened.
- An adapter with a protective mesh and a fitting for the air hose are screwed into the sleeve above the air hole.
- An air hose is attached to the fitting. The pneumatic return hammer is ready for use.
We hope that you learned a lot of useful things and with the help of step-by-step instructions you will be able to make a reverse hammer yourself.
Electric jackhammer - the first in history!
Some people think that it was the pneumatic chipper that was the first step in the development of slotting tools, but in reality, electric chippers were the first to be invented. However, using them in the most relevant direction at that time - mining - was quite dangerous, due to the high risks of ignition from sparks occurring inside the unit. Therefore, when pneumatic hammers appeared, they pushed all competitors aside for a long time. Today the situation is taking a different turn.
For most users, mobility is much more important than convenience, but rather they work with hammers in rooms far from the risk of fire, or even outdoors. Builders and non-utility workers began to actively master the electric jackhammer, since such a slotting tool operates from impulses of an electric motor that drives the hammer. The dependence on power sources in rooms where repairs are being carried out is usually almost unnoticeable, so among repairmen it is electric models that enjoy the greatest love, because they are not relatively inexpensive and do not cope with the assigned tasks with a bang.
The gasoline bumper in front of electric non-pneumatic tools has the weight that gaming slots have - it is not tied to an energy source. However, its arsenal, of course, has other disadvantages - it is not the noise level, not the considerable fuel consumption, not toxic exhausts. Therefore, it is not necessary to work in such a room, or it is well ventilated. A pneumatic slotting tool is the most reliable and safe among chippers. It does not spark, is not afraid of moisture, does not require fuel (unless you count air as fuel), and does not pollute the air with exhaust.
The only negative is that it is connected to a compressor, which pumps air under pressure. For repairmen, it makes sense to buy such a tool only when they already have a compressor.
https://youtube.com/watch?v=Y1ffHedLhZs
Varieties
Despite the fact that the design of the reverse hammer is quite simple, over time even it has had several modifications. This or that option is used in different cases - it all depends on the skill, as well as the type of deformation. But in general, the design is always the same, the operating principle is the same. The differences lie only in the method of attaching such a tool to the body.
The simplest version of the hammer:
- This is a metal rod, at one end of which there is a hook, and at the other - a load and a stop;
- A hook is attached to the washer, and the washer is welded to the place of deformation by welding;
- Provided impact forces are applied to the load, the deformation is extended to the desired moment.
But the second option (also quite simple) will differ somewhat from the first. At the end, instead of a hook, there is a simple thread. In order to level the surface using such a device, a hole is made in the center of the deformation, into which the threaded end is inserted, and a nut and washer are attached to it on the reverse side.
A vacuum hammer is the most complex version of its implementation. It is attached to the surface of the deformed area using rarefied air. The suction cup begins to work both in the usual way and with the help of a compressor.
Thanks to the vacuum device, minor body damage can be repaired and the paintwork can be preserved intact.
How to make a hammer with your own hands
You can make a tool for personal use yourself. The manufacturing process is quite labor-intensive, since you need to properly prepare the metal component, the handle and perform high-quality assembly.
The most popular type of hammer is the metalworker's hammer, which is actively used in everyday life and has versatility. Making this option is much more difficult than, for example, a wooden mallet.
How to make a hammer with your own hands at home:
- First of all, you need to choose the “right” steel. And then proceed to the formation of drawings and manufacturing itself. The ideal material for making the head would be high-carbon tool steel. It’s better to immediately find a block of the required parameters. And then process the workpiece correctly.
- Next you need to prepare a drawing of the hammer with dimensions. Such a sketch will help you follow the plan exactly and make the head as correct as possible.
- Use a lathe to turn a piece of steel in accordance with the parameters specified in the drawing. This will help make the metal part of the hammer as smooth as possible. By adhering to the exact parameters from the drawing, you will be able to obtain an accurate and effective version of the vertex.
- In the finished base of the head you need to drill a hole in which the handle will be fixed. In order not to make the hole too large, it is worth at least thinking through the cross-section of the handle in advance.
- The next step will be making the handle. For this purpose, a drawing for the hammer handle is initially made. You can choose the most suitable and convenient handle option.
- A handle is made from hardwood on a carpentry machine. In some cases, you can make a metal handle, but you will have to use all the skill and skill to make a suitable figure. After making the basic shape, you need to sand the surface to remove the slightest chips and protruding wood fibers.
- Then you need to place the head on the finished handle. The handle should fit tightly into the hole in the metal part. An additional fastening will be a wedge that is driven into the middle of the cross section of the wooden handle. The blade is driven through the upper hole in the hammer head.
- Next, you need to apply a protective coating to the metal component of the tool and treat the wood itself. After this, the tool will be completely ready for use.
A hand-made hammer must at least approximately meet the requirements of GOST. Even if there are differences, the tool will definitely be suitable for household use. The main thing is that it is strong and reliable.
Hammers can have different shapes, weights, structures and sizes, but the main function of the tool remains to enhance a person’s impact on another object. Most often, the tool is used for driving or driving nails, piles, connecting grooves and leveling tiles. The principle of structure and other characteristics depend on the type of device. You also need to handle the device skillfully, as it is a very serious tool that can cause significant injuries.
Requirements
A welder's slag hammer must meet a range of requirements. In addition, several tips for choosing a special tool should be noted. Below we list the necessary characteristics and recommendations:
- The double-sided head is the main working element of the tool, so it must be made of high carbon steel , hardened to the maximum level of hardness. This ensures long service life and prevents dulling.
The presence of pointed ends on the striker allows you to beat off slag in the most inaccessible places.
- The handle should be equipped with a loop or ring for convenient storage of the hammer on a workwear belt.
- The metal handle with a rubber grip and the spring handle perfectly absorb recoil .
- To prevent the tool from slipping out of your hands, it is recommended to choose models with longitudinal relief .
- The wooden firing pin must be secured with a safety plate , as the head sometimes falls off.
- You should pay special attention to hammers with an all-metal handle - the most reliable option.
Characteristics and purpose of the tool
To understand the characteristics of a tool, you must first determine what the hammer is intended for. This device is used if you need to drive a nail or a metal wedge. But the striker device can be more functional, for example, equipped with a device for pulling out nails. This hammer for removing nails is called a nail puller. There are other species that also have their own names.
As for the simplest option, the standard hammer complies with GOST 2310-77. The weight of the hammer depends on the functional features and scope of application, but usually it does not exceed 4 kg. To become more familiar with the tool, it is worth knowing its characteristics. But first you need to know the structure of the device.
GOST 2310-77 Steel hammers. Specifications
1 file 483.81 KB
Looking at the tool, it immediately becomes clear what the hammer consists of:
- Head. The metal part, which in turn is divided into a firing pin, a wedge and a sharp toe, can also have different shapes. Typically the hammer head has a round head and a spherical toe.
- Lever. The length of the handle consists of a part on which the manufacturer’s logo is applied and the main part for holding. The length of the hammer handle can be different, the main thing is that it provides a normal grip.
The dimensions of the hammer are determined in accordance with the structure and type. The main relationship is the mass of the head and the length of the tool handle. The average length can be from 25 cm to 33 cm. Otherwise, if the metal part is heavy and the handle is short, the device will quickly break or be ineffective.
Characteristics of the hammer according to its components:
- The weight of a hammer for driving nails can be 300-800 g. It can be more than 1 kg if the entire structure is made of metal.
- The tool head is always made of steel. Hammer steel goes through several stages of processing - casting, hardening, forging. The protective layer of solid material is 3-4 mm.
- To prevent the metal from being “eaten up” by corrosion, it is covered with a protective layer. Thanks to this, the striking part of the hammer can withstand enormous pressure and powerful blows.
The handle of any type of hammer can be made of wood, metal or fiberglass. All presented options have their advantages and disadvantages, but wood remains the most popular. In order for the handle to withstand enormous loads, hardwood is used for its manufacture - birch, ash, maple, oak. Additionally, the surface is covered with a protective layer.
Wide range of actions
The welder's hammer is designed primarily for the rapid separation of slag, which is formed during manual welding with coated electrodes, or remains after a welding tractor using flux. Beating off the slag is very important to check the quality of the connection, as well as for multi-layer seams, where the second pass is always carried out on clean metal, without debris and easily melting impurities.
The slag separator can also perform other operations while the welder is working. Among the most common:
- Knock off drops of stuck metal. When the arc burns, partial splashing of the filler and base material occurs. Hot drops adhere to the surface in the heat-affected zone, but are not welded to it. To give the product an aesthetic appearance, you need to use a sharp side to beat off frozen splashes.
- If there was a lack of penetration, then in order to redo this area efficiently, you need to completely remove the slag from the point or crevice in the seam. If this is not done, the liquid metal will flow around this place and it will not be possible to weld it. This can be done with the sharp narrow edge of a hammer.
- A welding tool with a more massive design is suitable for forging seams on alloy steels. Tapping the joint with a “blunt” edge will strengthen the metal structure in this place.
- The same product can be used to adjust the sides to the desired level or gap between them.
- Bend the heated part and tap it to the surface to make the seam more conveniently, you will get a “heavy” version of the tool.
- During welding, it may be necessary to cut off a new cable from the reel in order to extend the mass or wire of the holder. This can be done with a hammer with a wide nose like a pickaxe.
Device design
You can find drawings of a reverse hammer for body repair on numerous websites.
But before designing, it is important to decide on the purposes for which the tool will be used. It is possible to make a reverse hammer for straightening with your own hands in half an hour, but you need to choose a scheme in advance
It is easiest to assemble a model with an adhesive base or with replaceable threaded hooks.
The second stage is a clear drawing, in which every detail is carefully drawn. Thanks to this, the number of component parts and the degree of their readiness for assembly becomes clear. Most often, it is at this moment that you can think over and make pulling hooks of various sizes in advance. Since a reverse hammer can be made with one or more weights, such a variety of attachments will allow you to work with dents of varying severity. For example, in case of specific damage, it is possible to weld several loops on one straight line and then thread a pin through them to pull them out with one plane.
This method will not work for every dent, but it can reduce the resulting deformation forces in the metal, which allows you to get the job done faster and with minimal damage.
from tool design to its markings
Definition
Design
Marking
A hammer is a necessary thing in the household. It’s not bad to have several varieties of it in your toolbox. This sometimes greatly facilitates the performance of specific work. But for most household needs, an ordinary, one might say, standard plumber's hammer is quite suitable.
Bench hammer, definition
A hammer is a percussion instrument that is designed for hammering or, conversely, breaking some objects (in the first case, these are usually nails, in the second, for example, contaminated tightly separated joints). It is also used for some impact work (when manipulating with a chisel or a screwdriver with a thrust bearing). Its weight, dimensions and design features are determined by GOST 2310-77 “Steel hammers”. He also clarifies the concept of “metalwork” - created for the needs of the national economy and export.
Design
A steel metalworker's hammer weighs from 50 grams to 1 kilogram. The design of the tool: a head (for striking the surface being processed), a wedge that holds the first element, preventing it from going “flying” with the next blow, and a handle that serves to increase the swing, and at the same time making the entire object more convenient for the worker .
The working part of a plumber's hammer - the head - also has its own characteristics. Its two ends: the toe and the striker, differ in shape, which allows them to be manipulated differently.
The firing pin can be round or square. The toe is usually thinner and may be triangular or cylindrical or rounded at the end.
In the photo: 1 - head, 1a - firing pin, 1b - toe, 2 - handle.
According to GOST, a metalworking hammer must have a head made of steel grade 50 or U7. Other brands that are not inferior in properties to those mentioned are also allowed. A prerequisite is the presence of a protective or protective-decorative coating. Being steel, the tool head is usually galvanized. The coating can be oxide, phosphate, followed by oiling or painting with enamel or varnish.
According to GOST, a steel hammer can have one of three types of handles. The most common of them is an oval-shaped handle with a rectangular cross-section. Others are its modifications, oval-shaped with a narrowing or double narrowing for greater ease of operation. GOST allows other ergonomic forms. The width of the handles, depending on the size of the mounted heads, ranges from 18 to 41 mm. Length – from 200 to 400 mm. Household hammers often have a handle length of 250 to 350 mm and a corresponding head weighing from 100 to 400 grams.
to come back to the beginning
Hammer handles should be smooth, without burrs, as well as elastic and heavy enough to reduce the load on the hand when working. Hardwood has suitable properties. The most commonly used trees are birch, oak, maple, rowan, ash, hornbeam and dogwood. Modern materials - high-strength plastic and rubber coating. Another GOST requirement is the absence of any cracks on the tool handle outside its connection with the head (at the wedging point).
Locksmith hammer, marking
Everything a potential owner needs to know about a hammer should be printed on the head of the tool. This is the recommendation of the state standard. The list of data must include the manufacturer's trademark and the nominal weight of the product.
Previously, a mandatory indication of the price was required, but now this data is optional, as is the possibility of applying the manufacturer’s emblem to the hammer elements.
Pen
The welder's hammer should provide comfort when removing slag and should fit comfortably in the hand. Therefore, manufacturers offer various handle shapes . Two materials are used to make the handle: metal and wood . Next, we will analyze the advantages and disadvantages of each type of handle.
Wooden
Wooden handles are less common than metal ones. However, wood has its own advantages : it absorbs vibrations well during impacts and does not transmit them to the hand; provide convenience; Pleasant feeling for the hands, not cold. However, there are also disadvantages : the tree can burn from flying sparks; The metal head can fly off the wooden handle, so you should choose models with a safety plate.
Juco
- Country of origin: Ukraine.
- The firing pin is made of tool steel, coated with black varnish to prevent corrosion or rust.
- Handle material: beech.
- Weight - 350 gr.
Metal
Most hammer models are equipped with metal handles. Advantages: high wear resistance and long service life, does not break or burn. Disadvantages: there is a possibility of slipping out of your hands; may make your hands cold.
Foxweld 5885
- Brand from Italy.
- The Foxweld 5885 hammer is designed to remove slag from a fresh welded joint in order to control its quality.
- The all-metal handle with a spring mechanism at the bottom ensures comfortable operation and reduces recoil.
Spring
The metal handle, part of which is made in the form of a steel spring, has the following advantages : effective absorption of impact energy, recoil is not transmitted to the hand; when the instrument heats up, a configuration of this type dissipates heat into the surrounding air, the presence of a ring for convenient storage. Hammers with spring handles are more expensive than tools with more standard handles.
CH-01
- The welder's hammer SN-01 is designed to beat off slag.
- The head of the tool on one side has the shape of a chisel, and on the other - a sharp sting for removing defects at the root of the seam.
- The spring design of the handle softens the impact on the hand from blows.
Anti-shock
An anti-shock or shock-absorbing handle is a wooden or metal handle coated on the bottom with an additional layer of material: rubber, plastic, or others.
The advantages of such models: elastic material softens the impact force, which reduces the mechanical impact on the performer’s hand; Comfortable grip, no slipping out of your hand.
ESAB SH3
- The SH3 hammer is a compact tool with a chisel and a tip.
- Steel handle with plastic handle.
Construction and use of crowbar [edit | edit code]
Typically, a crowbar is a metal rod with sharpened or flattened ends (or one sharp conical end and the other flat).
- splitting solid objects: large pieces of coal, stone, ice, etc.;
- moving heavy objects over short distances (working with a crowbar as a lever);
- as an emergency tool in case of fire and other emergencies. Emergency electrical scrap has a rubber insulating coating;
- in exceptional cases, a crowbar can serve as a weapon;
- a crowbar can be used to commit theft (burglary). The slang name “crowbar” was invented by thieves to refer to a small crowbar for breaking locks, doors, etc.
- a simple tool that does not require electricity, fuel or repairs during operation;
- service life is limited only by corrosion and cyclic loads.
Why is a regular hammer not suitable for beating slag?
An ordinary hammer is not suitable for removing slag crust, since it does not perform the procedure effectively enough. An ordinary instrument weighs more than a special one, thereby greatly overloading the performer’s hand.
The unique design of the welder's chisel allows you to feel no kickback, an advantage that a conventional hammer does not have. And perhaps most importantly, a regular tool does not have pointed ends and therefore may not “get” to some connections . Therefore, for the convenience of the welder and to improve the quality of the slag removal process, a special hammer should be used.