Wood carving is a rather complex process that requires not only correct methodological preparation, but also appropriate tools. The result of the work of a particular master depends on its quality, technical characteristics and functionality. Therefore, it is so important to choose the right tools for wood carving; read how to do this in this article.
Basic tools
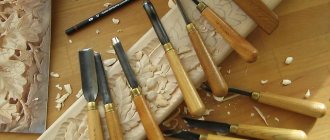
The basic toolkit includes several devices, among which experts primarily highlight knives, wood carving cutters, jamb knives, etc.
Knives
These instruments can have a classic appearance or an unusual shape. Each carver independently determines for himself which knife will be easiest for him to perform a particular job.
Flag knives have become widespread. They look like a small triangle stuck into the handle. This tool is considered universal. This is due to the fact that all areas of the blade are used for work. These wood cutters are used by almost all craftsmen to perform handmade work.
Blunt knives
These tools are distinguished by several features, such as:
- cutting edge angle;
- blade width.
Depending on the type of sharpening, jamb knives can be either single-chamfered or double-chamfered. Any woodcarver should have several of these tools, differing from each other primarily in width.
Geometric thread cutters
These tools allow you to create not only flat, but also very three-dimensional sculptures. They have a blade on one side only. Using these cutters you can perform the following types of work:
- contour;
- triangular-notched;
- nail (staples).
In many cases, a geometric carving knife is an indispensable tool when creating sculptural compositions.
Bogorodsky knife, “Tatyanka”
This tool is intended for performing power wood carving. With its help you can quite easily create small sculptures with a lot of details.
As a rule, the Bogorodsk Tatyanka knife is used to cut out figures of people or animals. In most cases it is used when working with soft wood.
How to make a blank for volumetric carving?
First, it is limited in height by sawing off from the bottom and top. Excess wood is cut off with an ax or scraper, and the direction of the wood fibers is always taken into account. If they work with an axe, then first they make several notches, this will prevent the wood from chipping. It is impossible to hew against the grain, since the cleavage line may go deeper into the workpiece. Next, use a plane to level the base of the workpiece and check its flatness with a steel ruler. The side edges are planed for ease of marking and drawing. Contour carving is limited to a small set of lines, but they can also be quite expressive. The main thing is to be able to identify the shapes of the ornament, which is achieved by varying the depth and width of the lines made. For large shapes, sharp lines are acceptable. In the ornament, it is necessary to differentiate the upper lines (they are performed first, due to which their edges are continuous) and the lower lines. The line passing along the background should be deeper and shallower if it goes to another form of ornament. When cutting out an ornament, make sure that the cuts are clean and the edges of the background are undamaged, since on a dark background each defect will be very noticeable.
Secrets between the lines
Chisels for wood carving
There are several different types of chisels designed for wood carving. Among them it is worth highlighting the following:
- Flat chisels for wood carving . They are one of the simplest tools. On one side, they have a sharp edge, which allows you to cut off the top layer of wood when striking the handle.
- Semicircular chisels . Professionals use them very often, selecting exactly the tool that is best used in a particular situation, depending on the type of wood and the complexity of the work. There are round, medium and sloping chisels of this type. They can be purchased as a whole set or individually.
- V-shaped chisels. They are used by craftsmen during wood carving only in cases where the use of flat tools is not as convenient and justified as possible. Typically, V-shaped chisels have an angular or triangular shape. Among them, it is worth highlighting such tools as straw cutters, spoon cutters, as well as chisels and knives.
For work, it is enough to purchase just one set of wood carving chisels. This will be enough to complete most types of sculptures.
You might be interested in reading: Types of wood carving . Artistic wood carving has developed over centuries. The article discusses types of wood carving - from traditional to the most modern.
Making a knife
When taking your first steps in wood carving, you can limit yourself to a simple knife made of high-quality steel, sharpening it in a special way. The only condition is that the knife blade must be rigid enough so that when making individual cuts it does not deform or bend.
The quality of steel is checked with a regular needle file, which should not leave marks on the sharpened blade or they should be barely noticeable. However, it is better to initially make a special knife-jamb, whose blade shape resembles the well-known shoe knife, but has a smaller blade width.
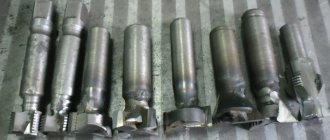
Most often, for the independent production of knives for wood carving, which have different widths and blade shapes, a machine-made hacksaw blade for metal with a width of 25.0...50.0 millimeters is used. Preliminary markings are made on the blade along the contour of which the blade blank is cut out.
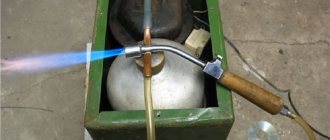
So, in machine-made hacksaw blades, tool steel is used (usually P6M5 or P9M3), then to create a knife blade blank you will have to use a grinder with a metal cutting disc. The workpiece should be cut with a small allowance. When cutting metal, the edges of the part burn (the structure and hardness of the metal changes), so the final finishing is done on an emery machine.
For the final production and preliminary sharpening of the knife, the same emery wheel is used, and the final finishing is carried out on sanding blocks of varying abrasiveness. The side surfaces of the knife blade must be polished; a felt wheel and GOI polishing paste are used for this.
Similarly, this type of tool is made from metal circular saws. The advantages of using a circular saw are a greater number of standard blade thicknesses. Knives can be made in a variety of sizes and thicknesses. If at the initial stages this factor does not play much importance, then over time, when a cutting tool with a semicircular or shaped blade is required, the thickness of the workpiece will be of no small importance.
On a note!
Power knives are made from these blanks for making deep cuts, and a tool for cutting shallow recesses can be made from a straight razor blade.
Special devices
Additionally, some special devices are used for wood carving, among which, first of all, it is necessary to highlight the following:
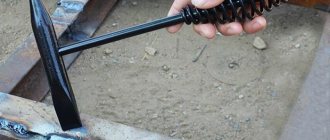
- Mallets. It is a famous carpentry tool made of hardwood. Recently, mallets have appeared that are made of rubber. This tool is used in cases where it is necessary to work with a chisel across the fibers of the workpiece. Also, a mallet may be necessary in cases where the volume of wood carving is quite significant. With its help, you can significantly facilitate the work and make the load on the master less significant. In most cases, the mallet has a round or semicircular box. This allows you to hit the chisel at almost any angle. The size of this tool can vary - from 75 to 150 millimeters in diameter. For most types of work, craftsmen select medium mallets.
- Tesla. They are carpenter's axes that have an unusual appearance. This is due to the fact that the blades in these tools are perpendicular to the ax handle. Thus, adzes are very similar to small peculiar hoes. In some cases, their blades have a convex or even semicircular shape. As a rule, adzes are used to hollow out various shapes from wood. In addition, with their help you can quite easily make grooves in workpieces. By purchasing one such hatchet cutter for spectacular wood carving, you can significantly speed up your work.
- Mints. They are a variety of metal rods that differ from each other in diameter, length, sharpening and some other important nuances. These instruments have notches on one side. As a rule, they are characterized by clearly defined geometric shapes. In most cases, embossing is used to finish the background if there is a sufficiently rough surface.
Thus, the above special tools for wood carving are also used when it is necessary to create sculptures or any other devices.
Geometric carving
In practice, for this type of relief carving, you can get by with several jamb knives.
(In the future, we plan to master the production of hatchet knives; they are also used for geometric carving.)
You can read about the technique of carving with a knife-jamb (knife-hatchet), for example, in this article:
They work with a jamb knife like this (Mikhail Ilyaev shows):
There is also a whole range of knives used for geometric carving if another carving technique is used (European)
This knife works like this:
To make it easier for you to choose chisels for sculpture and relief, let’s look at the characteristics of the tool:
- Impact and non-impact chisels
- Blade length
- Blade thickness
Electrical tools
Wood carving kits most often contain only those tools that are intended for manual labor. In turn, in some cases electrical devices may be needed, among which the following are most often used:
- Drill. This tool is intended for drilling holes in workpieces. Its motor transmits rotational movements to the drill, which is shaped accordingly. By sharpening its edges in a certain way, a notch is gradually drilled into the wood. Each subsequent rotational movement leads to the drill moving deeper.
- Jigsaw. This hand tool is designed for sawing wood and other lumber by performing corresponding reciprocating movements with its saw blade. Using a jigsaw, you can cut a workpiece, cut a certain shape into it, or cut off the necessary part from it.
In addition to the above-mentioned electric tools, other devices can be used for wood carving. The choice of devices to perform the work is carried out by each master separately.
Impact and non-impact chisels
“Impact” chisels are, for example, chisels from Pfei (Switzerland) and Narex (Czech Republic). You can hit them with a mallet :), since the design of the handle provides this possibility.
The chisels of the blacksmith Korneev allow a small blow, tapping with a mallet: https://stameskino.ru/shop/CID_326.html
Chisels of the Transnistria brand do not allow for working with a mallet: https://stameskino.ru/shop/CID_20.html
- If you plan to work with a large sculpture or relief where working with a mallet will be necessary, choose impact chisels.
- If you plan to work with hard wood, you may need impact chisels to effectively and quickly remove excess wood.
- If you plan to work with soft wood and small shapes, then you can choose budget chisels from the Korneev and Pridnestrovie brands.
- Budget chisels of the Korneev, Transnistria brands, and Japanese chisels are suitable for any detailing work on both soft and hard wood.
How to choose a tool and where to buy
Beginning woodcarvers, as a rule, do not understand how to choose and where to buy the tools that suit them. In fact, nowadays there is a huge selection of different devices for performing carpentry work.
When choosing tools, you need to pay attention to such nuances as:
- Difficulty of work . If it is not very high, purchasing several separate devices will be enough. In turn, wood carving tools for beginners are often sold in appropriate sets. Some experts do not advise purchasing them without having the appropriate experience.
- Steel grade . It is necessary to choose tools of better quality and reliability. This affects their service life and ease of use.
- Manufacturer . It is best to give your preference to well-known brands or trusted companies.
- Country of manufacture. In most cases, Chinese instruments are not of high quality. Experienced craftsmen advise purchasing domestic or European tools for wood carving.
Not only the comfort of carving, but also the final result of the work depends on the correct selection of tools.
Knives
When working with wood, you cannot do without a good knife; when choosing this tool, you should give preference to the one that will be most convenient for processing wood. It is also important to find out what grade of steel was used in its manufacture.
When choosing a knife from a foreign manufacturer, you need to compare the specified steel grade with a domestic analogue, and check what properties it has according to the steel grade.
A good knife is characterized by a high carbon content with the addition of alloying elements.
Knives for working with wood are divided into three types: folding, with a replaceable and fixed blade. A blade with a length of 40 to 50 mm and a thickness of 4 mm is considered optimal.
DIY tool
Many professionals advise making your own wood carving tools. This is due to the fact that all devices in this case will be fully suitable for the anthropometric parameters of the master - for example, the size of his hand. It will be easy to work with such tools, which in turn will improve the speed of making the sculpture.
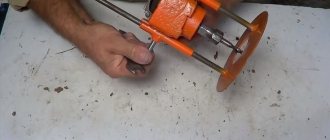
Having the appropriate experience and high-grade steel, you can easily make a Bogorodsk knife or a hatchet knife. For example, in such a situation, you can use a hacksaw blade if its thickness is at least 2 millimeters. The tool must be made using a sharpener powered by electricity.
It is advisable to make various devices with your own hands in the following cases:
- if you have relevant experience;
- if tools and materials are available;
- with a complete lack of money to purchase new products.
You need to transfer the outline of the knife to the workpiece, carefully processing its outline. During the manufacturing process, the canvas should be periodically cooled by dipping it in water.
The handle can be made from a cast made using plasticine held in the hand. After this, you need to select a suitable block. Having marked the surface, this workpiece must be clamped in a vice. Using a hacksaw, you need to remove all excess. In order to finally finish the work, you need to adjust the shape of the handle using a rasp and sandpaper.
Required cutter kit
There is no universal tool that can be used to perform on a wooden surface. Its full range is quite extensive, but taking the first steps, the carver can limit himself to the following items:
- one special blunt knife;
- straight and semicircular chisels with blades of various widths.
Over time, this minimum will expand, but to start work and master the skills, one knife and two chisels are enough - one with a straight blade and the other with a semicircular blade. In addition to this specialized toolkit, you will need a regular, commonly used tool:
- wood hacksaw with fine teeth;
- bit;
- set of files;
- sandpaper of varying degrees of abrasiveness.
Considering that imagination, skillful hands and high-quality tools are the key to success in any type of decorative and applied art, the production of the latter must be taken with special responsibility when choosing the right material for it. At the same time, finishing individual cutting and engraving objects to the required conditions usually takes much more time than its direct production.
Tool sharpening
You need to start sharpening by aligning the tool blade. To do this you need to use coarse sandpaper. It quickly removes various hangnails. This creates a cutting edge.
When sharpening, it is important not to damage the sharpening angle and the geometric shape of the blade. After using a coarse abrasive, you need to move on to finer ones. With its help, the master can remove the remaining roughness.
If the tool gets very hot during sharpening, it should be cooled in water. At the end you need to apply sanding mixtures applied to the felt. They ultimately create a perfectly flat surface.
Tool for miniatures - “marigolds”, “claws”, “rivets” and the list goes on
Hello everyone! I decided to add my two cents to the topic. I would like to show you my tools, which I use to work with bone and not only; some work well on wood and non-ferrous metals. These are claws, so to speak, I started making them a very long time ago. I just couldn’t get to the tricky place and decided to make an animal tool similar to a claw, it turned out to be very convenient to work with, then I saw others making similar homemade products. I make them mostly from spring steel. An ordinary one, which is thinner from auto junk, which is thicker from an old sofa, I annealed until red for an hour in a barbecue at the dacha, now, if necessary, I straighten the required rod, cut it, shape it, sharpen it, harden it from red-scarlet to water, and then to wheat I release the colors with an industrial hairdryer. I sharpen the finish on the mirror, first with seven diamond paste (seven is green) and also finish it on the mirror with white Dialux polishing paste. Why on the mirror, because it holds the edge very well when sharpening small edges. I sharpen with my hands without tools, just a mirror with paste on a hard surface and so that the elbow of my working hand is also on the same hard surface.
These claws were sharpened and sharpened from the dental scrapers of the periodontist to remove tartar. Steel is softer but holds an edge for quite a long time.
I also use many stichels. For its intended purpose...that is, it’s easy to draw a straight line or an arc with them, with some you can work something like a claw. I make them from P18 steel, old needle files, small bearing races, and springs. Quenching and tempering is still the same except for P18, it is alloyed and has a very complex tempering-hardening process, P18 is simply sanded with water to the desired shape and the final finish is also applied to the mirror.
I also use knives, sometimes I need to trim and cut through something. The shapes are like this, the steel is the same.
For deep contrasting lines I use these scrapers, scribers in my opinion, they also make it possible to crawl somewhere. The file is very convenient for filing something very thin, for example, detailing the edge of a very small feather. I made halves out of a SPUTNIK blade, placed a cylinder with a fine notch on a piece of wood and rolled the cutting edge back and forth with the blade. The result is a very thin file that cuts absolutely everything. Be careful with your fingers at first, in one pass you can saw through the nail along with your caruncle... I went through this task with joy.
The technique is based on three principles. The first, traditional, like a chisel, basically it’s just a chisel. Second, scraping or how to SCRAP correctly, these are all practically tools. Well, the third one is a lever with a persistent finger, this is everything except knives, at least I haven’t worked with knives like that yet, although sometimes I use a boot to trim the edge of something thin. In general, whatever is more convenient and the more convenient, that’s it. This is approximately how it happened, don’t scold me too much, I photographed and drew this method with a lever and a stop.
Example:
Sketch:
Scheme:
Regarding the sharpening angles, it’s very difficult to say, the fact is that, in theory, I first sharpen all the edges to 45 degrees, but then it becomes clear that I need to adjust, if it digs in, I increase it, if it starts to crunch and groan, I decrease it, so what’s the difference? In principle, there is no one panacea for everything. Moreover, the bone, I’m talking about the shank, is often more rigid and fragile on the surface, and towards the middle it becomes softer and more flexible... so you scour here and there... looking for the fifth corner.
That's how it is in general. If I wrote something that is not clear or you have questions, write, I’ll tell you everything I know. Thank you!
www.rezbaderevo.ru
Blade length
Determine what size your carvings will be. Japanese chisels with short blades are good for shallow reliefs and small sculptures, or for detail work. The short blade is maneuverable and well controlled, this is its advantage.
Pfeil chisels come in two sizes - standard (https://stameskino.ru/shop/CID_40.html) and compact (https://stameskino.ru/shop/CID_41.html). The difference is in the length of the handles and blades.
Standard ones allow you to work with a chisel, comfortably holding it with two hands:
Compact are convenient for small hands, or when holding a chisel with one hand.
Blade thickness
If you remember from your everyday practice of driving screws, screwdrivers with a thick blade are more powerful, and those with a thin blade are less powerful. The situation with chisels is similar: the thicker the blade, the more powerful the chisel (or knife) and the more powerful cuts it can make. For carving hardwood, use power chisels and knives.
- Pfeil, Narex, Korneev sculptural chisels (thickness 2.5 mm) - power
- Japanese chisels of the professional series (with wooden handles) - power
- Korneev's chisels (thickness 1.2 mm) are not power.
- Chisels "Transnistria" (thickness 1 mm) - not power.
- Korneev knives - power
- Narex knives - power
- Japanese craft knives - power
- Pfeil knives are not power knives
- Kulibin knives are not power knives
But at the same time, it should be understood that the characteristic “power-not power” is not a synonym for “good-bad”. Power chisels and knives are good for material removal operations (especially on hard wood), rather than power ones, it is better to use them for detailing work or when working with soft wood.