Carpenters, joiners, fashion designers, carvers, turners and other manufacturers of wood products sometimes have to make cutters for processing wooden blanks with their own hands. This is not so much an opportunity to save money as it is the need to obtain a cutting tool with a given geometry. A homemade milling cutter for rough processing of any type of wood can be made in tens of minutes or several hours.
Features of a homemade wood cutter
Not every profile cutter is sold in the nearest store; a tool ordered in China or for individual production will have to wait a long time, and in the second case, you will also have to pay a lot. It is much easier to make it yourself.
To create a homemade cutter on a manual or vertical milling machine for wood processing you will need:
- The material is durable, heat-resistant steel that holds an edge well.
- An angle grinder or grinder with a cutting wheel for metal.
- Electric sharpener or other grinding tool.
- Vise.
- A drill or screwdriver and a welding inverter are not always needed.
The first copies will not satisfy the quality of surface treatment and geometry. May have poor balance - exhibit noticeable runout, leave a “dirty” rough surface due to incorrect sharpening angles or insufficient sharpness of the cutting edge. After manufacturing and finishing several cutters, the result will begin to please you.
Which option is better when building a log house?
It’s impossible to say unequivocally which assembly technology – a warm corner or a bowl – is better.
With qualified installation, they will have approximately parity in terms of thermal performance indicators: both options have low thermal conductivity and are not blown through. But there are other aspects:
- When installing a bowl, the cost of purchasing material increases due to the formation of a protruding part on each beam. The cost increase is not too large, but on a large-scale project it can be noticeable.
- A house or cottage assembled in a warm corner is more economical in terms of materials. But the construction itself will take longer, and a more qualified team of builders will need to be involved in the work (with a corresponding difference in wages).
- It is also worth considering whether your own thermal insulation of a timber frame is enough for you. If the thickness of the walls is insufficient to retain heat in the house, you should choose a warm corner. This way you can install external insulation - either immediately at the construction stage, or later, if it seems to you that the effectiveness of thermal insulation is insufficient.
Tags: timber, assembly, log house, warm, corner
« Previous entry
Types of cutters
For processing wood, board and composite materials based on it: chipboard, OSB, MDF, plywood and others, two types of cutters are used:
- End - clamped using a collet clamp. They have a shank like a drill and a cutting part of any configuration. They are used with manual routers, including those built into a table or stand, pantorouters on their base, and CNC machines.
Factory equipment
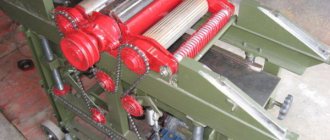
- Mounted or disk - made in the form of disks of any thickness. Designed for cutting grooves, tongues, quarters, profiling lumber and finished products. Installed on the shaft of a vertical milling or circular machine.
Mounted models
- Milling heads or drums are a tool for profiling lumber.
Drum with knives
Dimensions
One of the advantages of plug drills is that they come in a wide variety of diameters. In the manufacturers' table you can find options for 15 mm, 35 mm, and even 44 mm. In fact, this parameter can vary from 8 to 100 mm.
But it is worth understanding that equipment with a diameter of more than 5 centimeters is used exclusively for machine drilling. This primarily ensures the safety of the user.
On the market of modern devices you can find sets of several drills of different diameters, or you can purchase the product individually. Typically the direction of rotation is RH.
Diameters of 15 mm and less are considered one of the most popular. These are 8, 10, 12 mm drills.
How to make a cutter for a manual vertical machine and grinder with your own hands
The materials for making the tool can be very diverse: old finger cutters for metal, taps, drills, rods made of tool or high-speed steel. Almost anything, even a bolt, but the quality of its work will be very low. You should make homemade wood cutters with your own hands from the following grades of steel: tool, high-speed, structural, alloy, spring-spring.
Option 1 - Forstner drill from a bolt with a non-standard size
A Forstner drill allows you to make through and blind holes in wood materials. There are plenty of them on the market, but with standardized sizes: from 10 to 35 or more mm in 5 mm increments. What if we need a hole with a diameter of 17 or 22 mm?
Take a bolt with a head a couple of millimeters in diameter larger than the drilling diameter. A pair of symmetrical slots are made in it, which will become the cutting edges.
Bolt processing
The bolt is placed in the drill (its standard chuck accepts bolts with a diameter of up to 13 mm), and it is clamped in a vice. The electric motor power button is clamped and fixed. Using a grinder, the edges of the bolt are cut to the diameter of the hole. Additionally, the operation will reduce vibration.
The end part is slightly removed, but so as to form a point in the center. It is better to leave the needle a larger size, and then modify it with a burr or a needle file.
Grinding
They are formed, brought to perfection and sharpened at an angle of 35-40° - the harder the wood, the blunter the angle - the cutting edges of the tool. Afterwards they can be finished with a whetstone to give them ideal geometry and sharpness.
Sharpening
After completion of the work, the homemade cutter is tested at low speeds in a drill or drilling machine. It is strictly prohibited to install such equipment on a high-speed milling cutter:
- the collet clamp may be damaged;
- there is a high probability of the bolt flying out due to unreliable fastening;
- runout will accelerate failure of at least the bearing.
Option 2 – shear cutter
For a stationary vertical router or circular saw, disc cutters are needed. For wood processing, pass-through or slotted metal discs are often used. If they have many teeth, they are cut off one after another with a grinder or ground down on an emery wheel. When working at low speeds and sharpening properly, it copes well with quarters, grooves, and tongues. The main thing is to choose a cutter with a landing diameter that matches the thickness of the shaft. You can also use adapters or adapter rings - order from a turner.
Disc models
If necessary, the teeth can be given any shape, for example, to make grooves for dovetails.
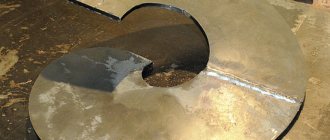
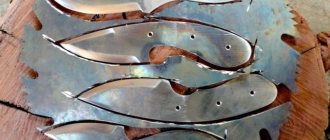
Option 3 – homemade cutter from a hairpin and a circular saw
A homemade wood cutter for a hand router is made from an old circular saw from a circular saw and round timber processed on a lathe. It is practical for making grooves for inserting slats in the manufacture of frames and drawers.
Teeth of the same shape and size are cut from the saw. Holes are drilled in the workpieces with a 6 or 8 mm drill, and they are put on a bolt of appropriate thickness through spacers in the form of small bearings, washers or other similar objects. The latter set the distance between cuts.
saw tooth
They are pressed with a nut through a washer and an engraver or with a pair of nuts for reliability. It is advisable to cut off their edges to minimize vibration. Afterwards, the teeth are equalized in height, and the cut ones are sharpened.
Ready-made equipment
To create shaped cutters from a saw blade, you will need a turner or lathe. A workpiece is turned on it, a thread is cut, then a slot is made at the end for a knife. It is cut from strong steel, such as a saw blade or blade.
Tool blank
The cutting part is inserted into the groove and pressed with a nut with embedded edges through the engraver. If possible, a support bearing can be installed in front of the nut; otherwise, its role is partially performed by the nut.
Shaped
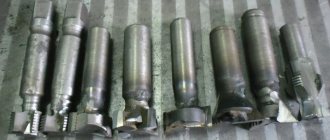
Option 4 – cutter from a tap or drill
A DIY wood end mill is made from old drills, taps, countersinks, reamers and other tools. At clothing markets they are sold for several tens of rubles. In general, the manufacturing process consists of cutting teeth, forming a profile, and a cutting edge. To do this you need a drill, grinder, burr, needle file or file and a vice. The set of tools depends on the material used, the desired profile, the types of wood being processed, etc.
The main thing when processing hardened steel using an angle grinder or sharpening machine is not to overheat it: the material is removed in thin layers. The workpiece should cool naturally or be doused with water before it becomes very hot. A hot homemade cutter cannot be cooled with liquid.
Tap product
With soldering
Using a lathe, a tool for cutting grooves and tongues.
You can use a tapping tool and drill bits to make end mills for a hand router, even without a lathe. The part is clamped into the drill chuck, which, in turn, is rigidly fixed in a vice. The drill is started, and the future cutter is given the required profile. It is refined and sharpened on a grinder or with a burr machine.
Remaking taps and reamers
Option 5 - homemade wood core cutter from a gear
The most suitable material is timing gear. The cutting edges are formed with a grinder, sharpened and brought to perfection.
Timing gear
The cutting part is heated to red and cooled in oil or water for hardening - increasing the mechanical strength of a homemade cutter.
Steel hardening
A homemade cutter can be used as an attachment cutter or an adapter can be made for screwing onto the angle grinder shaft. You need to be prepared to experiment with the sharpening angle.
Choosing a drill for drilling under the nail
It is very important that the tongue-groove connection in this case is tight, with a minimum gap size - the degree of warmth of the formed angle depends on this. According to the construction rules, a layer of insulation must be laid in each corner connection of the timber
As a rule, this is flax-jute fiber. Also, following the rules, we alternate tenons with grooves, so that in the end we get a kind of dressing that increases the adhesion of the walls to each other
According to the construction rules, a layer of insulation must be laid in each corner connection of the timber. As a rule, this is flax-jute fiber. Also, following the rules, we alternate tenons with grooves, so that in the end we get a kind of dressing that increases the adhesion of the walls to each other.
A supposedly warm corner undoubtedly costs the customer more. The average cost is 2,000 rubles per row. The price increase is associated with an increase in the crew's time costs. And, in fact, that’s all.
Why is there an alternative to the “warm corner” and is it really required?
Answering this question, we can confidently say that an alternative to the “warm corner” exists for several good reasons: 1) If your house is intended for permanent residence, then it simply needs to be insulated from the outside with basalt wool, covered with wind protection and finishing material (siding, imitation timber , block house). We definitely recommend covering all the joints of the house with a special sealant from the outside - this is simply a must!!! It is not clear why so little attention is still paid to sealants in Russian house construction? And if your house is closed from the outside with such a “bulletproof “pie”, the question is - why do you also need a warm corner?! That's right, no reason. 2) If you need an off-season house made of timber. Then you don’t have to sheathe it at all, but just go through all the seams and joints with a special sealant (if it’s a house made of profiled timber because it can’t be caulked) or caulk it if it’s a house made of straight planed timber. And if you still have to caulk everything around, despite the fact that the house is essentially a summer cottage. Then the question arises again - what magical role does the “warm” corner play?! But none. It’s better to use this money to buy the notorious sealant. Moreover, the groove of the “warm corner” in houses made of raw timber has a completely natural tendency to dry out and even, alas... fall off. This is something we have seen more than once in some houses. And then an honest question arises for the carpenters: what did they take the money for, friends? This is why in our company you, dear fellow citizens and dear ladies, do not see this expression anywhere - a “warm” corner.
Sharpening machines
The optimal device for sharpening drills with your own hands is a regular sharpening machine. But it is best to experiment with old equipment, since without experience the instrument can simply be ruined. If you have no experience working with emery, it is better to purchase a specialized machine.
Easy-to-use multifunctional sharpening devices are available on the market. You can purchase a simple manual machine or electrical appliance.
Modern models work almost automatically. The design provides not only a fixation mechanism, but also a supply mechanism for the sharpening tool.
This type of equipment is especially suitable for working with twist drills. However, the cost of such devices is quite high, so it is not practical to buy them for your home.
Feather drill from a key
You can make such a drill from an old key. To work you will need:
First, use a grinder to sharpen the upper half of the key, making it sharp. At this stage, special precision is not needed; we carry out the work “by eye”, since in the future we will still have to sharpen the workpiece.
Then, in a vertical position, excess millimeters are removed from the surface of the key. It is necessary to remove the same thickness. You will have to grind about 5-6 mm. Next, the same work is done with the sides of the future drill. This is how the master adjusts the size of the rod to the required hole size. The workpiece can be turned to any size. The main thing is not to forget to measure the correspondence of the drill to the diameter of the slot.
Making a feather drill yourself is not difficult. As they say, the master's work is feared. It is worth doing everything according to the step-by-step instructions and observing caution and safety precautions when working with an angle grinder. And the necessary material can always be found in every home.
In the first method, if desired, the stainless steel is replaced with any sheet metal and a blank is made depending on the diameter of the desired hole. In the second case, any key that is not useful on the farm will do. You can drill wood, plastic, ceramics and glass with this homemade tool.
Source
Getting a Big Hole
Home craftsmen are often interested in how to make a hole in a tree of large diameter. There are several ways you can do this:
- A circle of the required diameter is drawn. A small drill is used to drill inside the circle of holes. Then, using a chisel, the jumpers are cut out.
- Take a water pipe. One side is sharpened for teeth in the direction of the cut. In the second, a hole is made for the knob. The pipe is placed against the surface and slow rotation begins.
- At the first stage, a through hole of smaller diameter is drilled. At the second stage, a crown is taken and inserted to the maximum depth. At the final stage, the under-drilled wood is knocked out with a chisel. Chips will not occur because the crown has already set the direction.
Wood drills have a broad classification. This is an important item at home. However, each type of work requires the use of a specific tool. With the help of one, holes are made, the other - countersinks, the third - grooves. Knowing all these subtleties, it is necessary to have sets of such drills that will never lie around the household.
Homemade drill made from stainless steel and a metal pin
There are two ways to make a feather drill. For the first option, you need stainless steel (about 2 mm thick), a metal pin - 8-10 mm in diameter and an M6 bolt.
List of necessary actions to obtain the tool:
Making the tool will take no more than 30 minutes.