Heating with sawdust or shavings is a common thing for residents of our country, borrowed from European countries. Their popularity is due to the low cost of raw materials and their good specific calorific value during combustion. By creating a homemade briquette press, you can get high-quality fuel for practically nothing.
We will tell you how to make a simple and inexpensive machine for producing briquetted fuel. The article we propose shows the design and gives assembly tips. The production technology and requirements for the initial wood material are given.
Preparatory stage
Before you begin assembling the auger structure, you need to prepare a working tool . This list includes:
- sheet steel;
- car springs;
- file;
- special vice for fixing workpieces;
- hammer;
- cardboard and marker;
- grinder and wheels for it;
- fasteners; roulette;
- pipes of different lengths.
In addition, you will need a welding machine and safety glasses to reduce the risk of sparks getting into your eyes while working.
As for the pipe material, it is better to select steel elements that have increased corrosion resistance. If you take a cheap option, then after some time rust will appear on the surface.
If everything is prepared, then you can start working. To make a screw with your own hands, you must perform the following steps:
- first make a project, and then a template on thick cardboard;
- take a hollow steel pipe, this material must withstand severe mechanical stress;
- make coils from a flexible steel sheet and use a welding machine to weld the feathers to the pipe - you get a kind of spring.
If a screw is required to work with bulk material, then the turns must be arranged continuously. Otherwise, the desired effect will not be achieved. If everything is done correctly, you will get an effective tool that will have the following positive qualities:
- compact size;
- high performance;
- long service life;
- easy to use;
- rapid deepening and raising of the earth.
But all these characteristics can be obtained only if you strictly follow the installation instructions. Even a beginner can install some homemade devices.
Making fuel briquettes (euro firewood) with your own hands
Most country houses are heated with solid fuel. The task of a prudent owner is to calculate and select the type of efficient fuel with minimal costs for its acquisition.
European experience of several decades convinces us of the rationality of using briquettes made from compressed sawdust - Euro-firewood.
If you make such fuel briquettes with your own hands, the cost of heating your home will further decrease.
Advantages of Eurowood
Briquettes for combustion are a natural product without additives or binders, with a moisture content of no more than 10% by weight. The product is suitable for use in boilers and furnaces of all types.
In comparison with other classic types of solid fuel (wood, coal), Eurofirewood has the following advantages:
- The burning time is 3.5-4 times longer than firewood. A sawdust briquette burns with an even flame without the formation of sparks, with a small amount of smoke, with minimal smoke formation, and does not “shoot.”
- 1 ton of compressed fuel emits as much heat as a full dump truck of firewood – 7 m3.
- The high calorific value of fuel briquettes, even with low draft, is comparable to that of coal and is 2 times higher than this value for firewood.
- After their combustion, up to 1% pure ash remains. For comparison: burning wood leaves 15-20%, coal – up to 40%.
- The environmental friendliness of Euro firewood is evidenced by the absence of hazardous volatile substances and soot in combustion products. In this case, carbon dioxide is released 15 times less than when burning natural gas and 50 times less than from anthracite.
- When servicing boiler equipment, material and time costs are reduced, and the operating life of heating systems is increased.
- The cost of heating a building with compressed sawdust is significantly reduced.
- Briquettes are stored compactly, do not take up extra space, and are convenient for transportation.
How to make briquettes from sawdust
Why briquettes? This is explained by the inability of many furnaces to burn natural waste from logging and wood processing - chopped wood (chips) and sawdust. Expensive equipment with the principle of top combustion is adapted for this purpose. The briquettes produced have no restrictions for use in stoves, fireboxes, fireplaces, and boilers .
The fundamental principle of briquette production is the squeezing of small waste wood until lignin is released, a natural substance that glues them together into a monolithic finished product.
Methods for making briquettes
A machine used for sawdust briquetting must compress the embedded raw material with enormous force. Only in this case will lignin be released and bind individual particles. The process is accompanied by an increase in the temperature of the compressed substance. Therefore, the sawdust and the binder are sintered.
Raw materials
In addition to sawdust, shavings, larger woodworking waste, and agricultural waste that can burn are suitable for making Eurofirewood. You need to start making fuel briquettes after preparing the raw materials: grinding large fractions, drying to a moisture content of 8-10%.
Briquetting
The next stage of production is briquetting - pressing sawdust with pressure until a compact product of the required shape is obtained. The briquetting method is determined by the equipment used at this stage - a hydraulic press or a screw device.
The compressive force of the press reaches 300-650 atmospheres and the principle of its operation is intuitive. The operation of auger equipment is to gradually push raw materials into a tapering conical channel. In this case, a pressure of up to 1000 atm is created in the working part of the channel (with a minimum cross-section). At the exit, the compressed monolith is cut to size.
Manual hydraulic press
Features of home production
Making economical fuel briquettes with your own hands does not allow you to withstand the manufacturing technology.
DIY devices and equipment do not create the necessary pressure at which lignin is released. Therefore, to produce briquettes from sawdust, a different binder is required.
Its variants used in home production: finely cut paper (cardboard), glue (cheap options), clay, manure.
Using simplified home technology, you can press briquettes using paper, leaves, husks, dry grass, and straw as the starting material. You can also make peat briquettes and products from coal dust yourself. Before compression, the raw materials soaked in water must be mixed with clay in a ratio of 10:1 and then the binder used must be added.
Equipment for the production of
Homemade devices for home production of fuel briquettes can be classified into the following groups.
Screw press
The ability to make a screw press is considered a great success and will require professional skills. In addition, considerable costs will be required for the mandatory electric drive, high-strength and complex parts of the working auger, housing, and frame. The result of the work done is the opportunity to obtain homemade products comparable in quality to factory ones.
Manual screw mechanism
A simple homemade press has a screw drive. The manual press consists of a molding container for the initial mixture and a pusher with a screw drive, rigidly mounted on a durable frame.
The filled container is placed on the base of the frame and by tightening the screw (a mechanical jack can be used), the mixture is compressed to the required force or size. During the procedure, excess liquid is removed through the holes of the molding container.
The removed briquette dries naturally. The user's work will be greatly accelerated and facilitated by the use of a hydraulic jack.
Briquette ejection mechanism
A press for fuel briquettes with manual compression of the embedded raw materials using a long lever is also easy to manufacture. The longer the lever handle, the greater the force that compresses the future briquette.
For convenience, a mechanism is provided that pushes out the finished brick, which fits tightly in the mold.
To obtain productive equipment, you can make a press with several forming containers.
Production of Euro firewood for sale
The production business for the production of Eurofuel will require serious material costs at the organizational stage. Therefore, having decided to engage in this activity, you need to be sure that the invested funds will be returned and the created enterprise will be able to generate constant profit.
When drawing up a business plan and performing economic calculations, be sure to take into account:
- Demand and sales in the region.
- Availability, cost and possibility of delivery of sawdust.
- Purchase or lease of land.
- Costs of constructing an industrial complex or renting ready-made premises.
- The required number of employees to be hired.
- The need for storage space for raw materials and finished products.
- Costs of advertising campaigns.
Easy way
There is a very simple way to quickly assemble a homemade auger with two blades. These elements will fit perfectly into the ground. The only negative is that it can only be used at shallow depths, no more than 10 m.
The screw is manufactured using the following technology:
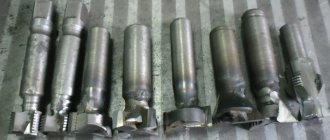
- We take a pipe with a length of 100 to 140 cm, it all depends on the height of the worker. In its upper part we weld an oblong nut that will correspond to the bolt. Can be replaced with two standard ones. If you take less, the structure will not hold securely.
- We weld a metal sleeve or thick reinforcement in the lower part - this element will act as an adapter to the drill. We buy a ready-made chisel or make it ourselves from a steel strip 30 cm long and 3 mm thick. First, we thoroughly calcinate it and then cool it in boiling lead or oil. We fix this spiral in the sleeve, and then carefully sharpen it.
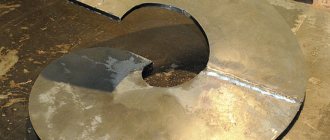
- We take two discs from an angle grinder: one with a smooth edge of 150 mm, the other toothed - 180 mm. We saw these disks in half, in which case the central part expands and coincides with the main pipe. We install them one by one: first the smaller one, and 10 cm higher - the larger one. We place the parts strictly at an angle of 35 degrees to the ground. In this case, the efficiency increases with minimal effort.
- Next, we make tubular elements for extension. To do this, take a pipe with a similar diameter and length of 100-140 cm. Then insert a bolt from below and weld it. In the upper part we install and weld an oblong nut.
In this case, the drilling structure will make longer strokes, which means that working with the tool will be easier and faster. At this point the auger is ready.
Equipment for pellets (with video)
There are companies in Russia that develop equipment, machines, and production lines, including those for the production of fuel pellets and briquettes, which can manufacture equipment directly taking into account your wishes on an individual order. In this video, there is a company that manufactures just such equipment:
Until recently, pellet manufacturers focused primarily on Western consumers. But it turns out that enterprising people have been successfully using such units on their farms in Russia for a long time. OGM-1.5 presses and AVM-1.5 dryers have been working regularly for one of my farmer friends since Soviet times, slightly modernized, with a new set of rollers and dies, they produce a variety of products.
Mini-equipment for pellets is usually multifunctional. By changing matrices, you can produce pellets from straw, hay, husks, and garden waste. This is both waste disposal and the production of raw materials for heating housing, greenhouses, and livestock buildings.
It can also be used to produce feed, fertilizers and many other things needed on the farm according to the required recipe.
Complex option
This method of manufacturing a screw will allow you to assemble a high-quality and accurate device that will serve for a long time. First, calculations and drawings are made, then measurements are made. It is also worth preparing tools and suitable material in advance, and only then start assembling a homemade drill.
Step-by-step instructions for installing a screw mixer are as follows:
- Take the prepared pipe, and it should be smooth, without any bends or deformations. Drill a perpendicular hole with a diameter of 8 mm at one end. This is where the top part will connect to the handle.
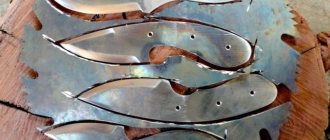
- Install the tip from below - this part will set the direction of movement of the earth. You can make it from an old car spring. You can cut the required square using a grinder.
- Make a longitudinal cut in the pipe, which should have a thickness equal to the tip. Next you should insert it with its sharp tip inside the pipe. The result should be a device that resembles a spear.
- Connect the parts using a welding machine, not forgetting about safety measures.
- Cut a cutter from the spring equal to ½ the diameter of the drill being made, and cut the teeth on it. It is these elements that will bite into the soil, loosen it, and only after that the soil will fall onto the spiral of a homemade auger.
- Position the cutters so that they are at an acute angle to the main surface. After this, the parts should be welded to the steel pipe.
- Cut a circle from a metal sheet, the same in diameter as the auger spiral. Make a hole in its center into which the pipe will be inserted. Attach the manufactured disk to the cutter welded to the tube. Mark their contact using a pencil or a special marker.
- Using the marks obtained, cut the circle from the edge to the center; it is best to do this with a grinder. Place the cut disk in a vice and twist the elements into a spiral with a hammer. Place the self-made auger onto the pipe and weld it. Finally, brush the surface with a wire brush and paint.
Actually, this is where the work is finished. All that remains is to make a handle and an extension cord. The first one can be made of plastic, it will be more convenient, but the last part can be made from any suitable pipe.
Causes of malfunctions and repairs
There is no way to protect the belt from wearing out; at some point it will still have to be replaced, but there are some operating tips that will help the belts “live” longer:
- Take breaks from work; long-term non-stop operation of equipment leads to the fact that all structural elements become very hot. Such conditions will very quickly destroy the belt, and will not have the best effect on the car as a whole.
- At the same time, you should not turn the snow blower on and off too often. This also has a detrimental effect on the operation of all parts.
- You should never forget that any technique loves caress and lubrication. Regularly lubricate all parts, this will significantly increase their life.
These tips will help you delay the death of your belts, and your car will certainly thank you for it.
With the help of minitrator you can remove snow in your garden or in the city.
About
Some tips
Some recommendations will help you make a high-quality drilling device. When working, you should consider the following:
- It is necessary to correctly calculate the diameter of the screw. The fact is that during operation the hole will differ slightly from the size of the cutting part. For example, a 200 ml element will provide a well of 240-250 ml.
- You can replace the grinder discs with regular sheet steel, the thickness of which will be about 2 mm. But it will have to be further bent and sharpened to give it the ideal shape.
- When working with the disk, you must follow safety precautions. It should be carefully and securely secured in a special vice, and cut only with safety glasses.
- To calculate the auger feather, you can use the special program “Compass-3 D”. She will do everything necessary, just enter the initial data and wait for the finished drawing. All this will significantly save time.
To extend the service life of a homemade auger, you need to clean it after each job. Remove soil from metal parts, adjust blades and sharpen them if necessary. In addition, for storage, choose rooms with low humidity.
Belt application device
There are two types of belts used in snow removal equipment; they do different jobs, but the principles are the same. In both cases, their task is to transmit torque from the drive shaft to the driven shaft. The first belt transmits the moment of force to the auger, and the second distributes it to the wheels.
Due to their strength and similarity to the structure of chains, timing belts are used on snow blowers. They are more convenient and lighter than regular ones, transmit torque well, and are easier to secure in hard-to-reach places. Among other things, belts are divided into two types:
The first type is more likely to be found on the auger; it is more elastic and durable, and is more difficult to deform. The second type is suitable for transmitting high torques in both directions; it is more often used for wheels.
Now it is clear that belts are integral structural elements, without which work is not possible. It is for this reason that it is important that they remain intact during operation, because they are one of the most frequently broken parts in a snow blower and wear out very quickly at the most inopportune moment.
If, while clearing snow, you suddenly notice that the wheels or augers are not responding when you try to operate them, you can be sure that you will have to replace one or both belts.
You can carry out the replacement work yourself, this will save you some money, but first you need to understand what exactly caused the belt to fail.
Comparison of pellet production technologies
Made from wood
Stages of wood pellet production:
- Coarse crushing of wood waste in a hammer crusher.
- Drying chopped wood in a drying drum.
- Fine crushing (bringing it to wood dust).
- Control of humidity in the mixer (if necessary, supply steam or water).
- Pressing and granulating fuel pellets in a granulator press.
- Cooling of finished cylindrical granules in a cooler (temperature 70-90°C).
- Packaging and packaging of finished products in bags.
From sawdust
The production of sawdust pellets proceeds as follows:
- Dry the sawdust so that its moisture content does not exceed 12%.
- Take a sieve and sift the sawdust so that no debris (small stones, leaves, etc.) gets into the granulator.
- Grinding sawdust in a hammer mill.
- If the humidity is below 8%, the crushed sawdust must be fed into the mixer (increase the humidity to 8-10%).
- Granulation of sawdust pellets.
- Cooling and drying of granules in a cooler.
- Packing sawdust pellets in paper bags.
From straw
Production of straw pellets:
- Straw chopping (length up to 4 mm).
- Re-crushing in a mill crusher.
- Drying in a tumble dryer.
- Control of the humidity of chopped straw in the mixer (water or steam supply).
- Pressing and granulation of straw flour.
- Cooling straw pellets in a cooler.
- Packaging of straw pellets.
From the slab
Slab pellets are produced as follows:
- Processing of slabs in a chipper (chip length up to 50 mm).
- Crushing wood chips in a hammer crusher.
- Drying slab chips in a drying drum (humidity from 8% to 12%).
- Fine crushing in a mill crusher (to the state of wood dust).
- Control of humidity in the mixer (if humidity is below 8%, steam or water is supplied).
- Granulation of slab wood flour in a granulator press.
- Cooling of cylindrical slab granules.
- Packing of slab pellets into bags.
From peat
The manufacturing technology for peat fuel pellets is as follows:
- It is necessary to lay out the peat so that it can dry naturally.
- It must be cleared of debris (plant roots, leaves, stones).
- Grinding peat in a crushing machine.
- Dry the peat mass in a dryer to a moisture content of no more than 12%.
- Re-grind (finely crush) in a crushing mill.
- Feed the crushed peat mass into a granulator press with a built-in mixer for peat granulation and steam treatment.
- Cool the peat pellets in a cooling column.
- Pack the finished fuel pellets into bags.
Recruitment
This process should be taken seriously. It is necessary to recruit labor personnel for the normal operation of the enterprise. The number is calculated depending on production volumes, as well as in accordance with the operating standards of equipment and the number of work shifts.
Determination of staffing levels for work is carried out taking into account working hours 365 days a year in 3 eight-hour shifts. Thus, a search is being carried out for the general director, chief accountant, shift supervisor (equipment adjuster), production operator, main workers, support staff, and drivers.
The economic side of the coin
To produce 1 ton of fuel briquettes you need to take approximately 2 tons of wood waste or 1.5 tons of straw. At the same time, the electricity consumption is approximately 100 kWh/t.
The calorific value of this heating product is 19 MJ/kg, which is much higher than that of conventional firewood (only 10 MJ/kg).
With the right choice of equipment, manufacturing and storage of products, the technology pays for itself in about 2 years.
After reading my article, you can decide for yourself what is better: make heating material from unnecessary raw materials, save time and money, or continue heating with wood. After all, when using briquettes, you can dispose of waste that is unnecessary in everyday life, and heat your dacha or bathhouse with environmentally friendly fuel briquettes. If you want to organize your own pellet production, then you will simply need information about organizing the technological chain, and my new book “Typical mistakes of equipment manufacturers when planning pellet production” will help you with this.
Benefits of sawdust logs
The following arguments can be given in favor of briquettes pressed from sawdust:
- Long burning time - 4 hours.
- Minimal smoke generation.
- Environmentally friendly. The starting materials are natural materials, so you can fertilize the beds with ash.
- High energy output. It far exceeds the energy capabilities of firewood and is comparable only to high-quality coal.
- Constant combustion temperature.
- Economical. The cost of 1 ton of such fuel will be cheaper than the corresponding amount of firewood or coal.
- Possibility of self-production.
There are also disadvantages. The main one is the fear of moisture. They cannot be stored in the open air, because... they will quickly absorb moisture and therefore will burn poorly. Therefore, it is necessary to allocate a dry room for storage.
Any significant mechanical impact on sawdust briquettes is contraindicated. If you buy special equipment for their production, the cost will be high and not always justified.
It is profitable to set up handicraft production if the sawdust is free, and you can use existing equipment for installation.