Why buy your children a cheap, quickly breaking toy, if you yourself can make them an excellent sword from hard plywood or a stick that your children will like and will last them longer than a store-bought one? We present to your attention instructions on how to make a sword out of wood.
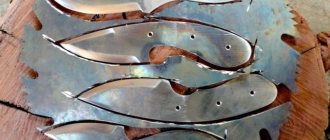
Most of the work involved in making a homemade sword is done using hand or power tools. To make the blade you will need a stationary circular saw.
Follow safety precautions when working with hand and power tools. Before using the tool, please read its instruction manual.
How to make a sword at home from wood
The sword can be made from any material. Let's try to make it from wood. This product is perfect for training or for playing knight for a child.
Choosing a wood species
The first step is to decide on the type of wood; experts recommend:
- aspen;
- ash;
- maple;
- oak;
- birch;
- nut.
Inspect the future workpiece; it should be free of knots, rot or damage. It is recommended that the block be soaked in water before production. And then dry it thoroughly.
Following these simple rules will allow you to get excellent results.
Required tools and materials
Having carried out preliminary manipulations with the workpiece, you should prepare the necessary tools and materials. Be sure to sketch a sketch of the future sword. He will be an assistant in the work.
Examples of drawings of a wooden sword
For manufacturing you will need the following materials:
- cardboard for template;
- wooden plank;
- strips of genuine leather or nylon thread;
- paint brush, roller and paint;
- PVA glue, pencil or marker;
- Sander;
- sandpaper of different grains;
- plane, chisel, chisel and mallet;
- clamps, knife and electrical tape;
- jigsaw, hacksaw or circular saw;
- milling machine.
The listed power tool may not be available to every novice craftsman. In principle, all manipulations can be performed without them. The only downside is that the work will take longer. But there is no need to worry, the eyes are afraid - the hands do it.
Sword making work
Having prepared all the tools, you can get to work. To make a sword with your own hands, I give you step-by-step instructions:
- The pre-prepared template must be transferred to the block, tracing it with a pencil or marker.
- Next, using a jigsaw or hacksaw, we cut out the workpiece from the block.
- We make a crosshair.
- Then the handle is processed; if it seems to you that the workpiece is too heavy, remove another small layer of wood. In this case, it all depends on the purpose of the blade.
- It is necessary to monitor the balancing of the product. The guard turned out to be massive, be careful.
- Let's put all the details together. Next, you should apply markings on the blade along which the descents will be made. And with a grinding machine he carefully removes the wood along its entire length.
- We go through all joints with putty.
- At the final stage, it is necessary to sand the entire product with sandpaper from coarse to fine grain. In this case, a sanding machine can come in handy. We prime and paint the sword.
An example of sketch transfer and finished work.
Finally, the sword can be painted if desired. It would be nice to wrap the handle with a leather strip for good grip on the palm. The work will not take more than one day or several hours. As a result, you will get an excellent exercise machine or toy without much expense.
Making a sword with your own hands from various materials
Naturally, the most popular are swords made of metal and wood. But we should not forget that in nature there are many materials from which you can make a sword with your own hands. And with skillful finishing, no one will be able to distinguish it from the real thing. Let's consider several options.
Plywood sword
A wooden sword may be too heavy for a child, but one made from plywood will be just right. Making a blade from plywood is not so labor-intensive, but it has its own small nuances. The following materials will be required:
- plywood itself, 5 mm thick;
- PVA glue or superglue;
- any waterproof paint;
- tape or strong thread for wrapping the handle;
- jigsaw, hacksaw, file and sandpaper.
Take the time to make a template on cardboard and mark the slopes. Do not forget that for the strength of the product, you must try to keep the thickness of the handle and the middle of the blade to the original thickness. There are not many manufacturing steps, proceed like this:
- Transfer the sketch onto the plywood.
- Then use a jigsaw to carefully cut out the outline.
- Next, use a file to gradually remove the wood along the slope lines.
- Make a crosshair and pommel.
- The parts should fit tightly to each other; install them in their places, having first thoroughly coated them with PVA glue.
- After drying, we begin to sand the entire product with sandpaper.
- Wrap string or strips of leather around the handle, if available. Paint the product in the color you like.
Plywood sword step by step.
Do not forget that it is better to smooth out the edge. A child may inadvertently get hurt or cause irreparable damage to a friend. Be careful.
Cardboard sword
You can quickly make your own toy for a little boy from cardboard:
- You will need a sharp knife, scissors, paint and a brush;
- a sketch of the future product is sketched on thick cardboard;
- then we cut it along the contour;
- We paint the sword with paint, and if desired, the blade can be wrapped in foil.
There is simply no simpler option.
Lightsaber
You can make Jedi weapons yourself at home. For a child, we will make a weapon corresponding to his height:
- The lightsaber blade is made of transparent PVC or polycarbonate pipe;
- inside the tube we pass a rod with an LED strip;
- Batteries or a power supply are placed in the handle.
The sword is ready.
Previous
BladeLegendary swords - 14 of the coolest combat blades with photos and names
Next
Bladed Copis, falcata and mahaira: trying to find out the true names of swords
Warnings
- When used in serious training and even battles, your sword will most likely crack or break (this is not unusual).
- If the sword is cracked, stop using it immediately. A cracked sword can fly into pieces at any moment. Wood chips can irreparably injure your eyes, pierce your skin with splinters, and cause other harm to your health.
- Hand tools can be dangerous if used incorrectly. Use caution when working with knives, saws, and other tools.
- Be careful when practicing with the sword. Even though the sword is made of wood, it can cause serious injury.
Musketeer's sword
If you need to make a sword very quickly, then a sword made from ordinary newspaper is the best option.
You will need an old newspaper, tape, a piece of cardboard and scissors.
- Newspaper sheets are placed on top of each other and rolled diagonally into a tube.
- The edges are secured with tape.
- One end of the tube must be bent, slightly pressed, and a handle for the blade must be bent out of it. The handle is secured with tape.
- An oval with a hole in the center is cut out of cardboard. The blade is threaded into the hole.
- To prevent the hilt from slipping, you need to wrap the tube with a strip of paper and secure it with tape.
- All that remains is to color the finished product with felt-tip pens or markers.
All products are made quite simply. If you watch a video where swords made from paper are presented, you can find many other options and interesting ideas. The main advantage of this weapon is safety.
How to make a sword with your own hands from steel
The most difficult option for making a sword with your own hands from steel. There are two ways.
The blade can be cut from a sheet of steel using a grinder, processed with a grinding machine, hardened and sharpened. Build a handle and guard.
But we don't take the easy route, so I choose to make a sword using forging . This is much more difficult than the option described above, but it's worth it. During forging, the metal takes on amazing properties: flexibility and strength.
Metal selection
The first attempts at making swords began with the discovery of bronze by man. It is clear that the material is quite plastic and the products turned out so-so. Over time, metals with more advanced properties appeared, from which, after forging, worthy products were obtained. Manufacturing methods also played a significant role, for example layer-by-layer welding of metal.
Today there are plenty of steel brands, but people, through trial and error, figured out that the best material is spring-type metals.
Car springs
This grade of steel contains impurities of nickel, chromium and phosphorus. This gives it excellent strength characteristics. And its most important property is its springiness, which will prevent the sword from breaking when struck. For forging, I chose a strip from a truck spring of 65G steel grade.
What is needed for forging
A set for forging a sword is practically no different from making knives by hand. The most important detail is the forge. It must be elongated, at least a meter in length. A real blacksmith must have such an item in stock. Or alternatively, it can be made by hand or an existing one can be extended. The following tools will be required:
- anvil;
- two hammers, large and small;
- pliers for holding the workpiece;
- extended horn;
- Angle grinder for removing jags and smoothing corners.
Be sure to make a sketch or drawing of the future sword, indicate the dimensions, it will be easier to work. What follows is a physically complex process. Forging is not just chiseling a workpiece; it must be done wisely, but more on that later.
Professional drawing of a sword.
How to forge a sword
The process of forging a sword is quite labor-intensive:
- The spring plate turned out to be too wide; part of it had to be cut off along its entire length with a cutting wheel using an angle grinder.
- At the initial stage, the shank is interrupted. To do this, heat one end of the workpiece until red hot and form a step. This section must be forged into a cone.
- Next we take on the body of the blade. The slopes from the middle to the edges are forged by blows at a certain angle, from the edges to the center of the strip.
- The valleys are made using a special template.
For precise forging, pressing the elbow against the blacksmith’s body will help; with this technique there will be a minimum of flaws.
Forging a sword on an anvil
Manufacturing of guards, handles and hardening of the product
Pommel
After rough work, the blade must be cleaned and hardened. After heating the workpiece until it glows red, it is placed in water. This procedure is done three times. The next step is to relieve the stress in the steel. To do this, the blade is heated to 200 degrees and left to cool in the fresh air.
Next, prepare the remaining parts of the sword:
- A blank is cut out of a metal plate and processed using sandpaper. This will be the guard. The recesses of the blade's shoulders are adjusted very precisely to prevent displacement during operation;
- a metal ball is being prepared for the pommel. A hole is drilled in it and a thread is cut;
- the handle is made of wood. I rivet two well-fitted plates to the shank with copper pegs;
- the ball is screwed onto the tip of the shank.
Then the product will undergo final grinding and sharpening. Not every average person can make a sword; this requires experience, at least in working with knives.
Finial (apple):
Pommel - this element of the sword is designed to balance it, only a balanced sword is suitable for skillful fencing with it; in different schools of weaponry, the balance may be different. However, it is considered a generally accepted way to measure the balance of a sword - this is measured using the fingers of the hand, as a rule, a good balance for a European blade should be four fingers from the sword guard.
How to establish balance using your fingers?
We take the blade of the sword and look at its balance, for this we place the blade on one finger of the hand, removing or bringing the finger closer to the guard, we find the point when neither side outweighs the other. This is where the balance will be.
In addition, the pommel serves to rest the hand, this is especially important because during a fight the sword begins to slide until the hand rests on the pommel.
Reenactors
The movement of role-players and re-enactors is popular in our world. Some use plots from fantasy books for their games, others reconstruct battles from our history. If the former can get away with not playing a very active role and not participating in mass battles, then the latter are better off having fencing skills, good physical fitness and dexterity, and also being able to fight in formation.
It’s always easier to buy a sword in a special workshop; it’s not difficult to find one among roleplayers, but if you decide to make a wooden sword with your own hands, then be patient.
Blade
The blade has many interpretations united by a common message. A blade is: 1) the cutting part of a bladed weapon or knife (literary dictionary, Ushakov); 2) the cutting and piercing part of edged weapons (literary dictionary, Ozhegov); 3) strip, generally the steel part of a cold, sharp weapon (except for a bayonet) and a knife (literary dictionary, Dahl).
And yet, what concept should be the key? It would be correct to turn to the legal concept of the word blade - an extended metal warhead of a bladed weapon with an edge, with an edge and one or two blades, or with two blades, which is part of a strip, this definition is enshrined in GOST R 51215 98. This is the generally accepted understanding of the word - blade .
However, we will also derive a specific concept of blade, associated with the reality of the Zbroevy falvarak workshop, the blade of the ZF workshop is an extended metal warhead of the product, with an edge, with an edge and one or two blades, or with two blades, which is part of a strip, externally and structurally similar to edged weapons.
The main feature: the master craftsmen of the Polar Division do not make edged weapons, but make mass-sized copies).
1) Let's take a closer look at the individual parts of the hilt:
Where can I find the drawing of Katsuragikiri Nagamasa?
To get the blueprint for Nagamasa's Katsuragikiri, you will need to collect 3 keys to "something" in Mikage's forge. After that, open the weapon room in Tatarasuna and find the Luxury Chest.
Get 3 keys to Mikage's forge
These 3 keys will be used to open the locked gate behind which lies the blueprint. Here are all 3 key places:
Keys to the place in Mikage's forge
The key to something №1
Number 1 on the map can be obtained from a common chest at the bottom of the Broken Tower, protected by an electrical barrier. Use the Electrogranum from the Thunder Sakura Branch to get through the barrier.
Keys inside the bottom of a broken tower protected by a barrier
The key to something #2
Number 2 on the map, a chest with a key can be found on the roof of a large house.
Key inside a chest on the roof of a large house
Key to something #3
Number 3 on the map, the chest can be found among the crates and ropes in front of the broken bridge, right under the cliff where you just jumped.
Key in front of a broken bridge
Head to the locked gate (weapon room)
Head to the locked gate by following the map below:
Weapon room location map
Open the gate with 3 keys
Open the locked gate using the 3 "something" keys you just received.
Open the gate with 3 keys
Defeat your enemies and claim your rewards
There are 3 mechanical enemies inside, fight them and collect your rewards.
The blueprint for Nagamasa's Katsuragiri can be found in the Luxury Chest. You can also find 1 Electrocool inside this cave.
Drawing of Katsuragikiri Nagamasa
Paper crafts are a useful and exciting hobby
Paper crafts are a useful hobby for adults and children - it's fun and interesting.
A sword can be made from paper in different ways, using the origami technique, or simply cutting it out of thick cardboard using a stencil, and then decorating your resulting craft, the main desire is all in your hands. And in order to make your product more realistic, you can wrap the sword with foil. This way it will look more like the real thing. In our article we will look at several ways to make a sword out of paper. We have selected some interesting instructions and videos for you.