Top 3 trays for hardware
BLOCKER BR3753 24.5x17x12.5 cm
High-quality set for storing hardware. The set includes 6 pieces, which will simplify operation. There are also three comfort bars that enhance comfort. Sold in two colors - orange and gray.
The average price is 545 rubles.
BLOCKER BR3753 24.5x17x12.5 cm
Advantages:
- Low cost;
- Durability;
- Durable material.
Flaws:
Stels 90801 24.5x17x12.5 cm
An inexpensive product that will allow you to package all available fasteners. Made from hard plastic that can withstand high loads. The dimensions of the device are standard, but the cost is 160 rubles.
Stels 90801 24.5x17x12.5 cm
Advantages:
- Strength;
- Convenience;
- Bright color.
Flaws:
Alternative M450 25x16x13 cm
The cheapest model, which has good capacity and quality. The product is sold at an affordable price. Therefore, anyone can buy it.
The average cost is 60 rubles.
Alternative M450 25x16x13 cm
Advantages:
- Low price;
- Strength;
- Capacity;
- Reliability.
Flaws:
Not obvious aspects of choice
In the selection process, first of all, look at the material from which the case is made.
Plastic tool boxes are lightweight and easy to use and repair. Despite all this, they do not withstand mechanical stress and loads very well.
Stronger and more durable metal tool boxes made from aluminum, its alloys or steel. With greater weight, they are more durable, but require periodic maintenance: restoration of paintwork, cleaning of rust and traces of corrosion. Among other things, metal boxes are more expensive.
Homemade structures most often consist of a wooden tool box. Main disadvantages: bulky, heavy weight. At the same time, wooden structures have a specific advantage, namely: wood stores metal tools well, since it absorbs moisture from the surrounding space.
Keep practicality in mind: the drawer should provide easy access to all tools. It must have a fairly reliable case that protects the contents from moisture, dust and external influences.
It’s not always convenient when there are too many compartments and drawers inside: you can get confused in them and spend a long time looking for what you need.
Pay attention to the hinges and lock - as practice shows, these are the elements that most often break.
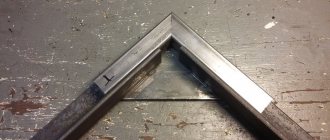
Cabinet assembly
- Sliding doors are fastened using long piano hinges. For internal sashes, two cuts of 760 mm are used, for external sashes - 600 mm each.
- The long and short hinges inside the body are centered, as shown in the diagram “Detailing the body” (side view). A gap of 3 mm is left at the top and bottom, and the edge of the hinge itself is moved outside the body by 3 mm.
- The hinges are screwed with screws or self-tapping screws through pre-drilled guide holes. The inner doors are installed first, and then the outer ones.
Transformation into a stool
From plywood and wooden blocks you can make a portable box for storing tools, which, when turned upside down, will turn into a simple stool or stand for performing work at heights. This universal design is made according to the following scheme.
The bars are cut according to the specified size. They will serve as legs and be located at an angle. To make the stool stable, the upper and lower ends are cut at an angle of 15 degrees.
Sheets of plywood are nailed to the legs, which will become the end walls. The recommended width is 360 mm, the height is selected in such a way as to completely hide the legs without protruding beyond their limits.
The side walls are cut out of plywood and occupy approximately half the width of the block. The edges of the rectangle are cut at an angle to exactly match the angle of the legs.
The cover is made rectangular and attached to the ends of the racks with self-tapping screws.
After the work is done, turn the resulting stool upside down, turning it into a deep box for storing tools. To make the structure convenient to carry, a wooden block is cut out, the length of which will correspond to the distance between the walls. Sharp corners are rounded off, the block is screwed with self-tapping screws and a comfortable handle is obtained, which additionally serves as a stiffening rib.
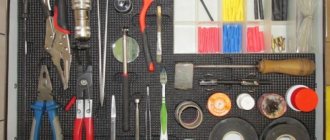
Types of organizers
Today, a huge number of organizers have been invented. Let's look at the most popular options:
- Portable box. An ordinary wooden box without a lid with a handle. It's easy and convenient to carry tools without a motor on a long handle: hammer, screwdrivers, awls, open-end wrenches and adjustable wrenches. But such an organizer will always be a mess, since it is impossible to somehow organize the workspace of such a box. An obvious advantage is the ease of manufacture. A more complex tool like an electric drill or a screwdriver cannot be stored in such an organizer.
- Drawer with departments. The same wooden box can be made with division of departments. In small sections it is easy to place various types of fasteners: bolts, screws, nuts, etc. Such an organizer can be either with a handle to make it easier to carry, or stationary. But most often the stationary version is performed. The organizer can be extended upward, then the drawer will take the form of a chest of drawers, with many compartments. You can also put power tools in such a place, although this is highly undesirable. The problem is that in order for such a box to support a heavy tool, you need to use thick-walled boards. Even thick plywood will no longer work, as it will begin to sag under the weight of the tools. Therefore, it is better to use a box on a frame to store the entire set of tools.
- Box on a frame with wheels. The main stiffening ribs of such an organizer are made of metal corners. And as shelves, boards are assembled or thick plywood is used. This approach makes the box extremely stable. As a rule, wheels are welded to it for convenient movement in space. A reel with an extension cord can be attached to the box on wheels to make working with a power tool easier.
- Fabric organizer. A fabric organizer is a good option for an apartment. A basic set of open-end wrenches, screwdrivers, pliers and a hammer can easily fit here. The organizer itself is a piece of fabric with pockets, which is rolled up after use and put away in the closet. In addition to the small number of compartments, the disadvantage of such an organizer is its short service life. The fabric quickly becomes dirty and begins to tear. Even purchased products do not have a long service life; homemade devices, as a rule, “live” even less.
- Unusual models. It would be surprising if none of the masters began to invent all sorts of unusual models. Depending on the available materials, the place where the toolbox will be located and the composition of these tools, everyone can choose the basic version of the organizer and change it to suit themselves.
Fabric organizer
Making boxes
A set of small drawers for holding fasteners and other woodworking odds and ends is an optional but very useful option in a carpenter's closet. By making and gluing together a series of simple wooden pieces, you can make the inside of your closet look neater and more organized. To speed up the work process, parts are cut out serially, placing the workpieces in a small stack.
The project cannot be considered complete until the method of hanging the cabinet is determined. Our article on choosing hanging accessories will help you do this simply and without errors.
Design of modern boxes
When talking about the design of such boxes, we do not mean their shape, but the method of opening and the presence of auxiliary sections. The following designs are considered standard today:
- Stationary . This concept is relative, since such a box is not usually carried to the place where repair work is carried out. It can only be carefully moved within the same workshop. The box does not provide mounts for tools, but they can be arranged in special compartments, which are divided into certain groups.
- Portable . This box holds a large number of tools, which are most often intended for a specific type of activity. The portable box must be equipped with a strong lock so that it does not accidentally open during transportation. While moving, the tools should not dangle; each device has its own niche with fastening.
- Specialized . Unlike the first two options, this box is designed for a specific group of tools. For example: for wrenches, drills, pliers. In addition to the basic tools, such boxes usually also contain maintenance material.
Manufacturing of internal and external doors
Internal and external doors have the same design and differ only in length: the height of the internal doors is 620 mm, the external doors are 780 mm.
- The sides of the internal (J) and external (I) doors are cut according to the dimensions indicated in the drawing.
All doors must fit into the body with a gap of 3 mm at the top and bottom (see the diagram “Detailing the body”, side view). This is taken into account in the drawing, but if you are making a cabinet with a deviation from the proposed dimensions, do not forget to check this point before assembling the doors. Parts J and I should fit into the body with a 6mm gap, resulting in a 3mm clearance at the top and bottom.
- The lids and bottoms of the doors (K) are cut according to the specified dimensions in the amount of 8 pieces.
- On the inner surface of the sidewalls J and I, a quarter 20 mm wide and 10 mm deep is milled at the top and bottom.
- On the side walls (J and I), covers (K) and bottom (K), grooves 6 mm wide and 10 mm deep are selected in which panels L and M will be fixed.
- According to the dimensions, panels L and M are cut from the diagram from 6 mm hardboard - 4 pieces for the inner door and 4 pieces for the outer door.
- After carrying out the “dry” assembly and checking with a square that all internal angles correspond to 90 degrees, they begin the final assembly of the doors using screws or self-tapping screws. The fasteners are screwed into pre-drilled holes.
Trolleys
Ideal for those who need to frequently transport tools. The presence of a wheel system greatly facilitates the transportation process. These models are spacious and durable. It is worth considering the most popular today.
STANLEY STST1-80151 Essential Rolling Workshop
An excellent product from an American manufacturer, which is a transforming box with a wheel system. Three modules are used here: a case at the bottom, a tray in the center and a box with a handle, which is used to transport the product. All elements can be used separately from each other. They are disassembled and, if necessary, connected using special latches. The top block contains an organizer for small tools. Thus, the master can come to the place and decompose. The capacity is high, so installers often use this cart.
STANLEY STST1-80151 Essential Rolling Workshop
Characteristics:
- weight 3 kg;
- several products in one;
- there is a wheel system;
- size 285×623 mm.
pros
- large capacity;
- high functionality;
- convenient to transport;
- there is a metal lock;
- easy to assemble and disassemble.
Minuses
- high price;
- can only be rolled on a flat floor;
- Requires a lot of storage space.
Box STANLEY STST1-80151 Essential Rolling Workshop
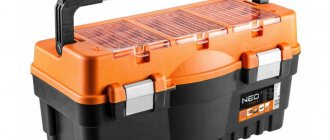
NEO 84-116
A product from a Polish manufacturer, which is popular due to its low price and ease of transportation. There is a telescopic handle. The manufacturer has provided metal latches on which you can hang a lock to ensure the safety of the contents. Users note the tightness of the box. The plastic is thick and durable, and there is a built-in organizer.
NEO 84-116
Characteristics:
- weight 4.5 kg;
- size 710x400x360 mm;
- metal locks;
- made in Poland.
pros
- convenient telescopic handle;
- durable plastic;
- spacious box;
- There is an organizer and a tray.
Minuses
weak wheels.
These are the most popular carts that are used to transport tools. You can put fairly large items in them. But do not overload the boxes, otherwise the wheels will quickly break.
Box NEO 84-116
Stages of work
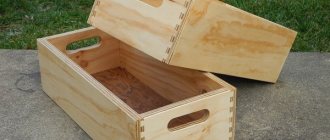
Sequence of operations for making a simple box for plumbing tools from plywood with your own hands. The bottom, walls and other parts are cut out using a pre-prepared template, the contours of which are transferred to a plywood sheet with a marker or a special pencil.
To remove burrs, the edges of the holes are ground with abrasive paper. Then the tray parts are glued together and fixed using tenon joints. This will give the structure strength.The manufactured tray is glued to the bottom between the parts that have holes for the handle, and is additionally secured with small nails.
Using glue, the bottom and sides are assembled in the shape of rectangles; the strength must be further increased with nails. Then you should insert the handle and secure it with nails or any other way.
A metal rod with threads at the ends is secured with nuts and washers. It should be taken into account that the hardening time of the glue directly depends on its brand and the temperature at which gluing occurs.
Internal connections are strengthened by gluing bars of rectangular or triangular cross-section at the joints between the walls, sides and bottom. The bars are additionally secured with screws or nails.