Angle clamp device for welding
A clamp is without a doubt a useful tool that is often used in various areas of life. Its main task is to provide high-quality fixation of elements on the working surface or any other supporting part. According to the drawing, such a tool must have at least two elements in its design.
The dimensions of the self-made unit depend on the needs of the user. A professional craftsman always has a small, long and large clamp in his arsenal. This small arsenal allows you to work with workpieces that can be of different diameters and lengths.
To make the jaw move, a lever or screw is provided. They make it possible to increase the force applied during compression and prevent reverse movement of the element when processing the workpiece. From the outside, the clamp looks very much like a vice.
The tool also found its use among carpenters. There it is used to fix two elements, between which an adhesive composition is applied. It does not always happen that the necessary tool is at hand at the right time. If you have a drawing and detailed instructions, you can make the tool yourself. It is better to make it from wood or metal. Sometimes an old jack or brake pads are used.
Metal
If we look at the design of the unit in detail, it always contains elements such as:
- lever arm;
- frame;
- clamp;
- movable sponge.
The advantage of such a unit is its durability, since the metal retains its properties for a long time. Using the tool, you can create a tight screed without worrying about the strength of the unit. Compared to a regular vice, such a hand-made clamp does not weigh much, so it is easy to carry with you.
Metal structural elements provide maximum grip on the workpiece. Thanks to this, there can be no talk of any rotation at the time of processing. The master is confident that even when working with an electric tool, the workpiece will not fall out or slip. By making a structure according to modern drawings, it is possible to obtain a universal tool that can be used with parts made of different materials, including metal, plastic, and wood.
The shape of the workpiece can be either flat or three-dimensional; this does not in any way affect the quality of fixation. The length can vary from several to tens of centimeters. Each type of tool has its own characteristics. For example, screw clamps are the most common. They have become in demand due to their simplicity of design and low manufacturing cost.
Such units have the appearance of a metal bracket. The support part is located on one side, and the threaded eye is on the other. The adjusting screw is located in the second part.
A sponge is installed in the part of the screw, called the working part. The handle is installed from the outside. It is most effective to use the tool when processing large and heavy parts that do not have a complex shape. If we talk about versatility, then in the work of the master, quick-clamping F-shaped units are such. The supporting part of such a clamp is fixed to a long rod. The working element with the sponge slides over it.
The workpiece is fixed using an auxiliary screw. On some models, you can find a stepper-type push mechanism instead. The pipe version of the tool also helps to ensure high-quality fixation of large workpieces.
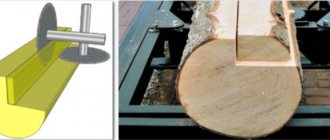
The design of such a unit contains two main parts: a sponge and a support platform with a clamp. When you need to combine workpieces, and an angle of 90 degrees must be maintained, you should use an angle tool. It has two supporting and working surfaces, thanks to which you can evenly glue two parts perpendicular to each other.
It is difficult to find a ready-made tool in the store that allows you to fasten elements together at an acute or obtuse angle. But such a unit can be manufactured if desired. There is another type of clamp - tape. Its design has one flexible element, that is, a rod along which several jaws move.
A clamp with two hinged parts and a spacer spring is called a clamp. This tool is used infrequently because the quality of the joint is not reliable. However, there is one significant advantage - the workpiece can be quickly installed and removed, which significantly saves time.
If we talk about making tools at home, then most often they use drawings for the first three types described. With their help you can solve most everyday problems. At the same time, the tool is not too demanding on the material.
A clamp is a kind of corner vice of universal use, used to fix metal workpieces before welding in a convenient position at the required angle. Depending on the method of fastening the part, devices may be used that differ in design, shape and size.
Many models of corner clamps are commercially produced, designed to perform specific jobs. For example, several devices can be used simultaneously to install a pipeline, installing the elements to be welded at angles of 15, 30, 45 or 90 degrees. Without using a clamp, it is difficult to accurately install parts, especially for work that requires high precision.
The design of corner clamps for welding has the following features:
- The jaws of the clamping elements are thick, which makes it possible to increase the rigidity of the workpiece connection and eliminate bending of the welding seam.
- The additional use of clamping screws prevents the threaded section of the corner clamp from soldering when molten metal splashes. This helps to increase the service life of welding equipment.
- When performing electrode welding at a certain angle, the use of a clamp allows you to expand the working area.
The design of the clamp consists of two elements:
- a moving part with a clamping screw designed to regulate the degree of pressing of the workpieces;
- frames
Thanks to the presence of a movable mechanism, corner clamps allow you to reliably fix elements of various sizes, geometric shapes, made of any metal. For ease of work, it is possible to use several corner vices at once. Most commercially produced clamps are designed for use in welding products up to 390 mm thick.
The transmission of force to the clamping planes, and from them to the fixed parts, is carried out using T-shaped handles. Cast iron staples are able to withstand any temperatures generated during welding.
When choosing a corner clamp, you should first of all focus on the type of work to be done:
- G-shaped fixtures are more suitable for fastening workpieces of small thickness;
- F-clamps, equipped with an adjustable clamping mechanism, are used for processing workpieces of impressive size.
READ MORE: Wall moldings: 40 photos of the best room decor ideas
Angle quick-release clamps can be installed in garages, small workshops and workshops on work tables and workbenches with a flat surface.
Once you have assembled your clamp, turn it over and start welding from the reverse side. I cooked one side first and let it cool. The side must be done completely at once so that the parts do not move relative to each other.
After welding one side is completed, turn the clamp over and check the angle again. Then we grab the other side. After this, we check the angle again. It is very important to allow the metal to cool between welding the two sides. Then you can compensate for the angle error if the metal moves during welding. Do not remove the C-clamps until the corner clamp is completed.
Although I have made such fixtures before, when making this particular one I discovered an angle error when checking with a square after welding one side. I simply cut the clamps and re-attached the steel pieces with C-clamps. After this, the angle turned out to be straight, as it should be.
After completing the welding, we check the correctness of the right angle with different squares. Sometimes it happens that the square has moved and its angle is no longer straight. Therefore, it is better to play it safe and check the right angle with different squares. Please note in the photo you can see that I cut off the protruding outer corners of the bottom crossbar. After welding, I simply sanded the entire surface with a flap wheel.
If the angle did not turn out exactly 90° or she was led after falling from the workbench, it can be corrected. First you need to find dents in the metal. You can simply put a clamp in any dent using a welding machine. Then place a straight piece of metal into the clamp and check the angle with a square. Level the clamp with a file until the angle is leveled to 90°.
A homemade corner clamp can be used both outside and inside. This is why all welds are made from the bottom side. The photo shows examples of use; if I were going to weld these pipes, I would additionally secure them with ordinary clamps. The last photo shows an example of adding a vertical element. This also explains why the gap between the arms should not be too large - otherwise the vertical pipe would slip through the hole.
Be careful when welding pipes externally - the internal bending radius of the angle may interfere with the clamping of the pipe. Be sure to check this point before you start welding pipes.
I tell you how to make something with step-by-step photos and video instructions.
Types of fixtures
There are several varieties of these devices that can provide fixation of workpieces.
Conventionally, they can be divided into three groups:
- Conventional - secure the workpiece on the work table.
- Angular – capable of holding two workpieces at a certain angle relative to each other.
- Volumetric – have a complex design that allows you to simultaneously fix three elements at once.
Fixed parts are much easier to connect with each other, they are easy to work with, and the result is of high quality.
A regular clamp is C-shaped. It is equipped with a special bracket and a threaded clamp. These devices come in plastic, metal, and wood. Angle clamps are the most common type, since they are used to perform a large number of jobs.
Work time is reduced, and there is no need to attract additional workers to help.
Design Variations
There are a huge number of clamps that differ from each other in shape, size, and the task they face. For example, a clamp for working with pipes is designed for welding the latter at various angles, for example, 90 degrees. Without the use of clamps, maintaining the exact angle when working will be difficult. Angle clamps are produced in different types, based on the width of the pipes being fastened and the angle at which these pipes will be welded.
Angle clamps differ in the following characteristics:
- thickness of sponges. The thicker the clamping jaws, the more securely the pipes are clamped and the welding seam does not bend or break.
- material for making clamping screws. During welding, molten metal can be thrown in all directions, and clamping screws are no exception. If molten metal gets on the screw threads, soldering may occur, which will render the thread unusable. To avoid this, copper-plated screws are made. Copper does not allow splashes to harden on the surface of the screw, thereby maintaining its performance.
- working surface. A clamp can increase the working area when working with the electrode at a certain angle.
The angle vise for pipe welding consists of a moving part and a main part. To regulate the degree of compression, the moving part is equipped with a screw. With its help you can adjust the distance between the clamping jaws and the part. The mobility of the structure ensures work with parts of various shapes and cross-sections.
When choosing a clamp, you should pay attention to the type of work being performed. For example, G - clamps are used when working with steel parts of small thickness. To work with parts of large thickness, F - clamps should be used.
Clamps are produced not only for welding, they are used in carpentry. Similar devices are also produced for plumbing work. A convenient corner clamp for welding work is an indispensable tool that sometimes you simply cannot do without.
Clamps vary in shape and size and can be designed for a specific size of workpiece or used as a vice for welding with reliable fixation of parts.
There are also clamps designed for welding pipelines. These are structures with hinges and screws that allow you to clamp a pipe of a certain diameter.
Clamps may use a cam workpiece lock or a screw to help adjust the distance between clamps. There should be several types and sizes of clamps on the welding table, depending on the operations being performed and the size of the parts. The simplest and most reliable homemade design of a welding clamp is an angle device, which is quite simple to make.
At the end of the screw, depending on the imagination of the craftsman, you can make a steering wheel for clamping parts. But the simplest and most common design of a clamp is a small jumper made of a square pipe or rod, welded or fixed in other ways.
To fix small parts during welding, it is enough to make a simple clamp in the shape of the English letter G. To do this, you can make the main frame with this configuration from the profile using cuts and bends. A nut and screw are welded on the top part, and the simplest clamp is ready.
Despite its simplicity, it will reliably fix small parts and help with welding. It is better to take a screw with a movable heel on one edge in order to securely fix the workpieces without moving them when tightening.
The most common is a clamp with the ability to adjust depending on the size of the workpiece. This device requires installation on a hard surface of a welding workbench or on a metal workbench of a craftsman.
Homemade clamps are no different in functionality from those manufactured in production. They can be used for gluing boards, assembling furniture, and gluing panels. Various tools are used for carpentry, including clamping, F-shaped, and table clamps. Depending on the purpose, it is worth choosing the right unit, taking into account its design features.
READ MORE: Yew berry - photo, description and features of growing a rare plant
If you plan to fix large workpieces, then a pipe structure would be the best option. Its advantage is that the length can be easily changed. However, such a unit has a complex operating mechanism. In carpentry, an angular version of the tool is often used. With its help, you can easily bring wooden blocks together at right angles. Sometimes such clamps are used for laminate flooring. Woodworkers also use band tools.
In appearance, spring units resemble a trailer. With this type of clamp, the force is generated by an installed spring. It is very easy to work with such a tool without using your second hand. The unit is used when high compression is not required, and on the contrary, this condition must be met, otherwise the workpiece may suffer, since it was made of a fragile material.
It is very important for the guide bar how much compression is applied. Poorly made and inexpensive instruments have weak fixation. End models have found their application in the furniture industry. There they are used when working with overlays on countertops. There is another budget version of the clamp - G-shaped.
DIY process
There are several options for making these devices yourself.
Corner for furniture assembly
Those who had to assemble furniture themselves often quarreled during assembly due to the inconvenience of connecting large parts to each other. It is especially difficult to do this if there is no assistant. Such an assistant can be a simple furniture vice, or rather, several simple clamping devices and a durable rectangular table or carpentry workbench, the manufacture of which can be learned from this article.
Grooves are installed on the table to secure parts of the assembled furniture, and carpentry clamps serve as clamps. There are many different options for how to make such devices.
Carpenter's clamp
The simplest screw clamp is made according to the principle of a caliper. To do this you will need several blocks of durable wood and a small sheet of plywood. To fix such a device in a certain position, a screw device with a locking bar is used on the rail of this simple tool.
Self-clamping clamps are often used to press the workpiece to the table. Their operating principle is very simple. On a workbench, such a device is fixed using a screw pin, and the clamping is done with a special lever with a rounded end at the clamping end.
Such tools are very convenient to use for processing a large number of parts of the same shape. For example, when milling or grinding, as well as when drilling and sawing.
https://youtube.com/watch?v=ayx-NSjjB8M
For welding work
Today, a welding machine in the garage is no longer a rarity, and sometimes even a necessity. For welding work, clamping parts at a certain angle is sometimes necessary, like air. Purchased tools often fail due to the dishonesty of their manufacturers, so it is better to make an angle clamp for welding yourself.
Having found a tedious drawing or made it yourself, we prepare the necessary material and tools. After this, we proceed to production according to a simple scheme:
Making the base. We weld steel plates and a corner of the same thickness according to the drawings of the selected option. The main task is to carefully measure the 90-degree angle to secure the parts to be welded. The angle may be different if you are making a tool for a specific purpose. Manufacturing of a clamping device. To do this, you can use large diameter nuts. We secure them with a bolt so that they can be changed if the threads break. You can find screw devices from broken vices or workbenches
Again, it is important to ensure that the clamping jaws are at a right angle or the angle for which our device is designed. Product assembly and fastening. When the base and clamp are ready, they are connected depending on the design of the product: by welding or using bolts and nuts
Here you can consider the option of attaching the device to a fixed surface. To do this, you can drill several holes in the base for such fastening.
Making any option requires a lot of effort and effort. All this will pay off handsomely when the next welding or connection of two slats at right angles goes quickly and smoothly. After all, you will have a reliable assistant who is always nearby and ready to properly serve the one who made it with his own hands.
Angle clamp device for welding
Welding devices will help secure individual parts or the entire structure in the required position.
The main task of such mechanisms is to correctly install the parts in the desired position.
The first type is used to fix the workpiece on the main surface. The second option allows you to install parts at a certain angle. Prisms position the pipes in the desired position in relation to existing parts of the structure.
The described mechanisms allow you to reliably install pipes and fix their position from accidental displacement.
- clamps for welding work;
- alligator clips;
- screeds;
- spacers
The clamp is a universal mechanism, widely used when performing various works with metal parts. They are among the most important devices, without which almost no work can be done.
The clamp can have different shapes and designs. For example, there are quick-release clamps with a cam mechanism.
Clamps are often more convenient for working with pipes. They are more suitable for such use. Their use is very simple, the part is secured by changing the jaw with the screw of the clamping handle.
It is very convenient to assemble the entire structure using a welding jig. It allows for high welding precision. This device is especially often used in professional workshops and production.
To securely fasten parts of the product, the conductors are equipped with crocodiles of 500 or 200 mm, depending on the work being performed. Of course, these parameters may be different. At home, you can limit yourself to hand-made spot welding pliers.
They include several circuit elements, which include:
- welding machine;
- cables;
- clamping pliers for the product;
- burner;
- product.
When using resistance welding pliers, such as fillet welding, grounding is also very important as the work is carried out with very high currents.
Preparation for welding work often takes much more time than the actual process of connecting parts of the structure. To ensure high quality, parts must be reliably and correctly aligned for welding in accordance with the drawings.
For these purposes, the following are widely used: welding clamps, welding pliers, resistance welding pliers, welding clamps, etc. Correct installation of parts of the structure can be done not only using mechanisms, but also using spot welding.
How to use it correctly
The corner clamp greatly simplifies the process of joining two workpieces. This device simultaneously supports them in the desired position and fixes them.
When assembling furniture, it is difficult to get by with just one clamp, so you will have to buy several tools, and this will cost a decent amount.
Using the clamp is not difficult, just follow the basic rules:
- No deviations are allowed; the angle of the tool must be strictly straight.
- It is imperative to ensure that the working part of the vice is completely adjacent to the surface.
- To clamp the workpieces, you need to turn the heel handle, which fixes them. Turning in the opposite direction releases the parts.
- When the workpieces are fixed, they can be drilled and fasteners installed without any problems.
- To carry out some work, for example, machining parts, you will need to additionally secure the clamp to the workbench. A vice is used for this.
- It is very important to monitor the pressure force so as not to damage the top layer of the furniture.
Saving your home budget is not the only advantage of a homemade tool.
In general, using clamps does not require any special skills. This tool is very easy to use.
The metal type of the tool has good fixation rigidity and has a long service life.
Devices for secondary protection during argon arc welding
Factory-produced welding clamps are quite expensive, so it makes sense to make a corner clamp with your own hands. Such a task cannot be called difficult, since for assembly you can use metal elements that have been stored in a garage or shed for years, which would be a pity to throw away. Due to the simplicity of the design, the use of complex tools is not required to make an angle clamp.
Regardless of the design, the main purpose of the devices is to rigidly clamp workpieces for their subsequent welding or surfacing. Corner clamps made of plywood allow you to connect both metal parts and wood blanks.
To make your own clamp you will need the following materials:
- a pair of hardwood blocks 25 mm thick;
- a sheet of plywood with a thickness of at least 12 mm;
- fastening elements: studs, self-tapping screws;
- hacksaw or jigsaw;
- drill.
A square with sides measuring 250 or 300 mm is cut out of a plywood sheet, to which bars are attached at right angles.
The angle should be set as accurately as possible, since the correct fastening of the workpieces relative to each other will depend on it in the future.
First, the bars should be glued, wait until the glue sets, and countersink with a drill. Self-tapping screws or other fasteners are screwed into the resulting holes. From the center of the pads it is necessary to draw perpendicular lines along which the screw studs will move.
At a distance of 20 mm from the corners, thrust bars are fixed, leaving a small gap between them. Its size should slightly exceed the maximum width of the workpieces to be fixed. It is more convenient to screw in the studs immediately, before attaching the thrust pads.
It is also necessary to prepare movable bars that connect to the pin. When screwed in, its part will move towards the corner block.
When making a corner clamp from a massive material, such as chipboard, a thicker material should be selected for the bars.
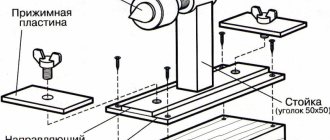
First of all, you need to make a drawing or sketch of the corner clamp and decide on the main dimensions.
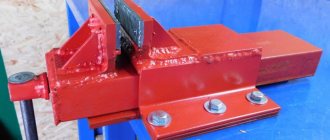
To make the base you will need sheet material 8–10 mm thick. For fastening, you can use a corner of the appropriate size. It is convenient to connect the elements using electric welding.
- For a screw clamping mechanism, two nuts are welded together. The bracket with a threaded hole in the central part is made with a height of 30–40 mm. For fastening, it is recommended to use a bolted connection, which can be easily replaced if the thread breaks.
- The mutual placement of the pressing jaws requires special attention. It is necessary to ideally set the right angle, since when performing welding work it will be impossible to achieve acceptable quality. First, one corner is welded to the clamp, and another is placed on it. The resulting structure is tightly compressed and welded to the bracket.
- Guides are attached to the side planes of the clamp to ensure movement of the base. A groove measuring 8–10 mm is cut along the bisector line of the clamping device.
- A bolt is screwed into the upper base of the clamp. Its thread should not reach the head, which will ensure free movement of the bases relative to each other.
Do you use a clamp at home or at work? Did you make it yourself or buy it ready-made at a hardware store? What difficulties and features of welding did you encounter when using the device? Please share your experience in the comments.
To obtain a high-quality seam, product parts must be correctly positioned in space relative to each other. To perform this action, special devices of various types are used for assembly and welding.
The first ones are used for installing and securing parts of a structure using tacks, welding pliers, welding clamps, and other simple mechanical devices.
Welding fixtures are used to connect pre-assembled products fixed in a certain position. These also include mass clamping. The third option allows you to combine the two operations listed above.
It is worth noting that the assembly mechanisms must allow free movement of parts of the structure. They will heat up during operation and their size may change.
If the parts are placed close to each other without the possibility of movement, then deformations may occur due to thermal effects.
READ MORE: Wall decor in the kitchen 74 photos design features how to decorate an empty wall near the table with your own hands How to decorate them using drawings
When working with large parts with low rigidity, tools should provide the ability to connect only the edges of the parts, and not the entire structure.
When planning welding work, it is necessary to provide in advance the possibility of access to the joints. If parts are located at right angles, corner clamps should be used. If possible, you can spot weld parts of the structure.
Then it is enough to throw the ground terminals of the welding machine over the product and you can start working. Sometimes you can use a lot of the details themselves. Under their own weight, they can be quite reliably positioned in the required configuration.
However, this option is not always applicable, so it is always better to have welding pliers on hand.
Magnetic clamps are classified as installation and fastening mechanisms. This means that they allow you to correctly position the parts and secure them. This operation is carried out using strong magnetic elements.
What advantages does this welding device provide? Let's figure it out.
The main advantages include:
- the ability to quickly connect parts;
- installation of parts at different angles using a magnetic angle for welding;
- significant reduction in time for preparatory work;
- small dimensions;
- the presence of a magnetic field activator in some models;
- possibility of quick and easy cleaning of magnets.
The main disadvantage of such devices is the limitation of their use depending on the material. Non-magnetic metals, wood, etc. do not allow the use of magnets.
On the other hand, magnetic welding fixtures allow you to fasten parts at any angle to each other, and they are more versatile than, for example, clamps.
In addition, on the Internet you can find a large number of reviews devoted to the manufacture of homemade devices for welding work. For example, you can make your own magnetic square for welding with your own hands or a magnetic mass for welding.
If you find everything you need and study the drawing in detail, you can make a good tool at home. A do-it-yourself metal clamp is a unit that is reliable. In this regard, it will be significantly inferior to a wooden unit. For manufacturing, you will need not only material, but also welding equipment, as well as some tools used in plumbing.
Many craftsmen prefer to make a clamp from a channel, reinforcement, from a corner or from a hairpin. All these metal elements are perfect for this.
Made of metal
It is best to use a metal pipe. The result is a tubular structure. You can make a different type of tool.
Additionally, you will need three metal rings. Their internal diameter must coincide with the external diameter of the pipe. It is allowed to use a metal rod instead of a pipe in the design. A welding machine is used to create the tool.
The work algorithm is as follows.
- The support platforms are welded to two rings. They are made from a metal corner. It's better if it's steel.
- A nut is placed on the remaining ring, and it is welded to the end of a rod or pipe, depending on what is being used.
- A handle is installed on the head of the pancake bolt being used, and the bolt is screwed into the ring.
- A hole is made in the free end where the fixing pins will be installed.
If you have reinforcement on hand, you can use it to assemble the clamp. The process looks like this:
- at the first stage, the reinforcement will need to be cut;
- then the sliding part is made, a nut is installed, which is attached to the lever;
- at the third stage, prepare the screw and stand that will rotate;
- you will need to cut a thread in the rod, then make a shoulder;
- at the last stage they make a handle and a panel for the jaw.
Made of wood
You can also make your own clamp from wood. This tool is most convenient for working with wooden workpieces. This can be plywood, fiberboard or chipboard sheets, timber or boards, but they must be of small thickness. When making wooden tools using this technology, you should adhere to the following sequence.
- First, a template is created on cardboard for future wooden blanks.
- Templates are transferred to wood in accordance with the selected scale.
- It is better not to use boards made from pine. The wood must be hard, then the unit will last a long time.
- Each part of the future clamp is cut out using a jigsaw.
- To ensure a clear shape, the edges are corrected with a file.
- The surface must be sanded.
- A hole for the bolt is first marked in the jaws, and then drilled. For an axial bolt, its length must be at least 1.5 times the diameter of the bolt.
- In the part that will play the role of a handle, a hole for the nut is also drilled.
- The nut is installed with glue. It can be epoxy or cyanoacrylic.
- Now you can assemble the tool. The axial bolt is fixed with adhesive. The rear hinge is installed with screws.
- The upper jaw is installed, then a washer is placed and the handle is placed.
A quick-release clamp can also be made from wood. The only drawback of this technology is that it takes more time, but it saves time when the work is completed. The process looks like this.
- First, the layout of the future parts is transferred to lumber, then the elements of the future clamp are cut out of the boards.
- A jigsaw is used to make slots for the axle plate. They are necessary in the movable sponge.
- The next step is to use a chisel. A groove is made for the cam lever.
- Holes are drilled to install the pins.
- The outer and inner surfaces must be treated first with a file to remove rough protrusions, and then with sandpaper.
- The axial plate is cut out of metal. It will also need to be properly sanded, and then drill holes where the pins need to be installed.
- At the last stage, the tool is assembled.
From the jack
Useful tips
The clamp, like any other tool, must lie in the designated place. You can use a shelf in your garage or a toolbox for this. If you don’t have time to make a tool, then you can use your own ingenuity. It is easy to fix the round workpiece on the rings that are pre-stuffed onto the frame. The simplest clamp looks like a pair of bars wrapped in tape. In such a tool you can clamp a pipe or metal rod.
To learn how to make quick-release clamps with your own hands, see the following video.
Terms of use
There are several different rules regarding the use of the device. Among the features we note the following:
Care must be taken to ensure that the surface is completely adjacent to the working part of the tool. When clamping, pay attention to the force applied. Too high an indicator causes damage to the surface layer. Do not forget that the corner clamp itself must also be securely fastened when machining the workpiece.
Otherwise, the processing becomes significantly more complicated.
The simplicity of the mechanism means that it is quite easy to use. You don't need to have any special skills.
Homemade and factory clamps for welding work
Even simple welding work requires a professional attitude. To obtain connections of the highest possible quality, in most cases it is necessary to use special devices. These include corner clamps for welding, which you can assemble from metal with your own hands.
Industrial samples of clamps of various shapes are produced, but at home it is quite possible to make a reliable and convenient clamp for welding work yourself.
Clamp material
Factory-made clamps are made of metal. Duralumin and various alloys based on it are used as raw materials. Such devices are manufactured according to the standard, so their technical characteristics and general dimensions are the same.
Using this tool does not require much effort from the user. It's easy and fast to work with.
Factory-made products cost a lot. If you need to carry out welding work or assemble furniture, one clamp is not enough. Buying several clamps will significantly impact your budget, so many craftsmen prefer to make them themselves.
In its classic form, the design looks like a simple and compact furniture clamp that allows you to fix composite structures at right angles.
The material of homemade clamps is selected taking into account the work to be performed. Clamps used to assemble furniture are usually made from wood. Only metal clamps are suitable for welding work. If you need to carry out a one-time operation, you can limit yourself to products made from sheet plywood.
Corner furniture clamps are used for furniture assembly. This is their main, general purpose.
The wood used to create wooden clamps is:
- larches;
- hornbeam;
- beech;
- birch trees
It has high strength characteristics, elastic properties and the ability to restore its original shape. The wood of these species is much harder than the material from which most furniture structures are made. To avoid damaging the workpieces, it is advisable to use protective heels. They come in wood, leather, and felt. It is allowed to use light-colored rubber so that there is no colored mark left on the surface.
Using a clamp, you can fix almost any part that fits the permissible dimensions of the tool.
Frame-shaped clamps are made of metal. For this purpose, profile pipes or steel angles are usually used. Metal parts must first be cleaned so that scratches do not appear on the workpieces during the assembly process. After this, the product is coated with paint. This is necessary to ensure that the metal is not damaged by corrosion and does not leave traces of rust on the surfaces with which it comes into contact. After this, wooden planks are fixed to the frame.
A homemade tool can be iron or wood.
DIY quick-release clamp
Every craftsman who makes products and parts made of metal or wood cannot do without homemade clamps. Previously, such a tool was produced in various modifications, from specialized to universal. The main task is to fix the workpiece for processing and joining operations. Let's look at how to make a quick-release clamp with your own hands in various variations.
Interesting articles:
- Clamps, what are they? Screw and other types What are they used for? How to choose a clamp for metal and pipes Forged furniture, plastic, metal and other types
- Cold welding for cast iron radiators mastix and something else
- Pipe clamps overview of models for pipes 34 on tubular legs 12 and other options How to choose
- What temperature can cold welding for metal withstand - high-temperature waterproof products, instructions for using glue, reviews