Do-it-yourself collet chuck: components and manufacturing procedure
The question of how to make a collet clamp with your own hands is relevant for those who are engaged in jewelry making, engraving or printed circuit board manufacturing and use such equipment. It is specialists in these categories who most often encounter breakage of the collet clamp, which can be replaced with a new production model or made with their own hands.
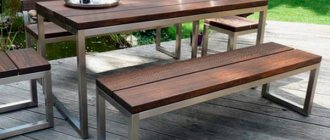
Homemade collet chuck turned on a lathe
There are several options for making a collet chuck with your own hands, each of which has certain nuances. However, no matter what method is used to make a homemade clamp, its price will compare favorably with the cost of a serial model.
Homemade collet coupling of the simplest design
The simplest collet, operating on the principle of a coupling, can be made of steel wire with a diameter of 1 mm. It should be borne in mind that the collet of the proposed design is not a universal clamping device and can only be used for drills of the same diameter. It is important that the transverse size of the drills used corresponds as closely as possible to the diameter of the output shaft of the drive motor. In addition, it is important to consider that such a collet can only be used when drilling materials with low viscosity.
Homemade wire clamp
To manufacture a collet coupling of the proposed design, the following consumables, fixtures and tools will be required:
- a cylindrical metal blank, the diameter of which corresponds to the diameters of the output shaft of the electric motor and drill;
- steel wire;
- electric soldering iron;
- soldering flux.
The process of manufacturing a collet chuck for a microdrill is carried out according to the following algorithm:
- The wire is wound onto a blank so that a rigid spring is formed. It is important that the spring coils are located as close to each other as possible.
- The finished spring is carefully soldered without removing it from the blank.
At one end, such a collet-coupling is put on the shaft of the drive motor, and the drill used is inserted into the hole in its free end.
The simplest collet clamp for a microdrill can be made with your own hands and in a different design. The design of such a cartridge, the manufacturing cost of which will be very low, consists of two halves fastened with a screw. On the inner surface of each of these halves, cylindrical grooves are machined, which, when tightening the screw, ensure fixation of both the clamp on the drive motor shaft and the tool used. If you decide to make such a collet clamp with your own hands, keep in mind: in order for it to work correctly, you must balance it before using it.
Homemade clamp based on a collet pencil
Production process
A part of the wall is cut out along the length of a 100 mm long pipe to install the motor. Instead of a saw, you can use a soldering iron.
A pipe plug is cut out of a piece of plywood and painted. Two rectangular holes are made in it for a voltmeter with a power button.
Wires are soldered to the button and voltmeter. The key and dial are inserted into the plywood and it is glued to the pipe.
A couple of holes are made in the pipe to improve cooling of the electric motor. The engine is connected to a voltmeter and a switch.
The engine is glued to the PVC body.
Electrical protection for batteries is soldered to the contacts of the battery box.
The circuits are connected one by one and connected to the terminals.
The contacts are sealed with a glue gun. The pipe is glued to the battery holder.
The mini-chuck is installed on the electric motor shaft through an adapter.
The batteries are installed into the space and the device is tested.
After a successful start, you can clamp a small drill attachment into the chuck and grind, cut, polish, and drill.
The device works properly with a flexible sleeve for the engraver, which will make the operation of the tool more convenient and expand its capabilities: access to compact cavities, performing delicate work. It will also protect the engine from dust entering through the ventilation holes.
To charge the batteries, they are removed and installed in the charger.
Then the fully usable drill is again ready for long-term use.
Jaw chuck for micro drills as an alternative to collet chucks
In order not to think about how to make a collet chuck or clamp with your own hands, you can purchase a jaw chuck to equip your microdrill. This clamp is an analogue of the jaw chucks used to complete conventional electric drills, and works on a similar principle. When the movable holder on the body of such a device rotates, the cams with which it is equipped move and thereby ensure reliable fixation of the tool.
Miniature jaw chuck ensures rigid fixation of working attachments
A wide variety of inexpensive jaw clamps are available today to equip micro drills. The vast majority of their models are fixed on the drive motor shaft using a threaded hole on the side of the mounting part, into which a screw is screwed. Rotation of the cam clamp cage, depending on the specific model, can be done either manually or using a special key, which is necessarily present in the factory kit of this device.
Purchasing a jaw chuck is a good opportunity for little money to equip your power tool with a universal clamping device that is easy to use and provides reliable fixation of working attachments. The main thing you should pay attention to when choosing is the material from which the main working elements of the clamp are made. If you choose a chuck whose jaws are made of durable high-carbon steel, it will last much longer and will provide precise fixation of the tool being used.
Materials used
To assemble the drill, the following components will be useful:
- 18650 batteries -
- Electric motor 480 series
- Adapter for jaw chuck JT0
- Mini drill chuck JT0
- Box for 18650 batteries -
- A pair of battery fuses
- Rocker switch
- Digital voltmeter
- Charger for 18650 batteries
- PVC pipe with a diameter of 35 mm.
Types and principles of operation of chucks
Collet chucks are used mainly when processing cold-rolled rods or other metal products that have an already machined surface.
Structurally, cartridges can be classified according to functionality:
- with a fixed mechanism;
- with retractable mechanism;
- with retractable mechanism.
Each design has its own characteristics. The feeding type is made in the form of a steel sleeve with 3 cuts forming petals that have a springing effect.
Drawing No. 1 of the main spindle collet
Collets type F - clamping the main spindle are used to secure the workpiece.
Drawing No. 2 of the counter-spindle collet
Collets type LN - counter spindle are produced elongated, size E depends on the standard size.
Drawing No. 3 collet type R
Type R – are pull-type collets.
Drawing No. 4 collet type T
Type T - clamping.
Drawing No. 5 collet BF
BF type feed collet - designed for bar feeding.
When installed on the machine, the feed collet is threaded onto the pipe with the help of which it is fed into the working area. It is necessary to take into account the design feature - the size and shape of the collet, which must necessarily correspond to the profile of the bar being processed.
How to make your own collet chuck
When making various products with your own hands, situations arise when the available equipment does not allow you to perform the necessary operations. It is required to produce a collet chuck that meets the requirements, with the product being manufactured according to the developed sketch.
All work must begin with the preparation of a sketch with the elaboration of all the necessary details. The sketch of the chuck allows you to take into account all the features when making the necessary equipment and clamping mechanism with your own hands.
When making collets with your own hands, you need to consider several features:
- the internal diameter of the collet is equal to or less than the minimum diameter of the part;
- in a collet, an increase in the internal diameter is possible due to the expansion of the petals;
- to increase the production of adjustable collets after setting and improve the quality characteristics, additional grinding of the conical and guide parts of the collet is necessary;
- It is necessary to take into account that during long-term operation the elasticity of the collet blades is lost, as a result of which breakage may occur.
DIY mini drill
To carry out drilling work on miniature workpieces, engraving machines, the so-called “dremels,” are usually used. The name comes from the name of the most popular manufacturer. This is a convenient hand tool, but its cost is usually high (especially for high-quality branded products).
The most common area of application is amateur modeling and production of printed circuit boards. As a rule, an industrial design is redundant for such work: some of its capabilities are not in demand. Therefore, home craftsmen often create instruments with their own hands.
What materials are needed to create a mini drill with your own hands?
- Of course, an electric motor . The power supply is preferably no more than 12 volts: at least for safety reasons.
- Power supply , if possible with a voltage regulator (to change the number of shaft revolutions).
- Housing (in the most primitive designs you can do without it).
- And the second most important part (after the motor) is the drill chuck .
Everything except the electric motor can be made independently. Although, the cost of the remaining components is so meager that you can limit yourself to only assembling power tools from ready-made components.
Let's look at a few tried and tested options.
How to create a dynamo from an old printer motor
A dynamo is a device that converts mechanical energy into electronic energy. The operation of the dynamo is based on the principle of electromagnetic induction. In other words, an electronic current arises in a closed circuit of a device when the flux of the magnetic induction vector penetrating the circuit changes over time.
In other words, a dynamo is a simple constant current generator.
In everyday life, a dynamo can be used to charge audio and video equipment, a telephone and other low-power devices (for example, fitness bracelets, tablets, a toy bot, etc.). In addition, the device is ideal for powering bicycle headlights, LED strips, hand-held flashlights and other devices powered by single-phase networks.
To assemble a homemade product you will need:
- Motor (electric motor) from an inkjet printer;
- Belt and gear from the same device;
- Handle with comfortable, non-slip grip;
- Two small wood bases;
- Four 10,000 µF capacitors;
- Diodik;
- Iron corners and fasteners;
- Wires and solder.
Making a dynamo is quite simple. To do this, you need to connect the capacitors in parallel, output the phase from the capacitors through a diode to the electric motor, and connect the zero of the capacitor through a jumper to the zero of the electric motor. Wires for connecting electrical appliances should be routed from the capacitor connected to the diode, observing the polarity. After this, you should put the entire system on the base, fastening the electric motor to a second piece of wood so that the pulley sticks out of it. On the pulley side, place the gear with the handle and cover them with a belt.
Complete analogue of the factory “Dremel”
To make it, you will need a motor with a 5V or 12V power supply, which can be removed from a broken children's toy, a miniature fan, a printer, a tape recorder, or simply bought on Aliexpress. If you plan to use the drill for more than just drilling printed circuit boards, you can make a convenient housing from a polypropylene water pipe. We select the diameter so that the motor holds tightly to the walls. Ventilation usually runs along the shaft. You can use an empty tube of construction sealant.
End caps can be cut from any material: for example, PVC or acrylic. If the engine is powerful enough, a charger from an old mobile phone will not work. You need a current reserve of at least 3A (for 5 volts). A good option is an old computer power supply (you can buy it for pennies on the radio market).
Tip: From a computer power supply you can make a universal power supply for your home workshop. Stable power supply 5V with a load of up to 20 amperes, and 12V with a load of up to 8 amperes. You can connect both a Dremel and a soldering iron.
The collet chuck can be purchased in the store: the department of components for engravers and Dremels. If there is a need to adjust the speed, you can make the circuit yourself, or purchase a ready-made unit.
The illustration shows a Chinese regulator and a power supply from an Internet router (12V, 1.2A).
With this homemade “Dremel” you can not only drill miniature holes. By installing the appropriate attachment, you can work with a milling cutter, cutter, or cutting disc.
Homemade attachments / cutters / consumables for engravers, drills and drills
The article will touch upon the topic of how to make consumables with your own hands. It's no secret that Chinese nozzles are of very low quality, while branded ones are overpriced. So in some cases it will be more profitable to do it yourself. Under the cut you will see my homemade attachments and also interesting solutions from the Internet .
Abrasive attachments
Petal circle for engraver
Original sandpaper on a rubber drum does not last long, so you need to find an alternative solution. Cut out a circle of small diameter from plywood:
Let's give it a more even shape:
Making cuts with a hacksaw for metal:
We glue sandpaper into the resulting slots using epoxy resin:
Flap wheel for drill
The nozzle has a larger diameter. To prevent a “spread” as in the previous version, when gluing, the sandpaper must be tightened with an elastic band. This occurs because the base of the fabric absorbs the resin from the cut and becomes rough.
The advantage of flap wheels is that they last an order of magnitude longer than regular sandpaper on a drum of the same diameter.
Emery for a drill from rollers from a tape recorder
Older reel-to-reel tape recorders have large rubber rollers with a metal sleeve. We place a bolt on the bushing and glue sandpaper onto the rubber:
Cutting wheels for engraver
The topic is quite common, but I’ll still tell you for the sake of completeness.
We take a thin cutting disc for an angle grinder, a compass with two needles, an awl, and unnecessary scissors:
1) We draw circles with a compass (you shouldn’t make too large circles, it’s inconvenient to work with them. The optimal size is slightly smaller than a standard circle) Make sure that the center of the circle is in the middle of one of the squares of the reinforcing mesh.
2) Use scissors to cut the disk into sectors, and then cut out the circles themselves located in the sectors. Metal scissors are suitable for this work, but ordinary stationery scissors can also be used, but this makes them more dull, so we take those scissors that we don’t mind.
3) Using light rotational movements of the awl, we begin to make a hole alternately on both sides. The diameter of the hole must be equal to the diameter of the screw. If the hole is any larger, it will break.
4) Grind the circle at low speed on an unnecessary sharpening stone:
And we get reinforced cutting wheels:
Making such circles is much cheaper than buying them. They also last longer than purchased non-reinforced circles.
Decorative sanding attachment
A self-tapping screw without a head is screwed into the cork, and a washer is glued to the base. The chuck's jaws will rest against the washer and prevent the screw from being screwed in deeper.
It is most convenient to use this attachment on a drilling machine. Instead of a self-tapping screw, you can screw a felt attachment into the cork:
Drill polishing attachment
Another fairly common topic. The felt from the felt boot is clamped with a bolt with wide washers. Polishing paste, such as GOI paste, is applied to the felt.
The following are a few examples of abrasive attachments taken from the Internet.
Grinding drum for a drill
Grinding drum for an engraver
A metal drum with a slot is turned on a lathe, into which the edge of the jig is tucked, and it is wrapped around the drum. Fixation occurs with an elastic band. The same structure can be made from plywood, as shown in the previous version.
Grinding cylinders for engraver
Comrade Marshall suggests making cylinders this way, I quote:
In order to make this type of consumable, we will need: a durable, but as thin as possible fabric (preferably cotton), sandpaper of the required grain size, and most importantly, a tube of suitable diameter, on which the cylinders will be placed during gluing.
So, we take the fabric and cut it into long strips 12 mm wide. Then we cut these strips to the size of the diameter of the tube with an overlap of about 1-1.5 cm, pull them tightly onto the tube (so that they do not dangle) and glue our pieces directly on the tube using regular PVA. The next task is a little more complicated: you need to correctly make a stencil, according to which the skins themselves will be cut out in the future. The stencil is shown in the picture on the right under the tube. We do this: take and cut off a piece of skin the same width as the fabric, but 1 cm longer. We apply it on top of the glued fabric and mark the place where the two ends of the skins should meet. After this, we carry out the necessary geometric actions: from the point of the proper junction we draw a line across the skin, from the other end of the skin, at the same distance, we do the same, after which we draw diagonals in the resulting rectangles and cut off pieces of skin along these diagonals. Now, when you place your stencil on top of the fabric glued to the tube, you get an accurate diagonal connection of the ends of the sandpaper. Now you have a stencil that you can trace with a pen along the outline on the back of the sandpaper.
Economical option without housing
Let's move on to creating a mini drill at minimal cost. We don’t buy anything except the motor itself (although it can be found for free in old equipment). Most compact electric motors are rated at 12 volts DC. We create a power supply for it.
Since there will be no additional options (speed controller, voltage stabilizer), the power supply is stabilized by a constant load. A typical 12 volt micromotor operates with a current of no more than 2 amps. A simple calculation shows that the output power should be 24 W. Add 25% for rectification losses, we get a 30 W transformer.
To get 12 volts under load, 16 volts must be removed from the secondary winding. You can make such a transformer in an hour, from any unnecessary power supply. Next is a rectifier bridge using any diodes: for example, 1N1007.
Our motor does not need rectified voltage ripple, so we connect a 25-volt electrolytic capacitor with a capacity of about 1000 μF at the output. It will smooth the output current. Despite its simplicity, such a tandem works stably, with only one drawback: as the load increases, the voltage drops. That is, with uniform rotation, the power supply produces 12 volts. And if you are drilling “heavy” material, you need to monitor the speed, not letting it drop. Otherwise the shaft will simply stop.
You can slightly complicate the power supply circuit by adding a suitable voltage regulator. For example, KR142EN8B or L7812CV.
In this case, there will be no voltage drop when the drill is loaded.
Next, you need to make a fairly accurate structural element - a drill chuck. If you don't want to spend money on a factory collet clamp, any bushing will do. It all depends on the scope of application of the mini drill:
- If you only drill PCB textolite, you will not need to change the drill. So we attach it permanently. The adapter sleeve can be made from anything: a tube from a telescopic antenna, a needle from a medical syringe, a refill from a gel pen.
Given the miniature design, no clamps are needed. Everything can be secured with glue or tape.
- When using a drill for universal use, which involves changing a drill or installing other attachments, it would be better to purchase a universal collet chuck.
- You can use a standard jaw chuck and install it on the shaft using an adapter sleeve.
The execution of the case depends only on your imagination. Most craftsmen leave a “bare” utilitarian design: the supply voltage is safe, the dimensions of the motor allow it to be held in hands without a housing.
If you want basic aesthetics, there are many options: and they are all free.
A homemade tool doesn’t just save money. It can be made exactly to suit your needs, unlike universal factory options.
see also
Comments 125
I was determined to create something like this. Maybe someone can tell me how to unscrew such a motor?
from a radio-controlled car)))
The speed controller is bad. It must be installed with power stabilization.
Why Dremel?! Dremel is the name of the company! And the tool is called an engraver.
Engraver, drill, whatever)
Why Dremel?! Dremel is the name of the company! And the tool is called an engraver.
Most likely it’s like duplication, saying: “make a photocopy”...
Not “make a photocopy”, but copy it)))
Why Dremel?! Dremel is the name of the company! And the tool is called an engraver.
Well, “Scotch” is also the name of the company, but that’s what everyone calls transparent adhesive tape
What a bastard, it spoils the table at work))) And it turned out so cool))) I bought the Whirlwind G150 engraver for 1400 rubles, one of the cheapest on the market, taking into account the bonuses. Thanks from Sberbank it came out to 700 rubles. I really like it, the motor is certainly more powerful than yours))) but it gets hot with prolonged use
Sorry I won't do this again)))))
It turned out great, but I probably ruined the table in vain