One of the stages in the construction of private houses and apartments is the installation of communications responsible for supplying water or draining wastewater. Assembling polypropylene pipes is much simpler than installing metal structures. To connect them, fittings are used, welded using specialized equipment - an iron.
The article we propose describes the technology for making connections and provides the standard temperature for soldering polypropylene pipes. We will cover the preparatory steps required to produce strong and sealed joints. Taking into account our advice, you will assemble the pipeline without any problems.
Specifications
The technical characteristics of a polypropylene pipe provide all the information an installer needs for welding and installation. That is, even when purchasing, the specialist takes into account the needs necessary for the installation of heating, cold and/or hot water supply.
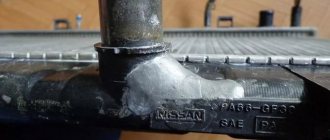
PPR marking
The inscriptions on the pipe indicate its technical characteristics Source sovet-ingenera.com
Each polypropylene pipe that you buy in the store has markings printed along the PPR. This data allows you to determine whether it is suitable for a particular purpose. Pay attention to the image above - it explains the meaning of each combination of letters and numbers. But experienced plumbers, as a rule, pay attention only to the PN value and diameter - everything else is adjusted by default.
Of course, first of all, PPR is selected according to the diameter of the pipe: for renovations in apartments, as a rule, Ø 20-25 mm is enough, but in a private house it is usually from 20 to 32 mm, and sometimes even up to 40 mm (for the heating riser ). But let's return to the PN value, which allows us to determine what this pipe is used for.
| Abbreviation | Digital symbol | Allowable pressure, MPa | Purpose |
| PN | 10 | 1,0 | For liquids up to 45°C. In practice it is used extremely rarely |
| 16 | 1,6 | For liquids up to 60°C. Suitable for cold water circuits | |
| 20 | 2,0 | For liquids up to 80°C. Used for hot water supply and heating. PN20 is also called universal pipe | |
| 25 | 2,5 | For liquids up to 95°C. Can be used in both autonomous and centralized heating |
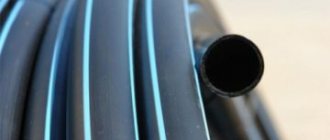
Reinforced pipe layer by layer Source kanalizaciyaseptik.ru
Standard temperature parameters
Both overheating and insufficient heating have a bad effect on the welding result. In the first case, the elements will deform, the roller will swell, and the internal diameter will decrease. In the future, scale and plugs may form in areas of uneven joints.
In the second case, the connection will be weak, and due to insufficient tightness there will be a risk of leakage.
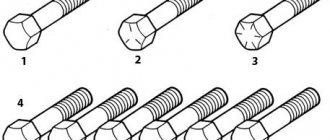
Examples of poor-quality pipe connections: internal and external polypropylene sagging, wall deformation, rupture. Such a water supply system cannot be put into operation
It is precisely because of the risk of a pipeline breakthrough that it is necessary to follow the welding technique and be sure to take into account such parameters as:
- diameter of welded products;
- heating and cooling time;
- equipment temperature;
- ambient temperature.
It is believed that the process of welding PP pipes is not advisable to carry out at temperatures below -10 °C, the upper limit is +90 °C. The most favorable ambient temperature is from 0 °C to +25 °C. For ease of remembering, the required temperature and time values were compiled into one table.
Table of technological values, optimal at an ambient temperature of +20 °C. For home installation, just remember the parameters for pipes with a diameter of 16-63 mm
If the air temperature indoors or outdoors is below +5 ° C, the heating time is increased by approximately 50%, that is, twice. The heating temperature is the same everywhere – +260 °C. The acceptable range is +255-280 °C.
It is interesting that the choice of parameter does not depend on the diameter of the pipe - the same values are used for both 16 mm and 50 mm. Only the time periods change. For this reason, the welding temperature of polypropylene fittings and pipes is usually not indicated in technological tables.
Video description
7 gross MISTAKES in welding POLYPROPYLENE pipes.
Particular attention should be paid to reinforced pipes, as in the photo above. Aluminum foil keeps polypropylene from deforming when hot water passes through it, that is, a hot water supply or heating circuit fixed on brackets at intervals of 80-120 cm will not bend. For the installation of plumbing and heating in the private sector, plumbers prefer to use the universal PN20, using it not only for heating and hot water piping, but also for the distribution of cold water. However, this depends more on the owner of the house and, if he wants to save money, then PN16 is installed for cold water. It should also be said about PN10 - at present, only irrigation systems for country gardens are made from such a thin-walled pipe and they refuse to use it in plumbing.
For centralized heating, PN25 pipes are suitable, which can withstand pressure up to 2.5 MPa or 25.5 atm. Such values are provided for a reason: when starting the system at the beginning of the heating period, the pressure is increased to check the integrity of the circuit and radiators. Thus, the pressure test in a nine-story building can reach 16 atm, but water hammer can cause one-time short-term surges of more than 20 atm. If the abbreviation PEX is present in PN25, then instead of aluminum foil, fiberglass is used for reinforcement, but this does not affect the strength.
The principle of the arrangement of layers on the walls of PN25 is the same as in PN20, but in the first case, the aluminum foil or fiberglass is located closer to the outer layer (almost under the top), so when the pipe melts in the matrix, the top coating goes away and the foil remains. It is clear that such welding will not have the required quality, so for PN25 they use a shaver, as in the photo above. This tool resembles a school pencil sharpener, only it cuts not to a cone, but in a flat plane, removing the foil. After this operation, the soldering turns out excellent.
PPR Welding Requirements
Look at this table first so that the explanations will be clearer later.
| D PPR, mm | Welding depth, mm | Time, sec | ||
| Warming up | Butt hold | Cooling | ||
| 20 | 12-14 | 5 | 4 | 3 |
| 25 | 14-16 | 7 | 4 | 3 |
| 32 | 18-20 | 9 | 4 | 4 |
| 40 | 20-22 | 12 | 6 | 4 |
| 50 | 22-23 | 18 | 6 | 5 |
| 63 | 23-25 | 24 | 6 | 6 |
| 75 | 27-29 | 30 | 8 | 8 |
| 90 | 33-35 | 40 | 8 | 10 |
| 110 | 37-39 | 50 | 10 | 10 |
The most common mistakes when performing welding
- Dirty pipe surfaces. If they are not sufficiently cleaned and free from dust and dirt, then the pipeline with such products will very quickly begin to leak.
- Also, incorrectly calculated soldering depth (its exact data is contained in the table provided) leads to poor quality joints. The table provides accurate data on the depth of the welding belt. If these values are not made accurate, then the result is hermetic errors in the entire pipe line. This also complicates the entire process of laying polypropylene pipes.
- And most importantly, the table contains the exact heating time for the pipes. It must be maintained clearly. Insufficiently melted elements do not fully bond to one another. Consequently, under such circumstances, surfacing welds of different sizes are obtained. It will not be able to withstand even a weak water hammer.
- The workpiece is not inserted into the fitting all the way; you must remember that there should be a gap of no more than 1 mm.
- Another very common mistake is applying too much force to connect the fitting and the workpiece. As a result, burr is squeezed out at the end of the pipe product, which creates a serious obstacle to the flow of liquid.
- Incorrect position. You have a couple of seconds to align the heated connected parts. If this time is delayed, then the deformation is no longer correctable, and a strong connection will not be formed. It is also important not to overheat the workpiece, otherwise sagging will form on it.
- Inexpensive material. If you take low-quality products for work, then even the most professional installation will not protect against breakage. It is recommended to buy both pipes and fittings from the same manufacturer. It must be a company with a proven good reputation. Otherwise it will turn out like the saying about the stingy man who has to pay twice.
- There is no need to connect pipes (even high quality ones) from different manufacturers. The constituent elements of the product material may differ and when heated, such products will behave differently.
The rules are quite easy. Simply ignoring the recommendations presented in the table leads to leaks in the water supply pipe line.
Video description
Soldering polypropylene pipes: technology, tools.
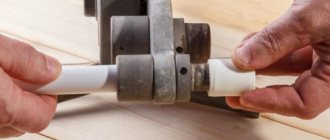
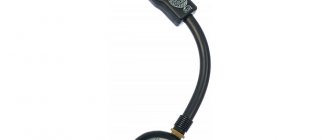
In 90% of cases, when installing polypropylene circuits, there is a need to switch from a metal pipe to PPR. Most often, for such purposes, electric welding is used to weld a fitting for screwing on a PPR fitting. When you yourself are not a welder, but there is no one to ask, then a whole problem can arise from this, but there is still a way out. These are threadless compression couplings, as in the photo above, or the same tees for tapping. That is, instead of welding a fitting, the pipe is cut and a tee is fixed on it, or a coupling with one nut is screwed onto its edge. For the household level, this is just a godsend.
Pipes can be bypassed using an insert Source sovet-ingenera.com
Sometimes it becomes necessary to intersect one or more pipes across their direction. This issue can be solved in two ways: solder the transition in the form of the letter “P”, using four 90° corners, or, as in the top photo, use a piece of pipe, which is called a bypass. That is, this is not even a fitting and you will need two through PPR couplings. The radius of this device can be larger or smaller - it all depends on how many rows you have to go around. In rare cases, in a store you can find a bypass for one row and it has inlet holes for welding on both sides.
Such fittings are used for connection to electric boilers Source izi.ua
Selecting a welding machine
Another name for the connection process is simply soldering pipes. It is performed using a special apparatus, which is called a device for welding polypropylene pipes, it is also called a welder or a welding iron.
It is not recommended to buy it if you only need to make a connection once. Since it is not economically profitable, it is easier to rent it. Most stores provide this service.
Nevertheless, if you decide to purchase a device for welding polypropylene pipes, then based on reviews, you can recommend Czech or Turkish devices. Chinese models are inferior in quality to the first two options. The cost of such a unit is proportional to its quality. High-quality devices are priced higher.
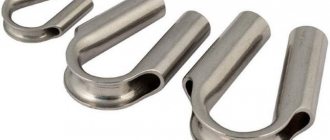
Clamps for polypropylene pipes
Such fasteners are used for PPR pipes up to Ø 32 mm Source rubaspec.com
Now some information about how polypropylene pipes are fastened. In most cases, polymer latches are used for this purpose, as in the top photo. Any circuit made from this material is almost twice as light as the water that circulates through it. Therefore, such devices are always available for sale for diameters of 20.25 and 32 mm.
Clamps are used for both PPR and metal pipes Source rubaspec.com
Types of tools
Tools for installing polypropylene pipes can be divided into:
- welders;
- glue guns;
- pipe cutters;
- stripping.
Welders
There are two types of welding machines:
- Mechanical apparatus. It is used if it is necessary to connect large diameter pipes or a lot of force is required to align the joints. Device:
- support frame;
- instrument unit;
- hydraulic drive.
Grips made of half rings are located on the left and right. Between them, to distribute pressure and perform alignment, liners are installed, the inner diameter of which corresponds to the outer diameter of the pipes being welded.
Mechanical welding machine
- Manual welding machine. Used for welding small diameter pipes up to 125 mm. Device:
- thermostat;
- a heating plate with holes into which non-stick nozzles are installed;
- a set of nozzles for installing elements to be welded (in pairs), the Teflon coating does not allow polypropylene to stick to the heated nozzle.
Connection using a handheld device
Glue guns
The use of a gun simplifies installation work. A socket connection using couplings or other elements can be made using glue for polypropylene pipes. Advantages of a hot glue gun:
- setting speed - from 1 to 3 minutes;
- The reliability of the seam is practically not inferior to other types of joints.
Surfaces to be bonded must be free of dirt and grease.
Pipe cutters
Types of pipe cutters:
Precision scissors with a ratchet mechanism (for pipes up to 42 mm in diameter) have a steel blade with a toothed rack.
Scissors for polypropylene pipes
Roller pipe cutter with ratchet mechanism. The pipe is inserted into a c-shaped recess and, when the handles are closed, it is cut off by a blade located opposite. Cutting must be carried out strictly at an angle of 90°. Deviation during the cutting process leads to deformation of the cutting line or even breakage of the scissors.
Roller pipe cutter for polypropylene pipes
- A cordless pipe cutter with a small electric motor that provides high cutting speed.
- A guillotine pipe cutter is used for cutting large diameter pipes.
If you don’t have a pipe cutter, you can use a regular hacksaw for metal or wood, but then the ends must be thoroughly cleaned of burrs. Also, when cutting, the pipe must not be deformed.
Sweeps
For hot water supply and heating systems, it is recommended to use reinforced polypropylene pipes. Pipes reinforced with fiberglass do not need to be stripped, since the mesh is located between layers of polypropylene, is not afraid of water and does not come into contact with the fitting. Aluminum foil used for reinforcement must be removed from the joint before welding. Aluminum in contact with water can cause electrochemical processes, which will lead to the destruction of the reinforcing film. In the case of external reinforcement, aluminum will interfere with the welding process of polypropylene elements. Therefore, pipes reinforced with aluminum foil need to be stripped. Types of stripping tools:
- manual - with removable, non-removable handles or corrugation;
- drill attachments.
Hand strippers and drill attachment
For small amounts of cleaning work and lack of experience, it is better to use hand tools.
- For the outer layer, couplings with knives from the inside (material – tool steel), the so-called shaver, are used. The diameter of the tool is selected to match the diameter of the pipe being stripped. Double-sided couplings are often used to accommodate pipes of two different diameters.
Shaver for polypropylene pipes
- For the inner layer, trimmers are used. The knives are located at the inner end. You just need to insert the pipe into the tool, turn it several times and you can weld.
Trimmer for polypropylene pipes
Removing the inner layer is faster, because it requires removing about 2 mm of foil. When removing the outer layer, it is necessary to remove about 2 cm.
Drill attachment
Drill attachments differ from manual strippers with a steel rod for installation in a drill, screwdriver or hammer drill. They are used to remove both the outer and inner reinforcing layers (the location of the knives determines the type of layer to be removed).
Video description
How to solder polypropylene pipes
But in situations where reliability is required, steel clamps with a plastic dowel are used for fastening. There are rubber gaskets on the inside of both halves of the clamp. Clamps of this design secure not only polypropylene, but also polyvinyl chloride and metal pipes.
For the most part, PPR pipes are hidden under plaster, drywall or PVC/MDF panels, but for this they also need to be fixed somehow. Usually, a channel is cut for a water supply, and the pipe itself is secured with a perforated strip suspension to prevent it from falling out. This can also be done without a groove - simply press the PPR tape, like a clamp, pulling it on both sides with plastic dowels with self-tapping screws.
How to reduce the likelihood of marriage?
It is recommended that two people work together to solder elements in difficult-to-access conditions. The second specialist helps remove the second element from the nozzle and puts the soldering iron on the platform. The first master carefully joins the parts with both hands with a minimum pause. Sometimes assistance from a third party is required. His services are used when a pipe needs to be fixed in a wall in an adjacent room. Attempts to perform all operations independently in difficult areas always lead to defects and the need to perform welding again.
Marking planting depthSource files.builderclub.com
During soldering, precise movements must be observed. The correct inclination of the fitting element relative to the second part, its axial angle of rotation on the pipe, and the depth of entry into the fitting cup must be maintained. To control the depth of entry and the angle of rotation of the fitting, marks are made on the surface of both parts. In order not to measure the allowance each time on sections of the same cross-section, use a template.
The iron does not need to be turned off during the entire welding period. The technician will lose time warming up the equipment. The soldering iron is ready for use after the heating indicator goes out. A lit indicator shows that the mirror is heated to the desired temperature. If you start welding during this period, the pipe will not warm up properly. In order to comply with the technological process and holding time, it is recommended to check the parameters according to the table, which is recommended to be kept at hand.
If combined pipes are purchased, they are connected only after mandatory stripping. The chamfering depth should be 2 mm greater than the depth of the sleeve into which the element is inserted. Reinforcement reduces deformation expansion by 10 times. On products with external reinforcement, before soldering, a part of the surface is removed with a shaver to the required depth for joining. Pipes with internal reinforcement do not require stripping. Their installation is faster.
About the secrets of fitting pipes in this video:
The nuances of maintaining the desired thermal regime
When designing a piping system, you should strive to ensure that the joints of pipes, fittings and fittings are in accessible places . The overall dimensions of the joint locations should make it possible to install a welding machine and place their ends onto the heater sleeves without significant bending of the pipes.
The closer to the joint the welding equipment can be placed, the less time the heated edge will have time to cool before welding. Such cooling during transportation leads to a significant decrease in the strength and durability of the joint.
It is also necessary to consider the sequence of installation of joints . It is not uncommon for inexperienced designers to find it impossible to install the last joint because the soldering iron simply does not fit into the remaining gap. You have to either strongly bend the pipes, creating residual stresses in them, or cut them and add another joint. Both solutions reduce the overall reliability and longevity of the system.
Experienced shareholders formulated the following recommendations:
- welding equipment must have a high-quality thermostat that ensures accurate setting and stability of maintaining the heating temperature;
- the distance from the welding point to the apparatus should be no more than 1 meter;
- welding should be carried out at room temperature;
- Before connecting, you need to check the temperature equality of both parts.
Following these simple rules will help you solder pipes efficiently.
Top best manufacturers of pp systems
Here is a rating of manufacturers of polypropylene systems 2021, compiled according to reviews of specialists. In their opinion, these products are the best in quality and reliability.
Russian trademarks.
Foreign brands.
Soldering iron option for “advanced users”
An important characteristic of any soldering iron is its operating temperature. Simple models do not have a clear temperature regime, and sometimes because of this it is not possible to do the job efficiently. For example, if the heating is insufficient, the solder will not melt to the required state and will not be able to fill all the necessary gaps. In this case, the so-called “cold soldering” will result, and the connection will be fragile.
In addition, if you have to deal with different options for work, it makes sense to purchase several soldering irons at once, with different powers.
But you can do it easier - buy a soldering station.
Microprocessor controlled digital soldering station Weller WDD 161V works with compressed air or inert gas
Detailed installation instructions
When soldering PP for plumbing or heating, it is very important to calculate all installation stages in advance. Perform accurate measurements, welding sequence.
The soldering process occurs very quickly, and if a mistake is made, it can only be corrected by dismantling the entire incorrect section.
Let's look at all the stages in more detail.
Preparing special tools
A special tool for welding is a soldering iron or “iron”. If you are at the stage of building a new house, then it makes sense to buy yourself such a tool. It is recommended to choose a manual soldering iron that comes with Teflon-coated nozzles. For home use, a set with nozzles up to 40 mm is sufficient.
The soldering iron is in a convenient case. The kit for household use includes:
- nozzles for heating PP, with a diameter from 16 to 40 mm;
- soldering iron stand;
- scissors for cutting PP;
- roulette.
If you are going to use it once, you can ask friends or rent a soldering iron for a while.
You will also need:
- building level;
- hammer drill or impact drill for mounting plastic brackets;
- pencil or marker.
Marking and cutting pipes
Before starting soldering, it is necessary to cut the pipes. To accurately measure lengths, find the distance between the fittings and add soldering depth on both sides. It is convenient to carry out all measurements with an assistant.
There is no need to add length for the coupling.
Carry out the cutting, prepare all the necessary elements and fold the diagram. Mark with a marker the position of the corners and tees in the diagram. When welding, you can accidentally change the position and it will not be possible to connect further according to the diagram.
If this happens, then you need to cut the pipe anywhere and connect them with a coupling. Therefore, when purchasing a pp system, couplings must be purchased with a reserve.
Think in detail about the sequence of soldering elements.
We clean the edges of the parts. They must be evenly cut, clean and dry. When mounting on a wall, brackets of the required diameter are attached in advance. If installation involves placing several parallel pipes, then it is better to purchase a bracket with a hook to each other.
Connecting elements and heating
When everything is prepared, you can start soldering all the elements. Place the soldering iron on a special stand. Attach a nozzle of the required diameter. If several of them are needed, first we attach nozzles of a smaller diameter, then a larger one. Set the temperature to +260 °C and turn it on.
Start soldering in a strictly drawn up diagram and sequence.
Once the desired temperature is reached, the relay will operate and the power will turn off. There is no need to disconnect it from the network, the temperature will be maintained automatically.
To weld two elements, we heat them simultaneously using a soldering iron. We count the time according to the diameter of the elements. After the time has passed, we quickly remove the parts and connect them together. You have a few seconds to correct the position. Therefore, it is very important to note the position of the elements in advance.
Once you have chosen the correct position, fix it for a few seconds, this will be enough so that the knot does not change its position. After cooling, you will get a strong, airtight connection.
You may be interested in the article “Ventilation deflector: 7 popular models” Go>>
We sequentially weld all the components strictly according to the drawn up diagram. We fix the pipes to the wall using brackets.