In the production of any structures from pipes, both metal and plastic, the procedure for joining two products is particularly difficult. The ends of the cut pipes require special processing and precise fitting in order to eliminate not only the formation of gaps, but also to give the structure an aesthetic appearance.
In some cases, lathes or milling machines are used for these purposes, but they do not have specific equipment to accurately perform this type of work.
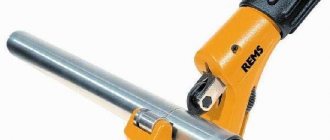
Only one type of equipment called a trimmer allows you to quickly and efficiently process pipe cut areas.
Types of tools
Tools for installing polypropylene pipes can be divided into:
- welders;
- glue guns;
- pipe cutters;
- stripping.
Welders
There are two types of welding machines:
- Mechanical apparatus. It is used if it is necessary to connect large diameter pipes or a lot of force is required to align the joints. Device:
- support frame;
- instrument unit;
- hydraulic drive.
Grips made of half rings are located on the left and right. Between them, to distribute pressure and perform alignment, liners are installed, the inner diameter of which corresponds to the outer diameter of the pipes being welded.
Mechanical welding machine
- Manual welding machine. Used for welding small diameter pipes up to 125 mm. Device:
- thermostat;
- a heating plate with holes into which non-stick nozzles are installed;
- a set of nozzles for installing elements to be welded (in pairs), the Teflon coating does not allow polypropylene to stick to the heated nozzle.
Connection using a handheld device
Glue guns
The use of a gun simplifies installation work. A socket connection using couplings or other elements can be made using glue for polypropylene pipes. Advantages of a hot glue gun:
- setting speed - from 1 to 3 minutes;
- The reliability of the seam is practically not inferior to other types of joints.
Surfaces to be bonded must be free of dirt and grease.
Pipe cutters
Types of pipe cutters:
Precision scissors with a ratchet mechanism (for pipes up to 42 mm in diameter) have a steel blade with a toothed rack.
Scissors for polypropylene pipes
Roller pipe cutter with ratchet mechanism. The pipe is inserted into a c-shaped recess and, when the handles are closed, it is cut off by a blade located opposite. Cutting must be carried out strictly at an angle of 90°. Deviation during the cutting process leads to deformation of the cutting line or even breakage of the scissors.
Roller pipe cutter for polypropylene pipes
- A cordless pipe cutter with a small electric motor that provides high cutting speed.
- A guillotine pipe cutter is used for cutting large diameter pipes.
If you don’t have a pipe cutter, you can use a regular hacksaw for metal or wood, but then the ends must be thoroughly cleaned of burrs. Also, when cutting, the pipe must not be deformed.
Sweeps
For hot water supply and heating systems, it is recommended to use reinforced polypropylene pipes. Pipes reinforced with fiberglass do not need to be stripped, since the mesh is located between layers of polypropylene, is not afraid of water and does not come into contact with the fitting. Aluminum foil used for reinforcement must be removed from the joint before welding. Aluminum in contact with water can cause electrochemical processes, which will lead to the destruction of the reinforcing film. In the case of external reinforcement, aluminum will interfere with the welding process of polypropylene elements. Therefore, pipes reinforced with aluminum foil need to be stripped. Types of stripping tools:
- manual - with removable, non-removable handles or corrugation;
- drill attachments.
Hand strippers and drill attachment
For small amounts of cleaning work and lack of experience, it is better to use hand tools.
- For the outer layer, couplings with knives from the inside (material – tool steel), the so-called shaver, are used. The diameter of the tool is selected to match the diameter of the pipe being stripped. Double-sided couplings are often used to accommodate pipes of two different diameters.
Shaver for polypropylene pipes
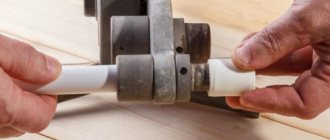
- For the inner layer, trimmers are used. The knives are located at the inner end. You just need to insert the pipe into the tool, turn it several times and you can weld.
Trimmer for polypropylene pipes
Removing the inner layer is faster, because it requires removing about 2 mm of foil. When removing the outer layer, it is necessary to remove about 2 cm.
Drill attachment
Drill attachments differ from manual strippers with a steel rod for installation in a drill, screwdriver or hammer drill. They are used to remove both the outer and inner reinforcing layers (the location of the knives determines the type of layer to be removed).
What is pipe end trimming?
Schedule:
Mon-Fri: from 8:00 to 19:00 (Office), Mon-Fri: from 8:00 to 17:00 (Warehouse)
- Catalog Used pipes by diameter Used pipes 1420 mm
- Used pipes 1220 mm
- Used pipes 1020 mm
- Used pipes 920 mm
- Used pipes 820 mm
- Used pipes 720 mm
- Used pipes 630 mm
- Used pipes 530 mm
- Used pipes 529 mm
- Used pipes 508 mm
- Used pipes 426 mm
- Used pipes 377 mm
- Used pipes 325 mm
- Used pipes 273 mm
- Used pipes 219 mm
- Used pipes 159 mm
- Used pipes 114 mm
- Aprelevka
- Refurbished pipes 1420 mm
- Lay pipes 1220 mm
- Trimming, cutting to size, joining steel pipes.
- VGT-Center /
- Services /
- Trimming, cutting to size, joining steel pipes.
Types of polypropylene pipes
Many craftsmen who are planning to perform one or another type of plumbing work sometimes face the pressing question of choosing the right choice of polypropylene pipes.
The modern plumbing market today offers a very wide range of different types of polypropylene pipes, which are usually classified depending on different parameters and properties.
To help the reader understand this issue, below are the main classifications of polypropylene pipes.
- Classification by purposeThe main feature of polypropylene pipes is their reaction to high temperatures! Depending on this, polypropylene pipes are usually divided according to the type of substance that will be transported through them, namely:
- hot water;
- cold water;
- heating;
- sewerage;
- ventilation.
- Based on the material of manufacture, polypropylene pipes are usually divided into the following types with the corresponding designation:
- PPN – made of homopropylene and is the optimal solution for the installation of industrial and domestic cold water pipelines;
- PPB - the manufacturing material is a block copolymer of propylene, which gives the pipes the property of increased resistance to hydraulic shocks;
- PPR is made from random propylene copolymer with the addition of ethylene, ideal for supplying hot water whose temperature does not exceed 70 C;
- PPS, the unique chemical composition of special polypropylene, gives the pipes the property of increased heat resistance (withstands temperatures of 90–95 C), which, in turn, makes it possible for them to be widely used in various fields.
- Based on the type of construction, the following types of polypropylene pipes are distinguished:
- single-layer (their types were indicated above);
- multilayer pipes, in turn, are divided into the following variations: reinforced structure, which has a layer of aluminum foil located inside the wall;
- structure reinforced with corrugated aluminum on the outside;
- a structure in which the inner layer is reinforced with fiberglass;
- The polypropylene-reinforced structure implies the presence of an inner layer of polyethylene.
- Based on their ability to withstand the nominal operating pressure, polypropylene pipes are divided into the following types with appropriate markings:
- with a working pressure of 1 MPa are marked as PN10;
- pressure 1.6 MPa - marking PN16 (rarely used type of pipe);
- permissible pressure up to 2 MPa – PN20;
- pressure up to 2.5 MPa – PN25 (rightfully considered the most durable and heat-resistant type of pipe).
- Based on the outer diameter and wall thickness, the following types of polypropylene pipes are distinguished:
- PN10 – outer diameter 20–110 mm, wall thickness – 1.9–10 mm;
- PN16 – diameter 16–110 mm, wall thickness – 2.3–15.1 mm;
- PN20 – diameter 16–110 mm, wall thickness – 16–18.3 mm;
- PN25 – outer diameter 21.2–77.9 mm, wall thickness – 4–13.2 mm.
- By the color of polypropylene pipes you can immediately recognize the features of its application:
- white color – the pipes are distinguished by excellent anti-corrosion properties and long service life;
- gray color – have excellent thermal and chemical resistance;
- black color – resistance to aggressive substances;
- green color – minimum indicators of resistance to internal pressure.
However, many experts believe that the color of polypropylene pipes does not affect their quality at all.
Operating principle of a metal pipe trimmer
The task of a pipe ender is to minimize the gaps that inevitably result when fitting the ends manually, as well as to give the welded joint sufficient aesthetics.
It is known that when connecting and inserting steel pipes, depending on the angle of their mutual inclination and diameter, the mutual coupling curve can be a parabola, an arc, or even a straight line. Therefore, it is very difficult to perform a successful pairing using analytical calculations. The problem can be solved by spatial 3D modeling using the well-known KOMPAS or AutoCAD programs, but in practice they do things differently.
In mass production, pipe trimming is carried out using a milling machine equipped with a dividing head. The method is accurate, but requires appropriate equipment, which is not always available to the home craftsman. At the same time, having a powerful metal drill (from 1000 W) and a core cutter, you can quickly profile the end of any pipe.
Industrial versions of such devices in the specialized literature are called tube notchers (groove cutters, although they are also capable of performing curved contours).
The pipe cutter includes:
- A shaft, at one end of which there is a seat for a drill chuck, and at the other end there is a seat for a core cutter.
- A bearing unit, rotating in which the shaft receives the necessary rigidity.
- The body, sometimes with a vice for clamping a tubular workpiece.
- A rotating device with which the workpiece can be positioned at the desired angle.
- Adjustment screw.
With the help of the end-cutters in question, it is possible to make connections between pipes with a diameter of 6...75 mm, which in most cases is quite sufficient. The range of changes in mating angles is from 45 to 210 0. It should be noted that the hole cutter is not included with the device.
For processing long pipes, manual pipe cutters with a chain clamp are used, and for short products, the supporting and guiding parts of the device are combined in one unit. Safety of work is ensured by the presence of retaining rings that limit the longitudinal movement of the shaft.
The shaft is the most structurally complex element of the trimmer. Firstly, it must receive longitudinal movement as the cutter penetrates the metal of the pipe. Secondly, milling creates vibrations that are caused by sharp fluctuations in the torque of the base power tool. Therefore, the shaft is made polished, has a sliding fit of high precision, and the bearings used are needle type, which allow compensation of axial and radial loads.
The price of such devices is from 8,000 to 50,000 rubles. At the same time, all end-cutters for pipes in the TT size range are fairly compact devices that are fixed in the chuck of a lathe. An electric drill is secured in the same way. When processing small-diameter pipes, the device can be rested directly on the workshop floor.
Tools
It is easiest to remove foil for external reinforcement. Simple tools will help in this matter - couplings with steel blades inside. They are easy to use, you just need to insert the pipe into the cavity of the coupling and turn, the blades will do their job quickly and accurately. It is very convenient to use double-sided couplings, with the help of which it is easy to produce pipes having a different diameter from each other.
Internal cleaning is carried out using a trimmer. Externally, the design of the trimmer is practically no different from the design of the couplings. So, this tool is a muff, the blades of which are located on the inner end of the device. As in the first option, you need to insert the pipe into the cavity of the device and make several turns.
A universal tool that can be used to remove reinforcement, both internal and external, is a drill with special attachments. Externally, they differ from the same end saw by the presence of a steel rod, which is necessary for installation in the drill socket.
Tools for cutting and stripping pipes
Introduction
Nowadays, almost all structures in residential and industrial buildings are made of metal, and pipes are often used in such structures. This allows you to significantly reduce the nodal mass and make the fastening stronger and more rigid.
In order for pipes to last a long time and not cause premature failures, they need to be prepared. One of the preparation stages concerns the ends. This process is quite labor-intensive and time-consuming, which is why they resort to using a tool such as a metal pipe trimmer.
Soldering tool
Soldering iron, also known as “iron”, a more official name is “ a device for welding polypropylene pipes and fittings”
“. This is a basic and indispensable tool in the context of today's topic. It is a heating element with nozzles for different pipe diameters; the nozzles have a non-stick coating. The nozzle consists of two halves - one heats the pipe directly (the pipe enters the nozzle), and the other heats the fitting from the inside. Thus, for each weld seam one or another fitting is required; the pipes are not immediately soldered together!
Of course, there is a technology for welding plastic pipes without intermediaries in the form of fittings, but this is a more specialized technology. Mainly used for large diameter pipes on an industrial scale.
Pipe stripping
– used to prepare for soldering aluminum-reinforced pipes. Removes the surface layer of aluminum foil - such pipes are already rare; you mainly have to deal with them when soldering to old communications. If absolutely necessary, this tool can be replaced with a sharp knife, carefully cutting off the foil around the soldering area.
When working with this tool, you can slightly change the thickness of the layer being removed by adjusting the blades within very small limits.
This method of stripping should be considered as an emergency - very inconvenient and time-consuming. Moreover, it is not as high quality as from a factory tool.
Pipe trimmer
- very similar to the previous device, but does not remove the top layer from the pipe. The tool cuts the pipe from the end, cutting off several millimeters of aluminum in the thickness of the pipe. Pipes with similar reinforcement are widely distributed under the pseudonym “lazy” - supposedly they do not require stripping. Indeed, stripping is not necessary; trimming is necessary so that the aluminum does not come into contact with water. It is worth noting that this device is usually only suitable for pipes from one manufacturer - it is unlikely that it will be possible to properly trim different pipes. When soldering pipes with a diameter of 20-25 mm. You can do without this tool, the main thing is to make sure that the aluminum at the ends is sealed with a layer of polypropylene.
If the installation uses pipes without reinforcement or with fiberglass reinforcement, stripping and trimming are not required.
Pipe shears
- definitely a necessary tool. If absolutely necessary, you can do without them by cutting the pipe with a hacksaw or (at worst) with a grinder. However, these are rather extreme options; scissors are needed!
Pencil and tape measure
– also necessary tools.
When cleaning is required
The ends of polymer pipes with fiberglass reinforcement do not need to be pre-cleaned. However, for products with aluminum reinforcement, it is necessary to remove the metal inner layer and strip the ends. Only then is a reliable connection established.
After all, molten aluminum prevents the formation of a hermetically sealed joint. Moreover, it is necessary to exclude the possibility of corrosion resulting from the interaction of the metal with the aquatic environment. The preparation process also allows you to remove various contaminants from the joined areas.
How to do stripping yourself?
To strip polypropylene pipes with your own hands, you do not need to have additional skills. To do this you will need to prepare the necessary tools. Next, the pipeline elements are cut to the required dimensions. When connecting using couplings, it is necessary to take into account the coefficient of thermal expansion of polypropylene. After trimming, it is necessary to clean the ends of the product from dirt, dust, and degrease them. Check the evenness of the cuts.
The procedure for trimming pipes to remove the reinforcing layer is performed using different tools. Before starting the main work, you need to perform several actions:
- Using the gauge on which the countersink is installed, align the diameter of the connected tubes.
- Secure the pipes in a vice so that it is easier to work with them.
The process of cleaning parts from the outer layer:
- Select a coupling.
- Attach the handles to it and put it on the end.
- Turn several times to remove the reinforcing layer.
- Remove the coupling and check the machined surfaces. If metal remains, repeat the procedure.
The process of cleaning parts from the inner layer:
- To do the job you will need a drill or screwdriver. It is necessary to select a shaver for a power tool, depending on the diameter of the pipeline.
- Set the drill speed to low to avoid damaging the plastic.
- During operation, hold the tool strictly perpendicular to the hole being processed. There should be no side deviations.
When the protective layer is removed, you need to turn off the drill, remove the attachment, and check the treated surfaces. After completing the work, it is necessary to clean the ends of metal shavings, plastic, dust and dirt. Degrease the surface and wait until dry. After this, you can begin soldering the tubes.
There are two types of polypropylene pipes - homogeneous and reinforced. The second option is the most durable and durable. Withstands high loads and pressure, and has a reduced coefficient of thermal expansion. When working with pipes that have a protective layer, you need to clean it at the joints. Otherwise, you won’t be able to make a strong seam.
PPR WATER PIPES WITH REINFORCEMENT. WHAT WERE AND WHAT THEY ARE NOW!!!
Watch this video on YouTube
When working with long pipes
Processing the ends of short pipes is simple; no special preparation is required. It is necessary to combine the guide and support parts into one unit. And when working with long pipes, you need not only to prepare, but also to choose a specific end-cutter for metal pipes - a manual one with a chain clamp.
For added safety, locking rings should be used. This limits the movement of the shaft. Particular attention must be paid to this detail, because during operation the shaft must:
- move freely relative to the cutting cutter;
- be resistant to vibrations occurring during milling.
Taking these requirements into account, manufacturers make the part polished with a sliding fit. And load compensation is achieved thanks to special needle bearings.
Common questions and answers about soldering polypropylene
Is it possible to solder pipes from one manufacturer and fittings from another? Of course it is possible, but I would like to warn you that both couplings and pipes should be used of proper quality. You should not use parts from unnamed manufacturers. In unprofessional stores they often sell pipes from different companies, but the fittings are the same, from an unnamed manufacturer. I don't recommend using this combination. In general, nothing prevents you from soldering pipes and fittings from different manufacturers, with or without different reinforcement on different sides of the coupling.
Is it possible to bend polypropylene pipes? They cannot be bent, either during installation or after. If there is a need to bend the pipe during installation, then you should use contours or combinations of corners. To be fair, it is worth noting that the weak point of the bending pipeline is the junction of the pipe and the fitting. This mating point breaks off at some breaking force. To make sure of this, just solder a test structure from a corner and two 50 cm pipe sections, and try to break this “poker” with your hands.
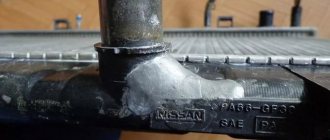
How to solder pipes if the faucet does not hold it? It is strictly forbidden to weld if there is water in the area to be soldered. If for some reason it is not possible to completely shut off the water, you need to stop it while welding. On the Internet they advise plugging the pipe with bread crumbs, but the problem is that the crumb is immediately squeezed out by the newly created pressure in the pipe. Therefore, the method will only work when it is possible to open the area up to the soldering point for air to escape. And when the pipes are soldered, the crumb easily pops out when pressure is applied.
Advice: if during welding you could hear the hissing of water on the nozzle, it is better to cut out the assembly and redo it! It’s better to spend extra time during installation than to fix and eliminate leaks in the future, with a bunch of problems that pop up!
In this photo you can see that the plug on the filter is unscrewed and excess water flows down the cloth from there. And in the place of soldering the bread crumb is plugged. Thanks to the open filter, we had a little over a minute to do the soldering before the water squeezed out the crumb.
Actually, this is where I propose to end the presentation of information. Over time, I plan to expand the list of common questions about soldering polypropylene pipes.
Rate this publication:
- Currently 3.75
Rating: 3.8 (16 votes)
DIY installation of polypropylene pipes
Today, installing polypropylene pipes with your own hands is not a very difficult task, especially since this can significantly save money on the family budget.
However, when installing polypropylene, it is worth following a certain sequence of actions and some technical rules in order to avoid mistakes during the work.
Let us describe in more detail the stages of installation of polypropylene pipelines.
- Familiarization with theoretical material Having decided to lay polypropylene lines at home, first of all, you need to familiarize yourself with information about polypropylene, the types of pipe products made from this material, as well as installation methods. The progress of high-quality installation of polypropylene pipes will largely depend on theoretical knowledge.
- Calculation of the pipeline diagramBefore you begin to install polypropylene communications, you must first draw up a detailed diagram of the future system. What will such a scheme achieve? Based on your plan, you can easily calculate the required amount of the following materials:
- devices and important components of the installed system;
length of polypropylene pipes;
- couplings and adapters;
- corners and crosses;
- contours;
- shut-off valves;
- other fitting elements.
- Preparation of material before installation Before installing polypropylene lines with your own hands, you need to carry out a number of preparatory work, the essence of which consists in the following operations:
- according to the diagram, the pipes are cut into pieces of the required length;
- the ends of the pipes are cleaned of burrs;
- if a reinforced type of polypropylene was chosen, then the ends must be trimmed.
- Preparing the location This stage includes the following types of operations:
- Markings are made on the wall for fastening polypropylene pipes;
- holes for dowels are drilled using a hammer drill, the distance between which should be 1 m;
- clamps will subsequently be installed on the dowels to secure the pipeline.
- Welding of polypropylene pipes
This type of work has the following features:- the welding machine is permanently installed on the workbench and prepared for work;
all structural elements of a certain section of the system are selected;
- they are pre-soldered, in other words, one section of the pipeline is connected into a single whole on the work table, and there should be as few turns and tees as possible;
- the finished section of the polypropylene pipeline is secured with special clamps on the wall;
At this stage, based on individual needs, you need to select the right polypropylene pipes and all structural elements (we talked about the types of pipes and the necessary tools above in the article).
- in the specified order, installation of subsequent sections of the system is carried out;
- For floating soldering, all that remains is to connect the fixed sections and connect all the system devices.
- As you can see, most of the work on connecting polypropylene pipes with your own hands takes place in a stationary position, and this, in turn, will not require much physical effort, and the connection of elements will occur more accurately and efficiently.
Homemade trimmers
Due to its functional features, a cutter for metal pipes can cost quite a lot of money, which makes you want to save money. The most economical option is to produce the tool yourself. With proper preparation, you can make a good, working model, but even with all your efforts, the result obtained will be inferior to an analogue that is produced for mass sale.
A variety of materials can be used for production, the main thing is that they are able to withstand certain conditions, and that the parts perform their functions properly. To assemble a trimmer with your own hands, you need to assemble the following parts:
- the base, shape, size depends on personal needs and the relationship to the workbench or work table.
- bracket, its shape should resemble the Latin letter L and have longitudinal grooves, three pieces.
- sliders with two screws: clamping, adjustable;
- replaceable clamping foot;
- staples for attaching the foot to the slider;
- bearing unit fastening;
- support lever;
- shaft.
If you try, you can get a completely effective model, and much cheaper. Particular attention should be paid to the quality of all materials and assembly of individual parts.
If any part is assembled incorrectly or poorly, then the entire structure and the final result of trimming will be at risk. If possible, before assembly, consult with professionals who can give useful advice regarding assembly.
Video with instructions for assembling a trimmer at home
Stripping methods and technology
When starting to install reinforced pipes, you must first select a stripping tool. These can be either manual or mechanical devices.
Tools for work
Stripping of propylene pipes is carried out either using hand tools or mechanical attachments. The choice is determined by the performer’s skills, experience and scale of work.
When the work is being done for the first time, it would be better to use hand tools. This allows you to control the process and perform stripping more accurately. Mechanical devices are used more often to perform larger volumes of work.
To obtain an even, finished cut, it is recommended to choose stainless steel devices made by crimping for stripping.
For manual stripping, double-sided tools are used, which allows stripping pipes of different diameters. For ease of use, removable handles are provided.
Tools needed:
- Pencil for marking the layer level that needs to be removed;
- Scissors or cutter. With their help, a section of pipe is cut off;
- Caliber with countersink. The gauge helps restore the geometry of the pipeline, levels out the cut area, and the countersink makes a chamfer and removes excess burrs;
- Conductor or pipe bender. If it is necessary to make rotation angles according to the project, then with the help of such mechanisms, the pipe bends under a certain radius;
- Stripping couplings. To remove the metal shell, a coupling is put on the pipe. And when it turns, the blades located in the middle remove the outer layer of aluminum. Removable handles make this process quick and neat;
- Trimmer. The blades are located at the inner end of the device. An ideal cut is obtained after several revolutions of the end cutter along the pipe. Its blades remove the middle layer inside the pipe. The process looks like this: put on the end trimmer, make a few turns, and you can immediately start soldering. You can use a trimmer to process a regular plastic pipe without a reinforcing layer;
- Shaver. It varies in caliber, depending on the diameter of the pipe. Processing is carried out using a drill, on which an attachment is installed instead of a bit. In this case, the rotation speed of the drill must be carefully controlled. The nozzles remove both the inner and outer layers of foil. The nozzle should be selected in accordance with the type of pipe reinforcement. After processing with a shaver, you can proceed to further work.
Stripping methods
Stripping methods vary depending on the method of reinforcement, and, accordingly, on where the reinforcing reinforced layer is located: outside or inside. Each stripping method is performed using different tools.
Stripping the outer layer
If the pipe is strengthened by applying an external reinforcing layer, connection using fittings is only possible when this external layer is melted and then cleaned.
If you neglect stripping, the molten aluminum foil will not be able to adhere to the polypropylene, and the connection will be unreliable. The essence of stripping is to clean the top layer to the depth necessary for good adhesion to polypropylene. The work is done using couplings.
Cleaning the inner layer
In this case, stripping is necessary to prevent the interaction of aluminum with water, and as a result, the development of electrochemical processes that will destroy the aluminum layer at the junction of the pipe and the fitting.
Let's start cleaning
If you have little experience and plan to do the cleaning yourself, it is better to use hand tools. The work does not require special skills, so a beginner, with the help of preliminary recommendations, can easily remove the reinforcing layer.
To clean the edge of the pipe, select a coupling of the required diameter, fix it on the pipe, and turn it using handles several times.
At this stage, the stripping is completed, there is a smooth cut edge.
The knives remove foil to a depth of about 2 mm in just a few seconds.
One person can cope with such a task; the use of special knowledge, skills, or expensive equipment is not necessary, and there is always the possibility of dismantling the connection if necessary.
What is pipe end trimming?
History of rolling
started with percussion instruments.
The tubes of the first steam boilers and condensers were sealed in tube sheets using ball mandrels and heavy hammers. Flaring
was carried out in several passes with the diameter of the mandrel ball increasing with each pass.
Then a mandrel began to be used - a long rod with cylindrical tides evenly distributed along its length. The diameter of the tides increased linearly from cylinder to cylinder. The mandrel was pulled through the pipe of the heat exchanger, flaring the pipe
in the grid. Later, the first representatives of cam and collet tools began to appear. In them, the rolling elements - split cams - were pulled by hydraulic pressure along a conical guide, deforming the pipe in the radial direction. The main disadvantage of this method was the inevitable occurrence of sliding friction at the point of contact of the cam with the pipe, and as a consequence the occurrence of local damage.
A breakthrough in rolling technology was the use of rotational motion, and self-tightening rolling machines appeared.
Instead of split cams, they used rollers or rollers, which rolled in a housing-holder along a conical guide-spindle, running into its larger diameter. Thus, with a rolling insert inserted into the pipe, the shank was set into rotation, the rollers, running onto the spindle, came out of the cage, rested against the pipe, rolled along it, simultaneously carrying out its radial deformation. The connection turned out to be uniformly deformed, sealed and reliable.
Currently, due to the growth of technological requirements for heat exchange equipment (pressure, temperature, medium flow, turnaround time), tube sheets of increased thickness, double tube sheets are used in the design of heat transfer steel; elements are added to the profile of the hole for pipes that increase the efficiency of the connection — grooves, the diameters of the holes in the tube sheets increase. The requirements for the roller drive are becoming more complex in terms of adjusting the rotational torque and weight and size characteristics.
Often, production does not require single tools; it requires equipment with a set of tools and devices:
- for preparing the rolling process ( rollers
and
groovers
with a drive, machines for removing fins at the ends of pipes);
for carrying out the rolling process (rolling with pneumatic or electric rolling machines
);
for post-rolling processing (devices for cutting off protruding ends, trimming tools, pipe cutters for steel pipes
); for repair of rolling joints (tools for removing pipes from tube sheets, machines for processing and drilling pipes).
To meet the growing demands on tools, new types of rolling mills are being developed, such as:
- type CP - for securing pipes in thick tube sheets; type RA - for securing pipes in gratings located in closed chambers with limited access; type RT – with adjustable rolling depth.
Dimensions and cost
Today you can find a large number of varieties of tools on sale, and the trimmer is no exception. The cost of this tool varies from 300 rubles to 1000. Of course, you can find a product at a higher price. When choosing a tool, you need to carefully examine its condition. There should be no damage or burrs. Any imperfection could damage the pipe when it is placed in the end saw, or the pipe may not fit into the end saw at all. You should be equally careful about the condition of the blades.
It is important that they are made of steel, softer material may be damaged when in contact with aluminum or may not cut through it
You can also find replacement blades for the tool on sale. Of course, over time and with frequent use they can become unusable. Replacing blades is much easier than buying a new tool. The most popular today are end-cutters designed for pipes of the following sizes:
- 20/25 mm;
- 32/40 mm;
- 50/63 mm.
The cost of a product directly depends on its size. Thus, a trimmer for small pipes will cost much less than an analogue designed for pipes with dimensions of 50/63 mm.
Polypropylene pipes, due to their operational parameters, aesthetic appearance and ease of assembly, are often used in the installation of utilities. Thanks to reinforcement technology, the reliability and durability of pipes increases while maintaining all the technological characteristics of polypropylene; the quality of pipes is not only comparable to metal ones, but also exceeds them .
However, for long-term and reliable operation of the pipeline system, proper processing and stripping of the ends when connecting is necessary.
A reinforced pipe is a product with three layers: two polypropylene and one reinforcing. The structural reinforcing shell ensures that strength is maintained in the event of sudden temperature changes.
This indicator - the coefficient of thermal expansion is 6% higher for pipes with aluminum reinforcement, which increases the durability and reliability of the pipeline in which reinforced pipes are used.
The presence of an aluminum layer in the polymer pipe allows maintaining high temperatures and prevents rupture of communications in the system. Temperature fluctuations are compensated by the flexibility of the reinforcing base.
Reinforcement is performed in two ways:
- Using fiberglass.
- Using aluminum foil.
Reinforced products are produced both with a solid sheet of aluminum foil and in the form of a mesh with perforations. The viscous polymer flows through the aluminum holes and creates a strong adhesion to the protective layer, increasing the reliability of tubular products even under elevated high-temperature loads.
Materials for production:
- Steel strip.
- A piece of channel.
- Corner.
- Shock absorber.
- Piston.
- Bolts, washers, nuts.
So, a couple of the most important parts of this device will be the shock absorber rod and the piston.
First of all, we cut out a piece 250 mm long from a piece of steel angle. Metal thickness - 10 mm.
The second similar blank had to be cut from a solid corner. The surfaces of the workpieces are leveled on a drilling and milling machine. If you repeat this project, then of course it’s easier to immediately take a steel strip.
You also need to process the ribs on a band saw. The result was two plates 250x65x10 mm.
The next part will be the rod from the shock absorber. To remove the rod from the body, you need to drain the oil and cut the body around the perimeter, moving 20-25 mm from the edge.
The piston will serve as a guide for the rod. The diameter of the holes for the “finger” should be equal to the diameter of the rod.
Both parts fit perfectly together, and the rod sits in the piston with virtually no play, but still rotates freely. You may have already guessed, the piston will play the role of a guide, and the rod will act as an axis for the crown.
In order not to select an adapter for the thread on the crown, the master decided to re-cut it. The standard thread is cut off and this end of the rod is ground to a diameter of 16 mm.
Having selected the desired blade and clamped it in a homemade chain wrench, the author cuts a thread on the shank without removing the workpiece from the chuck of the lathe.
The workpiece is turned 180 degrees, and the second end of the rod is ground to a diameter of 10 mm. This shank will be fixed in the drill chuck. The part is ready.
On both plates you need to round one of the edges. Rough pruning is done using a grinder.
On the same edge of one of the plates, the center is marked and cored.
Both workpieces are clamped in a machine vice and drilled simultaneously. This results in good accuracy. Both holes are drilled to a diameter of 12 mm. To avoid damaging the drills, be sure to use machine oil.
Having inserted a rod into the piston, the author marks a line on it perpendicular to the axis of the rod. Then, stepping back from the edges by 20 mm, two centers are marked. In this case, the distance between centers is 40 mm.
In these places through holes with a diameter of 8 mm are drilled. The threads are not cut into them; m8 bolts will simply be inserted here.
On one of the plates, two parallel lines are marked at the same distance from each other as the distance between the centers of the holes in the piston (40 mm).
Along these lines you need to cut two longitudinal grooves. Holes are drilled at the beginning and end of the grooves. Further sampling of the material is carried out on a milling machine, or cut out with a grinder.
To fix the pipe in the desired position, you will need to make a special holder. Channel No. 8 is suitable for this (height 80 mm, shelf width 40 mm). A workpiece 100 mm long is cut from it.
This part is placed on the base plate, a rod is inserted into the piston, and a mark is made on the channel. The essence of the task is to transfer the axis center mark to the channel.
Based on the resulting mark, two lines are marked on the shelves at an angle of 45 degrees. Now you need to accurately cut out two “extra” triangles. The resulting cuts should be symmetrical. The accuracy of the device depends on this.
A steel strip is pressed to the bottom of the base with a clamp, and the parts are welded together. The device will be fixed in a vice using this plate.
A pipe holder is welded to the top side of the same plate.
All details are ready. The surfaces are degreased and a protective layer of aerosol enamel is applied to them. Of course, bluing is better suited to protect such products from corrosion. This wear-resistant coating is practically scratch-resistant.
Now you can assemble the device. The master connected the heads of the m8 bolts that will secure the piston with a jumper.
The piston is attached to the guide through grooves with a bracket formed from bolts. From the bottom side, washers are put on the bolts, and wing nuts are screwed on.
The metal crown is screwed into place.
All that remains is to connect the halves of the structure with an M12 bolt.
The finished device is clamped in a vice.
Having set the desired drilling angle, you need to fix the position of the guide by tightening the bolt. The pipe is fixed to the holder using a clamp.
Before drilling, you need to lubricate the rubbing parts, and the contact area between the crown and the part itself.
We check the workpiece, there are no gaps.
Here is a homemade device for drilling pipes at an angle that you can make for your workshop.
The process of making a pipe trimmer is also shown in this video:
Reinforcement
Polypropylene is a material that has a lot of advantages, but along with them it also has some features. When choosing it for your home, especially for hot water supply and heating systems, they must be taken into account.
There are two main points to remember:
- Operating temperature limited to 95 degrees above
. Although, according to current standards, the water temperature in the engineering systems of an apartment building is limited to the same 95 C, in fact, under certain circumstances, this value can be exceeded. This is more like force majeure, but it happens. - High coefficient of thermal expansion
. The flexibility of polypropylene allows thermal expansion to be compensated to a large extent, but there are situations where any movement of the pipe is undesirable. Let's take, for example, laying a polypropylene pipe under screed or plaster.
Reinforcement completely solves the second problem and partly the first. almost does not expand when heated. In addition, at the temperature at which it begins to soften, the reinforcement will keep it from deforming.
Types of reinforcement
Two materials are usually used as fittings for polypropylene pipes:
- Aluminum foil
is a layer of aluminum with a thickness of 0.1 to 0.5 millimeters, located outside or inside the pipe, between layers of polypropylene. The method of connecting it to polypropylene is glue; it can be solid or perforated. - Fiberglass mesh
. To be precise, glass fiber reinforced pipes are a three-layer structure, where the inner and outer layers are polypropylene, and the middle layer is a mixture of polypropylene and fiberglass.
So, what does cleaning of polypropylene pipes have to do with it?
The fact is that if your polypropylene pipes are reinforced with aluminum, then before welding with the fitting, the aluminum foil must be removed from the joint.
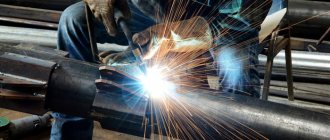
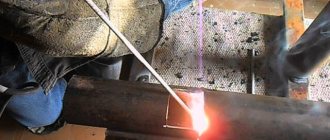
Trimming, cutting to size, joining steel pipes.
Butt welding of steel pipes occurs by melting the joint using welding equipment.
Pipe trimming is the operation of aligning the ends of pipes.
If during the dismantling of a used pipe the surface of the edge is deformed, it is necessary to trim it. Trimming of metal pipes is the leveling of the surface of a stale, used or restored pipe. This operation is performed using special equipment that helps remove nicks and polish the edge of the pipe.
There are the following types of trimming of metal pipes: for soldering or welding, for subsequent crimping and trimming with an allowance.
- If subsequent beading of the product is expected, then trimming is performed at a given angle. In such products, unevenness and recesses are not allowed.
- To machine an end with an allowance, careful deburring is necessary.
- Pipes for welding and soldering require strict adherence to the rules for all welded surfaces.
Pipe trimming occurs using special equipment. The most commonly used equipment is “Orbit”, which allows you to achieve good quality work, regardless of environmental conditions.
created in 2001. The main activity is the sale and supply of steel pipes with a diameter from 159 to 1420 mm.
The warehouses of VGT-Center LLC are located in the Serpukhov region. We have the largest warehouse in the Moscow region.
- About company
- Used pipes
- Refurbished pipes
- Stale pipes
- Services
- Shipping and payment
- Contacts
Address and opening hours:
Moscow, st. Butlerova, 17, office. 291 Central warehouse: Moscow region. Serpukhov district