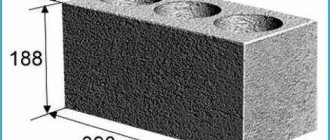
The essence of the method
The effect of acidic environments on the metal is of key importance in the process. The interaction of an aggressive environment with metal is called etching. This is a chemical process to apply a pattern to a knife. The area that is not intended for etching is covered with a protective layer.
It must be neutral to the etching substance. The depth of etching depends on the time of exposure to the blade. The experience of our ancestors revealed several effective methods. In this article we will try to consider all known methods.
Metal etching methods
The choice of acid for pickling depends on the type of steel. Each alloy requires its own aggressive substances. Correct use of the solution affects the speed and quality of the process. There are several ways:
Chemical
A simple process that does not require complex equipment is chemical. But one should take into account the emissions of fumes harmful to humans into the air.
Electrolyte
The use of an electrolyte with current passing through it. This method is fast and you can get a clear drawing. The working fluid solution is also saved, and there are no harmful fumes.
Ion plasma
The ion plasma method is used at large production sites. It is used in dry environments for microelectronics production.
For etching at home, the first two methods are perfect. They do not require complex manipulations and the components are quite commercially available.
We poison at home. Practical guide.
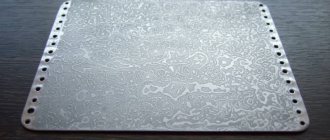
To decorate our notebooks, we use hand-made decorations from sheet brass. However, these decorations can also be used as a cliche for blind embossing - the prints will be of quite high quality. In this article I would like to share the technology for making such jewelry and cliches. In the description, I deliberately tried to select the materials and chemical reagents that were as accessible as possible to repeat the process at home.
If you believe the all-knowing Wikipedia, then Etching is a group of technological techniques for controlled removal of the surface layer of material from a workpiece under the influence of specially selected chemical reagents. But if you simply put a piece of brass into the solution, it will simply slowly dissolve in it. To make jewelry or cliches, we need the etching process to occur only in the places we need, thereby forming a pattern on the product. This means that a special mask must be applied to the product, which will protect the metal surface from etching. In this article I will try to show a method that is available for use at home and does not require the use of any special chemicals or equipment.
So, first we need:
- A piece of sheet metal. This example uses brass.
- Emery.
- Nail polish remover.
- A sheet of self-adhesive paper.
- Laser printer.
- Iron.
- Permanent marker.
Preparing a layout for printing
Fill with black
To create a high-quality image mask on a metal surface, we need the image to be exclusively black and white. Ideally, this should be a PNG file on a transparent background. You just need to fill it with black. Usually for PNG I use Photoshop like this: Blending options/Color overlay and choose black color.
Mirror reflection
If the goal is to make cliches, then the instructions in this paragraph should be skipped. If a decoration is being made, and there is text on the image, or details that must be located in the desired direction, then the image must be mirrored.
Print Settings
Next we need to print the image. We print it on a backing (!) of self-adhesive paper, having first removed the stickers from it (don’t throw them away - they’ll come in handy). Various master classes on the Internet say that you can use regular paper, but trust your experience - regular paper leaves behind a huge amount of lint, which will then inevitably affect the quality of the mask. We also print for a reason, but by first setting the printer for the thinnest paper (so the printer’s oven will not overcook it) and for maximum toner use.
Transferring an image to metal
The brass workpiece must be sanded and degreased. Remove all burrs and protrusions from it. The surface should be smooth, without drops or dents. Cut out the printed image and attach it to the workpiece. We fix the image on top with removed pieces of self-adhesive. The fixation must be of high quality - the backing with the picture must not move!
Ironing the workpiece
After ironing
Next, you need to transfer the image from the paper to the workpiece. To do this, use the iron at maximum power. To do this, simply place the iron on top for 30 seconds, and then iron the entire surface. It is necessary to allow the workpiece to cool before removing the paper from it. We remove it carefully - if we see that somewhere some of the toner is still left on the substrate, then we return the paper back and try to run the iron over the problem area again.
Transfer control
In most cases, it will not be possible to achieve 100% image transfer. To eliminate these shortcomings, we use a permanent marker. It’s better if you don’t just sketch out problem areas, but simply put numerous dots (imagine yourself as a tattoo artist or a dot matrix printer) - this way you’ll be able to paint as densely as possible.
Protect the reverse side with tape
Next, you need to protect the back surface of the workpiece from etching. I use regular tape for this - simply covering the entire surface of the workpiece with it.
Etching reagents
Hydrogen peroxide and citric acid
The most accessible reagent is obtained from a mixture of citric acid (20g), table salt (1 tsp) and hydrogen peroxide (100ml) - it is quite possible that you will not even need to leave home to find all these components. For a high-quality mordant of a 5*5cm workpiece, you will need at least two, or even three such sets. I use ferric chloride - the peroxide mixture is not very convenient for large volumes. You can buy it at amateur radio stores. My consumption of cold liquid is approximately the following - 250 grams per 125 cm2 with an etching depth of 0.5 mm. Preparing a solution of cold liquid is simple - dissolve the contents of the jar in water in the proportion of 1 part cold liquid to two or three parts water. Naturally, the etching container must be plastic.
Ferric chloride
ATTENTION! You need to work with chemical liquid carefully - it leaves indelible stains on clothes, and on ceramics and tiles too, if you don’t have time to remove it. Always have cleaning rags on hand. I usually put one tray inside another to avoid accidental drops on the floor.
Next, immerse the workpieces in the pickling liquid. If you are using a mixture of acid and peroxide, then place the workpiece with the etching plane facing up. Firstly, this way you can visually control the process, and secondly, gas bubbles can form during the process (I think it’s hydrogen) and with a different arrangement of the workpiece, the bubbles can form gas pockets in which etching will not take place.
Etching
If you are using CG, then the workpiece should be positioned so that the etching plane is at the bottom. The fact is that during the etching process, a precipitate is formed, which, settling on the workpiece, will complicate etching. You can try bending the corners on the workpiece to rest it on them. Small workpieces are held quite well on ordinary tape stretched between the sides of the etching container. You can glue the workpiece using double-sided tape to something that will allow you to fix the workpiece in the desired position. Lately, I have simply been using blanks of such a size that their edges rest against the sides of the plastic etching container.
After hydrogen peroxide and citric acid
Immediately after etching
Then all that remains is to wait and periodically monitor the process. The etching process in cold liquid usually lasts 3-5 hours for me, depending on the strength of the solution. After etching in cold liquid, I briefly place the workpieces in the already mentioned solution of peroxide and citric acid. After cold treatment, a coating remains on the metal on which the patina does not adhere well (read about this below), and a mixture of peroxide and acid perfectly removes this coating in a matter of seconds.
Etching problems
There are three in total:
Overharves the workpieces
“Over-etching” of the workpiece, in which important parts are dissolved by reagents. Usually the reason is insufficient control of the etching process. Unfortunately, in 90% of cases there is no way to fix this. I will leave 10% for cases of “over-etching” in the area of the edges of the workpiece, in which this defect can be masked by processing. Naturally, such blanks are not suitable for clichés.
- Toner is peeling off from the workpiece. There may be two reasons - poor-quality transfer or too strong a reagent. It is very important to detect the problem in time, remove the workpiece from the reagent, let it dry and paint over the problem areas with a marker.
Dot inclusions
Dot inclusions in metal. The problem is the low-quality metal of the workpiece itself. Remedies: during the etching process, mechanically scratch these places so that the etching process proceeds more actively, after etching - mechanically using diamond drills.
Patination of metal
Patination of the workpiece
Ammonia solution
I’ll say right away that this step is completely unnecessary for making cliches. Patination is the application of a durable film to metal. In our case, this film is needed to create a contrasting color background on the workpiece. For brass and other copper-based alloys, the easiest way is to use ammonia. The recipe is simple - a few drops of ammonia into a container, put the workpiece in there, and close the container for several hours. There is no need to pour over the workpiece - we need ammonia vapor. After the workpiece is covered with a characteristic coating, warm the workpiece (on the stove or with a lighter). It is very important not to heat the workpiece, but rather to warm it up - otherwise it will become brittle.
Completion
Next comes mechanical processing of the workpiece. I have an engraver, with which I remove all excess along the edges of the workpiece, and then needle files, files and emery come into play. For polishing - GOI paste applied to a strip of leather. This process is not fast and labor-intensive if you do not have mechanical means for processing. As a result, you should get something like this:
PS
A small parcel arrived from Ali Express, with some goodies. In this connection, I undertake to talk about such useful things in etching as thermally conductive rubber, photoresist and electrolysis.
If you find a typo, please select the fragment of text with this error and press Ctrl+Enter
Preparing metal for drawing
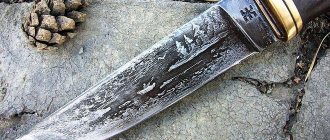
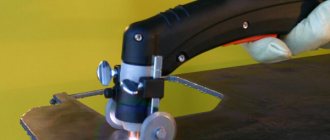
Etching on the blade.
For the etching process, it is necessary to prepare the blade. If it is possible to disassemble the knife, do so. It will be easier to work with the blade separately. If this is not possible, then you should wrap the handle with polyethylene.
An acidic aggressive environment can harm any material. The surface to be treated should be thoroughly wiped with acetone. Remove possible greasy stains from the blade. It is not recommended to touch the surface of the product with your fingers.
Drawing methods
The protective layer will be a pattern made of various materials. Metal can be etched without treatment. This process is similar to the film negative when developing a photograph. The protective material can be any polymer: nail polish, electrical tape, sticker, metal marker or vinyl.
Primer or bitumen varnish
To begin with, the entire product is coated with the composition, then the contours of the design are applied. It can be applied with a marker or brush. Next, the sketch is scratched down to the metal with a sharp wire or needle. The primer can be used GF 021 or XB 062. A noticeable disadvantage of this method is the possible chipping of dried soil when scratching the sketch.
Have you tried DIY etching yet?
Not really
Glossy paper
This is a good method that has a lot of positive aspects and is rapidly gaining popularity. It is necessary to print the proposed sketch using a laser printer on glossy paper in real size. Next, you need to attach the design to the metal surface and iron it with an iron.
The blade is then placed in water. The toner from the printer remains on the blade, and the crumpled paper peels off. You can additionally treat the design with nail polish. This method allows you to transfer all the smallest details of the design onto the blade.
Nail polish
This material is very common among amateurs. Nail polish is used very often due to its good resistance to aggressive environments. After the composition has been applied to the surface, it can be adjusted with a sharp object. This achieves smooth lines and clarity of the drawing.
Beautiful designs on knives.
Popular bluing methods
Blueing technology includes several methods, the main ones being the following:
- Alkaline method. In this case, you will have to work with oxidizing agents at a temperature of 130-150 degrees. Thanks to alkaline oxidation, iron is oxidized. But you should not work with this method in a house or apartment, as an unpleasant odor is released during the work.
- Acid method. In this case, the work is performed in acidic solutions using a chemical or electrochemical method. It is important to place the item in the solution for the specified time and act in accordance with the instructions.
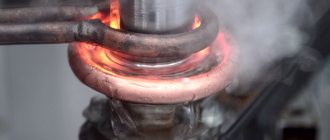
- Thermal method. This type of bluing is considered the oldest and simplest in existence. This technology involves heating steel in the open air. The procedure continues until the top layer of metal reacts chemically with oxygen. The higher the heat, the darker the part will become.
There are other ways to obtain blued iron. You can choose the most suitable one and do all the work yourself. The main thing is to strictly follow the sequence of actions and use the correct bluing compounds.
Alkaline
To blue metal using this method, you must follow a clear sequence of actions. First of all, you will have to degrease the surface with a solvent. Then do the following:
- Take a bowl and pour 100 ml of water into it.
- It is necessary to dissolve 120 grams of caustic soda and 30 grams of sodium nitrate in it, stirring them until smooth.
- Heat the composition to a temperature of 130-150 degrees.
- Place the part in the boiling mixture so that it does not come into contact with the walls.
- The part will turn black after 20 minutes, after which it is washed in distilled water.
When the product is completely dry, it must be lubricated with machine oil and wiped dry. As a result, the coating becomes smooth and wear-resistant. You will not have to additionally polish the product. These rules allow you to give the surface the desired effect without resorting to complex technology. Remember to use a protective mask and thick gloves.
It is important to carry out work only in a stainless container that is of sufficient size. This can be a problem if you plan to burnish a large knife. To avoid color changes, the entire surface of the product must be in the solution.
Acid
This option is performed in acidic solutions. In this case, electrochemical or chemical processing technology is used. It is important to clean off the rust. Regular sandpaper will do for this. To increase the cleaning speed in advanced cases, you can use an angle grinder equipped with a metal brush.
Then use a cleaning composition such as sodium triphosphate, ethyl alcohol with kerosene, or simple kerosene. The part must be immersed in the solution for 15 minutes. Finally, the product should be rinsed in running water, wiped well and dried.
While the part is drying, it is necessary to prepare a solution for acid bluing. Mix the following ingredients:
- 1 liter of water;
- 2 grams of tannic acid;
- 2 grams of tartaric acid.
At the next stage, the knife is directly blued. Heat the mixture to 150 degrees. Place the item in the container for 15 minutes. Make sure that the metal surface is completely immersed in the solution. Then rinse it under running water and plunge it into boiling water. This allows you to completely clean the surface of the solution.
At the final stage, the process of bluing the steel in oil is carried out. In this case, the product is immersed in machine oil for 60 minutes, after which it can be used for its intended purpose.
Important! When using this method, cold bluing is also possible. To do this, use a product such as rusty varnish.
Thermal
Everything is very simple here. This bluing is considered the oldest. This technology involves heating steel in the open air. The procedure continues until the top layer of metal reacts chemically with oxygen. The higher the heat, the darker the part will become.
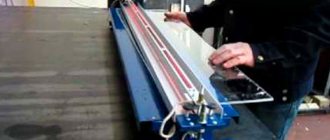
Instructions for liquid etching of a knife
The process is not complicated, but it will require a very aggressive environment. Gaseous emissions can harm your health. You need to turn on the hood or open a window. For safety you will need the following things:
- respirator;
- latex gloves;
- smock;
- protective glasses.
Avoid contact of the solution with mucous membranes. You can get a severe chemical burn. The following materials will be required:
- grinding machine;
- insulating tape;
- Plastic container;
- acetone, solvent;
- toothpick and cotton pads;
- marker, nail polish;
- distilled water;
- sandpaper;
- supply of ferric chloride.
Prepare your knife in advance. If the product is collapsible, then remove the blade from it, otherwise wrap the handle with tape or tape.
Creating a protective layer
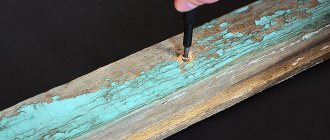
Transfer the pattern to the blade, then you will need to outline it with a protective layer. It should be taken into account that only areas without a protective layer will be susceptible to etching. The best way is to draw a design with a marker and then outline it with nail polish.
To make the lines even, the varnish can be adjusted. The final result depends on the personal qualities of the master; do not be afraid to fantasize. For clarity, use varnishes of different shades. The patterns can be anything.
Applying nail polish.
Preparation of the solution
It is imperative to use personal protective equipment. Always have baking soda on hand when working with acid. It can help if the solution gets on your skin. You should definitely remember the rule - pour acid into water, but not vice versa:
- The ratio of water and ferric chloride should be 50/50. To speed up the reaction, you can use other proportions, but half and half is the best option.
- You should not fill the container to the brim; you should take into account the item placed there. First pour distilled water and add ferric chloride there.
- The container should be marked with the word “Acid”, be careful with it. In this case, you can only use a plastic container; a steel one will not work. It may react with the solution.
DIY etching sketches.
Etching process
During the etching process, to obtain a high-quality result, it is recommended to move the part in the liquid. This will look like rinsing the product in a solution. It is strictly forbidden to touch the blade.
Leaving the part for a long time is also not recommended. According to professionals, it will require repeated short-term immersion of the blade in liquid. The process will look like this:
- immersing the product in the solution for 20 seconds;
- the part is exposed to air for the same amount of time;
- washing the workpiece under running water;
- air exposure 20 seconds;
- again the part is immersed in the solution.
In this way, proper control of the etching process can be achieved. All the steps described above should be done several times. The total time the blade is held in the solution should not exceed 10 minutes.
The total immersion time depends on the grade of steel and the concentration of the solution.
At the end of the process, you need to rinse the blade thoroughly with running water. And use acetone or solvent to remove the protective layer. You can go over the blade with fine sandpaper. Using a grinding machine you can bring the product to a shine.
Etching results.
Peculiarities
The nuances of the process are its simplicity and low requirements in terms of technical training. Galvanizing (the second name) of an ax does not require expensive equipment.
The main stages of the process are:
- Preparing the head for making the pattern: removing dirt and corrosion, cleaning to a metallic shine using a power tool (an angle grinder with petal wheels is enough), degreasing (solvent).
- Application of the desired graphics is carried out using paints and varnishes (from nail polish to regular paint) or stencils and elements cut out of paper and set on glue with strong adhesion.
- An interesting solution is to create several layers of the drawing. The essence of the principle is the same speed of electrochemical processes when protective layers are applied to each other and “eating” the unprotected metal.
- To do this, you need to apply various designs to the metal in 2-3 layers, optimally not with paint, but with paper or self-adhesive film. After etching, each layer will receive its own degree of processing depth.
- Connect the head to a power source and immerse in the solution.
- Current supply and observation.
The process will take from 10-15 to 30-40 minutes, depending on the degree of complexity of the applied pattern and the power of the coating. It is recommended to periodically turn off the current and remove the head.
Once the desired result is achieved, you should rinse the head of the future ax from the solution and remove the remaining protective coating.
After this, all that remains is to further polish and treat with a special paste (for shine and durability).
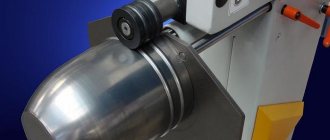
Forged ax with etching.
Etching a knife in Coca Cola
Quite an unusual method of etching. Experts say that drinking solutions can be used for the process: Sprite, Pepsi and Coca-Cola. The drinks contain phosphoric acid. But why not buy it in its pure form?
It can be done, but it is sold in very large volumes. If you put the matter on stream, then of course it is better to buy a canister of phosphoric acid. But if the process is planned to be carried out a couple of times, then there is no need for such a large quantity.
This acid works great against rust. The treated surface will resist corrosion for a long time.
Etching a knife in Coca Cola does not sound entirely correct, but it would be correct to say bluing the blade in Coca Cola. During the reaction, a layer of iron oxide is formed on the metal surface.
It gives the blade a dark tint and protects the steel from corrosion. The acid concentration in the drink is not high. Buy the drink in small quantities. This will make it easier to control the process. Blade bluing looks like this:
- First of all, you need to thoroughly degrease the surface. Otherwise the process will not be uniform.
- The drink should be poured into a container suitable for immersing the blade.
- Carbon dioxide is not needed in the process, heat up Coca Cola. Bubbles stuck to the blade can leave unetched marks.
- Every 2-3 hours we immerse the blade in the solution. When removing the blade, it should be washed with running water. The resulting oxide will leave. This way you can achieve a uniform coating of the blade with a layer.
All manipulations will take you about a day. If a light gray shade of the blade is enough for you, then this will take 3-4 hours. The resulting layer of bluing is not very strong, as with other methods. The blade will become less afraid of water and high humidity.
Blade bluing in Coca Cola.
Current source
To obtain a pattern and a uniformly processed surface, direct current is used. It must be supplied using a battery or charger. High power is not required - it has been noted that a voltage of up to 5 V and an electric current of up to 700 mA are sufficient.
Connection:
- “plus” - to a metal workpiece;
- “minus” - to electrodes immersed in the solution.
Ordinary cutlery – spoons or forks – can serve as electrodes. The main requirement for them when etching is not to touch the workpiece when current is applied.
The process will be accompanied by increased gas formation, this is a consequence of electrochemical processes. To comply with fire and industrial safety, it is necessary to carry out all work with electric current at least on a balcony that is well ventilated. Better - in the garage or on the street.
A stencil with a future pattern.
Solution
Etching is carried out in a saline solution saturated to the limit. Preparation: add table salt to ordinary water until dissolution stops (even with stirring). It is possible to heat the water to increase solubility.
There are no requirements for containers for preparing the solution. The etching solution must be applied to a non-conductive container. A plastic container is quite suitable - from a bucket to a trimmed 5-liter bottle.
Etching process.
Copper plating process
When replacing table salt with ammonium nitrate (up to 4 tablespoons per 1 liter of water), the same solution is obtained. During etching, it will acquire a rich blue color, in contrast to the dirty color with salt.
The head is prepared in the same way. The only difference is that if you want to get a multi-colored head, you should protect only certain places.
Further:
- The bare wires of the mobile phone charger are connected to the head (minus) and the copper part (plus), which is placed in the solution.
- The part (of any shape) is placed against the wall - without touching the head.
- The etching duration is up to a couple of hours.
- It is not recommended to take out an ax to control the layer.
The result is a smooth copper coating.
The principle of etching using electrolysis
Two methods are used for metal products: electrochemical and acid. They are used to remove scale and oxide films. It is necessary to follow the etching rules. They include: solution concentration and process time.
It is necessary to degrease the workpieces well. All the work of the master can be ruined by a small greasy spot. When working with varnish, be careful - it is highly flammable. The process itself is not safe. Treat it carefully and carefully.
The result of etching by electrolysis.
Solutions used for pickling steel
Different grades of steel require their own solutions for pickling. It all depends on the atomic lattice of steel. Etching solutions come in different forms:
- Alkaline solutions are well suited for etching aluminum and its alloys;
- The double pickling method is used for durable titanium steel. First, the alloy is processed in alkaline solutions and only then in high concentration acids;
- For copper and its alloys, nitric, sulfuric, and phosphoric acids are used. To increase the reaction rate, chromium and nitrogen are added to solutions;
- You can use nitric and acetic acid for steels of unknown composition;
- for nickel and tungsten, a solution of hydrogen peroxide and formic acid is perfect;
- Cast iron can be pickled with a solution of sulfuric acid.