Do-it-yourself repair of gasoline generators
In everyday life, we do not notice how important the availability of electricity is. Only when we find ourselves in places where there is no way to connect to power grids do we realize the depth of the problems that arise. Thanks to progress, this problem is being solved with the help of portable gasoline generators. Unfortunately, gas generators have a “habit” of breaking down, just like any complex tool. Many malfunctions can be resolved independently without contacting a service center. Repairing electric generators will not be difficult if you have already repaired a car or chainsaws.
- Design and principle of operation of the generator
- Main types of faults
- Elimination of engine breakdowns
Huter gas generator diagram
Let's look at the electrical circuit of the Huter DY 3000L gasoline generator, which I took from the instructions:
Electrical diagram of a single-phase gas generator Huter
Briefly, how the gas generator circuit works. Alternator A2 is manually spun by a cable, ignition coil A5 produces a spark on spark plug F1, which starts the gasoline internal combustion engine. There will be no spark if switch SB1 is closed - the spark will be shorted to the housing.
Two output voltages of the alternator are generated - coil L1 220V (supplied through QF1 to the 220VAC output) and coil L2 - 12V (supplied to the output via the diode bridge and QF2). There is no direct current protection against short circuit; all hope for a short circuit is a large voltage drop.
You can monitor the oil level using the HL1 indicator, and the voltage level using the PV1 dial gauge.
Coils L3 and L4 are responsible for the correct operation of the alternator and the stability of frequency and voltage.
Features of work
For what reasons does the generator unit not charge, what to do if the device does not work on the injector, how to remove the unit, how to disassemble it in order to replace the slip rings? First, let's look at the structure of the mechanism, as well as the principle of its operation.
The node consists of:
- a housing in which all components are located and equipped with a bracket with which bolts are used for fastening;
- rotor or armature with commutator;
- stator;
- voltage regulator with brushes;
- pulley;
- rectifier block.
As for the principle of operation, the generator unit converts the rotational motion that comes from the operating power unit into electricity. By means of a belt drive, force is transmitted from the pulley. When the rotor device rotates, a magnetic flux is generated in the mechanism, its power is regulated using a regulator.
The voltage itself comes from the collector rings to the brush assembly. The rectifier unit, which is structurally composed of diode elements, supplies energy in one direction. Thanks to the regulator, the output voltage will be in the range from 13.6 to 14.7 volts. As for the rotation of the shaft of the rotor mechanism, it is carried out in bearing devices, and the ease of rotation depends on their correct operation.
Node excitation circuit
If there are malfunctions in the operation of the VAZ 2110 16 valve generator unit and there is no excitation, then first of all you need to check the power wire. The diagram will help you do this.
Problems with the internal combustion engine.
The reasons for this may be the following:
- Lack of elements necessary for engine operation - fuel, oil, uncontaminated air filter. The presence of these components is the key to good operation of the gas generator; in their absence, the protective mechanism is triggered and the device stalls.
- There is no ignition spark. You can fix the problem as follows: using a special wrench, unscrew the spark plug, then, using sandpaper and an iron brush, clean off the resulting carbon deposits that appear when using low-quality fuel due to its incomplete combustion. Then you need to wipe the candle with gasoline or alcohol and let it dry. After this, you should check again for the presence of an ignition spark and try to start the generator.
- Insufficiently adjusted carburetor, soot appears when the generator is not operating at full capacity. Additional adjustment of the carburetor will help solve the problem.
- Other serious generator failures.
Problems in the operation of an electric generator usually arise due to a lack of voltage, which occurs due to a number of reasons. This may be a lack of contact, faulty brushes, burnout of capacitors, PWM units, etc. If voltage surges are observed at constant engine speeds, then most likely the issue is a malfunction of the excitation regulators. It is necessary to disassemble the device to find out the exact reason for its failure to work.
Difficulty starting the engine usually indicates a malfunction. Finding the cause in a timely manner means preventing its further development and stopping the negative impact on the operation of the unit.
Often the cause of a malfunction is several interrelated factors. In this case, they have to be eliminated comprehensively.
Most often, the circumstances that prevent normal engine starting are:
Poorly functioning ignition system. The following options are possible here:
Problems with the spark plug: too large or too small a distance between the electrodes (the electrodes must be positioned at the optimal distance), insulation failure (replacing the spark plug with a new one will help), formation of heavy carbon deposits (the spark plug must be thoroughly cleaned);
Problems with the ignition coil: insulation failure or winding rupture (replacement required), incorrect connection of circuit elements or interruptions in its operation (if it is impossible to eliminate the fault of the microcircuit, its replacement is necessary).
Poorly functioning fuel system
Causes and solutions:
- Lack of fuel in the tank (the tank needs to be refilled);
- Clogged or pinched fuel hose (thorough cleaning or complete replacement of the hose is required);
- Air trapped in the fuel hose (check the tightness of the connections, tighten if necessary);
- Low quality gasoline or diluted with water (fill with higher quality fuel);
- Problems with the carburetor: breakdown, fuel or debris getting into it. Disassembling and cleaning the carburetor will solve the problem. Also, the reason may be an incorrectly installed throttle valve, which can be solved by carefully adjusting this part.
Problems in the main engine components
Causes and solutions:
- Poorly tightened cylinder head bolts (tighten more tightly)
- The piston, piston rings or cylinder are worn out (needs repair or complete replacement)
- Poor contact between the working chamfers and the seats (repair required)
- Sticking valve (needs repair)
- The gap between the valves, the value of which differs from the gap size provided for this model (careful adjustment of the gap value is required);
- The intake manifold gasket does not prevent the passage of air (tighten the bolts; if air continues to pass through, the gasket needs to be replaced)
- Poorly tightened spark plug (tighten the spark plug more)
Diagnosis of generator failures
Now let's talk about how to independently diagnose a car generator so as not to trust it to third-party mechanics, who can often recommend overly expensive repairs and unnecessary spare parts. Let's start with how to check the field winding of a car generator. We will need an ohmmeter, which should be brought to the rotor rings. If the resistance value tends to infinity, then most likely a break has occurred; adhesions are especially weak points. It is necessary to check them most carefully. The normal resistance value ranges from 1.8–5 ohms. If you connect an ohmmeter with one end to the non-insulated part of the stator, and the other to the winding, then it should show an open circuit, otherwise a short circuit has occurred.
But it is possible to determine an interturn short circuit or break using PDO-1; if such a defect exists, then two curved lines are shown on the device screen. Everything is clear with the electrical part, but how can you check the functionality of the generator bearings on a car? Diagnosis is mainly carried out by basic visual inspection. It is not worth mentioning that the presence of cracks, corrosion, metal coating and other defects are unacceptable. If you find something, you will need new parts.
DIY generator repair
Most of the malfunctions that occur in the generator are solved by simply replacing one or another component. Actually, let’s take a closer look at how you can repair a car generator with your own hands and start with disassembly:
- Before starting to disassemble the generator, you will need to mark the position of the housing covers in order to subsequently facilitate reassembly.
- Next, the pulley is removed
Tools for repair
- The brush holder is carefully dismantled to avoid damaging the current collection brushes.
- All possible wires are disconnected, and the contact bolt located, as a rule, on the back cover is unscrewed
- After this, the case bolts are unscrewed, which prevent the rear cover from being removed. It is worth noting that the case elements fit quite tightly and it will be necessary to apply some effort.
- At the end of disassembling the case, the front cover and rotor are dismantled. Quite often the cover cannot be removed by hand, so it would be wise to use the following method. The cover is installed on two wooden blocks and the rotor is knocked out not with strong blows, you need to be extremely careful in order to avoid damage.
- Finally, the windings are disconnected from the diode block and the elements are dismantled.
After the generator is finally disassembled, its components should be checked in order to find out which element needs to be replaced:
Checking the stator winding for open circuit. The procedure is carried out using a battery and a control lamp. In fact, the finished system is a standard “dialing”. The lamp is connected in turn to the terminals of all windings, and the winding should “ring” in all three cases. If a break is detected, the winding must be replaced.
Generator repair
How to remove oil
The main methods used to eliminate the problem:
More often, oil enters the filter along with the gases that pass through it. To solve this problem, you will need to remove the hose from the filter, rinse it from impurities and debris that have clogged the element, and then install the hose back. If this does not help, you will have to check the throttle valve. Carbon deposits and debris often prevent the part from working properly, causing high pressure in the engine. More often the problem is solved by repairing the damper or replacing it.
Slag can accumulate in the vehicle's oil slinger; To fix the problem, you will need to clean this element and install an additional oil deflector.
If the air filter is damaged or clogged, it may itself be the cause of oil. In this case, the filter can be replaced or cleaned.
If the problem has not been solved, then the cause will have to be looked for in the engine. This means that the car will require more serious repairs: replacing oil rings or other types of manipulation.
Oil in the air filter pipes often appears due to poor compression in the car’s cylinders. You can check how the cylinders work by warming up the engine to operating temperature. If the values are not the same, then the engine requires repair. This problem occurs especially often in older cars.
The owner will also need to check the valve clearances. If they are too large, oil will begin to appear in the air filter. The same applies to replacing oil seals. In a garage environment, it is difficult to determine the cause of a vehicle malfunction. Most owners turn to a car service center, where diagnostics are carried out by technicians using special equipment.
If your car's engine is worn out, you can delay major repairs by doing the following:
- The hose conducting gases through the crankcase must be removed.
- A plug is installed on the fitting.
- The crankcase is ventilated through an extended length hose, which is passed through the bottom of the engine.
- Replace engine lubricant.
But these manipulations will delay the intervention of repairmen by a maximum of 500 km. After this, the motor will need to be repaired or a new unit installed.
What is the problem?
The presence of oil on the air filter itself will not cause harm, but it can serve as an alarming symptom that the need for a major engine overhaul is approaching, and this procedure is labor-intensive and expensive. The appearance of a sign requires prompt contact to a car service for in-depth diagnostics of the car.
Key Features
When checking engine compression, you must remember that a discrepancy of one or two units is acceptable. If the compression in the cylinders is very different from each other, then this indicates that the valves are burnt out or the rings are not pressed tightly, and it’s time to change them.
It is worth paying attention to what color the car's exhaust gases are. If the piston group is heavily worn, the smoke will take on a bluish tint.
If, after checking the compression in the cylinders, no serious deviations from the norm could be detected, then there is no cause for concern, and the oil most likely comes through the crankcase due to a hose clogged with debris. The hoses are easy to clean or replace.
Generator malfunctions and ways to eliminate them
As you know, repairs consist of eliminating problems that have arisen. The most important and fundamental malfunction of the generator is low voltage or its absence. We usually find out about this if the battery suddenly runs out, the car stalls, or the corresponding lamp on the car’s dashboard comes on. To verify this, try removing the battery terminal while the engine is running and pay attention to the behavior of the car. If it stalls or the engine starts to stall, then the generator is faulty. Finally, you can connect a voltmeter to the battery terminals. Normal voltage should be in the range of 12.5 - 14 volts.
There are many reasons for this malfunction. All problems and ways to solve them will be described below:
Engine breakdowns
- The equipment stalls immediately after starting or does not start at all. There may be several reasons: lack of spark, poor fuel supply, gas distribution mechanism, mechanical failures (connecting rod failures, crankcase breakdowns, etc.).
- Spark. The problem may be a burnt-out coil, spark plug, or cap. The relay or the oil sensor itself may fail (it stops sparking if there is little oil), as well as the electrical wiring.
- Poor fuel supply. One or more elements of the fuel system - gas tank, filter, tap, carburetor - is clogged or faulty.
- Timing belt If gaps and scale on the metal increase and accumulate accordingly, the engine may not start.
- Smoke from the engine. Problems with pistons and/or cylinder. Oil enters the combustion chamber due to the exhaustion of the piston - hence the smoke. Too much oil in the fuel mixture also causes smoke.
- The motor started knocking. Abrasion of the crankshaft or other engine elements.
- Fuel in the crankcase. Gasoline and oil are leaking from the crankcase. Carburetor failure. The reasons are its obsolescence and/or accumulation of dirt.
- The motor jams. Engine obsolescence, lack of oil, excessive carbon deposits in the combustion chamber.
Independent disassembly of the unit and repair
To disassemble the generator unit, you need to stock up on box and open-end wrenches, ratchets with heads, and an extension cord with a wrench. It is advisable to remove elements on the surface of white paper. This will help you avoid losing small metal parts (nuts, bolts).
Technology for dismantling a car generator:
- You need to turn off the ignition and remove the terminal from the car battery.
- First, the back cover is removed.
- The diode bridge and relay with brush assembly are removed.
- The rotor and stator are removed. To remove the cover from the stator, it is necessary to disconnect the phase windings from the output wires of the rectifier unit.
- The pulley is dismantled from the shaft (it is important not to lose the buffer bushings) and the front cover of the car generator.
During sequential disassembly, the condition of the bearings, contacts, voltage regulator is assessed, the braiding of the rotor and stator is inspected and the diodes are “ringed”, contacts are cleaned, and friction points are lubricated.
After repairing the unit yourself and replacing faulty parts, you can reassemble it.
The most important thing is to understand that the generator, like all components of the car, must be monitored and serviced in a timely manner. Change brushes in a timely manner, do not allow large amounts of dust and dirt to get in, not to mention water. Ensure that the alternator V-belt is properly tensioned so that it is neither loose nor overtightened.
It is recommended to check the technical condition of the generator every 15,000 km. mileage Typically, with proper care of the generator, it can last up to 160,000 km. mileage and repairing the generator with your own hands is simply not necessary, you just replace it and that’s it.
How to start in winter?
Surely everyone will agree that it is very unpleasant to find yourself in a house without electricity in winter in cold weather. And if you have a properly connected gasoline generator, such problems do not arise. However, owners of such devices need to remember that there are several ways to start gasoline power plants in winter.
- Regardless of the method of connecting the device, you must treat the injectors with care. They should be held at a certain angle to prevent fuel fluid from getting onto the spark plugs.
- You can inject a special agent into the carburetor to quickly start a gasoline generator. You can purchase this substance at any electrical goods store.
- The easiest way to start a gasoline generator requires taking the device into a warm room, warming it up, and then returning it to its place. Most likely, the unit has been frozen and, like a car battery, requires heating the electrolyte. This method cannot be called fast, but it is “miraculous.”
To protect the generator system from various damages during cold weather, the owner must drain the fuel liquid from the tank and lubricate the movable components of the system, especially when the next start will be made after a long time. But the most important thing is that a poorly functioning generator must be kept in rooms where the air temperature does not fall below 0 degrees.
Preliminary identification of the cause of the breakdown
Some idea of the “disease” of the generator can be obtained based on the characteristics of its new behavior. The car manual contains a lot of information.
- Noise during operation indicates wear of the bearings. If one bearing breaks, it will make a small sound. If two bearings are involved, the generator will rumble.
- The regulator indicator flashes red and charging is normal. Most likely, the relay in the electrical circuit is broken.
- Insufficient battery charge can be explained by worn-out or broken brushes, diodes, relays, or voltage regulator. Or there is a short circuit in the windings of the unit.
Before removing the generator, be sure to first remove the terminals from the battery, then disconnect all wires from the device itself. Before dismantling it, you need to check the tension of the drive belt and the condition of the tensioner. If it sags a lot, you can try to tighten it by loosening the fastenings and moving the unit along the guides.
Or use the tensioner adjustment. It is attached to the motor and rotates using a bearing. Many models do not have it. Where it is, you need to loosen the adjuster nut and increase the pressure of the tensioner on the belt. Checking the result by pressing on it should give a feeling of sufficient tension.
It was not possible to achieve sufficient tension - the belt needs to be replaced. Now you can safely remove the generator from the belly of the car and take it to the “operating table” for opening. It is advisable to have a surface lined with white paper nearby. It will be convenient to place small parts (nuts, bolts) on it to prevent their loss.
This must be taken very carefully, because some elements are made of insulating materials. The instruction manual describes these nuances. Replacing them (if the old ones are lost) with metal parts when servicing the generator is carried out will lead to its burnout at the first start-up with no chance of another repair. After assembly, the table should be empty.
Troubleshooting basic gas generator problems on your own.
The basic principle of repairing any equipment is eliminating faults by elimination. How we do it. The generator comes to us and we begin to check:
- First of all, we inspect the appearance for mechanical damage and oil leaks, as well as the presence of rust in the tank. Next, check the presence of oil and crank the engine with the starter (check the compression resistance and extraneous noise). Let's try to start it.
- If not, look for a spark. We immediately take a new spark plug (leaning the spark plug against ground and cranking the engine), if there is no spark or it is weak, we try to disconnect the wires from the oil sensor relay and replace the spark plug cap. If it doesn't help, look at the ignition switch or power button. If everything is fine there, then the ignition coil is faulty.
- If there is a spark, we try to start it. If it starts and stalls or runs with the choke closed, the carburetor is definitely clogged. Many people say that they cleaned it themselves, but the symptoms are the same. This is obvious; you need to clean the carburetor by disassembling it down to the bolt using special means. And that’s half the battle, then you need to install it and correctly adjust the rods and springs of the damper and speed controller. If it does not start at all, add a little gasoline to the combustion chamber, through the spark plug hole or an open carburetor choke.
- Rust in the tank is a very annoying problem, you can clean the fuel system and everything will work. But soon, after some time, this rust will get into the carburetor (into the jets, under the needle) and the symptoms will repeat. If there is rust in the tank, it is almost impossible to remove it. You can pour special agents (such as solvent) into the tank overnight or install a fuel filter, but the only salvation is to replace the tank.
Many people have a need to provide their home with an uninterrupted power supply system - the quality of domestic electricity supply is low, which is especially typical for suburban and rural areas. The most common solution is to purchase a gas generator - these devices are available in a wide range and have an affordable price. However, a gas generator, being a rather complex device, has many features, the knowledge of which is necessary for every owner to properly use such equipment.
Popular faults
There are several common reasons why a car alternator fails. The result is the following symptoms:
- there is low voltage at the output terminals;
- the generator has become noticeably noisier;
- devices are recharged;
- charging of consumers disappeared;
- Charging is in progress, but the warning light on the instrument panel is on.
Most of their described consequences have valid reasons. They can be direct or indirect, and can also be related to mechanical or electrical problems.
Failure of the electrical component of a gasoline generator
- The equipment supplies current, but it is either excessively high (and the equipment burns) or small (and it is not enough to operate). There are 2 options possible. The first is that the engine does not operate at 3 thousand rpm. The second is problems with the inverter board, diodes, capacitor or ATS).
- The equipment does not supply any current at all. The motor runs, but does not supply current. This problem occurs when the AVR, wiring burns out, diodes, rotor, stator or other elements fail. If it is an inverter generator, you should definitely look at its board.
- When the devices are turned on, the motor stalls or functions poorly. Here the problem is in the motor - it is poorly adjusted or clogged somewhere.
Prevention
Of course, the best way to avoid problems with the vehicle's power supply is to undergo technical inspection at service centers on time and do not forget to periodically diagnose the vehicle. After and before long trips, take the time to check the voltage level with a multimeter, as well as inspect and secure the main parts of the generator to its body. Otherwise, you risk escalating the problem to the point where you need to completely replace your car's alternator, which will cost your wallet a much larger sum.
vote
Article rating
Overload
Sometimes it happens that a power plant can be overloaded with consumers and devices, the sum of their powers exceeds the rated power of the generator. Try running the generator completely without load or simply disconnecting several devices from it.
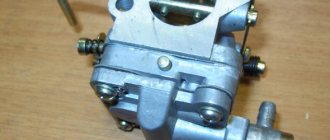
Carburetor clogged
Check the gas generator carburetor for blockages.
Gasoline injection needle clogged.
If the needle is clogged, it must be cleaned. Blow it out using a car compressor. Apply the nozzle.
Video instructions for cleaning the carburetor needle
https://youtube.com/watch?v=2UZLvmf_mWM
Clogged or stuck float mechanism for supplying fuel to the gasoline unit.
Purchase a carburetor cleaner and treat the entire structure. Wait a few minutes, and then move the float mechanism with your own hands and blow out the valve.
https://youtube.com/watch?v=oVhJbqFMKgA
Valve repair
The valves of a gasoline engine are controlled by a timing belt. To check its operation, remove the unit cover by unscrewing several bolts. You will see several valves and a pushrod. You need to push the shaft in the right direction. If you see that everything is moving, but the valves are not moving, then they are stuck. To repair them, take a carburetor cleaner and a hammer.
Rotate the rocker arm and carefully hammer in the valves. Next, turning the shaft, push the valves back, pouring plenty of liquid on them
Repeat this step until the valves come off.
The generator works, but does not provide energy.
If the gas generator starts but does not produce energy, then most likely the engine is damaged or the internal settings of the generator are lost. Take a voltmeter and an ammeter and compare the readings at the power plant with the readings given in the instructions. If the readings differ, then this is certainly an internal failure and your unit needs professional examination and repair. So call the experts.
Emergency start of a power plant using a drill and battery
If your portable generator starts but does not produce power, you can:
- Use the battery after connecting the wires to it correctly (plus to plus, minus to minus).
Remove the spark plug and start the engine by pulling the starter cord.
Starting with a drill.
Use a drill to restore the alternator's magnetic field. This video will clearly show how to do it yourself.
Advice: the best way to prevent breakdowns of expensive equipment is to maintain it correctly and in a timely manner, even if your autonomous power source only works from time to time. Also promptly change filters and other elements that require periodic replacement. Remember that it is better to play it safe and replace the filter than to rely on chance.
Finally, remember to use good quality oil and fuel. You will save a lot of money and time if you are familiar with the basic troubleshooting methods and can repair a gasoline generator yourself. Most of these techniques are described in the instructions for use for your model. Do your research first before calling the experts.