In recent years, technologies associated with the use of monolithic structures have become increasingly popular in the construction of private and apartment buildings and commercial buildings.
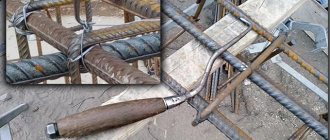
To give them strength and resistance to stress, before pouring concrete, a special metal base is formed inside. The reinforcing bars are tied together with steel binding wire using a special hook.
Such a tool is sold in any hardware store, or you can make a hook for tying reinforcement with your own hands.
Types of tools for knitting reinforcement
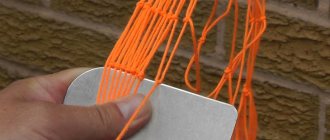
The knitting method involves using steel wire to manually fix rods perpendicular to each other in places where they intersect crosswise.
A crochet hook is a simple and safe tool that allows you to tie reinforcement bars quickly, securely and evenly.
Today, there are three types of ready-made hooks for knitting reinforcement bars, which can be purchased in the store. In addition, you can make a hook for the reinforcement yourself.
Manual
Photo of a purchased hook. The handle rotates freely.
A simple hook is a rod attached to a handle with bends that grip the wire. The hook for tying the reinforcement is rotated manually. The advantage of hand tools is their availability, durability and ease of use.
A hand crochet hook is an excellent option for novice builders, which will allow you to understand the knitting algorithm and feel the optimal degree of wire tension to obtain high-quality knots.
Screw
The knitting wire is selected with a diameter from 0.8 to 2 mm.
A semi-automatic hook is a reversible tool that operates by forward movements of the handle. The device has a rod with a hook in the form of a drill, which fits into the funnel of the handle along the thread, tightening the wire.
The cost of such a tool is higher than a manual one. But the screw tool makes it possible to cope with a wide range of work in a short time - in order to completely tighten the knot, it is enough to make only a couple of movements.
Mechanical
Builders who value every second choose an automatic hook (gun) for tying reinforcement. The operating principle of the gun is based on fully automatic rotation of the hook. This device is the most modern and advanced, allowing you to achieve maximum results and speed without large labor costs on the part of the builder.
Operating principle.
Buying such a hook for household purposes will not be justified: working with a gun requires a fairly large consumption of wire, and the cost of the device is high. But on large projects or when performing work that needs to be completed in an extremely short time, this option is ideal!
Homemade
Photo: hook made of wire with a diameter of 3-4 mm.
Purchased hooks are not always able to fully satisfy construction needs. Often, the shape of their rod has incorrect bends, and the length of the tools is made too short, which significantly affects the quality of work. So how then to make a hook for tying reinforcement correctly?
To make a device for tying reinforcement with your own hands, we will need a welding electrode or steel wire with a diameter of 4 mm.
In order to make a hook, you need:
- Make a handle for the device from a piece of thin hose to the size of a rod or trowel without a spatula.
- Insert the electrode into the hose or insert trowels into the funnel and secure (for example, using epoxy resin).
- Bend the rod at an angle of ninety degrees at a distance of about 5 cm from the handle (the bent rod should resemble a rocker in appearance).
- Bend the end of the rod in an arc.
- Before work, sharpen the sharp edge of the electrode using a file or sharpener.
A hook can be made from an unnecessary screwdriver or a handle from a construction roller, bending the sharp end at the required angle and sharpening it slightly. An automatic mechanism can be made by inserting an electrode rounded at the end into a screwdriver.
A homemade tool is perfect for household purposes, will save money and allow you to quickly knit even and reliable knots.
How to make a hook for tying reinforcement with your own hands?
The connection of metal reinforcing bars into a frame for concrete structures in private housing construction occurs using the knitting method. To assemble the reinforcing frame, a special device in the form of a small hook is used. Let's look further at how to make a hook for tying reinforcement with your own hands and how to work with it correctly.
Types of tools for knitting reinforcement
The knitting method involves using steel wire to manually fix rods perpendicular to each other in places where they intersect crosswise.
A crochet hook is a simple and safe tool that allows you to tie reinforcement bars quickly, securely and evenly.
Today, there are three types of ready-made hooks for knitting reinforcement bars, which can be purchased in the store. In addition, you can make a hook for the reinforcement yourself.
Algorithm for knitting with one loop
The principle of knitting reinforcement with one loop in the first stages does not depend on the type of hook. The only differences in how different tools work will be in the way the rod rotates: with a brush, by inertia or automatically.
To connect the frame rods you need:
- Cut the knitting wire into pieces of 20-40 cm (depending on the diameter of the rods).
- Fold the piece in half and wrap it around the joints where the rods intersect, slightly overlapping.
- Take the hook and pull it through the loop.
- Hook the two free ends of the wire with the tool.
- Twist the wire tightly, slightly lifting the tool up.
- Remove the tool from the loop and check the quality of the knot.
Diagram of types of wire knots for manual knitting.
The reliability of the bundle is checked not by the tension of the wire (if you tighten it, the wire can easily break), but by the mobility of the rods.
Advice! Before cutting the number of pieces for the entire volume of work, it is better to cut several test versions of different lengths and try to work with each of them: in this way you can choose the most convenient length and eliminate the possibility of transferring the material.
Conclusion
Anyone who has decided to seriously engage in monolithic construction should know how to crochet reinforcement, because this is the simplest and most convenient way to make a strong and reliable frame for pouring concrete. A crochet hook can be either purchased or made with your own hands. In any case, this device will become indispensable for fast work and knitting reliable connecting knots!
Methods of knitting reinforcement
Let's consider all the existing ways to connect reinforcement. Each of the options is good in some way, and is used by builders, depending on the type of building and design requirements. There are 3 ways to connect rods; with their help, a strong and reliable metal frame is created:
- Wire knitting.
- Welding.
- Plastic clamps.
These methods of tying reinforcement have their own characteristics. Each of them is correct and is applied depending on the requirements and the material used. When reinforcing a strip foundation for a private house, the reinforcement is often connected by welding rather than tied with wire. But which option is the best?
Advantages and disadvantages of welding connections
Despite the fact that these are different technologies, the right choice can save money and time on construction, without sacrificing structural strength. The method of connecting elements by welding was previously considered one of the most reliable and effective. However, such technology is not always appropriate. Usually it was used when installing bulky frames that strengthen the foundation for multi-story buildings and large cottages.
This method has some disadvantages:
- You need to have skills in working with a welding machine, otherwise you need to spend money on the services of a professional welder. In this case, the cost increases.
- Welding points are the weak point of the structure. There the strength of the frame becomes lower.
- The method is not suitable if you use fiberglass reinforcement. In addition, the A-400 (A-3) fittings, which are the most popular, cannot be connected by welding. Only rods with the index “C” are suitable for work, for example: A500C reinforcement.
Therefore, in modern monolithic construction, welding has been replaced by viscous welding. For private and residential houses, construction of a bathhouse, garage or other buildings, this is the best option for connecting reinforcement.
Pros and cons of joining using the knitting method
Why is this method so good? It has the following positive aspects:
- Speed of work completion. Knitting with wire takes little time, it is simple and does not require skills. However, if you do it manually, the process slows down. Next we will look at how to quickly knit reinforcement.
- Ease of troubleshooting. When working with welding, it will be more difficult to eliminate errors; you will have to take a grinder and cut the welding seam. The wire can be simply bitten off with wire cutters or unwound with a crochet hook.
- You don't need to be a professional to knit reinforcement.
- The reinforcement process can be performed in formwork.
- The cost of work is much lower.
An example of knitting a mesh of reinforcement with wire.
If we talk about shortcomings, we note the precariousness of the finished frame. True, this is not a big problem. The structure will be strong, the only problem is that when the frame is moved into the formwork it begins to loosen, in this case it is possible to tack the reinforcement in several places by welding. To solve this problem with fiberglass reinforcement, you need to attach several braces to make the structure more rigid and stable. By bending, the tension in the knitting areas changes, the frame moves. Therefore, you need to be careful when installing it in the formwork. It is better to knit the reinforcement in the formwork or above it if the strip foundation is being reinforced.
Features of connecting reinforcement with plastic clamps
The main advantages of this method are that it does not require special skills, it has a high speed of work, and reliable fixation of the reinforcement. The disadvantages of this method are the following:
- Price. For large volumes, the wire will be more economical.
- Speed of work (when compared with other methods of knitting).
- Correction. You made a mistake somewhere, you will have to bite off the clamp, it becomes unusable, but the wire can be tied up.
- Reliability. It is not advisable to move around a structure connected with plastic clamps.
- Temperature. They burst at subzero temperatures.
Based on these data, we can say that this method is more suitable for private construction, with small volumes, and it is also suitable for people who want to do the reinforcement themselves with their own hands.
Types of hooks
Types of hooks for knitting reinforcement:
- tools with a simple structure;
- screw devices;
- special guns that are not exactly related to hooks.
Simple hooks
This is the simplest knitting product, consisting of a metal rod with a hook at the end. This design allows for easy grip of the loop. The rod itself is curved, which, in combination with the bearing built into the handle, gives the device a high rotation speed. Due to this, the loop is tightened tightly, thus fixing the elements.
The screw hook for tying reinforcement is presented in the form of a mechanized version of a simple hook. The essence of the work is the same: the loop is tightened by turning the hook-tip. The difference is that the rotational movement is provided by the translational force of the tool, which in turn is transmitted by the worm gear. A mechanized hook gives a higher knitting speed, but it also costs much more. Purchasing a tool is advisable if a large amount of work is planned.
Screw hook and its principle of operation
When constructing large monolithic objects, the volumes of tying are so large that it is better to immediately buy a tying gun. The device fully automates the process: the gun is pre-loaded with a coil of wire for tying the reinforcement; when combining the elements, the tool winds the wire, pulls it tightly and twists the loop. After this, the excess is cut off.
Knitting reinforcement using this technique involves greater wire consumption, but all tensions are performed evenly. The gun provides high knitting speed: much higher than when knitting with a simple or screw hook. This is an expensive device, so it is purchased only if the construction of a large facility is planned.
Guns for tying reinforcement
Professional hook for fittings - use a gun
The knitting gun is a professional tool
Advantages of a professional device:
- there is no need to pre-cut the wire into blanks;
- wire is automatically fed from the working drum;
- material savings are achieved due to the absence of wire waste;
- increased pistol performance;
- increased loop tightening force;
- possibility of adjusting the twisting force and wire length.
Among the main advantages, it is necessary to note the possibility of autonomous operation from a battery, as well as the use of a special extension cord, which allows you to perform work while standing, without bending your body. The design of the device allows you to hold it in one hand, while the other hand supports the steel rods without the help of assistants. The duration of tightening the joint does not exceed one second. This is very convenient when performing work on an industrial scale.
Along with the advantages, there are also weaknesses:
- quite high price of a professional pistol;
- increased costs for purchasing special wire;
- inconvenience of use in confined spaces;
- the need to train knitters in how to work with the tool.
It is important to purchase consumables that correspond in cross-sectional size and rigidity to the characteristics of the gun. Otherwise, equipment damage may occur.
The gun is used by professionals when assembling the frames of large foundations. And at the same time, in certain places of the grille, fastening can only be done using hand tools.
Knitting gun BM-400
Proper use of the hook
A manual device in the form of a hook makes it easier to tie the reinforcement for the foundation, saving time and effort.
The metal hook is sold, but you can make it yourself. Take a reinforcing bar or steel rod with a diameter of 8 mm and a length of 20 cm. You will need two nuts and washers with a diameter slightly larger than the rod and a handle from an old roller or screwdriver. One side is sharpened for the tip of the awl and bent, and the handle is attached with hardware to the rod. Node formation process:
- A piece of 30 cm wire is folded in half and the intersection point of the reinforcing bars is clasped so that the loop on the bend is opposite the tails.
- The hook is inserted into the loop, catches the tails and rotates to wrap the ends around the loop.
- The resulting knot is tightened with force, without breaking the wire.
- The hook is removed from the loop, the remains are trimmed.
The wire is also folded in half, the hook is inserted into the loop, the end is wrapped around the loop and the hook is pulled towards itself. Turning the handle ensures tightening.
How to knit the frame?
When reinforcing a small volume of concrete, builders simply place the reinforcement in the formwork and then fill it with mortar. However, if large concrete products are to be reinforced, for example, a monolithic (slab) or massive strip foundation, then a frame is required. The reinforcement must be distributed evenly throughout the entire volume of concrete in order to reliably perform its function of increasing the strength of the structure. In these cases, a complex frame is made from metal rods.
crochet hook
The first option is the simplest and most accessible. If necessary, you can buy it in a specialized store for a hundred rubles or even cheaper. Moreover, it can be made by hand if the suitable material is available - we will return to this later. The downside is low performance. A novice knitter, with a sufficient supply of wire, will be able to produce 6-10 knitting per minute.
Screw hook
The screw hook is the next step in the development of the tool for knitting reinforcement. Outwardly, it looks a little like a regular one, but thanks to it, the knitting speed will increase, and the worker will get tired much less. If, when working with a regular hook, a specialist must twist the ends of the wire and manually twist them, then a screw hook is much more convenient.
Loop the loop and ends, then gently but firmly pull towards you. The plastic handle will be fixed in the hand, and the hook itself will begin to spin quickly, securely tightening the loop. Such a tool costs from 600 to 1000 rubles, depending on the manufacturer and store. It will be an excellent choice if you need to perform work once on a relatively large object. The knitting speed will increase, however, the wire will still have to be cut and bent by hand.
Instructions for crocheting reinforcement
It is useless to knit the reinforcement with your bare hands - you can achieve the required force to tighten the wire only with the help of additional tools. Let's take a step-by-step look at the basic techniques for crocheting reinforcement.
Manual
To knit wire by hand you will need a hook. The wire is folded in half and hooked under the fixation point. The free end is threaded into a loop and crocheted until the wire is tightly tensioned.
Simple knot
To tie a wire with a simple knot, you will need to do the following:
- A wire 200 mm long is cut and bent in half.
- The bent section is pushed under the point where the two rods meet.
- The hook is inserted into the loop and catches the free end.
- A full revolution is performed around its axis. The free end must be held.
- Next, while tensioning the wire, the hook is turned several more times until a reliable connection is obtained.
You don't have to buy a hook at the store. You can easily make a convenient tool yourself by giving the required shape to a steel rod and putting a handle on the end.
Dead node
Before crocheting foundation reinforcement, you need to learn how to form a dead knot. This method is especially good for tying vertical rods for columns and beams.
- A piece up to 400 mm long is cut and bent in half.
- The segment is pushed forward by a loop from below the knot being fastened.
- The free end is passed through the top and again bent under the rods.
- The loop and the free end are aligned and then hooked with the hook tip.
- The hook is rotated with tension until the loop comes off.
To obtain a high-quality connection, you need to ensure that the wire is tightly laid on the surface of the reinforcement. The knitting process continues in a checkerboard pattern.
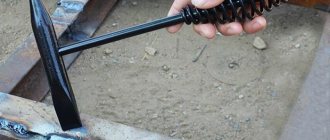
Screwdriver
The scheme of working with a screwdriver is reminiscent of the crocheting process, but instead of manual force, automation is used. Instead of a regular tip, a homemade hook is inserted into the screwdriver; usually a roofing nail is used for this purpose.
It is important to ensure that the speed of the screwdriver corresponds to the required force for tightening the wire. If you apply too much force, the wire will break, and at low speed you may end up with a weak knot.
Knitting technique
When using a simple homemade crochet hook, the knitting technique involves the following steps:
- The wire, which will be the fastening element, is cut into pieces of 30 - 40 cm;
- Each piece is folded in half and applied to the intersection of the rods. Apply from below, slightly lifting the edge of the wire;
- The end of the hook is threaded into the resulting loop, and the second end is bent on the back side of the tool;
- Then, holding the tool firmly in the hand, they perform a circular rotation, which causes the rods to twist among themselves;
- After the number of turns necessary for fixation, the hook is pulled out.
Important! Tying the reinforcement too tightly can break the wire.
Knitting with a screw hook is performed in the same way, but instead of rotating, the handle is pulled towards itself, which activates the rotation mechanism of the hook.
Attention! With high quality knitting, the reliability of the screed is checked by shaking sections of the reinforcement structure relative to each other. It is necessary to exclude their movement.
Automatic hook for tying reinforcement
A special device with a reverse operating principle allows you to speed up and automate the twisting process. At first glance, it looks like a standard manual device, but differs in the presence of a screw mechanism consisting of the following parts:
- plastic handle with internal screw thread;
- working body with a screw thread on the rod.
When assembled, these elements form a mechanism with a reciprocating principle of operation. The reversible device works quite simply - moving the handle causes rotation of the working element on which the wire loop is put.
Advantages of the reversible device:
- increased wire binding performance;
- Possibility of use in areas with limited access;
Automatic hook for tying reinforcement
- ease of knitting operations;
- durability of the device with regular lubrication.
The device has the only drawback - its increased price when compared with the cost of a conventional hand tool.
Using a reversible tool, the knitter can perform an increased amount of work without getting tired. The screw device is superior in efficiency to the manual device when it is necessary to manually pull and twist the wire ends. Without reinstalling the working hook, by cyclically moving the handle you can achieve reliable fastening.
Procedure for using the device:
- Insert the hook of the tool into the twisted loop.
- Pull the handle towards you along the working axis.
- Return the handle to the starting position.
- Perform the next movement cycle.
You can also make your own semi-automatic tightening device using a regular screwdriver. You will need a bent nail without a head or an L-shaped rod, the end of which must be inserted into the tool chuck. With a little practice, it is not difficult to master the principles of operation using this device.
Screwdriver device
A tool for tying reinforcement can be made using a screwdriver. A pre-prepared hook of the required length and shape is inserted into the screwdriver chuck. The work process is the same as when knitting with a manual device. The main thing is to choose the right operating mode for the equipment. The main parameter is the rotation speed.
When using an automatic gun, knot tying occurs at a speed of 1 knot per second. There is no need to cut the wire; it is cut automatically.
Related Posts via Categories
- How to calculate the cross-sectional area of reinforcement of all types?
- How much does 1 meter of construction rod reinforcement of various types weigh?
- Length of rod reinforcement - all possible options regulated by GOSTs
- Linear fittings – high-quality installation of power lines is guaranteed!
- Unmeasured reinforcement is the best option for low-rise construction!
- Brands and classes of construction rod reinforcement and wire for reinforcement
- Coupling fittings, what they are and what they are used for
- Anchoring reinforcement in concrete is a complex but important operation
- Hot-rolled reinforcement - GOST and the entire life cycle of the product
- Weight and features of steel corrugated reinforcement A3 and other classes
Making your own hook
Despite the low cost of a crochet hook for reinforcement, some experienced craftsmen who have worked with reinforcement for many years prefer to use homemade ones rather than purchased ones. This has its advantages.
- When making it yourself, you can give the handle the optimal shape so that it fits comfortably in your hand. Your hand will get less tired and your productivity will increase.
- The choice of steel for production; you often come across factory hooks made of soft metal. As a result, it cannot withstand the load and bends.
- Make a hook for crocheting reinforcement of the required size. There are times when it is impossible to get to the place of tying with a factory hook because of its length.
- Small, but still savings (if materials and tools are available).
Electrode hook
An electrode hook is suitable for small amounts of work. When it is necessary to tie a small frame from reinforcement.
Making a hook with your own hands takes only 5 minutes. You will need: electrode 4, pliers and a grinder (if not, you can do without it).
Let's look at how to do it step by step:
- We beat the electrode off the protective coating.
- We retreat 1-2 centimeters from the edge and bend it at 80-90 degrees.
- We retreat 3-4 centimeters from the other edge, make the first bend at 90 degrees. We retreat another 10-12 centimeters, and make a second bend at 90 degrees. We retreat another 4-5 centimeters and make a third bend.
- Let's sharpen the tip of the hook a little so that the wire can peel off better.
The hook is ready, it should have the same shape as in the drawing below.
Homemade hook made from rebar with a wooden handle
A homemade hook is most often used by professional reinforcers, thanks to the advantages described above. Its production will take about 2 hours, and the result will be a hook that is in no way inferior to the factory one.
To make a hook you will need the following materials and tools:
- Corrugated fittings 8-10 in diameter, 35-50 centimeters long;
- wooden blank for handle;
- 2 washers - the diameter is equal to the hook handle;
- 2 nuts;
- pliers, knife or hatchet;
- grinders and welding;
- drill with drill 8-10 diameter;
- sandpaper.
Manufacturing procedure:
We grind the ribs of the reinforcement on a grinder so that it becomes smooth. We take a corrugated one, not a smooth one, since a higher grade of steel is used for its production, the hook will be stronger. Let's prepare the pen. Using a drill, a drill of a suitable diameter, drill a hole in the center of the workpiece. Afterwards, if necessary, we adjust it to the required size using a knife or hatchet. At the same time, make sure that the hole is in the center of the handle. Next, sand the handle until smooth with sandpaper. We put a nut on the edge of the reinforcement and weld it by welding. Put a washer on top of the nut, then put on the handle, then the washer and nut again
It is important that there is a small gap between the washers and the handle so that the hook handle can rotate well. To do this, place a piece of paper folded a couple of times between them.
Then weld the second nut. Be sure to place water near you so that if the pen catches fire, you can immediately extinguish it. Now we will sharpen the edge of the reinforcement with a grinder, do not overdo it so that it does not turn out too thin, otherwise the crochet hook will bend. We retreat 1-2 cm from the edge of the handle and make a bend at 90-140 degrees (it all depends on the chosen type of hook, see examples of bends in the picture below). We retreat 1-2 centimeters from the edge of the reinforcement and bend the tip of the hook with pliers at 80-100 degrees. Make sure that the bends are in the same plane. To increase the service life of the handle, we cover it with impregnation for wood against rotting and moisture in 2 layers. After drying, coat it with wood varnish. The hook is ready, all that remains is to make a couple of ties for testing; if it fits well, then you don’t need to bend anything, otherwise you can bend it a little to fit your hand.
Photos of handmade hooks for tying reinforcement
We recommend watching the video instructions for one of the options for making a crochet hook with your own hands.
That's all. Now you have not only learned about knitting devices, but also learned how to make a hook for tying reinforcement with your own hands and can easily cope with this task.
Crochet technology
It doesn’t matter what kind of hook we use for tying reinforcement, the technology will always be the same. It is extremely simple and accessible to anyone. The wire must be cut into pieces 30–40 cm long, however, this parameter can greatly depend on the cross-section of the rods.
We suggest you read: How to make a boiler for a stove with your own hands
Steps 1-4 - fixing the reinforcement unit with a wire loop
- A piece of knitting wire folded in half is wrapped around the knot that needs to be fastened.
- The hook is inserted into the resulting wire loop and hooked onto its other end. After this, simple rotational movements are performed.
- The first few revolutions are done quite quickly.
- Then the rotation speed is slowed down and the knot is pulled out with great care so as not to break the wire.
- After this, the hook is simply pulled out and the strength of the connection is checked.
Steps 5-8 - Winding Wire Using a Hook
A hook for tying reinforcement is a simple but very necessary tool, which is easy to make yourself using available materials.
Regardless of what type of hook for tying reinforcement will be used in the work, one technology is used to create the frame, which is easy to implement. The main thing is to choose the right consumables, but we will consider this point below.
To tie the reinforcement bars, you will need a special wire, which is cut into pieces. Their length is usually from 30 to 40 cm. These are the most common indicators, but the calculation of this parameter always depends on the thickness of the reinforcement section.
Knitting a reinforcing belt using hooks is carried out according to a simple pattern. What steps should you take:
- Fold the tie wire in half.
- Pass the folded piece under the cross, in other words, the fastening knot.
- Cross the loop with the free ends.
- Insert the end of the hook into the wire loop and hook onto the free ends.
- Start the usual rotational movements, with the help of which the wire will be wrapped.
- After the first few turns have been made, reduce the rotation speed and carefully tighten the knot until the end. Otherwise, there is a risk of breaking the wire.
- Pull the hook out of the loop and check the resulting connection for strength.
To check the reliability of the resulting unit, it is not necessary to check the strength of the wire and how tight the connection is. It is enough just to try to shake the bars of the reinforced mesh. If the result is correct, they will be motionless.
This was a knitting pattern using a regular crochet hook. However, it also works when using a screw type product. The beginning of mating follows the same principle. The wire is folded in half and then passed under the crossed reinforcement bars.
Next, its edges are folded and secured to the hook. The main difference between a mechanized product is that to tie the wire, you just need to pull the hook handle towards you. There is no need to wrap the wire yourself using rotational movements of the brush.
The hook shaft begins to rotate due to displacement. Next, the handle is released, after which the action is repeated. The number of times this procedure will need to be repeated depends on the degree of hardness to be achieved. Plus, the device has one more feature - the product can both fold and unfold during operation. We remind you that to rotate the product, just pull its handle towards you.
The described binding scheme is quite simple, but at the same time it ensures reliable fastening of the reinforcing belt. Thanks to this, many can save money on this type of construction work. With a little practice and “straight hands”, you can knit reinforcement bars yourself, which will save a sufficient amount of money.
The key task is to ensure that the wire does not break while tying the reinforcement. To do this, it can be pre-fired if it is not flexible enough and does not bend well. To obtain optimal results, the wire should be held over the fire for some time. And before using it, it will need to be cooled. The most convenient is low carbon steel.
This parameter is selected experimentally whenever possible, since using wire that is too thin will cause the knots to break, and wire that is too thick will be more difficult to bend.
Additionally, when knitting, special clamps can be used, which are plastic parts. They are laid between the formwork and the rods, protecting the entire structure from damage.
Regardless of the type of device, the knitting technology is the same. The work is carried out according to the following scheme:
- The cut wire is folded in half.
- It is stretched under the intersection of the reinforcement.
- The free ends of the wire are crossed.
- The hook is pulled through the wire loop and hooks the loose ends.
- Rotational movements begin, during which the wire is wrapped.
- The hook is removed and the knot is checked for strength.
When checking the strength of the connection, the rigidity of the structure is checked. She must be motionless.
The process of knitting with a screw product is the same. The difference lies in the finishing stage. When threading a hook into a loop, you do not need to wrap it yourself. Thanks to the worm mechanism, just pull the handle towards you and the rotational movements will begin automatically.
We suggest you read: How to calculate the size of a door by opening
Low carbon steel is used as wire material. To prevent rupture during knitting, it must be held over the fire. After cooling, it is ready for use. Its diameter can be 1 mm, 1.2 mm, 1.4 mm. Parameters are selected based on experience. A wire that is too thin will break, and a wire that is too thick will be difficult to work with.
When fastening reinforcement, it is expensive to use welding. A knitting device is the best option. It is easy to make it yourself from scrap materials. This device performs high-quality work and is inexpensive.
Important recommendations for choosing reinforcement for the foundation
Diameter
When choosing reinforcement for the foundation, first of all, pay attention to the diameter of the rods. The relationship is simple: the thicker the reinforcement, the more severe loads it can withstand
When determining the optimal diameter, first of all, the characteristics of the soil are taken into account (the main point is heaving) and the expected weight of the finished building, taking into account the weight of its internal arrangement and residents/visitors.
This is how it should be ideally and according to the rules. Along with this, many private developers refuse to draw up design documentation and perform related extensive calculations, adhering to average and generally accepted values. In the case of the construction of relatively small buildings, for example, such as a bathhouse, such an approach is acceptable.
The recommendations are as follows:
- if the structure is erected from relatively light materials (timber, gas blocks and other lightweight building elements from this series), reinforcement with a diameter of 1.2 cm is used. It is impossible to use rods with a diameter of less than 12 mm for arranging the foundation - reinforcement so modest in its overall characteristics is only suitable for use in the construction of supports for fences, gates and other light utility structures;
- if construction is carried out using heavier materials, the recommended diameter of the reinforcement changes accordingly. In most cases, rods with a diameter of 1.4-1.6 mm are used.
Assortment of fittings
Class
The second important indicator is the class of the reinforcement. For a private foundation, class A-3 material is suitable.
Corrugated fittings A3, steel grade A500S, GOST 5781-82
The fittings of this group are very easy to use (easily bends without the use of special tools), durable and reliable. Less commonly used are rods of class A-2 (they can be bent 180 degrees, A-3 – 90 degrees).
Table of reinforcement classes and steel grades