Power plant tuning
Its power and equipment performance depend on the stability of the engine. Upgrading a standard engine is very expensive and unpromising. But, there are several ways to make the engine more efficient.
- Install a quality spark plug. Regularly clean it from carbon deposits and periodically check the clearance. At the first sign of loss of power, replace the spark plug.
- Use the best gaskets on all connections. This allows you to maintain the required pressure in the unit, preventing a decrease in power and the formation of smoke during operation.
- Fill the engine with the best oil to the upper mark. It should be remembered that when the unit is tilted, oil flows away from the rubbing parts.
- Check the quality of fuel before filling the tank. It is advisable to let it sit for a while so that the water sinks to the bottom of the container. The tank itself must be cleaned and wiped dry every 2-3 days.
- Install an additional radiator. To do this, steel plates are welded to the engine housing, which will effectively remove excess heat.
A radical solution is to replace the power plant with a more powerful and advanced one. Today you can purchase Japanese, Chinese and European engines, which are characterized by high performance and reliability. It is possible that the frame will have to be redesigned to accommodate the new power plant.
Plow for agricultural winch – video
The plow is used in conjunction with such a winch for plowing
On sale you can find industrial winches, motorcycles and electric plows.
A walk-behind tractor is a worthy replacement for mini tractors in small farms and household plots. Equipped with a diesel or petrol engine, depending on the power per shift, it is capable of covering an impressive area that would take many times longer to cover manually.
Self-assembly of the power unit (motoblock) is impractical due to the high cost and complexity of the process. But its main type of work - the plow - is not difficult to make and assemble with your own hands, as we will see in this article.
How to remake a walk-behind tractor
Many owners want to improve their walk-behind tractor to improve comfort during work. The most common modifications are the manufacture of adapters and trailers. This upgrade allows you to expand the functionality of the walk-behind tractor, because the adapter allows you not only to transport various loads, but also to use the walk-behind tractor as a vehicle.
Improving the walk-behind tractor will allow you to create a whole mini-tractor. Adapters and trailers can have their own steering, which is much more convenient than using a steering wheel from a walk-behind tractor. There are many step-by-step photo instructions and videos showing how to create a trailer. One of the most important elements of such a device is the frame, which is made of channel or pipes. Wheels can be taken from any car; the ideal option is wheels from an ATV. Bridges can be taken from VAZ 21-09, they need to be shortened. The steering column can be taken from the same car. The driver's seat will allow you to work with maximum comfort.
In addition, a mini-excavator can be made from a walk-behind tractor, the creation of which requires a hydraulic system. Such an excavator is very convenient for construction on a personal plot, because it is compact and can go where heavy equipment cannot.
Safety precautions
When operating a homemade plow, appropriate safety precautions must be observed. Among them, the most important points can be highlighted.
- When the plow moves along a furrow, adjusting it in height, clearing the wheel and ploughshare from the earth and other human manipulations are unacceptable;
- all connecting nodes must be securely fastened - play is unacceptable;
- it is necessary to carry out timely cleaning of mechanisms and sharpening of cutting elements;
- Perform all operations only with the plow immobilized and the tractor turned off.
To ensure occupational safety, it is important to perform work that meets the technical characteristics of a specific agricultural machine. Excessive loads can lead to rapid wear, damage to the unit and harm to human health.
To learn how to make a plow for a mini tractor with your own hands, see the following video.
Increased speed and maneuverability
These questions are relevant for those who have to work on heavy and damp ground, on ups and downs. Even the most advanced models can slip, forcing the operator to exert additional effort to push the machine forward. Many people are not satisfied with the speed of the unit when towing equipment or transporting various loads.
There are several ways to solve these problems:
- Increase wheel diameter. Most walk-behind tractors are equipped with wheels with a diameter of 25-30 cm. If you install 45-50 cm wheels from an old small passenger car, the speed of the unit will double. But you should not make a racing car out of a walk-behind tractor, since this device is not highly durable and has good stability. You can accelerate to 25-30 km/h only on a flat road without sharp turns.
There are many opportunities for radical transformation of even a small domestically produced walk-behind tractor. This equipment can be transformed into any agricultural implement and off-road vehicle.
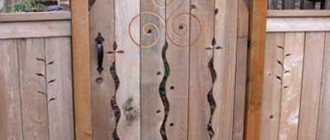
Do-it-yourself plow to a walk-behind tractor from a horse-drawn tiller
An equally good idea is to recycle an old horse plow into a walk-behind tractor. A full description of the process is presented in the video.
A feature of all horse plows without exception is their heaviness, created by a bulky moldboard. If such a plow is installed on a walk-behind tractor without modifications, the earth will not tilt.
This is a big advantage as it will not affect the horse's plow height.
To make a single plow for a walk-behind tractor you will need:
- Autonomously create a polygon, which is cut out according to a given design from a steel billet (3 cm thick). For accuracy, it is recommended to make a template from cardboard;
- after cutting, the stainless steel blade is given a special shape;
- remove the horse blade and install a homemade one;
- remove the handles that were on the vertical axis;
- in their place, metal fasteners are welded through which the plow will be hung on the walk-behind tractor.
- If during field testing it turns out that the converted horse plow does not throw well, the arm should be bent slightly so that it can cut into the ground more.
Manufacturing of additional accessories
Walk-behind tractors go on sale assembled and with minimal equipment. A plow and a cutter are clearly not enough to perform the entire volume of agricultural work. A factory kit for converting a walk-behind tractor can cost more than the unit itself. You can make various attachments and trailers from scrap materials, using tools that are in every pantry of a country house or cottage.
It is worth considering some options for making additional equipment yourself:
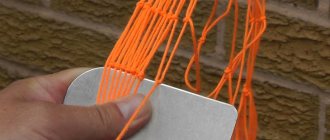
- A converted rake for collecting grass clippings, debris, branches and fallen leaves. If you do this work manually, it will take a lot of time and effort. Trailed equipment will allow you to clean large areas within a few minutes. To work, you will need a wide strip of sheet iron and several meters of reinforcement with a cross section of 8-12 mm. The reinforcement must be cut into pieces 10 cm long and welded to the plate in several rows and at intervals of 3-4 cm. Long rods are welded to the plate for attaching to the walk-behind tractor frame. Trailed rakes can be equipped with rollers to improve maneuverability and smoothness.
- Snow plow. Most units operate much more efficiently in the cold because they do not overheat. You can mechanize snow removal in winter. The blade is made from two pieces of channel welded together. This allows you to get a gripping height of up to 40 cm. The width of the blade is selected according to the power and weight of the unit within 40-80 cm. The blade is attached rigidly to the front of the machine with bolts. Initially, it can be mobile or stationary.
READ Motoblock does not start in winter reason
By showing a creative approach, you can make a hiller, harrows and potato digger that are not inferior in quality to their factory counterparts.
Dimensions
The dimensions of different types of plows may vary. You can consider the parameters of parts using the example of a rotary specimen. It is taken into account that the rotary type of such a device is assembled from the following bases:
- side vertical part of the runner;
- horizontal plane below the skid;
- front dump part.
The most productive is considered to be a plow in which the cutting edge at the bottom of the fixed share is 20 mm below the bottom of the horizontal skid. Another correctly aligned part of the plow is the matching of the cutting edge on the side of the fixed share with the cutting edge on the side of the moldboard. The share and blade should not protrude more than 10 mm beyond the boundaries of the vertical plane on the side of the skid.
There is one more important nuance - fastening the front plane of the blade share without visible cracks and gaps, and in the same plane. If we look at these parts in more detail, they should be well polished and, like a mirror, reflect any surface. There should be no protruding fasteners under any circumstances. As soon as the plow returns from earthworks, it is advisable to clean it of settled soil and foreign particles. Elements that have been polished should be poured with oil or coated with grease. Next, the mechanisms need to be rubbed using a rag. In this way, it will be possible to protect the structure from aggressive external influences, which can lead to the formation of corrosion on the surface of the plow.
As for the 4th correctly constructed structure, it includes the flat front surface of the ploughshare, which makes an angle of 20 degrees with the flat part of the plow structure. It will be equal to the angle located at the rear of the exposed share. The cutting sidewalls-edges of the plowshare and blade will also have 20-degree angles with their bases on the side of the furrow. Moreover, the edge located on the side of the blade may be slightly rounded.
External tuning of the unit
Structurally, light, medium and heavy walk-behind tractors are practically the same. They consist of a power plant, chassis and controls. The operator resembles an ancient plowman, holding the handles of the machine with both hands. However, it is not protected from sunlight, rain, snow and heat coming from the engine. To create additional comfort, you do not need to spend additional money. Everything you need is at hand. External modernization of a walk-behind tractor involves the installation of a removable or permanent awning, an additional protective casing or hood over the power plant.
- roulette;
- building level;
- Bulgarian;
- welding machine;
- electric drill;
- set of wrenches;
- steel or aluminum corner 30 x 30 mm;
- paint brush;
- acrylic paint;
- tarpaulin or cellular polycarbonate;
- flexible plastic.
External modification of the walk-behind tractor is carried out in the following sequence:
- Drawing up drawings. It is necessary to accurately calculate all dimensions of the frame and provide options for attaching it to the frame and handles.
- Carrying out markings, cutting out blanks for the awning, casing, wings and hood.
- Welding a frame from a corner. Drilling mounting holes, cleaning metal from rust, oil and dirt. Painting of the manufactured structure.
- Fitting the frame onto the frame. Marking and making holes in it. Fastening the frame with bolts and nuts, checking the reliability of all connections.
- Installation of plastic casings and awnings on frames.
There is an option to mount the instrument panel on the handle. This way the unit will look solid and representative. The operator additionally gets the opportunity to control the state of the power plant, know the speed of the machine and the distance traveled. When remodeling tractor from the outside, you need to pay attention to ensuring that air freely penetrates to the motor, cooling it efficiently.
Do-it-yourself modernization of the Cascade walk-behind tractor
Most modernization of walk-behind tractors is aimed at improving important characteristics, for example, performance, maneuverability, and expanded functionality. Modernizing the Cascade walk-behind tractor will help improve certain characteristics or correct shortcomings.
Engine replacement may be necessary to improve performance. Lifan engines have proven themselves for their quality and long service life, and in addition, they are perfect for the Cascade walk-behind tractor. It is important to consider that if you purchase an engine from an imported manufacturer, the shaft rotation may be different (clockwise), while domestic walk-behind tractors are adapted to engines in which the shaft rotates counterclockwise. The problem is easily solved - just move the walk-behind tractor pulley to the other side.
To improve cross-country ability and stability, you can install wheels of larger diameter. Pneumatic wheels perform well. Also, instead of wheels, you can install lugs, which can be easily purchased from the manufacturer or created with your own hands.
How to make a plow
When cultivating land, one of the most tedious operations is plowing it and preparing it for sowing. If you have equipment - a walk-behind tractor or a mini tractor - everything can be transferred to them, but for plowing you need a plow. Buying a ready-made one is too expensive. The prices for finished products are considerable. To save money, you can make a plow yourself. And there are two ways. First: do everything yourself completely. This is a difficult path - the shape of the plow parts is nonlinear, with bends of a certain radius, and bending thick metal at home is very difficult. The second way is to buy ready-made cases, and assemble the frame and all other auxiliary parts yourself. This is a simpler option that is relatively easy to handle.
How to improve a walk-behind tractor with your own hands: modification and modernization
Often, alteration of a walk-behind tractor is carried out in cases where the operational characteristics of the unit, functionality and ease of operation no longer satisfy the owner of the equipment. In some cases, individual craftsmen tune a walk-behind tractor to realize their visual fantasies or to impress others. Today, almost every private house and summer cottage has a walk-behind tractor or a walk-behind cultivator. However, the capabilities of this technique are limited. To expand the functionality of walk-behind tractors, you can contact a specialized workshop, but the price of such conversion can be very high. There are several ways to inexpensively and practically upgrade a walk-behind tractor with your own hands.
Some recommendations for plowing
While working, you should hold the walk-behind tractor as level as possible to avoid untreated areas.
When turning or turning, the plow must be pulled out of the soil and done at low speed.
It is not recommended to buy equipment with an automatic clutch (variator), as it breaks down faster and is not at all suitable for hard soils.
During plowing, the walk-behind tractor quite often overheats and, to avoid this, it is necessary to take half-hour breaks every 1-1.5 hours of work.
A well-adjusted unit and properly selected attachments will allow for high-quality plowing of the land. And this is largely the key to obtaining a good harvest in the future. Upon completion of all work, it is necessary to thoroughly clean the equipment, disconnect the plow from the walk-behind tractor and store it until next time.
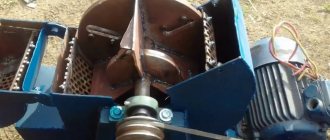
How does a plow work?
The work requires the participation of two workers. One must operate the unit, the second must work and control the plow. During operation, the cable is wound onto a drum, and the plow plows the ground; the controller monitors the correct plowing. As soon as 1 furrow is plowed, the drum goes to idle. The cable is unwound back, and the plow is placed at the beginning of another strip, and so the entire area is gradually plowed.
There is another way, when the plow is attached to a mini tractor. The participation of two workers is required, one sits at the mini tractor, the second regulates the operation of the plow. At first glance, a do-it-yourself plow seems unreliable and fragile, but this is not so. By making such a unit yourself, you can, firstly, save money, and, secondly, realize the assigned tasks for cultivating the land.
A homemade plow does not destroy the top layers of soil. In addition to the plow, it is easy to make such an indispensable device in agriculture as a horse-drawn mower. The device is used for mowing grass and is attached to a mini tractor. A horse-drawn mower is very useful for people who own large plots of land that are overgrown with grass from time to time.
No lathe or drill is needed for manufacturing; assembly is simple and quick.
The engine and reverse can be taken from the C3A motorized stroller. The rods and steering mechanism can be taken from Zaporozhets. The cutting unit can be taken from the walk-behind tractor, and the drive will be carried out using a belt drive. Sprockets from agricultural machinery are suitable for making a creeper. Such a horse-drawn mower consumes only 2 liters of fuel if the grass is not very thick.
Double-sided plow for walk-behind tractor
A double-sided plow for a walk-behind tractor (hiller) is used to hill various agricultural crops. This also eliminates weeds between the rows. With such plows you can cultivate the soil, cut furrows to plant plants, and then fill them up, including the reverse drive of the walk-behind tractor. Such devices differ only in the grip width – fixed and variable. The only difference between them is the movable wings, which adjust the grip width.
The plow , which has a fixed working width, works with a light walk-behind tractor (up to 30 kg), the engine of which has a power of up to 3.5 hp. Their feature is 12 mm racks (protect the walk-behind tractor from overload).
The most common type of hillers, which have a variable working width. Their only drawback is that soil falls into the furrow after passing. Such plows come with walk-behind tractors weighing more than 30 kg, with 4.0 hp engines. and higher.
Types of plows
A plow for a tractor can be purchased ready-made, but it is possible to make it yourself. Tillage is a complex operation that is performed before sowing crops and after harvesting.
The models of plows are different, but they are united by their structure. The product has a ploughshare made of metal, which turns over layers of earth. The walk-behind tractor drives across the field, and the ploughshare follows it, turning over the top layer of soil and destroying the weeds. This happens because their roots are cut by the ploughshare, as a result of which the weeds end up deep in the ground after plowing. They cannot germinate and die.
During the plowing process, the soil is loosened, it becomes crumbly and saturated with oxygen. There are different types of plows, so when choosing a tool you need to take into account the area of land, soil type and other indicators, then the quality of land cultivation will be high.
Plow on a walk-behind tractor: varieties and their design features
A plow is a special device for plowing the soil, equipped with a metal share. Designed for loosening and turning over the top layers of soil, which is an important part of pre-sowing and fall treatment. Initially, plows were pulled by people, and somewhat later by farm animals. Today, a plow on a walk-behind tractor is one of the options for using this mounted auxiliary equipment, in addition to a tractor or mini tractor.
READ What kind of engine can be installed on the Agros walk-behind tractor
Depending on the shape of the main working elements, plows on walk-behind tractors are:
- plowshares;
- dumpless;
- disk;
- rotary;
- combined.
- screw;
- cylindrical;
- semi-cylindrical.
Based on the number of working parts:
- single-body plow on a walk-behind tractor ;
- double-hull;
- multi-hull models designed for extremely complex tasks.
In addition, plows for walk-behind tractors, according to the specifics of fastening, are divided into conventional and reversible.
The Neva walk-behind tractor is a universal equipment that can cultivate various types of soil. To perform a large number of works in areas with different soils, the plow must consist of a geometrically shaped plowshare and a heel and be made of durable and hardened metal. Most plows have a collapsible design. The immersion depth of the plow for the Neva walk-behind tractor is 25 cm, and the working width is 20 cm. Manufacturers produce several types of attachments.
- Rotary - consists of several blades. The disadvantage is that the soil is tilled in one direction.
- Reverse – used for soil with a hard structure and complex terrain. The appearance resembles a feather.
- Single-body - consists of one ploughshare. The disadvantage is the ability to cultivate only soil with a loose structure.
Experts pay special attention to the Zykov plow, which consists of the following elements:
- support wheel;
- double-sided housing;
- ploughshare and blade;
- field board;
- rack;
- plow body with a rotating mechanism.
A double-sided body with a plowshare and a blade allows you not only to plow the soil, but also to turn it over, and the field board reliably fixes the structure and makes it stable. A double-turn plow has a right and left share and allows work to be done in both directions. To change the working plow, simply press the pedal, which fixes the position of the stand, and move the device to the desired location.
The most popular in recent years has been the rotary plow, the plowing depth of which is more than 35 cm. The disadvantage is the high price range. The advantage is the ability to use it in complex areas of irregular geometric shape. When choosing a plow, it is necessary to take into account the type of soil, the power of the walk-behind tractor and its model.
The weight of the most popular plow models ranges from 3 kg to 15 kg, respectively, the sizes also vary. In case of breakdown, you can replace the plow with special mounted cutters. Manufacturers produce several models of cutters:
- saber-shaped legs - for processing virgin soil;
- crow's feet - used for the hardest types of soil.
Reversible plow
A reversible plow , which can be disassembled, is perhaps the most ideal option because the blade can be replaced or sharpened.
You also need to decide what size your plow will be, which will directly depend on what model of walk-behind tractor you are using.
To use the plow more efficiently, it is necessary to adjust the device, for which it is better to use a hitch (although not necessary).
For more precise adjustment, it is necessary to take into account several principles: first, it is necessary that the longitudinal axis of the regulator and the walk-behind tractor coincide, and second, the vertical position of the beam.
This setup will allow you to perform agricultural work more efficiently. It is also necessary to use axle extensions and metal wheels with weights for various tasks.
When purchasing a plow for a walk-behind tractor, you must follow several rules: the plow should not have a thin stand, a shortened blade, a thin body sheet, or low-quality steel. There must be an instruction manual. Compliance with all of the above will reduce your costs by preventing breakdowns, and also perform quality work.
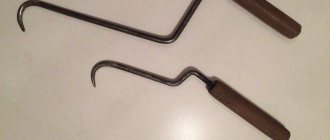
Blade
You will need a pipe with a diameter of 0.5 meters. In this case, the wall thickness should be no more than five millimeters. The part is cut out from a pre-made cardboard blank, also processed on an anvil and sharpened.
After this, the parts are assembled. To begin with, you can do all this using cardboard blanks. And if all the parameters are met, and the plow itself turns out to be correct and reliable, then you can proceed to the metal parts.
Conversion of a horse-drawn plow to a heavy diesel walk-behind tractor. Check in operation
How to adjust a homemade plow ? Exactly the same as the factory one. The only difference is that if the work is incorrect, you can bend and adjust the parts yourself using a hammer.
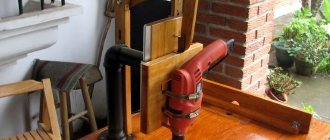
What does a plow consist of?
The basis of the design is the VP-150 engine. The motor is forced cooled and has a power of 4.4 kW. The frame is made of thin-walled tubes, and the engine is installed on it. To reduce the overall weight of the product, it is recommended to connect the exhaust pipe and muffler to the frame pipes. This will significantly reduce the noise level. In addition, the frame will touch the ground, soil and cool.
Another interesting article: Which oil to choose for a walk-behind tractor?
The winch drum is located on the left, in the area of the output shaft. The drum is secured with a pair of brackets. The drum is made of a large tube. The cable is connected to the plow at one end, and the other is wound onto a drum. If there is a change in traction, the cable must be passed through a bracket pre-attached to the frame in front, not far from the exhaust hole.
The lugs should be welded to the bottom of the frame. Thanks to the lugs, it becomes possible to securely fix the winch when plowing light and medium-light soil, while pulling a light load. In order to process virgin soil and move massive weights, it is necessary to increase the height of the lugs to 150 mm.
A horse-drawn plow can be replaced by a ploughshare plow. The product designs are similar. The body of the plowshare product is tightly welded to the stand; a shield and field board are also attached here, thanks to which lateral rotations are compensated when plowing the ground. To make a board, you need to take a 25x25 mm steel corner. The stand is also made of steel, the size is 45x12x450 mm.
The blade is made of a strip of steel 3 mm thick. The outer diameter of the steel tube is 42 mm. The plow is attached to the frame with 4 bolts through a stand. There is a regulator (bar) in front of the frame, thanks to which the ploughshare plow is connected to the motor through a steel rope. The support wheel fork is installed and secured at the bottom using a bracket.
DIY disc plow
A disk plow on a walk-behind tractor or a hiller plow is a special device used for cultivating the soil before planting tuber crops. Lays furrows for planting potatoes, beets, celery, and hills them.
Below is a diagram and drawing of the hiller. Its structure is distinguished:
- 2 – disks;
- 3 – fist;
- 4 – bracket;
- 5 – axis;
- 6 – scraper;
- 7 – driving beam;
- 8 – screed;
- 9 – handle.
The number 1 indicates the work area.
Discs can be taken from an old seeder. Their installation is carried out at an angle to improve the productivity of arable work. Attaching the hiller to the walk-behind tractor through the hitch bracket. The T-shaped plow leader is screwed to it with bolts and a stopper. At high speed, the hiller may begin to slip. Therefore, you need to work with it only at low speeds or with paired wheels.
According to another instruction, the disk plow for the walk-behind tractor begins to be assembled by cutting out an equilateral corner. The toe is welded to it, and then through the thrust bar and the heel. The discs are mounted on special hinges, which are welded to ensure their symmetrical position to the common axis.
READ Installing a Chinese Engine on a Cascade Motoblock
Plowing the site
Before you start plowing the area, you need to mark the first furrow and visually determine its center. The test row should be done at low speed, while observing the single-body or reversible plow. It must be strictly perpendicular to the furrow, but if this is not the case, then make additional adjustments. The furrow depth must be at least 15 cm. If the depth is less than this value, the plow should be lowered by one hole.
After the first strip is made, it is necessary to turn the walk-behind tractor and install the right lug opposite the test furrow. It is necessary to plow along the right edge of the furrow, then the soil will be laid in even ridges. When working, there is no need to exert additional effort and push the unit, but you should hold the walk-behind tractor in relation to the plow at an angle of 10˚.
After you have obtained an even furrow and you have become comfortable with the control of the walk-behind tractor, you can increase the speed. In this case, the soil dump is stronger and, therefore, more even and high-quality furrows are obtained.
How to convert a horse-drawn plow for a walk-behind tractor
Testing a homemade plow
As practice has shown, it is important not only to make a product according to the rules, but also to adjust it correctly and accurately. It is the correct adjustment of the unit that guarantees successful, high-quality tillage. Before you start plowing, you need to set up the plow and set the plowing depth.
The product is adjusted by changing the level of fastening of the housing rack. Maximum plowing depth 220 mm. This depth is ideal for plowing the field for planting potatoes and vegetables. If the plow is needed to remove turf, then adjustments should be made differently. In this case, it is necessary to raise or lower the support wheel relative to the bracket.
Another interesting article: DIY motor pump assembly
Drawing of plow parts for walk-behind tractor
You can draw up a layout diagram of functional and structural elements and a detailed drawing of the plow yourself. Maximum accuracy will allow you to avoid difficulties during assembly and the negative impact of errors on the performance characteristics of the finished unit. It is necessary to strictly adhere to the dimensional parameters of the parts. Even minor inaccuracies can have a significant impact on equipment performance. The drawings with the dimensions of the attachment for the walk-behind tractor include three structural surfaces:
- The plane of the slide is lateral.
- Bottom horizontal.
- Front dump.
A typical diagram of a simple homemade plow consists of:
- Two handles made of steel pipe.
- Frames.
- Stand clamp with screw size M10 or M8.
- Mounting fork for frame hinge.
- Drawbar.
- Bearing.
- Jumpers between handles.
- Joint shaft.
- Locknuts.
- Adjusting washer.
- Drawbar handles.
- Tee.
Depending on the type and purpose of the inventory, this list may include other elements.
Reversible plows
Reversible plows are distinguished by the shape of the plowshare, which resembles a feather. A plowshare with a curved upper part turns over the soil. Recommended for plowing hard, hard soil. Plows of this type are compatible with walk-behind tractors of medium and heavy classes, for example MTZ. They got their name from a device that rotates the ploughshare when changing the direction of plowing, which is convenient for long areas. The direction of the soil dump is maintained.
Useful tips
In order to sharpen blades, it is not necessary to contact specialized organizations. It is enough to use a sharpening stone for this purpose.
While working on the site, soil may stick to the unit. It increases resistance, so it should be cleaned off the blade. You should do the same with plant roots.
When working in the field, it is necessary to lubricate the bearings daily. This increases the service life of the unit. After completion of processing, the plow is washed, dried and lubricated with oil, protecting the product from corrosion.
Agriculture has become a profitable business using modern technology. To grow first and then harvest is the true goal of a farmer. Compliance with technology and endless work is the key to obtaining results.
Among the necessary, mandatory tools, the plow remains, since it allows you to work with different crops; every good farmer needs it. A really good farmer can make a plow for a mini tractor with his own hands, if only he puts in the effort.
Good plow for private farming
A good plow is needed in every farm where a lot of land is cultivated. Of course, such a device can be purchased by paying a considerable amount of money, but not every farmer can afford such an expensive purchase. At the same time, buying a plow is not very rational, since the owner will use it very rarely. Of course, the advantage is that you can plow a small field and spend very little money and fuel if you have a small mini-tractor with a plow.
If the farmer does not have a lot of capital, then the right and correct decision would be to make attachments for his unit with his own hands at a minimum cost. It will not be difficult for a person who knows how to do things on his own to do this kind of work. You just need to choose a good and durable material that would be suitable for this type of work, spare parts for plows, and follow all the instructions in the instructions and rules, in general, nothing complicated. Most people think that it is very difficult and time-consuming to make a plow for a mini tractor yourself. Unsuccessful projects are just poor knowledge of simple geometry among masters who are just beginning their journey. The picture shows a diagram of the development of a drawing for calculating a double-furrow plow for a mini tractor.
To achieve a good result, you need, first of all, skill, and at home it will be difficult to do any thing, since the necessary materials and tools are not always available. There are also different plow models, for example, double-furrow, reversible, rotary. Each option requires a special design and well-selected material; the tools that will be needed when working on the unit are also important.
The shape that is inherent in a plow on a mini tractor
For proper entry into the soil, this attachment, made of metal, is wedge-shaped with an angle specifically required for entry into the ground. A plow for a mini tractor must have consistent parameters for the work for which it is intended. A plow made correctly, according to all the rules and drawings, will serve no worse than its factory counterpart.
First, you need a model; to make it, a drawing of a plow for a mini tractor will help, then you need to make an exact template. The template will be a cardboard cutout of your device for a mini tractor. After the cardboard parts are made, they are assembled. If the design is correct, correct, you need to do the same according to the diagram, only, of course, from metal. This will help the manufacturer avoid mistakes when starting to manufacture a home-made unit.
What blanks are needed to make a plow?
The production of a plow (the process itself) consists of several stages. To create equipment you need materials and equipment:
- Rollers;
- Metal scissors;
- Iron welding machine;
- High quality steel tube (diameter 600mm);
- Several sets of nut-screw (M8);
- Alloy steel 9ХС (5mm);
- Metal sheet (3 mm, 50*50 cm);
If you want a rotary plow model for a mini tractor, then you need to start working on it only after watching an instructional video or consulting with a knowledgeable person. For the agricultural sector, the most popular ones are: double-body, single-body (rotary), reversible. The picture shows the model of the rotary version; it is the simplest and is very inferior to other analogues of the unit.
Single body plow model
First you need to make an oval cylinder shape. Parts for assembly: side shield of the rack, additional sheet, plowshare. To install the ploughshare, you need to insert the wedges onto the sheet at an acute angle of 45 degrees, then the surface of the ploughshare must be connected to the side shield, while the blade of the ploughshare itself must protrude 1 cm below the shield. Next, the blade must be attached to the ploughshare, then we weld everything to the plow welding
Rotary plow model
You can make a reversible plow for a mini tractor with your own hands according to the principle of a trailer. For convenience when cornering, this model has a grip. A reversible plow will allow the minitractor to make even furrows; with each subsequent pass there is no need to return to the other end of the site, since reversing the plow will turn the furrow in the opposite direction.
The reversible plow model consists of three parts:
• Lower horizontal plane of the runner;
• Front blade plane.
The edge that will be cut must be positioned 2 cm below the runner, and the edge of the ploughshare and the side edge of the blade must converge. It is necessary that the ploughshare leans against the blade without gaps, very tightly. If such a model is put together, then you can weld all the structural elements together and be confidently satisfied with the result.
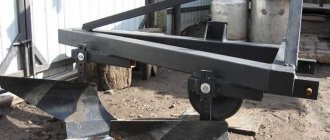
Installing a plow on a walk-behind tractor: step-by-step steps
Before you attach the plow to the walk-behind tractor and start setting it up, the draft unit itself must go through a number of preparatory procedures. They boil down to:
- transporting the walk-behind tractor to where it will be used;
- dismantling the wheel travel, which is replaced by lugs. Otherwise, the equipment will begin to slip and may get stuck.
Once these requirements have been met, installation of the plow can begin.
- fastening the plow to the hitch of a walk-behind tractor with nuts, which will allow you to independently set its operating parameters in the future;
- prepare two fastening pins with which to attach the hitches and plow to the shackle.
This completes the task of installing the plow and you can move on to the next one.
How to set up a plow on a mini tractor
After the unit is installed, we begin to configure it. Adjustment of the plow on a mini tractor must be done. Each element should be checked and lubricated with oil. Carefully inspect the wheels on the plow, tighten the screws on all structural elements.
You can set up the plow yourself. It is necessary to check each fastening and adjust the angle of rotation. If the unit will be used on heavy soils, it must be weighted. This is done by installing a metal disk, it is mounted on the frame. In order to properly adjust the product, do the following:
- Adjust the depth. There is a bolt on the outer part of the pipe that allows you to adjust the wheels. If you turn it clockwise, the depth of tillage will be increased.
- Adjust the width of the land.
- Adjust the frame level. To do this, tighten the front bar or stretch it.
Read also: Drawings of tin products
Additional equipment can be attached to the plow. Mounting devices used for cultivating land can be done on your own. If the elements are installed incorrectly, the plow will not work well on the ground.
Plowing depth and how to adjust it
The plowing depth should be at least 20 cm. It is easy to set up. To do this, the unit is rolled out to the site of the upcoming work, where a control pass is made. A cord is stretched along the approximate first furrow. It is advisable to immediately turn the handle of the device to the left in order to move on a surface that has not yet been plowed. The passage to the opposite end of the section is carried out at minimum speed. This will allow you to check the correct installation of the plow bar and make the necessary adjustments.
The right lug should be placed in a fresh furrow and moved forward slowly. After the first pass, the device turns 180° and moves in the opposite direction. At the same time, the depth of the furrow made is assessed. If it is unsatisfactory, the equipment is adjusted using the bolts of the fixing bracket. It is necessary to ensure that the right lug does not leave the furrow, and the equipment stand is placed perpendicular to the soil surface.
Rotary plow on a walk-behind tractor: advantages of the unit
It has the most advanced form for plowing virgin soil and areas overgrown with weeds to a depth of about 30 cm. A homemade rotary plow includes:
The walk-behind tractor on which such a tool is mounted must have a working power take-off shaft. It is he who drives the axle, and she – the plowshares.
Homemade rotary plows for walk-behind tractors are most often found with disk mechanisms. But drum, blade and auger plows are also known. Indispensable for applying fertilizers and controlling weeds.
Materials and tools
Making a homemade plow for a mini tractor requires the following basic tools:
And an additional tool, the list of which is determined by the design of a particular mechanism and the conditions of its manufacture.
The materials composing the main structure must be solid steel billets. Violations of their integrity - cracks, deformations, severe rust - are unacceptable.
List of materials you may need:
- thick sheet metal with high resistance;
- metal corners and plates of sufficient thickness;
- bolts of various calibers;
- additional names (washers, bearings, springs), determined by the features of a particular design.
Plow on a walk-behind tractor: varieties, manufacturing, video, features
A plow for a walk-behind tractor is an attachment designed for cultivating any type of soil, including dense and viscous soil. The use of such equipment allows farmers to reduce the cost of physical energy and reduce the time required to complete agricultural work. You can make such a device yourself. It is cheaper than buying a ready-made factory product. Equipment of our own design can be installed on any units, including motor cultivators with reversible drive.
Sources:
https://kalibrtractor.ru/spetstehnika/plug-na-motoblok.html https://lizing-spectehniki.ru/motobloki/kak-legko-sdelat-i-otregulirovat-plug-dlya-motobloka-svoimi-rukami.html
Features of a homemade model
The self-erecting plow is a tool that meets the target needs and has a low cost. To assemble it, you can use available materials, as well as structural parts of other agricultural units. The latter can be collected from old agricultural workshops, ferrous metal collection points and other similar places.
A homemade plow can be easily adjusted to suit your needs. It can be adapted to different soil types, traction mechanisms, and also for processing crops. Your plow can be customized to match the power and performance of your tractor, allowing you to achieve maximum efficiency and reduce destructive loads on your plowing implement.
The cutting element of this plow can be replaceable and independently manufactured/sharpened, which significantly reduces the cost of servicing the mechanism. In the case of self-production, it becomes possible to change the intended use - introducing the function of replaceable elements: nozzles, fasteners, body parts and frame. This allows for combined work, such as plowing and mowing the bush.
When assembling a plow, special attention should be paid to the choice of materials and their quality. This is one of the main advantages of homemade assembly, since when buying a plow in a store, it is difficult to be sure of the quality of the metal from which the factory unit is made. After purchasing a store model, it may require further modification or replacement of low-quality structural elements.