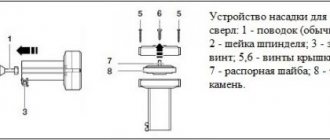
A problem arose: to repair the equipment, I needed to accurately drill several holes with a diameter of 2 mm in a steel plate, and the drills turned out to be so blunt that they burned and did not work.
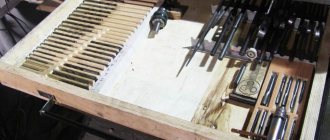
I tried to sharpen them on a homemade sandpaper made from a three-phase asynchronous motor with a simple capacitor start. The machine in the photo: a tool rest with markings for sharpening drills.
However, my skills and coarse-grained corundum stone allow me to edit drills from 4 mm relatively well, but problems arise with smaller diameters. You need professional equipment.
This need shaped the task: to make by hand a device for sharpening small drills, as simple and reliable as a metal bolt. I took as a basis an idea from the Internet (used for a long time) called Wishbone (in our opinion - Wishbone), which I talk about below in this article.
I had to work in the evenings in the kitchen of a city apartment, not a private house, after all stages of dinner had been completed. Naturally, I sawed, drilled and leveled almost on my knees with the most accessible hand tools.
Therefore, Vishbon was completed only on the second day, although in a workshop, using a grinder and a drilling machine, it can be done in a couple of hours.
In general, advanced users quickly print this device on a 3D printer and get high-quality samples of hand tools.
Wishbone - what a drill sharpening device can do and what functions it cannot do
This product allows you to fix dull and broken twist drills quite quickly and shape their cutting edges, just like in a factory for home use.
The main feature of the device: it does not require high sharpening skills; anyone can use it. The design is not complicated.
It’s worth immediately taking into account that such a homemade product only performs two-plane sharpening. Its capabilities are limited to two functions:
- by forming an angle at the apex, and you can deviate from the standard value for steel of 120 degrees and grind other values. A table of the dependence of angles and parameters of different types of processed material are published in reference books;
- creating a rear cutting angle.
Apex angle
Relief cutting angle
You can talk about them for a long time, but it’s unlikely that it will be better than Viktor Leontyev (a real master) on his YouTube channel. For those who don't know this, look there. I think I should warn you - this is important!
In principle, the correct creation of these two angles is sufficient for working with small drills at home, and often in production. Sharpening the jumper with this device will not work. You need to use a special machine.
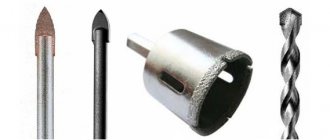
Drills for ceramics and glass
Ceramic tiles or glass are drilled with a crown or a special spear-shaped tool. Its tip is made of either pobedite or tungsten carbide. If a specialized tool for glass or tiles is not available, you can use a concrete drill
It just needs to be sharp, and you need to work with it carefully, since its shape is not entirely suitable for such work.
Spear drill bit for ceramic tiles and diamond-coated bit.
A crown for glass and tile is almost no different from a crown for stone. Only on its cutting edge instead of teeth there is a diamond coating.
A tool called a ballerina is used to drill large holes in tiles. It resembles an ordinary compass. Drilling is done from the underside of the tile. The drill speed is set to minimum.
Personal experience of making a Wishbon instrument at home with your own hands
You can choose any body material, of different compositions:
- aluminum sheet or soft alloys;
- plastic;
- laminate or fiberboard;
- polyethylene or fiberglass;
- even a wooden plank.
I settled on a plate made of getinax: it is easy to process and has high strength.
To make the case, I drew a sketch on a squared notebook sheet. No drawings needed. Scale 1:1. I placed a small drill on it as a size guide.
For clarity, I outlined the dimensions with a red pencil and showed the corners.
After that, I drew the dimensions on the getinax. I drilled holes in the body of the future device.
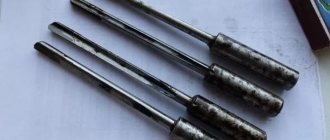
Since I didn’t have a normal drill, I had to make a homemade one based on the cannon drill principle. I used a piece of a spoke from a Soviet bicycle. Diameter 2 mm.
I filed off part of the side edge and sharpened the end into a central corner. On the one hand, it is a parody of a cannon weapon, but it is a completely working design for soft materials.
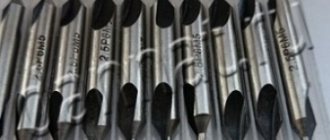
It is permissible to make them even from nails and wire of different diameters. This way you can make different types and diameters of such tools. No special precision is required. My finished drills are shown in the photo.
From the getinax I used a hacksaw to cut out a body blank and an additional part for attaching the wheel - a regular washer for an M3 nut. I used a 4 square piece of copper wire as an axis. In order for the wheel to rotate well, a spacer had to be installed.
The method of connecting parts is conventional riveting. Vishbon showed the rest of the details in the photo.
The clamping block (a pentagonal figure in the photo) was made with holes with a diameter of 4 mm.
In the central part of the body, I had to use homemade drills to increase the diameter of the hole and cut the thread. I made the tap with my own hands from an M4 hairpin: I sharpened one end slightly into a cone and cut part of the thread along the length from opposite sides with a hacksaw.
From the opposite end of the thread, I clamped two nuts against each other, which allowed me to work with it with a wrench.
Homemade tap
I must warn you: it’s easier to work with a factory tap. But, in a critical situation and for soft materials, this design is justified.
In the middle of the 120 degree angle I scratched a bisector, which serves as the basis for laying the thinnest drill bits.
I reduced the height of the body so that even the smallest drills protrude from it: this makes it easier to install them.
In the upper part of this, Vishbon made a mark at the exit of the angle bisector to facilitate the assembly process: centering the axes of large drills when fixing them in the fixture.
The mark indicates the center of the drill.
Spade drill for wood: video on how to sharpen
Wood is a material that can be easily processed with various tools. One of their types may be a drill. You have to use a drill quite often when processing material.
The holes that need to be drilled can be of different diameters, as well as blind or through.
- Twisted or single-stranded
- Ballerina
- Crown
- Forstner drill bit for wood
- Feather drill
- What is a drill?
- Features of use
- How to sharpen a feather drill?
For small sizes, a metal tool is usually used, but for larger diameters, a specialized large-diameter wood drill is used.
There are several types:
There are, but are rarely used, drills for cutting conical tenons, cork drills, etc., etc. Let's look at some of them.
9 main rules for working with Wishbone, without which it is impossible to achieve a good result
I show them in the form of step-by-step instructions with a strict sequence of actions. However, keep in mind: there are two ways to work with Wishbon:
- straightening dull factory edges;
- bringing broken drills back into working condition.
How to straighten dull edges
1. Loosen the clamping screws and insert a drill under the fixing plate, tighten the fastening without fanaticism: you will need to make adjustments.
2. Using a magnifying glass, set the drill so that the cutting edges are parallel to the plane of the body or wheels. It is very convenient to turn it with pliers.
3. Adjust the sharpening angle at the tip. To do this, we install some kind of even guide, for example, a ruler, on the top of the drill and the wheel. The planes of the fixture and the reference line must be parallel.
But if you need to make the sharpening angle not 120 degrees, but less, then we simply move the drill a little higher, as in the photo.
To accurately set a certain degree value, the required angle is drawn on a sheet of paper using a protractor and its bisector is drawn. The device is oriented according to this template.
4. The fastening screws are tightened until they stop. The drill is fixed. After this, you need to repeat the measurements in steps 2 and 3. Be careful and careful as a necessary condition for accurate sharpening.
5. Place the Wishbone vertically on the grinding surface of an abrasive stone or sandpaper, laid on the most even surface, for example, glass or plastic.
Then we tilt it at a slight angle from the vertical to cut off the occipital region. At first, a simple template will help.
After sharpening several drills, it will lose relevance due to the skills developed.
6. All that remains is the sharpening itself: the Wishbone is lightly pressed against the abrasive surface of the sharpening device in the set position (large loads are harmful), and smoothly moved away from you, always placing the wheel in front.
Without reaching the end of the abrasive surface and without further touching it, the device is lifted and carried through the air to the beginning of the abrasive. The process is repeated several times.
During each sharpening, it is very important to always point the Wishbone in only one direction: away from you.
7. The Vishbon is rotated 180 degrees around the axis of the drill and completely repeats steps No. 5 and 6 for the second edge.
8. Using a magnifying glass (the eye gauge may fail), a visual assessment of the condition of the cutting edges, apex angles and rear cutting is made. If necessary, repeat steps No. 5 ÷ 8.
9. Sharpening ends with one pass for each side, which ensures the removal of the remaining burrs on each of the cutting edges. The edges will be perfect. I advise you to check it.
I should note: when I first made Wishbone and immediately began sharpening the drill for metal, acting on a whim, I neglected most of these rules. As a result of the test, it was possible to drill only an aluminum plate, but failed to drill a steel one. There was no hole.
I showed this entire process of sharpening and drilling in the video below. You should do everything right at once, without unnecessary haste.
How to sharpen a broken drill bit on Wishbone
The process described above for broken drills will take a very long time. Therefore, the damaged end must be ground off using an emery wheel.
You can also use a drill:
- insert the broken drill into it;
- turn on reverse;
- set an angle of 60 degrees to the sharpening stone. This tilt is important;
- start the engine;
- Carefully grind the broken end onto the cone. Follow safety requirements.
Now all that remains is to repeat all the steps to correct the edges and additionally restore their shape.
Good abrasives quickly grind down thin drill bits. Therefore, after 20 passes on the surface being treated, conduct a visual assessment of the cutting edges and angles and re-adjust them.
Mini sharpening machines are at your service:
All devices are divided into two types: attachments or stops for universal tools, and independent devices of narrow specialization. Let's look at the most popular of them, from simple to complex:
Hand holder
This is just the device for those who have a steady hand and a diamond eye. In fact, it only allows you to hold the drill in a given position without fear of injuring your fingers. Angle control is visual, according to the position of the “wings” relative to any landmark. There are few advantages: instant readiness for work, compactness and price. The disadvantages are obvious: manual control of the process does not add accuracy.
Stop for electric sharpener
In fact, this element is not a special device for drills. It simply allows you to fix the tool at a certain angle. The accuracy will be higher than in the previous version. Most stops allow you to set the angle of inclination, and even have a marking scale. And yet you have to rely on firmness of hands.
Read also: Pictures for cutting with a hand jigsaw
There are also more advanced stands: with replaceable elements and adjustment of not only the angle, but also the height. The devices are mounted not on the emery body, but on the workbench: which makes them more versatile.
In fact, such a stop can be adapted to any electric sharpener. An additional bonus is that with the help of such a stand you can sharpen knives, cutters, screwdrivers, chisels, etc.
Semi-professional guides for all types of drills
This is a fairly advanced tool that allows you to control sharpening characteristics with micron precision. All linear parameters are securely fixed, the values are set according to the markings. The drill is mounted in the groove, accidental displacement or rotation around its axis is excluded.
For sharpening, the possibility of both linear movement and movement of the edge along the arc path is provided (for conical sharpening of large diameter drills). Linear movement (along the axis) can be controlled by a master, or a limit stop can be installed.
From the point of view of processing quality, the device has practically no shortcomings. But for proper sharpening, the operator must know the parameters of the drill. That is, there is no automation: therefore the tool belongs to the professional category.
As a development of the line - a guide with its own sharpening unit. There is no need to install a stop on the workbench and change discs. In fact, you have a semi-automatic tabletop sharpening machine.
Important note: All listed devices are designed to work with standard electric sharpeners. Therefore, before starting to process drills, it is advisable to install a special emery disc.
Electric sharpening machines
They are specialized power tools for performing a single task: sharpening twist drills.
Even a person who is far from technology can use the machine (although why does he need sharp drills?). The operator only needs to determine the diameter of the drill and immerse it in the appropriate hole. It is convenient to work, errors are practically excluded. However, all drills are sharpened with the same comb. The price to pay for ease of use is the lack of flexibility in settings. For home use - the best choice: especially if there is an additional attachment for sharpening knives and scissors.
There are versions for masters. The drill is installed taking into account the sharpening parameters, the process can be controlled by the operator.
The sharpening angle, the method of edge processing (linear or conical), and the depth of metal removal are selected. The drill is not located in a common holder, but in an individual cartridge.
Industrial sharpening equipment for a metalworking shop
During intensive use of drilling machines, a separate post is required to restore the functionality of the tool. Professional stands for sharpening drills of any diameter save time and effort, but the cost of such equipment is too high for home use.
The information obtained will help you choose a sharpening device without extra financial costs. In addition, there are replaceable attachments for hand-held power tools (for example, a drill). But this is a topic for another article.
How to sharpen drills with the correct sharpening angle without much effort and skill? Unfortunately, many of us do not succeed the first time. This device is very simple in design. Therefore, each of you will be able to repeat it. Many people know that the edges of bolts and nuts have the same angle as a standard drill sharpening. We will use this. We will not weld two nuts together to get the correct pattern. The design is a little different.
To start, you need any nut. The larger the diameter, the larger the diameter of the drill that can be sharpened in it.
The nut has 6 faces, 2 of which we need. Take a caliper and mark 4 mm from the edge of the nut. We turn the nut the other way around and make a mark on the edge that is one and a half mm larger than the first one. We make a triangle on 2 sides. Cut with a hacksaw or grinder. The result was a nut with cuts.
We weld another one. The device is almost ready. He misses the puck, which we throw into the middle. You will also need a bolt; it screws into a small nut.
The cuts in the nut have different depths, which differ by 1.5 mm. This difference is hardly noticeable to the eye. We insert the rod, fix it, and apply a ruler. The gap between the ruler and the round timber is smaller on the left than on the right. That is, the device has a certain angle. Where the gap is smaller, the master made a mark.
Wishbone alternative design: what are the differences between the tool
An alternative is to mount the guide wheels across rather than along the main plane of the housing. I hope that making such a device is not difficult. But 3D printing will require drawings.
In this case, drills are sharpened perpendicular to the plane of the cutting edges. For some, this feature of the tool is fundamentally important...
I do not think so. It is necessary to take into account that a spiral drill for metal, using a stationary machine, can be sharpened in different ways:
- the already mentioned Victor Leontyev performs this action, placing the cutting edge across the rotation of the emery;
- sharpener Nikolai Kulikov places it parallel. Watch his channel “Kulikov Experience” on YouTube.
Both techniques of these experts work correctly and have a number of advantages and disadvantages. Welders sharpen drills with a grinder. They always have this tool at hand: it allows them to cut off any bolt, angle, channel, or fragments of metal elements.
Homemade people make a sharpening machine, which is adapted for straightening drill elements on the side of an emery wheel... Such devices, I must note, are not suitable for everyone.
There is no universal advice. Which design should be chosen and used for sharpening metal drills with your own hands - decide for yourself.
Homemade sharpening machine for autonomous type drills
If desired, you can make a sharpening machine for straightening drills, the design of which will have its own electric drive motor. Such equipment will be completely autonomous and will not have to be attached to an existing grinding machine.
The frame of such a compact machine can be made of plexiglass or textolite 10 mm thick, and an electric motor from an old fan can be used as a drive motor. The guide element of such a machine, on which the stop for the drill shank is fixed, works on the principle of a conventional caliper. The angle at which the drill, which has the ability to move in the horizontal direction, is sharpened is set by using a rotary platform.