Precision is paramount | 08/10/2016
Different types of measurements require their own accuracy. Part sizes are usually measured with a micrometer. But what to do if you need to measure not the part itself, but the hole in it? Today, we will talk about a little-known tool for which it will not be difficult to give a value accurate to hundredths of millimeters for the cylinder block of your car.
Purpose of shtihmas
Shtikhmas is a tool for measuring the sizes of holes of various shapes. That's why it's called a bore gauge. When measuring, the shtihmas comes into contact with the surface at only two points.
The diameters of round holes or the width of the groove (the distance between the planes) are measured. The measurement accuracy is one hundredth of a millimeter.
There are more accurate instruments (scale divisions are 5 microns).
With its help, you can understand how worn the internal cylindrical surfaces are, determine the ovality, and find out how much the actual size of the part differs from the required one.
Checking bore gauges
To check the gauge, a calibration ring is used. This procedure is carried out in several stages:
- Selection and installation of a replacement rod.
- Ensuring sufficient pressure on the locking screw.
- Fixing the hollow sleeve in a vice.
- Rotate the instrument head until the arrow points to the zero mark.
The calibration of the bore gauge is carried out at room temperature and air humidity up to 80%. The nuances of verification are described in GOST 17215-71. The calibration interval is determined individually, depending on the intensity of use of the shtihmas. If these nuances are observed, it is possible to maintain the optimal parameters of bore gauges for a long time: operating range, permissible errors and division value.
Types of shtihmas
There is no generally accepted classification of shtihmas. Therefore, they are divided into groups according to the method of measurement. Micrometric and indicator have different measurement methods.
Micrometric measures actual length.
Indicators compare the template and the actual size. Shtikhmas are adjusted to a specific size. Then they determine how much the real value differs from this indicator.
Shtihmas have different reading devices and transmission methods. The shapes of surfaces that help to measure can be different.
The measuring surfaces of the three-point gauge are located at an angle of 120° to each other. This allows for a minimum number of measurements to be taken to determine the linear characteristics of the part. Information about the size is taken on the digital scale of the caliper.
A spherical gauge is an instrument whose measuring surfaces are located on the same sphere. Maximum length 1000 mm. It belongs to two-point. For measurements you need to take more measurements than three-point.
A collet (ball) pin is used to measure small holes that cannot be measured with a micrometer (diameter from 0.95 to 18 mm). Equipped with a set of heads of different types. To measure, a head of the required size and shape is inserted into the hole, the inner needle is shifted along the axis, and the collets are pressed against its walls.
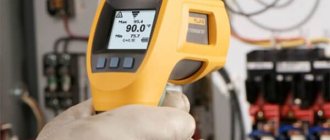
The most accurate, convenient and expensive is the electronic pen.
Service
The most logical thing to do is to allocate a specially designated time for this work. It is worth noting that it is not necessary to wipe the entire device. It is enough to carefully walk along the rods themselves and other surfaces that touch the walls of the hole. Also, if excessive force is applied, a low-quality tool may bend. Therefore, it should be regularly checked for integrity and functionality.
Storage, as already emphasized, is allowed only in a protective case. And it should also be processed periodically. Violation of the maintenance rules will not affect the shelf life. But it has another side. The measurement results will become greatly distorted. And when every hundredth of a millimeter is taken into account, this is a serious problem.
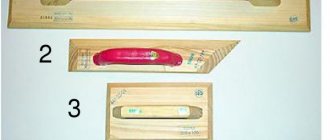
Micrometric shtihmas
It consists of a steel rod, the ends of which are sharpened in the shape of a ball, and a device with scales for determining distances.
There is a special concept: “removing shtikhmas.” It denotes the process of measuring parts.
Shtikhmas belongs to a group of instruments called calibers.
The micrometric shtihmas is very similar to the micrometer. We can say that their operating principle is the same, but the locations of the measured parts are different.
The micrometer head is the main part of this shtihmas. It consists of a rod (stem), a screw, and a drum.
Measurement technology
Before taking measurements with a bore gauge, you need to check its functionality. To do this, you need to assess the condition of its components and inspect the markings. After a visual inspection, the interaction of the shtihmas elements is checked. Using an instrumental microscope, the width of the strokes of the stem and drum is measured. At the end, the radius of curvature of the tip and the dimensions of the installation gauge are checked.
Before carrying out measuring work, it is also necessary to ensure that the shtihmas meets the following requirements:
- The error limit at room temperature and humidity up to 80% is no more than 0.09 mm.
- The range of readings is no more than 1/3 of the scale division.
- The radius of the contact surface of the rods is 2–40 mm.
- The heads of the device are made of hard alloys and have roughness in accordance with international standard 2789.
- The coating of the metal surfaces of the micrometric bore gauge has anti-corrosion properties.
- The handle located on the drum is made of materials with low thermal conductivity.
It is recommended to use bore gauges from official manufacturers (Mitutoyo, Mahr, Norgau, CHIZ). They have a certificate of compliance with international and Russian technical standards, which confirms the quality of measuring instruments.
The procedure for measuring workpieces with a micrometer bore gauge is carried out according to the following algorithm:
- The dimensions of the object being measured are set on the instrument. It is necessary to set the approximate dimensions of the workpiece.
- The head is located at an angle of 90° relative to the longitudinal axis of the micrometer bore gauge.
- The shtihmas comes into contact with the walls of the drum and ratchet.
- The micrometer screw is screwed in, the rod with the tip is removed.
- The length of the head is added to the scale value.
When working with wide holes, it is recommended to use micrometric bore gauges with additional extension rods.
Operating principle of the micrometric gauge
The tool is placed inside the hole to be measured. They begin to rotate the drum. It is connected to a measuring tip, which, under the influence of the drum, extends until it rests against the wall of the hole being measured. If the size of the pin was immediately larger than the distance being measured, then the tip is screwed inward until the device fits in it.
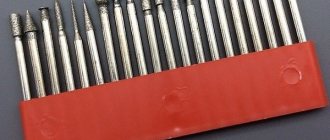
But the dimensions of the device’s stem are limited. To measure a hole whose length exceeds the length of the bore gauge, use extensions. They have a constant size. It is marked on the outer surface of the device. Each pencil measuring kit contains several extensions of different lengths.
Device and application
Thanks to the universal measurement technique and simplicity of design, the scope of application of bore gauges covers mechanical production, mechanical engineering, repair of machines and equipment, as well as in many other activities where it is necessary to carry out precision measurements of the internal dimensions of the diameters of parts and assemblies.
Typically, measurements are taken with two spherical tips that are at an angle of 180° relative to each other. Most designs include a device for centering the measurement line, as well as a system for transmitting motion from the tips to the measuring device.
Let us consider the device of a bore gauge using the example of a micrometric mass.
- Micrometer head.
- Extension set.
- Measuring tip.
- Installation measure.
The micrometer head includes a screw, a drum rigidly connected to the micrometer screw, and a cap that secures the drum, as well as a tip, a safety cap and a stopper.
Indicator letter
This may be a device that looks like a compass. Its spring-loaded legs are curved outward at the ends. These are measuring surfaces. The legs of such a caliper-stichmas are moved and moved apart with a screw.
Other models are made in the form of a rod (guide sleeve), at one end of which there is a round scale with an arrow.
Inside the guide bushing there are two rods of different lengths. The shorter one touches the head. It contains a slider and a measuring rod.
First, the device is set to the desired size. An engine with a spring transmits movement to the indicator. The arrow moves and indicates the size deviation.
Requirements when working with the device
There are several important aspects that must be taken into account. This:
- Suitable room temperature. At best - 20 degrees Celsius. Minor deviations of 3-4 degrees will not significantly affect the result. And you don’t have to take them into account.
- The surfaces with which the tool will ultimately interact must first be cleaned. Even if there are no visual signs of contamination, there may be a slight layer of dust or metal shavings. And with precise work, the result can be greatly distorted if you do not take care of this point in advance.
- The surfaces of the tool itself must also be treated accordingly upon completion of the process. The ideal solution would be to wipe them with gasoline or a similar solution.
- The device should be stored exclusively in the special case included in the kit. Leaving it open is strictly not recommended. To avoid pollution from the external environment. As well as layers of various masses on surfaces.
- You should first study the operating documentation. Many models have their own nuances, for example, how the guide rods are set.
Telescopic shtihmas
The device of the telescopic stichmas is similar to that of a micrometer. Measurement accuracy 0.01 mm.
Designed to check horizontal and vertical surfaces, ovality, taper of shafts, holes and cylinders.
The measuring parts of the gauge are made from the following types of steel:
- cemented carbon 15 and 20;
- carbon 12A;
- ball bearing ШХ15;
- instrumental alloyed X and CH.
To ensure that the measuring surfaces are preserved as long as possible, they are chrome-plated, nitrided or overlaid with a durable alloy.
DEFECTIVENESS OF ENGINE PARTS
DEFECTIVENESS OF ENGINE PARTS
You will need: a portable lamp, a set of flat probes, a ruler, a caliper, a bore gauge, a micrometer, a scraper.
After disassembly, thoroughly wash the parts with kerosene, blow and dry them with compressed air (especially the oil channels of the parts).
1. Inspect the block, especially carefully the crankshaft supports. Cracks in any place in the block are not allowed.
If there is a suspicion of cracks in the block (coolant getting into the crankcase or oil getting into the coolant), check the tightness of the block on a special stand. Carry out the check in repair shops that have the appropriate equipment.
2. Inspect the cylinders on both sides. Scratches, nicks and cracks are not allowed.
When inspecting cylinders, we recommend illuminating the cylinder mirrors with a portable lamp - this way defects are visible much better.
3. Determine the actual diameters of the cylinders using a bore gauge. Measure the diameter of the cylinder in three zones (Fig. 5.8). In each belt, the diameter is measured in two mutually perpendicular directions (longitudinal and transverse). In the area above belt A (at a distance of 5 mm from the plane of the connector with the block head), the cylinders practically do not wear out. By the difference in size in this zone and in the remaining belts, one can judge the wear of the cylinders. The nominal dimensions of the cylinders are given in table. 5.9. Ovality and taper should not exceed 0.065 mm. If the maximum wear value is more than 0.15 mm or the out-of-roundness exceeds the specified value, bore the cylinders to the nearest piston repair size, leaving an allowance of 0.03 mm for the diameter for honing. Then hone the cylinders, maintaining such a diameter that when installing the selected repair piston, the calculated gap between it and the cylinder is 0.03 mm. Carry out troubleshooting, boring and honing of the block in workshops with special equipment.
How to read shtihmas readings?
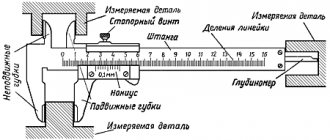
When the rotation of the drum stops and the micrometer screw stops moving, secure it with a stopper and begin to look at the readings of the device. It consists of two scales located perpendicular to each other. One, the main one, is located on the stem of the device. The price of one division on it is 1 mm. When the heel touches the micrometer screw, the zero on the drum scale matches the zero on the stem. The drum scale is divided into 50 divisions. The numbers appear every 5 divisions. The price of each is 0.01 mm. Therefore, when the drum is fully rotated, the screw moves by 0.5 mm.
But the stem has its own scale. Its length is 13 mm. The division value on it is 0.5 mm and 1 mm. Therefore, the readings on the stem are first assessed. Then they look at the readings on the bevel of the drum. Add up these numbers. But that is not all. In most cases, an extension cord is used for measurements. Its length must also be added to the resulting value.
Maximum length without extension 63 mm. To attach the extension cord to the device, remove the nut from the stem. Install the required number of extensions and tighten the nut onto the end of the latter.
The shortest extension is 13 mm, the longest is 600 mm. In addition to them, there are sizes of 25, 50, 100, 150 and 200 mm.
Species diversity
The designated line of devices does not have an official gradation. But in production it is still customary to divide them into types. To do this, one of the features, a certain unifying or dividing factor, is selected as the basis. And based on it, we can distinguish types.
First of all, you should pay attention to the design features. With their help, they distinguish:
- Micrometric. The most common option. It works using a banal method: two points of contact determine the actual length. No additional features. The extent to which the rods diverged is what will be shown.
- Spherical. A type characterized by the arrangement of measuring points in a single sphere.
- Ball. This option has many attachments that are inserted into the hole before connecting to the tool. The distinctive aspect is the ability to work with very small grooves. From 0.9 to 1.8 mm. Accordingly, with a longer recess this method will no longer work. Here, for example, spherical is useful. It operates over a range of up to 1000 mm. But with a hole of only 1.5 mm, neither the first nor the second type will be able to do their job.
There are also divisions based on the method of measurement. There are absolute and relative. In the first case, in most cases micrometric is used. And in the second, indicator. Below we will talk about each type in detail.
Therefore, people often prefer to buy a set of shtihmas. So that you can work with any size, conduct research in every way. And the nice thing is that in this option the price per unit of goods will be significantly lower. As happens when you buy a batch at once.
And it is cost that becomes the main reason why electronic devices have not yet supplanted their analogues. This is another way of gradation, classification. Mechanical ones are a more common option; there are masses of them on the market. Electronic ones are less common, but they are more reliable in terms of measurement accuracy. Plus, they almost completely eliminate the human factor from the process. And in the absence of electronic failures, there can be no errors by definition. True, you will need either energy or a network connection. The first one breaks down over time and will need replacement - and this is an expense. And the need for an access point to electrical current sometimes seriously reduces the variability of tool use.
Micrometric
This is a small device consisting of three main parts. The foundation is the sleeve. To some extent, also the body. A screw extends from one end of it, the purpose of which is to rest against the opposite surface. At the alternate end there is no rod, only a special sphere pressed against the other wall.
The rounded ends are necessary for equal accuracy when working with square or rectangular grooves, as well as holes in the shape of a regular circle. It is worth knowing that if the distance is too large for the device, this does not mean that it will not cope with its task. Almost every set has a lot of different attachments that can increase the measurement range. Thus, a standard instrument with them is capable of studying values up to 250 mm.
It is easy to use. The stem moves apart after moving the entire structure inside the measured space. But if the slot turns out to be too shallow, the tip can be reduced. That is, screw it into the sleeve. In most devices it goes away almost completely. And there you can unscrew it a little until it hits the wall.
Actually, the micrometric gauge is designed for almost any surface and size. In addition to the smallest and largest. A generally accepted standard that will be needed most often.
It was with this option that the history of the entire line began. Even before the advent of spherical and other models, only the presented copy existed on the market.
Remember that this view only works using absolute measurements. Just like the micrometer itself, which gave the device its name. But for comparative, that is, relative results, a different model is needed. And it is precisely about her that we will continue our story.
Indicator letter
It is necessary primarily to identify the magnitude of deviations. That is, in production there is some kind of part template in which the groove is indicated at a certain value. This number is identified on the drawing and the device itself is adjusted to it. And then, substituting it to the finished part, they see whether it fits or not. If there are deviations, the device is also used to check exactly how much of a mistake was made when creating the product.
Structurally, the differences are visible to the naked eye. This type has two model lines. These are the guide rods and the compass. The first is a long pin, with an indicator located at only one end. And the alternative one already has two small stems. They are the ones who carry out all the measuring work. They are strictly recorded before the start of the work process. To the very template that we need. And then they are inserted into the slot. If there are deviations, the spring is activated, and the stems diverge in different directions. And the magnitude of the error is determined in hundredths of millimeters.
The second type resembles a caliper, only its legs are bent inward. And it works on the same principle as the previous one.
An important aspect is the indicator, often in the form of a dial with certain values. On it, by the movement of the arrow, you can clearly see what result the device showed.
Telescopic shtihmas
This type has only one moving part, the measuring rod. It is pulled out from the main body using a spring. The remaining elements are completely motionless. They serve to hold and fix, demonstrate results.
After the rod moves on the spring, it must be fixed. This can be done in any position. For this task, a long lock is located inside the handle. It is located perpendicularly. With its help, you can firmly clamp the rod, and it will remain in the desired position.
The range of the device is very wide. It is capable of measuring holes up to 150 mm. But micro grooves are not his element. 12 mm is the lower limit.
The verification of the resulting value itself is carried out separately. Unlike the indicator one, the instrument does not have its own scale with which it could show the result. Only the fixed length of the rod emerging from the fixed part. Therefore, after work, the device must be removed from the slot, applied to the ruler and the resulting value checked.
If you need to measure a very small pipe
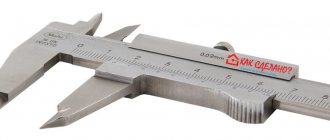
It is usually recommended to measure the diameter of small objects using a caliper. This method is suitable when working with pipes up to 15 cm. One end (leg) of the device is pressed against one edge of the pipe, and the other against the other. In this case, special indicators on the caliper will show the outer diameter of the pipe.
A caliper is a universal tool for measuring internal and external dimensions, as well as hole depth, with an accuracy of 0.1 or 0.01 mm.
If you need to use it to measure the internal diameter, then you can press the edge of the pipe, the one that is “responsible” for its thickness, between the legs of the caliper. The pipe wall thickness is then subtracted from the outside diameter. This will be its internal diameter.