There are many objects of different sizes and shapes, with the help of which property owners strive to decorate it, distinguish it from the surrounding buildings, and give it an interesting and original look. One of the options for such decorations are weather vanes. Despite the abundance of modern solutions, this detail of the external interior remains relevant to this day. In addition to decorative ones, it performs practical functions. Making a weather vane with your own hands is not difficult, but to do this you need to decide on its structure, role and purpose.
The purpose and principle of operation of the weather vane
Many owners of private houses are thinking about how to make a weather vane with their own hands at home with a minimum of effort, money and time.
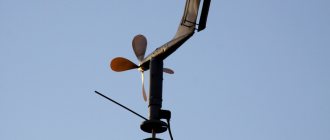
However, before you start making it, it would be a good idea to learn about its purpose, structure, varieties and meaning of symbolism. Let's look at them in more detail. A weather vane is a decorative element of the roof of a house and a multifunctional device. The principle of its operation is based on the interaction of a special part - a flag - with the air flow. The force of the wind turns it in the direction of minimal resistance. In this case, the counterweight arrow will always show the direction from which the wind is blowing. If you have a light propeller, the device will also determine the wind load, and when connected to other devices, it will also perform other useful functions.
Weather vane for determining wind directionSource alfakrov.com
Depending on the tasks assigned to it, it can have one or several of the following purposes:
Decorative.
It is part of the exterior design of the building.
Meteorological.
Acts as a device showing the strength and direction of the wind, as well as its quantitative measurement when a meter is connected.
Protective (for chimney).
Closes the pipe outlet from precipitation, objects and wind.
Electricity generating.
With sufficient power of the blades and constant high wind force, it is possible to connect a generator to generate electric current.
In addition, a weather vane can protect both the house itself and the surrounding area from rodents. However, in this case it is not installed on the roof, but directly on the site.
Original weather vaneSource stroy-podskazka.ru
Installation of a weather vane
After you have made your own weather vane, you need to secure it to the roof. In order for it to correctly determine the direction of the wind, and not serve as a useless decoration, the following rules should be followed:
Note! In order for the weather vane to show not only the direction of the wind, but also the strength, a special suspension is made. It is cut from a sheet of metal, foam plastic or thin plywood in the form of a small rectangle. A hole is made on one side of the workpiece, a thread is inserted into it, and then hung to the arrow of the weather vane. When the wind blows, the gimbal deflects, showing how strong the gust is.
Source
Device
A weather vane is a simple meteorological instrument that can be used to easily determine which way the wind is blowing. It is installed on or on the head of the pipe and serves as an entertaining decoration, which also has practical applications. The design of this device includes the following elements:
Weather vane device
- Frame. The body or glass is the part of the weather vane into which the axle is inserted and the wind rose is secured. With the help of struts it is fixed to the roof ridge. To make a housing with your own hands, use a piece of pipe; sometimes, to facilitate the rotation of the axis, a bearing is placed in it.
- Axis. The axis of rotation is the element due to which the weather vane rotates. It is made from reinforced twigs, sticks or other materials.
- Cap. A small part in the form of a funnel or circle with a hole in the middle is called a cap. It is attached to the axis of rotation of the weather vane and serves as a limiter and protection for the body from moisture penetration.
- Wind vane. The flag is attached to the axis of rotation, it is driven by wind currents and indicates its direction. The pointing part of the weather vane is called the arrow, and the opposite part is called the counterweight. Experienced craftsmen can make this part in the form of an animal or a whole plot picture, and they do not need drawings to work, just show the photo you like. You can make a weather vane from wood or plastic with your own hands.
- Rose of Wind. The compass rose is the name given to the compass pointer; it consists of two twigs crossed at right angles with letters or colors that indicate where north, south, west and east are located. To correctly make a wind rose with your own hands, during installation you need to orient the pointers along the compass.
Weather vane in the form of a wooden mill
Windmill in the shape of a cockerel made of plywood
Windmill with propeller and mouse
Do four
secret-mastera.ru
Screeds
Now you need to decide where the device will be installed. This is an important moment to achieve your goal. The sun should fall on the windmill, and it, in turn, should send bunnies into places where there is no sun. It is rational to place the windmill on the north side (if you live in the northern hemisphere). The figure shows an example of windmill placement. So, we decided on the place. It is necessary to find a blank for mounting the windmill. This can be a pole 2-6 meters long if it is intended to be installed on the ground, or the remainder of a mop handle for mounting on a balcony, roof ridge or pole, etc. In my conditions, the windmill was installed on a pole. The upper end of the pole should have an even cut, and we will also drill a hole in the center of the cut. Let's take care of the method of attaching the pole to the surface or to the tree. Examples of fastening poles are shown in the photographs. There is no need to secure it tightly. The windmill requires maintenance. Screeds or improvised materials are good for fastening.
Pole attachment
Pole attachment
Pole attachment
Types of weather vanes
There are several types of weather vanes. The most common of them is meteorological, which determines the movement of wind. The second type is the Wild weather vane. It also determines the intensity of the wind, in addition to the direction. The principle of operation is simple - the deflection of the wind vane indicates the strength of the wind; a propeller can be used here. The next type is chimney. They protect the pipe from blowing out. Decorative ones main purpose is to decorate the house. But we shouldn’t forget about the Tsar Weathervane, which has no analogues.
Nowadays, the weather vane is often used exclusively for decorative purposes, ignoring its original purpose. The material used in manufacturing has also changed. Its surface is covered with a layer of special paint to protect it from ultraviolet radiation and moisture. This increases the service life of the product. In addition, they have increased sensitivity to wind changes, thanks to the installation of small propellers.
The materials for the weather vane are now copper and steel. Standard dimensions for a house are 40 centimeters in height and 70-80 centimeters in length; for small architectural forms, weather vanes of reduced size are used.
The principle of operation of the weather vane and its functions
How often do people think about the question of what wind is blowing today and what is its speed? Hardly. But in windy weather, watching the fancy fouettes of a weather vane is interesting for both adults and children. In addition to its main meteorological function (indicating the direction and speed of the wind), the weather vane has other tasks:
According to the teachings of Feng Shui, weather vanes contribute to the flow of positive energy into the house, promote mutual understanding with neighbors and friendly relations within the family.
Materials for making a weather vane
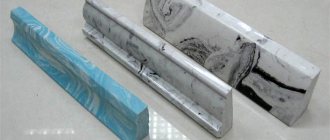
The right material for a good and durable weather vane can only be metal. Although, as a creative experiment, you can make a weather vane from wood. Naturally, in a few weeks there will be no trace of it left, but as a test of skills in weathervane making, even a wooden one will do. A plastic weather vane can live much longer than a wooden one, but there is no life in it. Plastic, that's all.
But metal is a completely different matter. Why don't they give plastic wedding rings? That's right, because they count on bonds as strong as the metal itself. It is unlikely that anyone would forge a weather vane flag from gold, but a copper or steel or stainless steel flag will not only become a durable decorative element, but will also show the thoroughness of the owner and his attitude towards his home.
What can a weather vane be made from?
If you decide to take a thorough approach to making a weather vane, then there is no better material for a flag than a sheet of copper. A figurine made from this material will not only look good against the background of tin products, but can also become a reminder of your skills for future generations. And all thanks to the fact that copper excellently resists corrosion. Copper roofs and domes of ancient cathedrals have not lost their functionality over several centuries and also successfully withstand precipitation. The advantages of copper as a material for a flag also lie in the fact that this ductile metal is easily processed, so the figurine can be made more voluminous, and its surfaces can be decorated with embossing.
Thanks to the plasticity of copper, the weather vane figurine can easily be made three-dimensional
If you can’t get a copper sheet, then you can use aluminum or stainless steel - they certainly won’t let you down in terms of durability. The situation is a little worse with sheet structural steel, but if a flag made of ferrous metal is painted according to all the rules, then it will also be able to survive more than one owner.
If you need it “quickly and inexpensively,” then you can use materials such as plywood or plastic. And although a weather vane made from these materials will not be as solid as a metal one, it will also be able to please your family and provide invaluable experience in making a functional windsock.
A weather vane made of wood is less durable, but is not inferior in beauty and functionality to a metal one.
It is wood and thermoplastics that are often chosen by novice home craftsmen, preferring quick processing with sandpaper and a jigsaw to more labor-intensive work with power tools and an emery wheel.
For the manufacture of other parts of the weather vane - boom, body and axle - pipes and metal rods of various diameters are suitable. As a rotation unit, you can take suitable bushings, balls, thrust or radial bearings from automotive or agricultural machinery.
How to properly attach a weather vane to the roof
Assembling the weather vane is only half the battle. In order for the device to function reliably and be clearly visible from any place around the house, it must be installed correctly.
Recommendations for installing a weather vane with your own hands:
- it is necessary to fasten the device in such a way that its weather vane is at the highest point of the roof, at a distance of at least 0.5 m from the roof;
- For the correct orientation of signs (points of reference) on the ground, a compass is used;
- vertical alignment of the body is carried out using a plumb line or a building level;
- The wind direction indicator is fastened using strong metal brackets, anchor and dowel connections;
- Before installation, the rotation unit must be lubricated;
- In order for the structure to serve as a lightning rod, the housing is connected to the ground loop using steel wire.
There are several ways to attach a weather vane to the roof:
- To the chimney. This option is the most successful, since the chimney is most often made of brick. To ensure the stability of the structure under strong wind loads, strong metal brackets with holes are welded into the upper and lower parts of the vertical base of the device. For fastening, metal anchors with a diameter of 10 mm or more are used. If the house is equipped with an exhaust pipe or a metal chimney, then the weather vane can be attached with crimped C-shaped clamps made from a metal rod with a diameter of at least 8 mm.
- To the gable. If the side surfaces of a gable roof are covered with bricks, then the wind direction housing is mounted in the upper part of the gable in exactly the same way as in the case of a chimney. If boards are used to cover the ends of the roof, then through holes are made in them, and for fastening, overlays or washers with an area of at least 25 square meters are used. cm.
- To the skate. The ridge is most often made of wood, so this option should be considered only if it is impossible to secure the weather vane in any other way. In order to securely fix the structure on the roof, the body should be equipped with support legs that will ensure its stability.
- To the elements of the rafter system. This installation method will provide excellent rigidity and stability to the wind direction, but will require making a hole in the roofing material. The device can be secured using suitable brackets or clamps. If the design of the weather vane allows through drilling in its vertical post, then you can secure the device using nails or powerful self-tapping screws. The disadvantage of this method is the violation of the integrity of the roof and, as a consequence, the need for additional waterproofing.
When choosing a place to install a windsock, you should be guided not only by the criteria of aesthetics, functionality and reliability, but also take care of the safety of installation work and the possibility of servicing the windsock in the future.
When deciding to decorate your home with a weather vane, approach this process with all responsibility. First of all, the device must be reliable and stable, and only then - beautiful and functional. Don’t forget that the figure on the roof will one way or another tell others about what kind of person you are - a dreamy, romantic person or an independent, pragmatic person. Use the symbolism of the weather vane correctly and it will attract good luck and prosperity to your home.
Do five
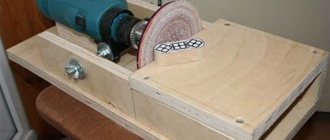
Windmill blanks
Disc
So, now that we've taken care of the pole, let's continue working. We perform all operations with care so as not to damage the disks. A windmill falling from a small height, or an unsuccessful contact with the assembled structure can lead to disk failure. We insert the disk into the cut of the rocker arm; for greater reflectivity, we insert a disk with two-sided mirroring into the cut from a hacksaw for metal. But you can insert it into a cut from a hacksaw on wood
turned with mirror sides outward . We insert it carefully, trying not to break the discs, split the rocker along the length or damage the fingers. I managed to insert it, great! It is desirable that the disc fits completely into the groove. We won't glue the discs. Just drill, CAREFULLY, the rocker arm where the disk is mounted and secure the disk with a wire.
Drilling the rocker
Securing the disk
Fastening the wheel
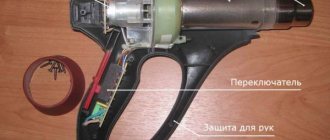
Flat ledge
Next, if you removed the bearings from the wheel, put them back. We will secure the turbine with a long self-tapping screw; if you have an assistant, let him help. We tighten the self-tapping screw completely; if in your design it falls into the wheel hole, use a washer. Once secured, the wheel should rotate freely on the bearings. Place the rocker on a flat ledge, such as a stack of textbooks, a system unit, or a stool, and move on to the next step.
Installation of a finished weather vane on the roof
It is not enough just to know how to make a weather vane with your own hands from scrap materials; you also need to correctly install it in the cardinal and vertical directions, and also securely fasten it in accordance with the roofing material. In general, the installation procedure is as follows:
- Initially, the structure is assembled, then checked for correct assembly.
- Fastening elements are being prepared.
- The device is brought onto the roof and installed with alignment to the compass (if there is a wind rose) and vertical to the building level.
- The fastening block is fixed with screws, nails or other fasteners.
Before completing the installation work, you must make sure that all parts of the weather vane are in place - especially the bearing or ball for the rotary axis. Without the last element, the device will not function correctly. The ease of impact of the minimum wind load on the flag and its response will depend on this.
DIY weather vane Carlson photo drawings
Free technical library:
▪ All articles A-Z ▪ Encyclopedia of radio electronics and electrical engineering ▪ News of science and technology ▪ Magazines, books, collections ▪ Archive of articles and search ▪ Diagrams, service manuals ▪ Electronic reference books ▪ Operating instructions ▪ Polls ▪ Your stories from life ▪ At leisure ▪ Random articles ▪ Reviews about the site
Technical documentation:
▪ Diagrams and service manuals ▪ Books, magazines, collections ▪ Directories ▪ Parameters of radio components ▪ Firmware ▪ Operating instructions ▪ Encyclopedia of radio electronics and electrical engineering
Free archive of articles
(20,000 0 articles in the Archive )
Alphabetical index of articles in books and magazines Bonuses:
▪ Your stories ▪ Riddles for adults and children ▪ Did you know that.
▪ Visual illusions ▪ Fun puzzles ▪ Vivasan catalog ▪ Palindromes ▪ Solving a Rubik's cube ▪ Forums ▪ Site map Design and support:
Alexander Kuznetsov
Technical support
: Mikhail Bulakh
Programming:
Danil Monchukin
Marketing:
Tatiana Anastasyeva
When using site materials, a link to https://www.diagram.com.ua is required
made in Ukraine
It is advisable to paint the figurine with durable car paint in bright colors, equally on both sides.
The Carlson weather vane, with its ringing bells, delights not only children, but arouses curiosity among adults. In addition, there has been a noticeable decrease in the number of annoying feathered thieves in the garden: sparrows and blackbirds.
See other articles
section Builder, home handyman.
Read and write
useful comments on this article.
Source
Stages of creation
Making a weather vane is quite a responsible and troublesome task.
The incorrect shape of even one seemingly unimportant part will lead to the device not working properly. Therefore, it is better to entrust the production of such a device to real professionals.
For those who have some experience, you can offer an example of the following instructions on how to make a weather vane from a stainless steel sheet yourself:
- A drawing of the weather vane design is made.
- Draw the main figure in full scale on a large sheet of paper.
- Then the figure is cut out with scissors.
- The resulting stencil is applied on top of a suitable size stainless steel sheet about 2 mm thick.
- Draw the outlines of the figure with a marker/pencil/chalk.
- Then the sheet is clamped in the layout table.
- After this, using an electric jigsaw, the required figure is cut out exactly along the outlined contour.
- Next, burrs are removed from the edges, irregularities are removed, and corners are adjusted.
- The cut out contour is given elements of artistic processing - eyes, mouth, nose, mustache, etc. are made.
- After this, a weather vane is made from a metal rod with a counterweight.
Video description
This video shows how to make a weather vane from a stainless steel sheet:
- All elements are carefully verified before fixation so that there are no distortions in weight.
- The figurine is welded to a weather vane with a counterweight.
- A rotary axis is attached to it at the bottom.
- For it, in turn, a bracket is made in the form of two plates at an angle of the roof and a pipe coming out of the corner, into which a rotary axis with a ball will be inserted for better rotation.
- When all the elements are ready, they are assembled and tested for functionality.
- Next, the weather vane is painted, processed and brought to its final state.
- Finally, the device is installed on the roof with vertical alignment using a building level.
During manufacturing, it is important to maintain proportions, angles, balance and distance between all components - so that the weather vane works even from the slightest breath of wind
Do eight
The device in action
We install the pole in a pre-selected place. First, replay the climb in your mind and evaluate your capabilities. We lift it carefully, the main thing is not to destroy the windmill by hitting foreign objects. After installation, securely fasten the pole. Hooray! Ready. The house, the dacha are protected from dark forces ;)! Video of a wind turbine in operation. Bunnies video.
According to Feng Shui, evil forces are concentrated in dark corners; a windmill, when installed correctly, can throw sunbeams into the most unexpected places in dark corners and rooms. About the positive impact of the design in protecting against dark forces