Principle of operation
The main difference between this type of mechanism and emery machines is the level of processing of the workpieces.
It is suitable not only for sharpening cutting devices, but also for removing unnecessary layers of material. Physically, the machine is equipped with a power mechanism (electric motor). Due to transmission elements (belt or gear drives), the grinding shaft rotates. To securely fix the workpieces, a base is provided, often attached to the mechanism body.
Depending on the design features, processing mechanisms can be of the following types:
- position of the working body - vertical or horizontal spindle. This directly affects the processing technique;
- accuracy when removing unnecessary layers. For production modifications this is tenths of a micron. In homemade machines, it is very difficult to obtain such parameters;
- mobile organ To process large parts, the location of the grinding element or the part itself can be changed. In the second case, there is a need to equip it with a moving table.
To make a surface grinder with your own hands, techniques with manual settings are used. Despite the rather significant errors, they are distinguished by ease of execution.
Surface grinding machine device
To construct sanding equipment for wood processing, you will need the following components and available tools:
- This mechanism forms the working surface on which the performing organ is mounted. The table can be mounted relative to the tabletop in any position, depending on technological needs.
- The machine is equipped with a drive, the purpose of which is to move the work table in the required direction.
- Above this table there is a working belt. Its location is determined by a screw mechanism.
- The grinding process is carried out using the transverse movement of the table and the possibility of longitudinal movement of the iron.
- The belt moves by an electric motor.
- The machine is also equipped with a dust collector, where waste generated after grinding is transported.
When setting technical characteristics for grinding, you need to proceed from the properties of the material being processed and its roughness. Thus, the following parameters are adjusted:
- speed;
- “roughness” of the working skin;
- the force with which the surface of the workpiece or semi-finished product must be pressed against the sandpaper.
The choice regarding the grain size of the skin is made based on the desired end result. The force used to adhere the belt and the speed are the fundamental indicators. If the belt is not pressed sufficiently and the speed of the grinding process is significant, then there is a possibility of fragmentary (incomplete) processing.
This means that certain areas will not be treatable. If we simulate the opposite situation, with significant pressure and weak feed, the semi-finished product will most likely turn black.
Principle of operation
The main difference between this type of mechanism and emery machines is the level of processing of the workpieces. It is suitable not only for sharpening cutting devices, but also for removing unnecessary layers of material.
Physically, the machine is equipped with a power mechanism (electric motor). Due to transmission elements (belt or gear drives), the grinding shaft rotates. To securely fix the workpieces, a base is provided, often attached to the mechanism body.
Depending on the design features, processing mechanisms can be of the following types:
- position of the working body - vertical or horizontal spindle. This directly affects the processing technique;
- accuracy when removing unnecessary layers. For production modifications this is tenths of a micron. In homemade machines, it is very difficult to obtain such parameters;
- mobile organ To process large parts, the location of the grinding element or the part itself can be changed. In the second case, there is a need to equip it with a moving table.
Types and features
Three modifications are offered for consideration, most applicable to home needs.
Surface grinder JET 16-32 Plus. This machine has excellent technical parameters, which are more than enough for household use and for minor repair work. The accuracy of surface finishing of a part can reach 10 fractions of a micron.
The machine consumes power at the level of 2 kilowatts, which is also acceptable for home working conditions, because not every electrical network can support the operation of a 10...15-kilowatt unit. Small dimensions and weight (61 kg). The characteristics of the main work are as follows:
Surface grinder PROMA RVR-400A. This is already the level of professional equipment, equipped with CNC. There is a working surface that is designed for a fairly significant load (350...380 kg), which will allow processing large-sized semi-finished products. The power of such a machine is 10 kW. Has the following operating parameters:
- 1100 mm – maximum possible longitudinal feed;
- 240 mm – possibility of cross feed;
- 550 mm – maximum lift of the “working body” above the bed.
This example is given more as an example, because equipment weighing almost 4 tons is needed in a production environment, and not in a home workshop.
Surface grinding mechanism LSh-322. The manufacturer of this equipment presents it as a machine for small repair rooms. Just what we need. The machine has small dimensions - 1050 × 1000 × 1800 mm, weight 700 kilograms. Significantly more compact than the previous model.
It has excellent characteristics regarding processing accuracy - maximum deviations are in the region of 3...5 microns, and roughness is 0.16 microns. Still, for household needs, this mechanism is expensive (its price is about $15,000) and also massive.
Video: homemade surface grinding machine.
Tools
From time to time, every home craftsman needs to grind and adjust metal parts.
This work can be done either manually or mechanically. The first option will require a lot of time and effort. The second greatly facilitates the grinding procedure and ensures good processing accuracy of the part. For mechanized processing of a part, you will need special equipment - a surface grinding machine. This is an invaluable item for metalworking. If you regularly work with metal, then sooner or later there will be a need to purchase such a machine. There are two options: buy or try to assemble it yourself. The first option will cost a pretty penny and is advisable in cases where working on such a machine will bring in money, i.e. actually a business. The second option is cheaper. And although the capabilities and parameters of such equipment will be lower, nevertheless, its capabilities are quite sufficient for home needs. Since the topic of machine tool building is quite complex, this article does not claim to be comprehensive information. Rather, this is an attempt to understand the structure of a surface grinding machine and recommendations for those who decide to make such a machine with their own hands.
Content
Purpose and design of a surface grinding machine
Any metal part goes through a grinding stage. In industry, specialized machines are used for these purposes. They can be fully automated, i.e. CNC or semi-automatic. In everyday life, having such a machine is almost a luxury. This is true both in terms of the cost of such equipment and its capabilities. But since this article is about homemade surface grinding machines, it is simply necessary to know their structure. Otherwise, we would have to “reinvent the wheel.” Therefore, it is more advisable to consider a factory machine and copy its structure, adapting it to your needs.
So, a surface grinding machine is designed for processing profile and flat surfaces of parts. A professional machine is capable of providing surface processing accuracy of up to 0.16 microns. In everyday life, this figure, although desirable, is not critical, but in homemade machines it is practically unattainable. Unless you are a milling machine operator or lathe operator at an arms factory with 20 years of work experience.
The main component of any machine, and a surface grinding machine is no exception, is the bed. Its dimensions and strength will depend on the required characteristics (sizes) of the parts intended for processing. Factory machines have a cast frame, predominantly made of cast iron. Due to its massiveness, it excellently dampens vibration, and in grinding and finishing parts, this is practically the main condition.
The next part of such a machine is the work table. As a rule, this is a magnetic plate of a given size, but there are machines with special fastenings for parts. The main feature of surface grinding machines is the mobility of the table. It makes circular or reciprocating movements. The shape can be round or rectangular.
In factory machines, the table is driven by a hydraulic system. In a domestic environment, such a system will cost the owner quite a lot, so a reliable mechanical system will be sufficient.
The working surface of the surface grinding machine moves along guides. In professional equipment they have high precision and durability. For a home machine, these characteristics are also required. The maximum precision of surface processing of the part will depend on this. Also critically important is the smooth sliding of the table, without jerking. To achieve this, friction must be kept to a minimum. If this requirement is ignored, then when jerking the table with a fixed part, you can forget about grinding accuracy.
For machine guides, it is necessary to use hardened high-strength steel; it is durable and wear-resistant.
A grinding wheel or belt is installed on the spindle of the headstock, depending on the version of the machine. Some models have both. The grinding wheel is driven by an electric motor. The movement of which is transmitted either through a gearbox or through a belt drive. In a homemade version, you can choose a grinding wheel diameter that will allow you to do without a gear. In this case, the drum will be fixed directly to the motor shaft. These are the main components of a surface grinding machine; without them it is impossible to build such equipment. Now let's take a look at the models that manufacturers offer today.
The most interesting models, their characteristics and prices
Let's consider 3 models that are most suitable for home use, both in price and in size. And here is one “classic” surface grinding machine for comparison.
Machine JET 16-32 Plus. This model of surface grinding machine has an attractive price from 1200 to 1500 USD. In addition, it has excellent characteristics, which are quite sufficient for home use. Thus, the accuracy of finishing the surface of a part reaches tenths of a micrometer. The power consumption of the machine is 2 kW, which is also not an unimportant factor for home conditions; not all electrical networks are capable of delivering 10 - 15 kW per consumer. Small dimensions, weight (65 kg) and a frame on wheels make it easy to find a convenient place to work. The grinding characteristics are as follows:
- minimum thickness – 0.8 mm;
- maximum thickness – 75 mm;
- The maximum width of the part for grinding is 810 mm.
The drum rotation speed reaches 1400 rpm with an adjustable abrasive element feed speed from 0 to 3 m/s.
Grinding machine FDB MM 1130, designed for grinding metal and wood. Its distinctive feature is its price and size. The cost is up to 400 USD, the weight is only 35 kg - it will allow you to install it on a workbench in the garage. The dimensions of the machine are quite compact - 455 x 400 x 385 mm. The table installation angle from 00 to 450 allows the machine to grind most types of parts. This version of the machine is easiest to make with your own hands if you have most of the necessary components available.
Surface grinding machine PROMA RVR-400A. This is professional CNC equipment. A plate with an electromagnet and a work table designed for heavy loads (400 kg) allow you to process large parts. The power of such a unit is 10 kW. It has the following characteristics: 1.1 m – maximum longitudinal feed; 238 mm – cross feed; the height of the spindle lifting above the table is 540 mm. This example is given more as a sample, since the machine weighs 3.5 tons and has a price of 30,000 USD. needed in production, not in everyday life.
Surface grinding machine LSh-322. The manufacturer of the machine positions it as equipment for small repair shops with self-employed workers. Just our option. The machine has small dimensions - 1000x970x1800 mm, with a weight of 700 kg. Indeed, much more compact than the previous example. At the same time, it has excellent characteristics of the accuracy of the processed surface - deviations of no more than 3-4 microns with a roughness of 0.16 microns. The machine is semi-automatic. A machine is good for everyone. But the price of such equipment, although justified, is still somewhat high for home use - 15,000 USD. Such equipment should bring profit to the owner.
We assemble the surface grinding machine ourselves
So, as we can see, factory machines, although they have excellent technical characteristics, are very rarely suitable for home use due to their size and price. Therefore, the option remains to build a surface grinding machine with your own hands. If you already have most of the materials for a homemade machine in stock, then it’s just a matter of skill. And if there are none, then it will be spent, it will have to be anyway. The main components of a homemade surface grinding machine will cost you approximately 1000 USD. Below is a diagram of a surface grinding machine.
Disadvantages of my grinding machine
We recommend reading our other articles
- The practicality and benefits of purchasing corn seeds from a reliable and trusted supplier
- Wireless charging for iPhone - a stylish and practical solution
- Features of choosing household air conditioners
- Features and rules for choosing wires for arranging the power supply system
Practice has shown that the machine has the following disadvantages:
- When I got used to the machine, I realized that a 380 W motor was not enough, now I plan to convert the machine to a 1 kW motor. A machine with this engine allows you to sharpen wooden, plastic, and plywood blanks, but does not allow you to grind, for example, large boards and bars. Metal on this sharpening and grinding machine can be processed with a thickness of up to 2-3mm, a corner with a thickness of 4-5mm is already quite tedious to grind. It all depends on the goals, for me the machine performs 90% of the goals perfectly, but when I need to grind a large workpiece, there is not enough power...
- Sometimes the speed controller is missing, this can be solved by connecting a frequency converter.
- Rearranging a wheel with sandpaper takes about 5 minutes - you need to remove 2 casings and a table, and then unscrew the wheel with sandpaper - for some this is “5 minutes of work”, but for me it’s inconvenient when you need to sharpen something with finer sandpaper, but then work again with coarse sandpaper. For small jobs I use a universal machine with a drill chuck. Otherwise, it would be convenient to attach the emery to the circle with Velcro, or I’ll just make a second machine with a 1 kW motor for large jobs, and leave this one for smaller jobs.
- As I said above, replacing the sandpaper on a wheel is quite difficult - you need to tear off the old sandpaper, you can use heat or make a Velcro fastening. Although Velcro may have its drawbacks - I have not seen sandpaper for Velcro sold in our city - only small circles for a drill, and it can also fall off over time, because will become clogged with sawdust. And replacing the sandpaper on the wheel is not necessary so often - only once every few months.
- When processing wood there is a lot of dust, you need to connect a vacuum cleaner, so I started installing covers on the machine.
Operating principle of surface grinding machines
The main difference between this type of equipment and electric emery is the degree of processing of the workpiece. It is intended not only for sharpening cutting parts, but also for removing a certain layer of material.
Structurally, the machine consists of a power unit (electric motor), which is located in the main body. With the help of transmission mechanisms (belt or gear), the grinding shaft rotates. To fix the workpiece, a frame is provided, which is most often connected to the body of the unit.
Depending on the design, metal processing units can be of the following types:
- spindle location – vertical or horizontal. This affects the processing technique of the part;
- accuracy of metal layer removal. This depends on the hardware settings. For factory models it is tenths of microns. In homemade installations, achieving such results is problematic;
- moving element. To process large workpieces, the position of the grinding part or the workpiece itself may change. In the latter case, a moving table is required.
To make a surface grinding machine with your own hands, use circuits with manual parameter settings. Despite the relatively large errors, they are easy to implement for working on metal and wood.
Making a machine yourself
General view of a homemade surface grinding machine
The main component of the equipment is the power unit. For this, it is best to use an asynchronous electric motor. The number of revolutions should be from 800 to 2000. But it all depends on the parameters of the workpiece.
The main problem is the absence of any diagrams for making a machine with your own hands. Experts recommend proceeding from the characteristics of the manufacturing materials that are at hand. The optimal household model is designed for processing small steel products. An abrasive tape is used for this.
Recommendations for making components yourself:
- main shaft It can be made of wood, usually the diameter is 25-30 cm;
- tension mechanism. Installed on the motor housing. Designed for belt tension, must have vertical adjustment;
- Desktop. The most important component that a surface grinder should have. Since changing the location of the motor shaft is problematic, the degree of impact of the abrasive on the workpiece can be adjusted by raising or lowering the work table.
The last component should include a steel plate and a flat part. Its position can be changed using adjustable legs. This is the best option for a homemade design.
To increase the processing area, you can install a shaft system. But you need to take into account that the dimensions of the entire unit will become larger.
For safety reasons, it is necessary to install a protective shield. It is made of plexiglass and attached using a regular loop. To ensure stability, a steel plate can be used as a base. The electric motor and work table are fixed to it. It is also recommended to install the on/off button in a convenient location for the operator.
To process parts made of carbide steels, corundum wheels can be used instead of an abrasive belt. They are installed on the motor shaft, the grinding procedure remains the same.
In the video you can see how a disc surface grinding machine was made with your own hands:
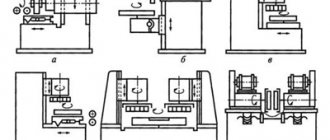
Design and features of surface grinding machines
The design of surface grinding machines is not highly technologically complex. Let's consider the design of the simplest domestically produced apparatus. The bed and frame - the load-bearing elements of the unit - are made by casting. There are vertical guides on the sides. A carriage with a grinding head moves along them, which moves along separate guides. The drive can be either a hydraulic motor or manual force. The purpose of this arrangement is to increase the rigidity of the machine, which provides increased accuracy for various types of grinding.
The rolling screw nut ensures stable feed of the machine. To move the carriage in the vertical direction, a special automatic intermittent mechanism is used, which is mounted on the front of the frame. Manual feed control options are available. To increase the speed of movement, a vertical movement mechanism is used.
High-end machines that are capable of grinding with the highest precision are equipped with hydrostatic guides.
Some units are equipped with two-speed electric motors, which expands the range of technological processing capabilities.
Device Features
The 3G71 spindle has a horizontal arrangement. This arrangement determines that the cross-type table support moves on the frame. The movement is carried out along the rolling guides. During operation, it is possible to move the workpiece in two mutually perpendicular directions.
Circuit diagram 3G71
In any passport you can find the features of the cross table:
- The instructions indicate that the mechanized feed from a hydraulic cylinder works.
- During operation, you can use a manual or mechanical feed mechanism.
- Longitudinal movement of the workpiece also allows you to speed up the work process.
- The longitudinal reverse of the table and the transverse reverse mechanism also significantly increase the functionality of the model.
There is a control panel. The back side of the frame has a column; a 3G71 spindle moves along vertical guides, which belong to the rolling category.
Other design features include the fact that there is a hydraulic type unit inside the frame. Repair of the 3G71, namely the hydraulic system, can be carried out through the left door located in the frame. The system also has a special cooling tank, which is located on the right side.
3G71 repair video
Machine device
The supporting structure of the tape machine consists of a vertical stand and support. The first is a metal strip, the lower part of which is bent at an angle of 90º, and the second is a rectangular sheet of thick metal. The bent part of the rack acts as its supporting platform, with the help of which it is attached to the front edge of the support. A drive is mounted on the support plane, the role of which is an angle grinder (grinder), connected from the mains via a speed controller.
A drive pulley in the form of a metal roller is attached to the grinder spindle on a thread, which sets the movement of the sanding belt. The driven roller is installed on the top of the rack. Behind it there is a T-shaped rocker arm, which is fixed at the lower end to the support and connected by a cross member to the stand. At the near end of the rocker there is a tension roller, and a spring is attached to the far end, providing tension on the belt.
Rotating elements
The most important and complex component of any belt sander is the system of rollers along which the belt moves at high speed. The size of the drive pulley determines the linear speed of movement, so its diameter must be determined by calculation.
The linear speed of the belt is calculated by the formula: V = (π × D × N) / 1000 × 60, where V is the speed (m/sec), D is the drive pulley diameter (mm), N is the number of drive revolutions (rpm) . Accordingly, the diameter is determined by the formula: D = V × 1000 × 60 / π × N (mm).
Recommended processing speeds for materials vary:
- wood - approximately 25 m/sec;
- steel - 25-30 m/sec;
- plastics (depending on type) - 10÷30 m/sec;
- titanium - 15 m/sec.
Since the main materials processed in a home workshop are steel, wood and plastic, the calculation will be based on a limit of 26 m/sec. The maximum spindle speed of our angle grinder is 11,000 rpm, so the calculated diameter will be 45 mm.
All three rotating elements have the same diameter of 45 mm, but a different design:
- Drive pulley. Cylindrical in shape with edges at the edges to prevent the tape from coming off. The glass is machined inside to a depth sufficient for attaching it to the threaded end of the spindle with a long M14 nut. The total width of the working surface is 60 mm, the side is 1 mm.
- Driven roller. The outer surface is the same as that of the drive pulley. Rotates on two bearings, flush on both sides. A bolt with a diameter of 8 mm with a short end thread protruding beyond its overall dimensions is used as a shaft.
- Tension roller. The shaft and bearings are the same as the driven roller. The outer surface is barrel-shaped, without sides, 60 mm wide.
All three products are best tested and assembled where they were made. Experienced craftsmen will certainly help you seat the bearings correctly and correct possible defects. In addition, the workshop must make a hole in the bottom of the rack with a diameter of 42 mm to install the drive.
Structural elements and components
All other structural elements can be made independently or purchased at hardware stores and metal depots. To assemble a belt sanding machine with your own hands you need:
- Rotating elements. Described above.
- Bulgarian. For example, a Hitachi g12 sr2 manual angle grinder with 11,000 rpm and a power of 650 W. Connects to the mains via a power regulator.
- Base. A sheet of metal 10 mm thick, measuring 30 x 40 cm. 10 mm holes are drilled along the edges to attach it to the workbench. Two holes for screws are hidden in the place where the rack is installed and another one is located where the drive is fixed.
- Rack. The plate is 8 mm thick and 8 cm wide. The bottom is bent at a right angle (4 cm shelf) for installation on a support. The height from the fold to the upper end is 65 cm. In the lower part there is a hole for the drive, and in the upper part for attaching the driven roller. At a height of 20 cm from the bend there is a hole for attaching the connecting strip of the rocker arm.
- Tension roller rocker arm. It consists of a stand (thickness - 8 mm, width - 3 cm, height - 25 cm) and an asymmetric crossbar attached to its upper end (through a bushing with a bolt). A hole is drilled at both ends of the latter: on the long end for installing the tension roller, and on the short end for attaching the tension spring.
- Hardware and other materials. Screws, bolts, nuts, grommets and bushings required for assembly, as well as wooden pads and a clamp for attaching the angle grinder to the support.
The list does not include materials for the work table, which is mounted in front of the fully assembled sander. It must be manufactured individually depending on the installation location.
DIY drum sanders
The working element of this type of grinding machine is a cylinder (or simply a drum), on which a strip of sandpaper (sanding belt) is wound along its entire length.
Moreover, the drum can be installed both vertically and horizontally.
The most common are grinding machines with a horizontally mounted drum.
They are mainly used for sizing boards, slats, furniture panels and other wooden workpieces.
Vertical drum sanders are great for sanding radii and semi-circular recesses. Also, on such machines it is very convenient to process the inner sides of a round hole.
Drum Sanding Machine for Wood Panels
We present to your attention a homemade design of a drum grinding machine, in which the drum is installed in a horizontal position. An electric motor is used as a drive.
As we said earlier, such a sanding machine is perfect for calibrating boards and glued furniture panels.
The idea of this homemade product was shared by the author of the YouTube channel DIY Tools.
Necessary materials:
- plywood;
- wooden blocks;
- housing bearings;
- bolts with nuts;
- threaded rod;
- sanding belt.
First of all, we cut out two pieces of plywood 20 mm thick. Sheet sizes can be different - at your discretion.
The larger sheet of plywood acts as the base of the structure, while the second sheet serves as the support platform for the sanding machine, along which the workpieces will move.
We connect both plywood blanks using door hinges, as shown in the photo below.
Next, it will be necessary to make a screw mechanism to adjust the angle of inclination of the support platform.
To make it, craftsmen use wooden blocks, a threaded rod, pieces of plywood and housing bearings.
On the sides of the base it is necessary to screw supports assembled from wooden blocks. Housing bearings are attached to the upper part. We install a wooden shaft in them, which is essentially a drum.
A wooden shaft can be made from an ordinary block, rounded on a lathe.
The drum is located above the surface of the support platform. Thus, by changing the angle of inclination of the support platform, you can adjust the distance between its surface and the drum.
At the next stage, we install a support platform with an electric motor on the base of the structure. We connect the motor shaft to the drum. We wind the sanding belt onto the drum.
Details on how to make a drum-type surface grinding machine can be seen in the video below.
Amazing Woodworking Homemade 800mm Drum Sander
If you are gluing furniture panels, then this homemade product will definitely come in handy.
With this machine you can easily calibrate the shield to the size you need. In addition, you can sand a regular board or wooden plank.
Construction of a homemade belt sanding machine
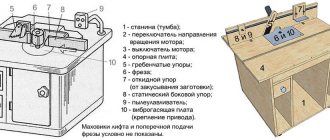
Grinding machine device.
The main parts of the machine are as follows:
- A motor or motor-driven engine powered by electricity. It is better to install the drive next to the main diameter drive roller.
- Base or bed. It is often fixed directly on the floor, sometimes this thing rides on wheels - whatever is more convenient and necessary for you.
- Two tension rollers - driving and driven. Make of metal or very durable wood with a thin layer of cushioning rubber to prevent the tape from slipping onto the rollers or drum.
- Spring and lever for the belt tension system. The spring is pressed, and the lever is attached to the base and driven roller.
- Base for placing a motor with a drive.
- For abrasive tape you need to use paper or cloth. Its width can be very different - in the range from 5 to 30 cm. Grit level - from 80.
- Metal pipes with a thickness of 2 mm or more.
- Metal corners in accordance with the dimensions of the machine.
- Special magnetic stand for metal parts.
- Rail type guides.
Diagram of the grinding machine.
Stages of work:
- We make the frame of the base or bed. – we cut the corners according to the dimensions of the bed; – weld the frame and corners; – we fix a chipboard board at the bottom of the frame to reduce vibration during operation.
- Making a work surface. – cut a steel sheet to size and weld it directly to the base; – weld the rail guides to the top of the frame; – we make a carriage from corners with wheels for moving along the guides of the bed; – on both sides of the working surface we mount and fix bearing supports; – fix the screw with the handle on the carriage;
- We fix the electric motor to the working area lifting system.
- We fix the gear supports.
- We install a tape with an abrasive coating. – cut the tape with a margin of a few centimeters at an angle of 45°; – glue it together overlapping with glue on the sides with the abrasive washed off with water; – dry the gluing area with a hairdryer;
- We are preparing for a test launch of the machine. – we treat all machine parts with machine oil; – supply electrical power; - We do a test run.
Option for manufacturing a band press
To assemble a belt-type grinding machine, you will need an electric motor, a durable frame and rollers on which the belt will rotate. Be sure to have a drawing or detailed diagram on hand indicating all components and dimensions. We offer an example of a diagram of a machine with a wooden bed in the photo.
The following photo shows the finished design of the machine. In this embodiment, the arrangement of the three working shafts is designed so that the moving belt forms a vertical grinding plane. A belt drive is used as a drive.
The machine design can use four rollers. One of them is the leading one and is mounted directly on the electric motor shaft. The photo shows an example of such a design. Installing four rollers allows you to get two grinding planes: horizontal and vertical.
The wooden frame smoothes out the vibration of a running electric motor, however, wood is short-lived. It is optimal to cut a workpiece measuring 50x18 cm from steel 2 cm thick. One edge of the frame is made perfectly flat in order to attach a platform for the electric motor to it. For the next part, you will need steel 1 cm thick. The area is cut out 18x16 cm in size, and then secured to the frame with a bolted connection.
A large electric motor power is not needed for such a machine. A motor from an old washing machine will do. If greater productivity of the grinding machine is required, then it is advisable to find an electric motor with a shaft speed of 1500 rpm with a power of 2.5 to 3 kW. High-quality grinding can be achieved by moving the sanding belt at a speed of 20 m/s. To achieve such parameters, working drums with a diameter of 20 cm are used. If you make the rollers thinner, you will have to reduce the speed of the motor shaft using a gearbox, which is extremely inconvenient.
The drive drum can be mounted on the motor shaft. If this option is not suitable, a separate unit is made. The drive shaft with bearings is fixed to the frame. A belt drive pulley is installed at this end, and a drive drum is installed at the other end. Then a pulley is also mounted on the electric motor shaft and a V-belt is put on. The driven rollers rotate freely on bearings.
The belt drive pulleys will have to be turned on a lathe, and the rollers can be made from square pieces of chipboard measuring 20x20 cm. The plates are stacked on top of each other until a total thickness of 24 cm is obtained. A hole is drilled in the center of the square plates, a threaded pin is inserted and the plates are pulled together tightly on both sides with nuts. The square blank is machined to form a drum with a diameter of 20 cm.
When grooving the roller, a thickening is provided in its central part. In relation to the edges of the drum, the difference should be 3 mm. Due to the thickening, the belt will not move off the rollers. The surface of the wooden drum is covered with rubber. An old bicycle tube will do. Rubber will prevent the belt from slipping on rollers.
To make a sanding belt, cloth-based sandpaper is suitable. You can cut a solid strip of the required length, the edges of which are glued end-to-end. If there is no long strip of sandpaper, cut a strip of durable fabric and sew it into a ring. Sandpaper is cut into rectangles and then glued to a strip of fabric.
When making a sanding belt, it is important to choose high-quality glue so that the sandpaper does not peel off
Making rollers for a grinding machine
A homemade metal grinding machine will not be able to function without moving rollers. They can be made from various materials. A budget-friendly and reliable option are rollers made of oak, walnut, ash, and hornbeam.
For homemade equipment, it is enough to make three movable rollers - the main, upper and tension. To make the main roller, you will need two round wooden plates of 13 cm in diameter. The optimal thickness of the plates is 2.5 cm. For the upper and tension rollers you need round wooden plates 10 cm in diameter. The plates need to be glued together and left to dry completely in clamps.
Next, future rollers need to be processed on a lathe to dimensions of 5 x 10 cm and 5 x 8 cm. In the center of the resulting parts, you need to drill holes for placing bearings and a through hole for threading a bolt through the entire roller and bearings.
Homemade roller for the machine
Bolting the rollers
Individual parts of the rollers (wooden plates) require additional bolting. Bonding with glue is not enough
It is important to recess the bolt heads into the rollers so that they do not catch on the frame
Tension lever
The lever can be made from a metal strip with straight or rounded ends. It should not be more than 20 cm in length. The future lever requires drilling 4 holes. The first is located 8 cm from the edge of the lever. Two more holes need to be made in the opposite side at a distance of 5 cm between each other. The last hole should be on the edge, near the pivot point.
When assembling the adjustment mechanism, after making the holes, the lever is secured between the main roller and the main one. The bar should rotate freely around its axis after fastening.
Installation of rollers
All three rollers must be positioned in the same plane. In this case, the tension roller is static. They are aligned using washers and bolts.
Belt stabilization
To prevent the abrasive belt from jumping off the rollers, it is necessary to make a stabilizing mechanism. The tension roller should have some free play. The stabilizing device itself consists of a fixing element and an adjusting bolt.
Fixing bolt
This is a fastener in which a hole has been previously drilled. The head needs to be ground off and placed between the lever and the main roller.
The bolt on which the roller is attached
It is important to loosen this fastener to allow the idler pulley to move. It is necessary to additionally secure it with a lock nut to protect it from destruction due to vibration.
Making rollers for the grinder, a barrel roller and a straight roller.
Communities › DIY › Blog › Disc grinder.
Hi all!
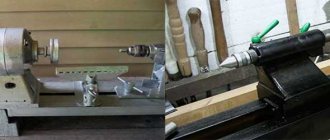
Since I don’t know how to make barbecues or wallets, I will offer you this machine ;-)))) I made such a machine for the household. On a drilling machine it is often impossible to do what is on this thing. A very convenient thing, I must say, I have wanted it for a long time and now it has happened. Moreover, almost free of charge, the goal was to reduce costs to a minimum. As for the electrical part, please don’t ask questions, they helped me do it, I’m not very good with electricity :(. So, to begin with, I climbed into the attic and took out this engine. It was covered in peeling paint, dirt and cobwebs. The studs and the impeller casing were rusty . Cleaned the tag. Power - about 1 kW (inaudible), 1420 rpm. Quite suitable. Checked for functionality.
Then I completely disassembled the engine, down to the screw. Then there was a long process of cleaning everything possible and polishing.
To distribution there was no nut in the box, I solved the problem this way: from an unnecessary used ear adapter to a metal-plastic pipe with a diameter of 20 mm, I unscrewed the nut, made a metal washer and a rubber seal from an old car inner tube.
When cleaning I used sandpaper of different grains, needle files, files and a little grinder. It took 3 days to complete the building. Polishing - GOI paste. When assembled it looks like this. After assembly, I checked how it works again, you never know...
While the cleaning and assembly work was being carried out, a plan washer was made, ordered from a turner. They didn’t take any money for the work, I made several keychains - bottle openers as a gift. The outer diameter is 100mm, 4 holes and one in the center, all with a diameter of 4mm, the thickness of the washer itself is 4mm. However, in fact it turned out that it is put on the engine shaft with at least a little effort, but by hand. But I would like it with a little tension. The foil doesn't fit, it's too tight. So I applied a coat of primer :-).
Now it’s the turn of the working surface - a plywood disk. At first I used 12mm, I got it on a ball (I think everyone remembers about the minimum cost). But it was bent (propeller). And if I leveled the end with a chisel through the stop in literally 2 minutes, then I had to suffer with getting the plane out. After honestly spending 2 evenings grinding down the disc to 9mm, I couldn’t eliminate the beating, so I gave up this thankless task. For 70 rub. I bought 2 pieces of 16mm chipboard for sawing in a furniture making shop, for coarse sandpaper and fine sandpaper. 5 or 6 layers of PF-170 varnish were applied in a circle. To accurately install the disk, I did this: in the center of the plan washer (into a pre-drilled hole during manufacturing), I drove a short nail, and aligned it with the drilled hole in the center of the disk, marked and drilled 4 holes in the disk for fastening.
The screw heads are made to be countersunk and mounted on epoxy so that they do not turn when the nuts are tightened.
I found the bolts and nuts for fastening the engine, they were rusty, put them in order, and opened them like this.
Next we make a frame from old cabinet doors; the pieces were already ready-made, so not a single cabinet was damaged.
Modeling using a stool