Wood is easy to process. Using simple tools, you can create things of amazing beauty and functionality.
Separately, it is worth noting products that have the shape of rotation figures: tool handles, staircase balusters, kitchen utensils. To make them, an ax or chisel is not enough; you need a lathe.
Buying such a device is not a problem, but a good machine is expensive. It’s not difficult to acquire such a useful tool and save money, because you can make a wood lathe with your own hands.
Why is it needed and how does it work?
A lathe is designed for the manufacture of wooden products that have a cylindrical or similar shape. This is an indispensable thing when renovating a country house with a wooden staircase, a carved porch, but not only.
If you have some experience, a turning tool will allow you not only to save on purchased decorative elements, but also to earn money, because handmade wooden products are highly valued.
Whether such a machine is needed in a home workshop is up to the master to decide.
Of course, if you need several handles for chisels, it is easier to buy them, but if you want to make an all-wood staircase, then a set of balusters will cost a very large sum. It is much cheaper to make them yourself. By the way, you don’t even have to spend money on buying equipment - a simple machine can be made in your own workshop using scrap materials.
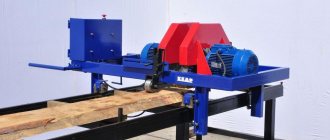
The operating principle of a wood lathe is not particularly complicated. The cylindrical workpiece is fixed along the axis of rotation. Torque is transmitted to it. By bringing various cutters or grinding tools to the workpiece, it is given the desired shape.
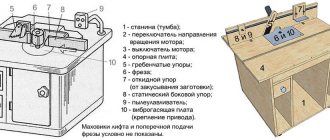
Main parts of lathe:
- a frame on which all components are fixed;
- electric drive;
- headstock;
- tailstock;
- handyman
For ease of operation, schemes for changing the rotation speed are used. In professional equipment, this is a real gearbox, a system of gears that allows you to regulate speed within a very wide range. This is difficult; it is enough to equip a homemade wood lathe with a belt drive with several pulleys of different diameters.
How to become a professional
Turning can be studied throughout your life, since in addition to the theoretical part, a specialist must understand modern technology.
Progress does not stand still, which means there will always be an object of study. In addition, new samples of composite and polymer compounds are appearing among the materials being processed.
To master a profession, there are educational institutions and courses where highly qualified specialists pass on their experience to young students.
Information can also be gleaned from the Internet, where a variety of literature on turning is openly available.
The work requires good physical training, since very often turners suffer from a number of diseases. We can say that excellent health, advanced training courses and the ability to set up equipment will help you achieve the desired heights in your career.
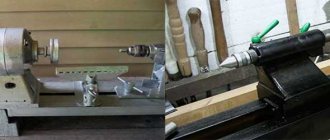
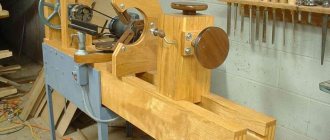
Manufacturing of the bed
The bed is a frame that combines all parts of the machine into a single whole. The strength of the structure as a whole depends on its reliability, therefore the best material for the frame is a steel angle. You can also use a rectangular profile pipe.
First of all, the dimensions of the future unit are outlined. This indicator largely depends on what specific products the machine is needed for. The average bed size of a home lathe is 80 cm. Using a grinder with a metal circle, cut two identical workpieces.
Laying wooden blocks, the angles with the shelves up and inward, are laid on a flat surface, their upper edges should create an ideal plane. The same distance is maintained between them, approximately 5 cm. To orient them correctly, use a strip of appropriate thickness.
The longitudinal parts of the base are fixed with clamps. Cross members are made from the same square. There are three of them. Two are attached to the edges of the structure, the third, which is a support for the headstock, is approximately twenty centimeters from the left edge. The exact dimensions depend on the type of motor used and the parameters of the pulley that could be found.
All that remains is to weld the frame into a single whole. The seam must be reliable and of high quality; it can be welded manually or using an automatic machine.
It is important to immediately decide how the machine will be used. Desktop installation or production of a stand-alone unit is possible. In the second option, it is necessary to provide legs. They can be made from the same square, or they can be cut from timber of suitable thickness. The use of wooden legs will allow you to save on material, in addition, the machine can be made collapsible.
Turning cavities
Before creating a recess in the part, it is rough processed. It is more convenient to do this with conventional center-to-center fastening. During rough processing, the outer surface of the product is formed and the parameters of the recess are outlined.
The tailstock of the machine is removed; it will not be needed. Cut the workpiece to the required length and install it in the headstock clamp. Check the reliability of the fastening. The tool rest is turned perpendicular to the workpiece, and the machine is turned on. Using a semicircular cutter, turning of the cavity begins.
Important! You only need to work with that part of the workpiece that moves from top to bottom, otherwise you may drop the tool or even get injured.
It is more convenient to work if you pre-drill a hole of the required depth in the center of the workpiece.
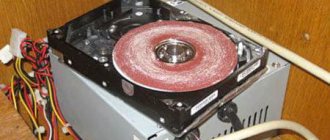
Electric motor for machine
The basis of the lathe drive is the engine. When choosing this unit, it is important to pay attention to its main characteristic – power. For a home machine, models with a power from 1200 to 2000 W are suitable. The type of connection is important; there are single-phase and three-phase motors.
In a low-power table lathe, you can use a motor from a washing machine. It is unlikely to cope with the processing of large workpieces, but it will help produce small decorative elements and kitchen utensils.
Turning while clamping at one end
A special approach requires processing wood on a lathe when clamping at one end. This is how all kinds of boxes, decorative bowls and glasses, and wooden plates are made. For these purposes, fastening between centers is not suitable; one cartridge is needed that will hold the part during processing.
The workpiece is fixed using various holders. Most often used:
- holder with screw;
- cup holder;
- lock with key;
- three-jaw chuck.
In addition to the above clamps, a combination holder is widely used. Its design combines all known methods of fixing a workpiece, making it a universal tool.
Direct drive or belt drive
There are several ways to transfer rotation to the workpiece. The simplest is direct drive. In this case, the workpiece is attached directly to the motor shaft. A distinctive feature of this design is its simplicity. With all this, direct drive has a number of significant disadvantages.
First of all, a direct drive machine does not allow you to adjust the rotation speed, which is critical when working with hard material. It is also worth considering the load on the electric motor, especially when working with large workpieces. No matter how well it is centered, it cannot do without vibration. Motor bearings are not designed to withstand longitudinal loads and will often fail.
To protect the engine from damage and provide the ability to adjust the speed of rotation of the workpiece, it is worth considering a belt drive. In this case, the engine is located away from the axis of rotation of the workpiece, and torque is transmitted through pulleys. Using pulley blocks of different diameters, it is easy to change the speed within a fairly wide range.
It is advisable to equip a machine for your home with pulleys with three or more grooves, which will allow you to process wood of any species with equal success, and, if necessary, work with soft alloys.
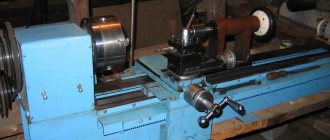
Headstock and tailstock
The workpiece being processed is clamped between two devices called the headstock and tailstock. Rotation from the engine is transmitted to the front one, which is why it is a more complex unit.
Structurally, the headstock of a homemade lathe is a metal U-shaped structure, between the side faces of which a shaft and one or more pulleys are mounted on bearings. The body of this unit can be made of thick steel; bolts of sufficient length are suitable for assembling it into a single whole.
An important part of the headstock, as well as the machine as a whole, is the shaft, a spindle with three or four pins designed to fix the workpiece. This shaft is passed through the bearing of one of the cheeks of the U-shaped housing, then pulleys are mounted on it. To fasten them, a key or a means for fixing cylindrical parts is used, the second cheek is put on last, and the structure is securely tightened with bolts.
The tailstock's job is to support the long workpiece while allowing it to rotate freely. You can buy a ready-made part from a factory machine, or you can use a powerful electric drill chuck mounted on a square of suitable length. A shaft with a pointed end is clamped into the cartridge itself.
The headstock and tailstock are installed on the bed. It is important to understand that the axes of rotation of both shafts must completely coincide. Otherwise, breakage of the workpiece, failure of the machine, and possibly injury to the turner are likely.
Work process when fastening between two centers
One of the most popular ways to work on a lathe is to turn a part secured between the headstock and tailstock. Using this method, you can make various products, including quite large ones. In addition to its versatility, this method is safe; it is recommended for training beginner turners to use a wood lathe.
Grinding to cylindrical shape
Using a semicircular cutter with a smooth cutting edge, the part is aligned. Starting at one end of the workpiece, without pressing hard, slowly and carefully remove excess material. There is no need to chase speed, this work does not tolerate fuss. As a result, all planes should disappear from the surface, and the workpiece should take the shape of a regular cylinder of the required diameter.
Leveling with a flat cutter
After the blank is shaped into a regular cylinder, the lathe is turned off. Since a certain amount of material was removed during the work, the workpiece became thinner, therefore, it is necessary to move the tool rest closer.
Further alignment is performed using an oblique flat cutter. This is a simple and effective technique. The blade of the cutter rests on the tool rest, it is supported with one hand, and the other is held by the handle, slightly lifting the tool to counteract the rotation of the workpiece.
Note! It is necessary to maintain the same cutting depth along the entire length of the future product, then the surface will be smooth, as if processed by a plane.
From time to time the machine is turned off and the diameter of the part is checked using a caliper.
Using a parting cutter
This type of cutters is used if it is necessary to cut a piece of wood of a certain length. It leaves a perfectly even cut, requiring virtually no subsequent sanding.
To ensure an accurate cut, it is recommended to first mark the parts. A regular pencil will do for this. Holding the cutter perpendicular to the workpiece, press it into the wood with light pressure. The cut is not made to the full depth; a thin neck is left, which is subsequently cut off with a knife or saw.
Making decorative elements
The main decorative elements that are made on a lathe are the roller and groove. Most often, a cylindrical belt is left between them. By combining these three simple parts, you can turn a wide variety of wood products: from cornices to furniture elements.
It will be easier to work if you do some preliminary marking. For this, a ruler and a simple pencil are enough. Marks are made when the machine is turned off, and when the workpiece begins to rotate, they are made using the same pencil. It is enough to bring the stylus to the rotating surface, the line will be clear and contrasting.
Note! Rollers are made using a flat cutter with an oblique cutting edge.
The work begins by making a groove with a cutter slightly to the side of the intended line. The groove depth is approximately 3 mm. By tilting the cutting part in one direction and the other, the groove is expanded.
All that remains is to give the roller the correct shape; to do this, place the cutter exactly in the middle of the groove and slowly turn the handle, allowing the cutting edge to remove excess wood. The other side of the roller is done in the same way.
It is convenient to create grooves using a semicircular cutter. Slowly moving it along the workpiece between marks, remove excess wood, gradually increasing the depth of the excavation. You can complete the groove using an oblique cutter. They form the transition from the groove to the roller or cylindrical belt.
Tool support: tool rest
A tool rest is a table on which the tool rests during operation. In principle, it can have any configuration, the master can choose, the main criterion is convenience. One of the best options for a tool rest is a trapezoidal turntable made of thick steel, mounted on a platform that allows you to move it in all directions. It will allow you to process any workpieces and produce products of various sizes and shapes.
The simplest tool for turning work is a square welded to the base. The height of its upper edge must correspond to the level of the axis of the headstocks.
Wood cutters
Cutters are used as cutting tools for a lathe. You can buy such a tool at almost any hardware store. Individual cutters and entire sets are available for sale.
If there is no store nearby, but you have the opportunity and desire, you can make the necessary tool yourself. To do this, you will need a metal-cutting machine, as well as a sheet of tool steel; it can be replaced with an old tool. A high-quality turning tool can be obtained, for example, from an old Soviet file.
Selection and preparation of workpiece
The basis of the future product is a square block. The timber must be free of knots, cracks and other mechanical damage. Using a ruler and pencil, mark the centers. Finding the center is not difficult; just draw two diagonals at each end of the block.
Before attaching the blank to the lathe, it must be given a shape close to cylindrical. You should not try to sharpen a solid block; you may break the tool or get injured if large chips fly out. But it is not necessary to create a perfect cylinder; it is enough to cut off the corners, turning the block into an octahedron. This can be done with a hatchet or a plane.
Sometimes, not a block is used as a base, but a workpiece with a cross-section close to a circle, for example, a piece of log. In this case, a slightly different technology is used. There is no need to give the log a round shape, but difficulties arise in finding the centers. Here you can’t do without a special carpenter’s tool - a center finder.
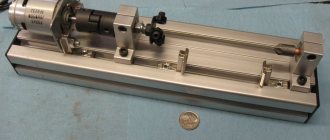
Mini machine for small jobs
Often there is a need to turn several small wooden parts, in this case it is not at all necessary to make a full-fledged machine; you can get by with a mini-wood lathe. Its production does not require much labor and will not take much time.
The design of such a machine is extremely simple. A motor from an old tape recorder, powered from an external power supply, is ideal as an electrical component. The bed of the mini-machine will be a piece of board of the required length.
The engine must be secured. Of course, a belt drive is not suitable for a small machine; the workpiece will have to be mounted on the motor shaft. The best device for this is a faceplate. The drive housing is a U-shaped plate, in the center of which a hole is drilled for the shaft. The engine in the housing is mounted on the frame using self-tapping screws.
The main part of the machine is ready, all that remains is to make the tailstock. Its body is made of a block of suitable size. A hole for the shaft is drilled in it exactly at the height of the engine; a dowel-nail of suitable length is used as it. The headstock is attached with glue and several screws.
Using a power source with the ability to adjust the output voltage, you can create a machine with variable rotation speed. It is convenient to regulate the speed using the foot control pedal. The design of this device can be very diverse, it all depends on the available parts.
Finishing the workpiece
This method is used to process cylindrical elements of varying lengths, fixed between the centers of the tailstock and headstock. Accordingly, you have the opportunity to make any parts: from railing posts and table legs to tiny chess pieces. In particular, skilled craftsmen are skilled at making and sharpening billiard cues.
The first step of the job is to determine the location of the axle of the piece of wood to clamp it between the center of the tailstock and the driving center.
The second stage is to make a blank (from cutting a log or a square block of wood). This can be done in the 1000−1500 rpm mode. In this case, the chips should be removed from right to left using a grooved concave wide chisel to pre-process the reyer. If the workpiece is long, then roughing is carried out in several steps; the tool rest moves closer to the part as it is finished, without changing its height position.
When turning parts, there are tools of various shapes for processing shaped surfaces:
- hook,
- semicircular cutter,
- flat chisel,
- beveled chisel (or popularly - jamb),
- grooved chisel, etc.
Depending on the type of tool used and the stage of the work process, it is necessary to bring the tool rest closer to the workpiece from time to time. At the end of the process, when the part is ready, the final finishing is carried out:
- polishing,
- toning,
- grinding,
- waxing, etc.
The finishing touches occur when the support has already been removed.