Very often there is a situation where there is not enough money or no money at all for some very necessary equipment (a wood lathe for a home workshop). At the same time, to work, you constantly need to sharpen something.
That’s when the need arises to make the missing equipment yourself, and in this case, a wood lathe. Is it possible to make it yourself in a home workshop and is it expensive?
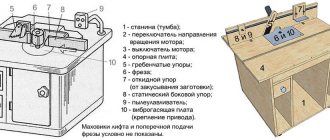
General design and structure of a homemade unit
When designing a homemade lathe for turning, you can consider two design options: with an electric drive and without an electric motor. Despite the antiquity of the method of processing wood using human muscles, this option has the right to exist in conditions where it is necessary to process wood, but there is no possibility of using electricity.
The main structural elements of a lathe are listed below.
bed
The bed is the frame of the entire mechanism. The safety of the craftsman and the quality of the future product depend on the reliability of the frame.
Electric drive
Drive: motor rotor or pedal for foot drive.
Headstock
The headstock is a chuck for clamping the product and its subsequent rotation. Rotation from the engine is transmitted to it through a gear transmission, pulleys or a belt. At the end of the headstock there is a spindle with a faceplate for fixing the product.
Tailstock
The tailstock is needed for additional fixation of the workpiece, which will help improve the accuracy of the rotation axis and avoid unnecessary vibrations. It is a freely rotating blade that can be moved along the axis of rotation of the product to adjust the distance between the headstocks.
Podruchnik
A tool rest is necessary to support the chisel while processing wood. Without a stand for a hand tool, it is impossible to maintain high accuracy of the blade tip hitting the sketch lines and it is extremely difficult to regulate the pressing force of the cutter.
Grandmas
It would seem that it is impossible to make the headstocks of a lathe, and the back one with a rotating center, without precision turning operations. No, it’s possible – using the phenomenon of an oil hydrodynamic cushion (OHB). This, by the way, is one of the ways to answer the question: how to make parts for a machine with an accuracy of 0.2 on a machine with an accuracy of 1. In mechanical engineering, HDP is rarely used, because for its formation and stabilization, the machine with the workpiece fixed in it must run at idle for 2-5 minutes. If a shift lesson consists of only 10 parts, then the daily loss of working time will be up to an hour or half an hour, which is “off scale” in mass production. But in general, HDP is not uncommon in technology. For example, warming up the internal combustion engine of your car is necessary, incl. and in order for the GDS to form between the connecting rod clamps and the crankshaft journals, otherwise the engine life is sharply reduced.
What is GDP
The principle of operation of the HDP is shown in the figure:
Operating principle of a hydrodynamic oil cushion
Any grease is suitable for it: grease, grease, cyatim, fiol. But the best thing is shahtol, a special lubricant for mining machines and mechanisms. Due to difficult working conditions, they, like the Kalashnikov assault rifle, are made with large gaps between the rubbing parts, but they are not required to have a high rate of fire. Shakhtol is specially designed for relatively slow movable rotation joints and is perfectly suited for the headstocks of a wood lathe using a GDP.
Headstock
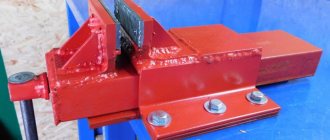
The design of a typical headstock of a woodworking lathe is shown on the left in Fig. There are already a lot of metal lathes in it for the amateur, and the shaft journals and bearing cap seats need to be sharpened with the same precision as a Morse taper.
Design of standard and homemade headstocks of a wood lathe
A simple way to make your own frame
The reliability of the bed is a key characteristic of the machine. Human safety and the quality of the product depend on the properties of the material and the quality of the connection of the parts of the frame.
Based on these requirements, the choice falls on metal profiles, chipboard, plywood or solid wood (preferably solid wood: oak, birch or the most common: pine).
If the choice is on a metal frame, then you need to choose a channel, an I-beam or a profile pipe that will carry the load-bearing functions of the machine. Here the choice depends solely on the availability of the material, its price and ease of installation. However, the metal frame is the simplest in design: you only need two I-beams, on which the engine, tailstock, tool rest and caliper are then mounted.
If the choice is wood or chipboard, then based on a preliminary sketch-drawing with the existing dimensions of the engine and all other elements, the design of the frame is formed. As a rule, it consists of a table top, which acts as a base, a stand for the tailstock and a box on which the motor and headstock axle are mounted.
In addition, two parallel slats are run between the headstock racks, on which a movable support board is attached. A gap of 5 cm is maintained between the slats. Afterwards, it is necessary to weld the frame with a welding machine - this will give additional strength to the structure.
If the machine is supposed to be a tabletop machine, then there is no need for legs, but when processing heavy and massive elements, the bed should be independent and its stability should not raise questions. In this case, it is necessary to provide legs. They are made from rolled steel, for example, angle or timber.
The dimensions of the machine primarily depend on the goals pursued by the master. Most operations at home are performed with products up to 80 cm in length, so most often the length dimensions of the machine are 80 cm. If the frame is made of metal, then two blanks of equal length are cut with a grinder.
Base, frame and spindle box
Before you start making a wood lathe with your own hands, you need to decide what type of equipment is needed - portable or stationary. Portable can be used in any convenient place and, if necessary, transported. The stationary turning mechanism has high legs and can only be carried indoors.
It is on the frame that the drive, the headstock and tailstock, as well as the tool rest will be attached, so you should pay close attention to its design.
Frame for a homemade wood lathe
Spindle unit
The reliable frame is made of a channel 125 cm long. A motor is installed at one end of the base. It can be secured using a steel plate welded to the motor itself and to the channel.
If you plan to make a shaft system to evenly distribute the load on the motor, the motor should be installed perpendicular to the base. To do this, you will need to weld an additional platform to the base from a piece of channel of the required width.
Next, several holes are made in the frame for attaching the tool rest and tailstock. It is recommended to make holes every 10 cm to the very end of the base - this will allow more precise adjustment of the mechanism. To ensure fast fixation of all moving elements of the lathe, threads are cut into the holes. If you don’t have a tap in your arsenal, nuts of suitable size are welded on the back side of the frame.
The simplest option for manufacturing a spindle box is to directly attach the spindle to the rotating element of the motor. This option is suitable for turning small workpieces made of pliable material. A more complex design of the spindle of a DIY benchtop wood lathe is called the headstock.
Choosing an Electric Motor for Woodworking Operations
An equally important element of the machine is the engine. The main characteristic that needs to be given enough attention is power. Regardless of the type of motor - single-phase or three-phase, the power can range from 1200 to 2000 W.
Perfectly suited engines:
From a washing machine, if a lathe is needed for small-volume work and the size of the workpiece will not exceed 30–40 cm, in this case the exact maximum length is selected experimentally. Such engines can help in processing small items, dishes, small knobs for stairs and similar interior elements.
Some models of washing machines are equipped with an asynchronous electric motor, in which, by changing the winding, you can step by step change the shaft rotation speed. Similar motors are also installed in floor fans, only there they have a lower power of about 40–100 W. This motor is enough for a mini-machine for small household products.
What can you buy on Aliexpress?
On the Aliexpress marketplace you can also purchase the necessary shaft for a circular saw machine.
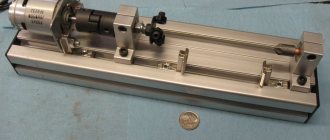
Closed type option
It is a shaft for a closed type circular saw. The body of the product is made of metal and coated with powder paint for greater reliability. Built-in sleeve bearings with a closed race ensure stable operation at a shaft speed of 6000 rpm. For ease of maintenance, oil filler plugs are located in the casing.
The shaft drive is carried out through a pulley, which is equipped with the ability to install two belts. The delivery set includes an adapter sleeve, with which you can change the seat diameter of the saw blade from 25 to 30 mm.
You can learn more about the product and purchase it by following the link.
Selecting a transfer method
The transmission of torque from the engine to the workpiece can be carried out in two ways.
Direct transmission
Direct transmission of the drive to the workpiece is the simplest design method, but not the most perfect. Disadvantages of direct transmission:
- It is impossible to regulate the rotation speed, since the motor without additional units cannot change the rotation speed by simply changing the incoming voltage. This drawback is especially noticeable when working with hardwood, such as oak, teak or apple tree.
- High load on the motor shaft and shorter service life compared to belt drive. Heavy products will have a particularly strong effect on engine wear. This is primarily due to the fact that the bearings of most motors (except for motors in washing machines) are not designed for longitudinal load. You will also have to pay more attention to the centering of the material, because any inaccuracy will lead to excessive vibrations, which at high speeds can make the work impossible.
Belting
This method of transmitting rotation guarantees a longer service life of the motor and makes it possible to regulate the speed of rotation of the workpiece. In this case, the engine itself is located offset from the axis of rotation of the wooden product, and the torque is transmitted using a belt and several pulleys.
If you provide the machine with pulleys of several radii, it will be possible to change the rotation speed of the headstock. With three or more pulleys of different diameters, you can tackle hardwood with confidence. If you stock up on the necessary tools, you can even work with soft alloys.
How to use the equipment correctly
Once you have completed production of your machine, you should test it with a test run. If everything is fine, it is recommended to study the basic rules for working with the equipment. Below is a detailed video and brief instructions on how to behave correctly with the machine.
The list of mandatory requirements for working on the machine includes:
- Choose the right workpiece so that it is free of knots, cracks and other defects.
- Securely fix the workpiece before work.
- Check grounding before starting equipment.
- Always use a protective shield and replaceable overalls.
- Check the tool before work - it is forbidden to use a tool with loose handles or without them at all.
- Any wood can be used as a blank, as long as the humidity is no more than 20%.
These are the basic rules for working on a lathe, which were taught in labor lessons at school. It is also recommended to conduct a six-monthly inspection of the equipment for condition and change the oil every year, and diagnose the engine and other operating elements to identify defects.
Important! Pay special attention to each element; it is better to eliminate defects or defects noticed during the manufacturing or operation process immediately. Also save the drawings .
Moreover, be more responsible when choosing a bed. It must be strong and reliable, because it can be said to be the basis of your machine. The machine is screwed onto a powerful wooden or iron table. It is necessary to level the equipment so that it does not wobble on the floor.
Also, in addition to checking the grounding, it is recommended to place dry wooden boards or a rubberized mat under your feet each time. This will protect you from electric shock.
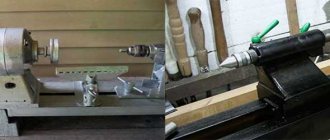
An example of using a homemade machine from a drill.
Well, that's it! Now you can make something on a do-it-yourself lathe, as shown in the photo . Good luck to you and endless inspiration for your work!
Installing the headstock and tailstock
One of the most important parts of the machine is the headstock and tailstock. The workpiece is clamped between them. The headstock directly rotates the product.
Important!
To make the base of the headstock - the spindle shaft - you need to turn to professional metal turners or find a finished part or generally ready-made headstock modules in specialized stores.
The design of the front tank consists of two bearings of type S, V or U, which are bolted to the frame of a shaft machined from carbon steel with a diameter of 40 mm, a chuck for clamping the part.
The shaft is equipped with three or four pins that help eliminate vibration. The shaft is passed through the bearing and pins are attached to it with a key or other fastener for cylindrical parts, after which the shaft is fixed on the second bearing, which is already tightly bolted to the steel corners or the board of the frame.
The tailstock also produces rotational movements, but does not set the product in motion. It is especially important to fix the tailstock on the same axis as the front one, because all subsequent work will depend on this.
Reference. For subsequent control of the axis, the headstock can be designed with adjustment screws, which will allow slight changes in the axis of rotation of the headstock.
The tailstock consists of the following elements:
- A base of angle steel or similar material, similar to the base of a headstock.
- Guide pipe.
- Inner tube or quill. It is made in such a way that it can be placed in a guide pipe, and then a drive screw can be passed through the quill.
- Drive screw. A screw with a nut thread for the quill tube. An 8 mm thread is provided for mounting the flywheel on the rear.
Museum exhibit - a foot-operated machine
First, a little about the history of turning devices. Since people began to process natural materials, the need arose to give them a cylindrical shape. Apparently, it was then that the device was invented, which became the ancestor of the well-known lathe. Only two people could work on it - one person twisted the workpiece using a wound rope, the other processed it. Moreover, note that the rotation occurred first in one direction, then in the other; accordingly, it was possible to work only in the correct direction.
But time passed, progress did not stand still, and at some point a foot-operated lathe was invented. It used continuous rotation and could be operated by one person. Further improvements during the 18th century gave the machine the appearance it has today.
Despite the progress, you can try to make a foot-operated wood lathe with your own hands. There may be little practical benefit from this; rather, it will be an excursion into history, and for the younger generation a good opportunity to build a machine with their own hands and study its operation.
The basis of this unit is a durable frame, a flywheel and a crankshaft that drives it, similar to a foot-operated sewing machine. The flywheel should be heavy and as centered as possible, the drive pedal should be as wide as possible. The upper part of the machine is no different from a regular lathe - the same headstock, tool rest and tailstock, the shaft is driven by a belt.
How to make a handicraft at home?
The support for guiding the cutter along the shaft of the workpiece is a tool rest. It is best to make it from a steel pipe or angle iron, because wooden supports wear out quickly and are not able to withstand as heavy loads as a metal part of the same size.
You can make it by welding two pipes in a T-shape, or you can do it even simpler and fix a piece of board with a wooden boss on the frame, but the accuracy and wear resistance of such a design is not durable. The main thing in arranging a tool rest is that the upper edge of the pipe or angle must correspond to the axis of rotation of the workpiece: in this case, the risk of breaking the chisel is minimal.
Important!
When working on a lathe, only the lower part of the workpiece can be processed! Failure to do so may cause the incisor to become jammed or fractured, which can result in serious injury. When operating a woodworking machine, be sure to wear safety glasses to reduce the risk of injury.
Materials and components
Metal is usually used to construct machines, but as practice shows, you can assemble a small lathe from improvised means, for example, pieces of plywood, wooden blocks and metal plates.
The simplest and most successful material for work is plywood; it is a strong and lightweight material that can withstand heavy loads. It’s not for nothing that plywood is used to build airplane fuselages, and if it can withstand overloads there, then it can withstand the overload as the main material for a lathe.
Connections can be made using furniture bolts, confirmat, self-tapping screws. Strengthening the structure can be done using furniture steel plates.
How to securely secure a workpiece
Wood is a capricious material: it easily splits, chips and wrinkles. Most often, a trident is mounted in the headstock - this holder is universal and is most often equipped with household machines and many homemade ones.
The only thing is that it is extremely difficult to make a trident yourself, so it is better to purchase one. In addition to the trident, there is also a screw chuck and a clamping chuck, which is a tube with screw holes along the radius; clamping screws are screwed into the holes and firmly fix the workpiece.
Often the faceplate is made independently from plywood 12–16 mm thick. So, the washer is assembled from two layers of plywood and, on the one hand, attached to a steel sheet about 2 mm thick. In such clamps, through holes are drilled and spikes are inserted there; the points of nails can play their role.
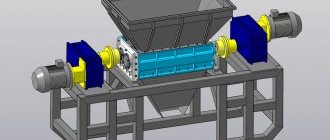
Options for manufacturing the shaft and bearing assembly for it, with and without a jointer
There are a huge variety of options for making circular saw shafts. They all vary in cost, reliability and practicality. The main options for manufacturing such a unit are:
- shaft with open bearing pair. The simplest and most frequently used option. It is characterized by its relatively low cost, ease of maintenance and the ability to easily and quickly change parts. The disadvantage of this model is the need for constant cleaning and maintenance due to contamination of the bearings with sawdust;
- shaft with closed bearing group. Used in industrial machines. This is due to the complexity of maintenance and repair, as well as higher cost. Despite this, this model is wear-resistant and extremely reliable;
- shaft with carpentry equipment. A special feature of its design is the presence of several knives mounted on the shaft axis. In addition to driving the saw blade, it can be used for planing boards as a planer or jointer.
Additionally, the shafts can be manufactured with a right, left or central drive pulley arrangement.
How to choose cutters yourself?
Wood cutters are a must-have tool for woodworking. You can make them yourself or buy them in a store. Wood cutters have the same design, although different shapes.
The following tools are the most popular among wood cutters:
- A universal knife-jamb, which is shaped like a triangular shoe knife.
- Clukarza is a chisel-like tool with a curved blade.
- A spoon cutter is a ring-shaped cutter that is used for cutting out dishes with deep recesses.
- Chisel, the most common type of wood cutter.
Chisels, on the other hand, come in all sorts of shapes to perform a variety of tasks.
Cutters for manual turning of wood are divided into the following types:
- Semicircular.
- Flat obliques.
- Cut-off.
- Cut-off with figured sharpening.
- Angular.
- Shaped.
- Hook cutter.
- Ring cutter.
- Beveled corner.
Special ones can consist of two metal plates that can be moved relative to each other, so that a unique cut or pattern can be obtained. The most popular cutters for turning work are:
- Reuter is a tool with a semicircular cutting tip.
- Meisel is a tool with a beveled flat blade.
It is used for processing wood and bringing it to the state of a finished product.
Do-it-yourself wood lathe using a drill
If you have a workbench in your workshop, then the process of manufacturing a woodworking unit is greatly simplified. In this situation, there is no need to search for materials for the frame or to assemble it directly. A conventional drill fixed on a flat, horizontal surface of a workbench can replace a turning device.
Helpful information! The drill performs several functions at once, which in a conventional machine are performed by the front unit, as well as a rotation drive.
The drill is fixed using a clamp and a clamp, which must be secured to the neck of the electronic tool. However, the remaining components necessary for processing wooden blanks still have to be assembled.
A do-it-yourself lathe from a drill will allow you to save on the purchase of several specialized processing devices
First of all, this concerns the tailstock, which acts as a stop. This unit is fixed parallel to the drill and, as a rule, is made of wooden blocks. For reliability, it is also recommended to use an adjustment screw, the head of which is sharpened to a cone.
Further assembly of the lathe from a drill is quite simple. The support can be replaced with an ordinary wooden block, which is fixed on a horizontal plane using a clamp.
The main rule when assembling such a simple structure is to ensure alignment of the spindle rotation axis and the adjustment screw on the rear assembly. For example, you can temporarily assemble a lathe from an ordinary drill. Moreover, on such a machine you can both perform wood processing and produce workpieces from soft metals (aluminum, copper, etc.).
How to make cutters?
The cost of sets of high-quality models is high, but making them yourself is not difficult. Moreover, professionals prefer to make instruments on their own.
To make wood cutters on your own, you need an electric machine for sharpening metal tools or a grinder with cutting and grinding discs.
Wood cutter blades can be made from high quality steel.
It could be:
- Drill.
- Scalpel.
- Soviet files are especially widely used for making homemade cutters.
- Hacksaw blade for metal.
- Circular saw blades made of carbon steel are also popular because sharpened carbon steel cutters hold their edge longer than others.
The process of creating a cutter is simple:
- First of all, the strips of the required size are cut with a grinder (angle grinder).
- Using a grinder or an electric sharpening machine, the required shape of the blade is formed.
- After changing the grain size of the abrasive discs, the workpiece is sharpened and the cutter tip is ready. All that remains is to design the handle. The hardest wood species, oak, is excellent for making handles. Also popular are birch and apple trees, which are not much inferior in their flexibility when processed.
The blade is placed halfway, cut lengthwise, into the blank of the future handle and glued with wood glue. You can also choose a notch in the bar that exactly follows the shape of the point. Afterwards, the bars are pressed and glued together. The handle is turned to an ergonomic shape and fired with a gas burner, treated with oil or varnished.
The optimal dimensions of the handle are considered to be about 12 cm in length, and the blank for the handle can have a cross-section of 22*22–24 mm. After sanding the handle, a clamping ring is put on the chisel, which securely fixes the blade in the wooden handle.
An important step in preparing a wood cutter is sharpening it.
The chamfer sharpening angles are equal for all types of cutters and reach about 18–25 degrees. The length of the tip is on average 20–35 mm. To maintain the sharpness of the blade during operation, it is periodically cooled in a container with cold water.
Sharpening is done as follows:
- Using a sharpening stone, periodically moistened with water.
- Sharpening on a less grained stone and on the finest grit sandpaper.
- Polishing with a leather belt with GOI paste. GOI paste is sold in any automotive or hardware store.
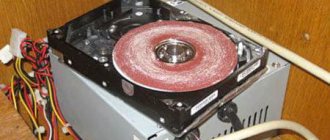
DIY mini wood lathe
A smaller device can also be made in a home workshop. A DIY mini wood lathe has a size of 20 to 30 cm. In order to make it, you will need an old motor and a power supply from an unnecessary Soviet-style radio. This small device is perfect for turning small wooden parts (for example, handles).
You can start assembling the mini machine in any order, the main thing is to follow the order when assembling its parts
This device can also be used as a mini metal lathe. With your own hands, it is not difficult to make such a small device that will allow you to give the desired shape not only to wooden blanks, but also to products made of tin and even aluminum.
In this case, there is a certain algorithm of actions that should be followed. First of all, you need to take a metal sheet and prepare a box that will serve as a case for the engine. Experts recommend choosing sheets with a thickness of 1-1.5 mm. The plate must be bent in the shape of the letter “P” and a hole must be made in it for the shaft.
Next, you need to make several elements from a wooden block at once. The thickness of the material should be approximately 2-3 cm. First, the supporting casing is made, and then the supporting parts for the motor and rear assembly.
The next step is to cut square pieces of wood and glue them together into a “tower”. Then you need to secure the resulting structure using self-tapping screws (4 pcs.). In the end, all that remains is to mark the point of the holder, the function of which is performed by a self-tapping screw, and fix the faceplate on the engine side.
A mini woodworking machine greatly facilitates the process of wood processing and makes the work more fun.
Such instructions allow you to make a small machine, the dimensions of which will not exceed 25 cm. Of course, such a device is not suitable for serious work. But for performing small tasks, such a device is the most suitable option, which is very easy to assemble with your own hands. A mini lathe consumes very little electrical energy, which is also a plus.
What other types of machines can be made?
Before creating your own lathe, you should study those varieties that were invented by many interested people. Among the machines, both home-made and factory-made, the following types are distinguished.
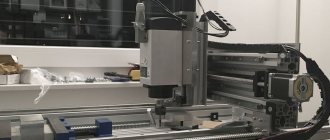
Turning and milling
Such a machine is already a powerful modification of previous versions of machines. Most often, a turning and milling machine is equipped with a CNC, because it is extremely difficult to manually control the milling machine with high precision. However, such a machine has a right to exist and is widely used for domestic needs. Its design consists of:
- Beds.
- Electric motor for rotating the headstock.
- A manual milling cutter placed on guides that ensure its movement along the axis of rotation of the workpiece.
With a copier
A lathe and copying machine is necessary when creating a large number of identical products; most often you hear about dishes and balusters for stairs.
There are several options for making a copy lathe: with a router, with a circular saw and with a chisel. All these methods involve the use of patterns. A pattern is a profile of a future product, which is cut from thin plywood.
A handrail is attached along the lathe along the entire length of the workpiece. The pattern is mounted behind the lathe. A cutter or cutter is attached to the handrail, the movements of which are regulated thanks to a stop running from the cutter, cutter or saw to the pattern.
Thus, during the rotation of the block, the cutting tool completely repeats the silhouette of the plywood profile with sufficient accuracy.
Mini
For many household needs, it is not necessary to create a unit of impressive size, capable of rotating a log with a radius of 300 mm. Sometimes a machine with an extremely simple design is sufficient, in which the engine can be a drive from an old tape recorder, powered through a power supply. For the bed of such a machine, you can use a board 150 * 20 and long, which depends only on the needs of the craftsman.
For such a mini-machine, a belt drive would be superfluous, so most often the headstock is mounted directly on the motor shaft. And the head from a drill or a homemade chuck with three clamping screws serves as a faceplate.
The tailstock is made of a block, in the center of which a hole for the shaft is drilled exactly at the height of the motor axis, which can be a dowel-nail. If you provide the machine with a power supply with adjustable output voltage, you can get the unit with a speed controller.
From an electric drill
An electric drill can be found in almost every home. The advantage of a machine driven by an electric drill is that there is no need to buy a separate motor. Drill-powered designs range from the most basic, where the drill is clamped to the table.
On the contrary, the tailstock is mounted using a pair of angles and a nail or a sharpened screw, to a more advanced one, in which the drill serves as a source of rotating force, but is not directly involved in the process of rotating the workpiece. The second method protects the motor from overheating and stalling under overload.
In the video you can see how to make a wood lathe with your own hands from a drill.
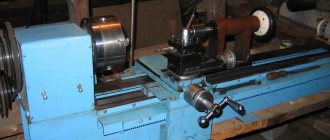
From a washing machine motor
It is a standard layout of a lathe with a motor, direct or belt drive, bed and two headstocks.
When constructing a lathe from a washing machine motor, it is necessary to remember that the motor of a household appliance is designed to circulate with an unbalanced load, but this does not mean that the tailstock can be abandoned. Its presence is mandatory especially when working with long and heavy workpieces. The design of such a lathe is easy to implement at home. To do this you need:
Weld or bolt two steel pipes and attach a motor from a household appliance to one end. Fix a block between the pipes with the ability to move it along the frame; the corner of the tool rest will be attached to it. On the opposite side, the tailstock is installed in accordance with the instructions outlined above.
The device of a wood lathe
This unit includes several main components. Each of them performs a specific function. To make a homemade device, you will need to become more familiar with the structure of these elements.
A homemade lathe, which you make yourself, will allow you to significantly save on the purchase of such expensive equipment
Bed. The basis of any machine, including woodworking. This unit ensures the stability of the structure on the working surface and also facilitates the fixation of individual elements of the machine. Thanks to the frame, all components are located in the right places.
It is important to remember that stationary devices have a larger frame equipped with legs. In turn, desktop units have a more compact base, which makes them mobile. When making a woodworking machine with your own hands, you need to pay special attention to this unit, since the accuracy and efficiency of the structure as a whole depends on it.
Headstock. This unit performs a very important function: it ensures the rotation of the wooden block during its processing. The workpiece is fixed in a chuck located in the spindle shaft. It is worth noting that some small-sized machines include a headstock that can move along the guides of the base (bed). Its movement allows you to adjust the location of individual parts relative to each other.
When the part is being machined, the headstock of the lathe is securely secured. Models that are classified as stationary often combine this element with a frame, which makes it completely motionless.
Wood lathe diagram
Tailstock. This unit, which is part of the woodworking structure, is not static. It performs a very important function: it fixes the blank in the desired position during processing. Securing the workpiece by means of the rear assembly takes into account its pressing against the chuck. Due to the fact that the tailstock is able to move freely along the guide elements of the frame, fixing and processing of parts of different lengths is ensured.
Note! The tailstock must be in line with the spindle shaft.
Caliper. A very important design element, thanks to which the movement of the cutter is realized. Moreover, the latter may have a different location in relation to the spindle. In most homemade devices of this type, this function is performed by a tool rest, securely fastened in the working position.
This part of the machine is capable of moving along the guides of the base (bed). Small-sized desktop devices, as a rule, involve the use of an element such as a stop for cutters.
The support of a universal lathe is designed to move a fixed cutter along the spindle axis
Thus, both a serial and a home-made machine is a rather complex design. Any wood processing unit includes several interconnected units. Before you make a wood lathe with your own hands, you need to clearly understand the purpose of its components.
General operating rules
When working on a lathe, compliance with safety regulations is the key to comfortable work.
Necessary:
- Remove all jewelry, especially chains or earrings. Tuck long hair under overalls. Anything that could wrap around the product cylinder must be securely removed from the machine.
- Always securely secure the workpiece before starting work and then remove the key, if provided.
Important!
It is prohibited to pass objects through a running machine. Any little thing can fall on the product and not only damage it, but also bounce off in an unexpected direction.
Machine capabilities
Woodworking machines for working with solid wood are universal, as they allow you to perform a large number of operations. By making a wood lathe, you will be able to carry out a full range of work on mechanical wood processing:
- drilling;
- creating grooves;
- figured turning;
- end processing.
With proper assembly of a mini turning device for woodworking, a home craftsman will be able to produce not only functional pieces of furniture (table legs, counters, elements for stair railings), but also decorative elements. Even with a simple machine you can make beautiful dishes, gift boxes and children's toys. And by making a wood milling machine with your own hands, you can make more complex shaped wood products.
Processing wood on a lathe