Rating: 5/5 (1)
Those who are seriously interested in embroidery know how urgently a comfortably equipped workplace is needed. After all, the work of an embroiderer requires meticulousness in every stitch , so it is important that it is both comfortable and does not damage the embroidered fabric. And an embroidery machine is the optimal solution for those who spend hours doing various types of embroidery - beads or cross stitches.
Types of embroidery machines
Actually, machines are traditionally divided into table-top, sofa-mounted and floor-standing. In turn, they can also be rectangular or round. Today they can not only be made by hand, but also purchased in the form of hoops or frames. This is much better than embroidering “on the knee”, since thanks to the mechanics you can adjust the position of the machine, work with different sizes of canvas, and maintain high-quality tension, which is so important for the correct embroidery of ornaments, patterns and paintings.
Note! The standard dimensions of an average machine are as follows: width - from 40 to 70 centimeters for the sofa version and from 80 to 100 centimeters for the floor ones.
The device of the machine for cross stitching
The design of the embroidery machine resembles an artist's easel. The main part is a frame onto which the canvas is attached on four sides or two.
This part should be movable, since the needlewoman can sit at a table or on a sofa. We need options for adjusting the frame - higher, lower, tilt angle. The height should also be adjustable due to the side strips with grooves. The stability of the structure is given by the base in the form of a right triangle. Experienced craftsmen recommend making several machines in order to work on several paintings at the same time without removing them from the frame. It would not be superfluous to have a floor, sofa and table loom, as well as a device for embroidering large canvases - paintings, tapestries. Working on such masterpieces takes a lot of time, sometimes you need to do something smaller and faster in the meantime, so a spare stand will come in handy.
How many machines would you like?
OneMultiple
Materials and tools for making the machine
To make such a machine with your own hands, you will need the following tools and materials:
- Planed ruler (20 by 30 millimeters);
- Drill manual or automatic;
- Wood saw or jigsaw;
- Handle for a “chopper” with a diameter of 3 centimeters;
- Thick quality fabric;
- Strong threads;
- Needle;
- Stapler for fixing fabric.
Embroidery tools
In addition, do not forget about accessories:
- Screws type M5;
- Screws type M6;
- Furniture screws 5 centimeters (4 pcs.);
- Furniture screws 8 centimeters (2 pcs.);
- Simple screws 6 millimeters in diameter (4 pcs.);
- Simple screws 5 millimeters in diameter (8 pcs.);
- Washers and screws with M6 thread.
READ ALSO: Characteristics and size table of HDPE pipe according to GOST
Which machine to choose?
The industry pampers needlewomen with an abundance of different models of machines. Choosing exactly what you need won't be difficult.
All machines are divided into main groups:
The name speaks for itself. Sofa - designed for embroidery while sitting on a sofa/bed or any other surface. Machines with a table are a frame with pins, securely fixed on a small wooden table. A floor loom allows the embroiderer to stand or sit on a chair while embroidering. Such a machine will be a useful and beautiful thing! decorates his machines with wood carvings, turning a handicraft tool into a real work of art.
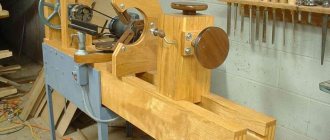
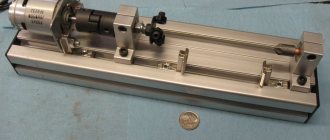
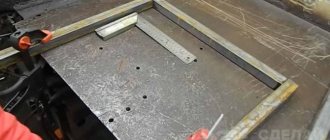
Parts manufacturing process
First of all, parts must be prepared for assembly from a regular rail.
Homemade pipe machine
Next, step by step, according to the instructions, the parts are made:
The first stage involves cutting out 30 cm bars from slats. A total of 8 such bars are needed. The required number of holes is drilled into them. In two of them, which will be the lower legs, two holes are drilled in each. The first is 1.5 cm from the edge, and the second is 6 cm. They are needed for fastenings.
Embroidering on a homemade device is more enjoyable
Next, 4 bars are taken, in which holes are also made. These are the legs of the device. Here you need to make two holes: one from 1.5 cm from the left edge, and the second from the right.
The last two blocks are the side parts of the machine. They require three holes: two on the sides and one in the middle: the first - 1.5 cm from the right edge, the second - the same, but from the left, and the third - in the middle at a distance of 15 cm from each edge. The central hole is needed for an M6 screw, and the side holes for an M5 screw.
Important! To make the machine more stable, you will need another block into which two M5 screws are screwed.
The next step is to make two cylinders for the legs of the product. Their height is 2 cm. You will also need cylinders 3 cm high for attaching the embroidery canvas.
Assembly sequence of an industrial product
Final assembly of the machine
- Assemble the frame using wings and washers for an M6 screw
- Screw two 2 cm cylinders to the bars for the machine legs. They will ensure stability and prevent the machine from folding.
- Screw the following bars through the outer hole. They must rest on the cylinders.
- At the same time, fasten the 55 cm block with the remaining bars for the legs.
- Connect the frame to the legs using 3 cm cylinders and 8 cm furniture screws.
- The result should be a machine like this.
Decoration
Decoration is also possible. It is often used for:
- Varnish treatment. Before or after assembly, you can coat wooden surfaces with a small and even layer of special varnish, which will add shine to the product and will not allow it to deteriorate due to high humidity;
- Stickers. If desired, you can cover the machine with various stickers;
- Covering the machine with high-quality fabric. This is also done before assembly. It is important to ensure that it does not leave puffs or interfere with other elements.
READ ALSO: Cases for laying pipes
Important! You can decorate the machine as you please, but additional decorating elements should not interfere with the work or distract the craftswoman.
Fabric stretching
You have a ready-made machine in front of you, but the question still remains: how to connect it to the canvas and make this device “work”? Look at the rounded slats with thick tape secured with staples. This is the tape you need to secure your painting/canvas. Prepare a needle with fishing line or double thread. Unfold your fabric that will be embroidered or is already embroidered.
Stepping back 1-2 cm from the edge of the rail, attach the canvas and begin sewing canvas, gabardine (any fabric that serves as the base) to the thick tape. A regular overlock stitch is used. To be honest, sewing is not very convenient, so the stitches are far from ideal. This is not essential, the main thing is to evenly position the edges of the work. We perform these manipulations with the upper and lower ribbons.
The painting simply sag on the machine, and this is seriously puzzling. But! The stretching process is not yet complete. The last, key action is to bring the machine to “combat readiness”. What are we doing? Loosen the screws around the perimeter of the frame (2 on top, 2 on bottom), doing this one at a time. We start from the top: loosen it, put your hand in the middle of the slats and scroll it away from you, as if you were rolling/winding a fabric.
We “tightened” the upper part in this way, tightened the screws, fixing this position. We proceed to the bottom part and repeat this action. As a result, the canvas is stretched, evenly distributed on the machine, ready for work and use! To work with small patterns, magnifying glasses are useful, reducing the strain on your eyes.
How to make the right choice
If the workload is large, you should use tabletop machines, as they allow you to relax and fix your arms and shoulders in the correct position. Typically, the design of the products allows you to adjust them and the position of the canvas according to your preference.
If the machine is equipped with a magnifying glass, it will allow you to create fine embroidery on black canvas or canvas, produce combinations of non-contrasting colors, carefully design everything and make even stitches. As mentioned, devices can be square, round and rectangular. It all depends on preferences and the desired result.
Important! For those who are just starting to embroider, a store-bought plastic machine is also suitable. It is very easy to assemble even with the help of improvised means.
The company produces high quality embroidery machines. If you don’t want to bother making it yourself, you can just buy it. "Dubko" produces devices from high-quality hardwood.
RMP-45K Frame hoop with supports
Factory "Omanik"
It is located in Talin and produces machines, frames and accessories for embroidery and needlework. The quality of the machines is good, but they are not so easy to find in the CIS, since there are practically no official representatives.
A popular manufacturer of machine tools, picture and photo frames, reproductions, mirrors and puzzles in Ukraine. It is located in Kyiv and offers not only machines, but also embroidery kits and patterns, floss, beads, canvas and other accessories.
Floor-standing embroidery machine “Stork”
Embroidery machines made of metal. They are delivered throughout Russia through online stores and sold in specialized stores. The complete set of this machine includes:
- The device itself;
- Frame holder;
- Holder for ku-snaps;
- Hoop holder.
Important! You can separately purchase a sliding lamp holder for one and a half thousand rubles.*
READ ALSO: Which brand of polypropylene pipes is better to choose? Prof Pipes
Embroidery machine "Stichsmart"
This device will eliminate the need to hold the hoop and frame on your knees or hands. This will allow you to devote even more time to your favorite activity, completing your work better and faster. The main feature of Stichsmart is that its mechanism rotates 360 degrees, which allows you to set the angle and tilt of the frame in the most convenient position for the current human posture.
Embroidery machine “Birch”
A simple, cheap Russian machine with an adjustable frame size of 56 by 30 centimeters. It also features 360 degree rotation and is made from high quality birch plywood. For 1200 rubles, which is exactly how much it costs, you can save a lot of time and nerves that appear when making embroidery.
"Oriole"
It costs a little more than Beryozka, but has all the same characteristics. Moreover, the Orioles have several options: with a frame of 30 by 40 centimeters, with a frame of 30 by 56 centimeters, 35 by 48 centimeters, and also 40 by 56 centimeters. The product is made of durable beech with a polished surface that is pleasant to the touch.
Review of manufacturers of finished machines and varieties that are on sale
Manufacturers of embroidery machines offer an incredible variety of their products - there are floor-standing, table-top, sofa-mounted, and universal machines. In general, the choice is huge.
We suggest you familiarize yourself with the characteristics of some manufacturers whose embroidery machines are in high demand , as they allow you to do perfectly high-quality work that gives the impression of machine embroidery.
Factory "Dubko" is a domestic manufacturer of machines for cross-stitching and beading, as well as accessories for embroidery. Dubko products account for almost 20% of all machines sold in Russia. Embroidery machines produced by Dubko, according to reviews from needlewomen, fully meet the basic requirements, because when designing machines, the maximum needs and requests of embroiderers are taken into account. Hardwood species are used in production.
Ukrainian offers a wide range of embroidery machines with original names “Oriole”, “Stork”, “Penguin”, “Crane” and the like. Floor looms from Arabesque are large in size, which is very convenient for large canvases. Floor and sofa-table models are available. Frames rotate in any direction.
Factory "Omanik"
Omanik Factory is a small factory producing handicraft tools. Embroidery machines from Omanik are made of high quality steel. Well-known models from Omanik, which are in high demand, are “Monster”, on which a canvas of up to 1.2 m can be attached, and “Duplex” for mobile use.
How to organize an embroiderer's workplace
After you have made the machine yourself or bought it in a store, you need to properly organize your workplace. This depends not only on the size of the device, but also on its type and shape. One of the basic rules: correct posture and posture. If you sit crookedly, your lower back and other parts of your body will often hurt, and this can directly affect your work.
Important! When using a desktop device, you can allocate a separate chest of drawers for your workplace with drawers in which all tools, materials and accessories will be stored.
Thus, making an embroidery machine with your own hands is not easy, but it is more economical compared to purchased options. At the same time, mass-produced embroidery devices made from metal or plastic pipes have better characteristics.
*Prices are current as of December 2022.
LiveInternetLiveInternet
Quote from gaberlik
Read in full In your quotation book or community!
How to make a sofa embroidery machine yourself?
The machine is stable, convenient, everything you need is at hand.
Initially it was an ordinary
Universal embroidery machine.
It is not difficult to make it yourself from a wooden plank 25 x 15 mm thick.
You need to cut off six plank parts, two stops (you can grind the cylinders), and two distribution cubes. Drill holes in the planks. And buy eight fastening kits (long bolts with washers and wing nuts).
1 Two strips (bases) 320 mm long with round and oblong holes on one side.
2 Two planks (racks) 320 - 350 mm long. Rectangular strips with a rounded end and two holes at the ends.
3 Two strips 220 mm long with three holes.
It is better to round all the parts along the edges and smooth the corners with sandpaper. The planks were coated twice with wood varnish.
Two small cylinder stops are attached to the long hole of the strips 1.
We connect the bar-rack with the bottom bar.
When assembling, the lambs should always be outside.
We connect the middle bar-rack with the top bar.
The sizes of the two cubes (or cylinders) ( 4 ) for connecting the tapestry frame to the stand can be made different (so that they do not cling to the stand of the machine). Or take the mounting bolt longer (by the width of the cylinder).
We attach a tapestry frame with embroidery.
The machine can be assembled and adjusted in different ways
and use
You can make several of these simple embroidery machines for parallel work.
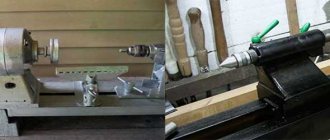
I have been embroidering for a long time using homemade sofa machines of a standard design.
But when I purchased a large magnifying glass, which turned out to be heavy for my sofa machines, I attached the magnifying glass directly to the frame, it was unstable, the machine tried to tip over backwards. I spent a long time surfing the Internet looking for improvements that would suit me. I discovered that various devices mainly concern floor machines, but nothing new has been invented for sofa machines.
At my request, my husband finally made me a new device, but in fact - a completely different new sofa machine! General view, machine in operation.
I embroider on the bed, with my legs stretched out and a pillow under my back - this is how I embroider comfortably. I don’t bend over the embroidery, my arms are lowered, only my hands move, my back and neck are straight. You can also embroider on this machine while sitting on the sofa; it is not very big - the entire structure is 80 cm wide.
The machine stands very stable due to the side bars, which form a rigid triangle (2) and the top crossbar (3), to which a large magnifying glass is now attached. The machine has become stiffer and does not vibrate.
At first the angle was straight, but experimentally they made it a little sharp, with a slight tilt forward, so that the entire structure would stand level and not tip back. Side view:
I left the side strips (1), thanks to them I can bring the frame closer to me or move it further, in addition I can twist it 360 degrees. Direct view:
The upper crossbar (3) was made from a block with a cross-section of 3x3 cm, so that the clothespin from the magnifying glass would hold tightly.
We came to this decision empirically. With my embroidery machine, you can lower one side of the frame lower under the arm with which I embroider on top
, in this case the left side.
It lowers due to the side bar (1), I lower it towards myself, and leave the right one in its normal position. Embroidering is much more comfortable. The mobility of the machine remains, I can easily move it to the side, take it with both hands or one by the crossbar. Gradually, my sofa machine acquired various embroidery accessories. All ideas from our forum, thanks to the girls who showed off their ideas and devices! This allowed me to dramatically increase the speed of embroidery, but the main thing is that it is very comfortable to embroider! Front view of the machine:
I now have almost all my embroidery supplies at my fingertips on the machine. Made from a polypropylene pipe on the top crossbar - a “parking lot” for needles and threads. A large magnifying glass, for the sake of which the machine was redesigned. Next to it is a pincushion with pins, with which I attach the canvas to the frame or stick it into the “parking space” and hang the quilts with which I embroider this fragment. On the sides, on double-sided tape, there is a glass with markers and a “trash bin” for thread trimmings. The scissors are now on the right side of the magnet. There is the same magnet on the left. Machine at the back:
I cut the polypropylene pipe lengthwise and simply put it on the crossbar. My permanent workplace, the lamp is on the nightstand, I listen to audiobooks and embroider.
Design dimensions:
1 – top crossbar, block with a section of 3x3 cm, length 75-81 cm; 2 – straight rear post 50 cm; 3 – upper oblique bar – 48 cm; 4 – Bottom bar – 35 cm.
https://zlataya.info/publ/n_uch/master_klassy/stanok/10-1-0-107
Here https://zlataya.info/publ/n_uch/stanki/stanki/14-1-0-98 you can get acquainted with other machines.
And this machine made from PVC pipes:
A homemade embroidery machine is very easy and quick to make.
It took 40 minutes. The cost was 260 rubles. Any woman can make such a machine herself. Good access to the underside (rotation of the frame by 360 degrees), but most importantly, it is very convenient for attaching ku-snaps or for homemade frames made of PVC pipes! PVC pipes for electrical wiring
in electrical goods stores.
Water pipes are not suitable
(their connections must be attached using special devices), but electric pipes fit very tightly into the grooves of the connections.
We have to:
- hacksaw for metal
- 2 bolts (No. 40) 50 mm long with wings
- plastic pipe (diameter 20mm)
- fittings (connecting elements in the form of angles and tees)
- clamps for pipes (half-rings for attaching pipes to the wall) + 2 round rubber gaskets
- and desire
.
All sizes depend on the size of the ku-snap frame, so first: 1.
Assemble the ku-snap type frame - cut 4 pieces of pipe and connect with 4 corners
2.
We connect the clamps for the pipes (we put them on the bolt, and put a rubber gasket between them to facilitate rotation).
3.
Insert the ku-snap into the clamps (clamp for fastening pipes with a diameter of 25 mm and clamp for pipes with a diameter of 20 mm).
We make the frame from pipes with a diameter of 20mm, but due to the clips and the thickness of the canvas, we take a 25mm clamp, and a 20mm clamp will be put on the machine. 4.
We begin to saw off pipes for the machine along the frame (it is necessary to take into account 1.5 cm of distance (the thickness of two folded clamps), we connect the sections with fittings (angles and tees). Using a hot (hot) nail, we make 2 through holes for inserting screws with clamps for the pipe). snap, insert, fix with a thumb. The design of the machine can vary depending on where we are going to embroider. We use our imagination, design, select sizes. The machine can be made tabletop, sofa and even floor-mounted. Attach additional tube strips for attaching the diagram, organizers, improvised materials devices.
This material from the Internet helped me a lot: Forum homyakov.net.
Accessories and devices for embroidery “How to make a Q-snap frame from PVC pipes” After assembling my plastic machine, I don’t use an expensive wooden one, the plastic one is much more convenient.
Dimensions of my machine:
Measured on the outside in assembled form, taking into account the sizes of the fittings (corners) 1. I have an American frame 43x35 cm 2. The lower rectangle (attached to a table-stand 30x54 cm (this is the lower base of the machine-stand). For the floor version, I would make 45x54 see the length of the lower rectangular stand is 54x30 cm) 5. The length of the tubes on which the circuit holder tube is attached (they connect the tube from points 2. and 4. - 15 cm 6. The height of the tabletop machine (as in the photo) 22 cm (these are the sides) - (for floor 75 cm) 7. The height of the pipes for the circuit and lamp (there are 2 of them - left and right) 20 cm (but generally arbitrary)
Detailed master class
for the production of plastic frames-hoops for embroidery, analogues of q-snap
on the website of the Kosha studio. A ladder stand for organizers
can be made separately from the machine and placed next to it, so that it is convenient to take threads and needles. This is how I got the stand for organizers and lamps.
The clamps for attaching to the pipe are attached to the holes on the back of the Paco organizer
For large embroidery projects, when you need to attach several organizers - a mount with three cross bars for multi-color designs.
If you attach 2 organizers on one rail, the length of the transverse rail, i.e. stand width = 56 cm = length of 2 organizers. In an assembly with three slats, 45-degree angles (connectors) are used (to attach the top rail).