What does drying out lead to?
A typical case: you made a shed at your dacha to store household equipment and for other needs.
They did it for themselves, so they pulled together the boards from which the walls were made, carefully, without the slightest crack. Two or three months pass; the boards dry out and the entire wall glows with cracks. In winter, snow blows through them; in summer, the wind blows dust inside the barn. To prevent this from happening, you need to use quarter boards for wall cladding. A wall covered with such boards will never have through gaps. With their quarters, neighboring boards overlap each other and when they dry out, through cracks no longer appear.
Unfortunately, lumber is very rarely sold with a quarter finished. Therefore, an amateur craftsman should know the ways in which boards can be modified if necessary.
DIY milling machine from a drill
Considering the fact that a serial milling machine is an expensive piece of equipment, the question of how to make a small milling machine from a drill is very relevant. Such a machine, used in conjunction with wood cutters mounted on a drill, is indispensable in the construction and repair of a country house, as well as in performing many other works.
Homemade machine from a drill
When starting to make a homemade router, you must first make a table for it, which should be stable and reliable. For this, plywood is often used, the thickness of which should not be less than 12 mm. Supporting elements can be made from four wooden blocks
An important part of such a homemade device is the limiter pad, the task of which is to ensure the correct position of the cutter in relation to the surface being processed. You can make such a platform from a sheet of chipboard or thick plywood by cutting out a piece of the required size and rounding its corners
A hole is drilled in the center of the limiting pad, which is necessary for the wood cutter to exit.
Arrangement of mechanisms for vertical movement and fastening of the drill
The drill itself is fixed with clamps on a stand made of chipboard. The length of such a stand should approximately correspond to the length of the drill itself, and its width should be sufficient to place power tools and fasteners on it. The stand and the limiting platform are connected to each other at a strictly 90° angle. When fixing the drill on the stand using clamps, you should place it so that the cutter inserted into its chuck extends beyond the surface of the base pad by the required amount. To increase the strength of the resulting structure, you can further strengthen it with a piece of chipboard connected with self-tapping screws to a stand and a limiting platform.
Homemade coordinate table for a machine
Using a conventional drill, you can make an even more functional and easy-to-use milling machine if you install the power tool on a homemade stand equipped with a stand with a simple microlift. Such a machine can also be made from wood, except for the lead screw, along which the microlift with the tool attached to it will move.
Inlay
Cutting thin, flush inlays requires shallow cuts and precision, making a router the ideal tool for the job. Inlaying requires shallow digging into the wood to seat the pieces flush with the surface. You can do the job with other routers, but an edge router is best suited for this task. Its small size and much lighter weight are an advantage over other models, as they provide better accuracy when inserting inlay elements.
Source: hobbywood.ru
BASIC CONNECTION IN GROOVE
Cutting grooves on a tabletop circular saw with a set of groove discs is much faster than manually. But long or wide pieces are difficult to maneuver around the table. A pendulum saw solves this problem, but it has a drawback - usually its console is not enough to cut across wide parts.
A router helps solve this problem. But this also has its drawbacks.
First, if you are selecting more than one pair of grooves, setting the ruler for each side can be time consuming. Therefore, use an insert with a width equal to the distance from the rib of the router base to the cutter. To install the ruler, slide the insert along the marked shoulder line on the work piece (Figure 4).
Rice. 4
. Insert for router.
Second, the thickness of the workpiece is almost never matched to the cutter to ensure a tight-fitting joint. Solid wood parts can be planed or sanded, but plywood parts are difficult to trim. Cutting a groove to fit is more clear. But this requires two passes with a router - one for each shoulder.
Faced closely with the selection of grooves, you can make a simple device (photo A).
Seam using an electric plane: step-by-step instructions
Step #1
First, the workpiece is placed on a carpentry bench and secured as tightly as possible with clamps. The fastener should be on the opposite side of the processing area.
Step #2
After this, the instrument is prepared. Set the angle stop at the required distance from the part. This way it will provide the required planing width and a 90° angle between the tool and the edge of the part.
Step #3
A depth stop is screwed onto the right side of the power tool.
Step #4
The cutting tool of the device should be installed as close as possible to the right edge of the sole.
Step #5
When everything is ready, turn on the electric planer and select the fold, pass by pass. Setting the maximum planing depth in one pass is not advisable. This point must be coordinated with the recommendations of the tool manufacturer.
Selection options
When choosing one or another method of milling wood, first of all you should pay attention to the possibility of installing a milling attachment on a drill. To do this, the power tool must have a cylindrical neck, in the extension of which a chuck is installed
In the absence of one, it is not recommended to use a specific drill model for milling. If it is installed on a specialized drill device intended for milling, then you can select cutters. First of all, you should pay attention to the type of work. The milling tool is not universal, so each operation will require its own model of equipment. The diameter of the shank must allow clamping in a specific drill chuck. It is not recommended to use large cutters, as they can require significant spindle power.
It is also necessary to take into account processing modes. Many wood tools require high RPMs that are unattainable with drills. It should be remembered that any electric drill is not designed for long-term loads. Therefore, it is not recommended to apply great effort to it and perform work continuously for a long time.
The sawing machine works neatly and quickly
When it comes to choosing grooves, rebates or tongues, all workshop workers first of all think about the sawing machine. As a rule, it takes less time to install the groove disk and set up than it does to prepare the router. In addition, I like the fact that the saw machine quickly copes with such work and it is convenient to work with boards and panels of different widths and lengths.
Grooving discs come in two types: dialed and adjustable (so-called “drunk”). We prefer compositors that make square, clean cuts. Of course, the most expensive type-setting disks cut cleaner, and the bottom of the cutting turns out to be flat, and the side surfaces are parallel and without chips. However, most set-up discs leave small triangular grooves in the bottom corners, caused by the beveled edges of the teeth on the outer discs. Adjustable (“drunk”) discs are attractive due to their low price and speed of adjustment, but they have a serious drawback - the bottom of the disc turns out to be concave, and the corners are not straight, and after working with them you have to resort to cleaning.
You can also do all three types of cuts with a 40- or 50-tooth combination saw blade. When choosing a groove or tongue, make the outermost cuts first, and then remove the material between them in several passes. Small irregularities at the bottom of the sample can be smoothed out with a sharp chisel or milling cutter.
In the same way, it is possible to cut folds, but we prefer to make them using two cuts. First, a cut is made to form the shoulder of the rebate. Then a high overlay (150-200 mm depending on the width of the workpiece) is fixed to the longitudinal (parallel) stop, the overhang of the disk is adjusted and a second cut is made at a right angle to the first. To avoid kickback when the blade jams and ejection of cuttings, make sure that the cuttings are not caught between the blade and the fence.
What tools do you use?
Methods for making grooves, tongues and grooves vary depending on the arsenal of tools you have at your disposal and whether the finished joint will be visible after the project is finally assembled. (The attached table will help you compare the advantages and disadvantages of these methods.) Remember that some connections can be hidden behind the facade frames, and a more or less even groove can be made even better using special cutters (see the section “Cutters for cleaning grooves will remove flaws in the sawing machine” ).
Having much in common, these samples nevertheless differ depending on their location in the wooden blank. The fold forms an L-shaped depression along the edge or end. The groove has two shoulders (walls) and is located transverse to the direction of the fibers. The tongue also has two walls, but it is located along the grain.
FIVE WAYS TO SELECT GROOTS, RABBLES AND READINGS
| TOOL | RESULT ASSESSMENT | PRICE | OTHER APPLICATIONS | |
| Stackable groove disc | Advantages: cuts cleaner than most conventional blades; precise thickness adjustment using spacers | Disadvantages: leaves triangular grooves in the corners of the sample; When working across the grain, a support board is required to prevent chipping | $80-$250 | Formation of tenons, box joints, half-tree joints, etc. |
| Adjustable groove disc | Advantages: simple and quick setup; affordable price | Disadvantages: uneven sampling bottom; When working across the grain, a support board is required to prevent chipping | $50-$80 | Formation of tenons, half-tree joints, etc., but with low quality requirements |
| Combination saw blade with 40 or 50 teeth | Advantages: allows you to do without a groove disk; when working across the grain, it makes clean folds | Disadvantages: the need to make several passes, which is time-consuming and often leads to errors; tooth marks require cleaning; When working across the grain, a support board is required to prevent chipping | $10-$80 | Rip and cross cuts in normal sawing operations |
| Straight cutter | Advantages: makes clean and rectangular selections; excellent accuracy when the cutter diameter matches the width of the tongue or groove | Disadvantages: deep samples are made in several passes; When working across the grain, a support board is required to prevent chipping | $5-$20 for one cutter or $30-$100 for a set of 6-9 cutters | Selecting nests, milling according to a template, leveling rough surfaces |
| Seam cutter | Advantages: makes clean folds when routing by hand and on a router table; Setup is faster and easier than a straight cutter | Disadvantages: deep folds are made in several passes; when working across the grain, a support board is required to prevent chipping; may tear veneer edges from coated surfaces | $10-$40 for one cutter or $20-$60 for a set with multiple bearings | Not intended for other operations |
HOMEMADE DEVICE FOR SELECTING GROOTS
Although the device looks complicated, it is quite easy to make (Fig. 10). Cut the workpieces to size, and then carefully plane the planes and edges. Then select a groove in the fixed bar for the fixed ruler using a few cuts on a circular saw. Then, to ensure a tight fit and square edges, use a sharp chisel to trim its shoulders. The half-wood connection on the adjustable ruler is made so that its upper surface is in the same plane as the fixed ruler.
Mill out all the cracks in the planks and rulers using a ruler pressed to the base of the router (Fig. 8). First, releasing the cutter approximately 3 mm in each pass, mill narrow through slots in several passes. Next, mill out pockets for the screw heads and T-nuts.
Small clamps are used as clamps. The pressure pad is a T-shaped nut at the end of the screw. The locknut prevents the pad from coming loose when it presses against the workpiece. Select the grooves in the adjustable bar so that the clamps can hide behind its edge. Rice. 10
. Device for making grooves.
Hello! In principle, you can put a cutter in a drill if we are talking about a hand router cutter. But the effect will not be very good. I tried to install and process it manually, but the quality of course left much to be desired. And the chuck constantly relaxed and the cutter flew out. I made a special table and installed a new cartridge. The quality has certainly improved, but the processing speed is low and the processing depth is difficult to regulate. In general, you can install it, but there will be some inconvenience and the drill has a small rotation, not for milling, and the motor may burn out!
If the only question is what is possible or not!, then you can certainly adapt the cutter to a drill and you can mill with it, but what the result will be is a completely different question.
At first, the rotation of the drill is not enough; for a clean cut of the cutter, the cut will be torn and unsightly - you will have to additionally process everything with sandpaper, and perhaps there will not be a smooth surface at all, since due to the lack of rotation, wood fibers will be torn out!
Secondly, in order to work with a drill with a mounted cutter, you will need to construct a holder device, because a working cutter will constantly be pulled out of the processing area and it will be very problematic to hold it with your hands!
Thirdly, if it is a large shaped cutter with a significant diameter, then working with such a cutter is not possible at all, and even more dangerous!
In general, the conclusion is this: if there is some rough work, such as cutting or grooves, for example, for a lock or internal parts, then it is quite possible to cope with this work with a drill and a cutter!
Basic operating techniques
So, having firmly secured the block, you should stand so that you can move freely at the same time as the tool advances. Excessive body tension needs to be relieved. Sleeves and hems of clothing should not interfere with the movements of the hands holding the plane tightly.
Working posture when working with an electric planer.
First you need to turn it on, holding it in the air above the workpiece. And only when the tool has been running for a few seconds so that the knives reach maximum speed, can you carefully bring them to the end of the workpiece and begin the first pass. It is important that the sole of the working plane is always parallel to the surface being planed.
The tool should move smoothly and evenly across the workpiece. At the same time, you need to make sure that the shavings do not get under its sole! Do not allow sudden movements, jerks, increase speed or stop. In any of these options, there is no way to make the surface completely flat, without pits and other defects.
When planing planes, press the tool handles with the same force. Moreover, at the beginning of each pass, press a little harder on the front handle, and at the end of the movement - on the rear handle, otherwise blockages are inevitable.
When planing a quarter, the position of the hands is different. With one hand you should move the plane forward, and with the other you should press the side stop against the edge of the workpiece. At what speed is it better to advance the tool? There is no need to rush here; it is quite enough to walk 1.5-2 m in a minute.
It is extremely important that the tool follows exactly the intended path. As you deepen, the side stop fades into the background, and after a few passes the edge of the fold already becomes the guide. The cutting depth is limited by the parts of the plane that protrude from the side. But on one side they are specially raised so that a sufficiently deep quarter can be made.
What does drying out lead to?
A typical case: you made a shed at your dacha to store household equipment and for other needs. They did it for themselves, so they pulled together the boards from which the walls were made, carefully, without the slightest crack. Two or three months pass; the boards dry out and the entire wall glows with cracks. In winter, snow blows through them; in summer, the wind blows dust inside the barn.
To prevent this from happening, you need to use quarter boards for wall cladding. A wall covered with such boards will never have through gaps. With their quarters, neighboring boards overlap each other and when they dry out, through cracks no longer appear.
Unfortunately, lumber is very rarely sold with a quarter finished. Therefore, an amateur craftsman should know the ways in which boards can be modified if necessary.
Lumber processing options
Let's figure out how to choose a quarter on the board with your own hands. We buy grade 2 board and process it in a convenient way. How can you do something like this:
- electric planer;
- circular;
- manual milling cutter;
- Bulgarian
First, you need to make a cut from the end of the board, with a depth of half the height, and then in the center of the end. Then we set the width of the working part of the board and saw another fragment. Here the depth should be 1.5 times greater than half the height to make it more convenient to remove the sawn-off part. In this way, you can create a finished product with your own hands that is twice as expensive as the original one.
Despite the production from second-grade raw materials, the quarter has excellent characteristics:
- strength;
- thermal insulation properties;
- visual appeal;
- possibility of decorative use;
It is possible to use this material for external cladding.
A circular saw
The work scheme is not fundamentally different from the previous ones, the only difference is that wood processing is carried out with a circular saw.
Electric planer
They are convenient for cutting boards and giving them shape. The process of obtaining a quarter board is no different from working with other equipment, but a plane is better because of its convenient operation. This device provides an open view of the working surface of the board.
In the absence of a circular saw and a plane, a grinder with a wood disc or a hand router on which a cylindrical cutter has been previously installed will be suitable for work. But both options are characterized by low productivity, that is, they are unlikely to be suitable for processing large volumes of material due to their low speed.
Alternative methods
As mentioned, a stationary circular saw is very convenient for selecting quarters. (There is a separate article on our website about the types of circular saws and the features of their choice.) But it is not always in the master’s arsenal, and sometimes it is physically impossible to use it.
If you need to cut quarters out of thick, long boards, you can use a hand-held circular saw. The manufacturing principle and sequence of operations are the same. The difference is that in this case the board being processed and the tool change places. The board is fixed motionless, and the master moves the circular saw with a parallel stop along it manually.
If you don’t have a circular saw or a hand-held circular saw at hand, you can use a grinder with a wood blade or a hand router with a suitable cylindrical cutter. Both methods are very slow and are not suitable for large volumes of work. In addition, choosing a quarter with an angle grinder is inconvenient, dangerous and turns out uneven.
Another way is to use an electric plane. However, most modern plane models are not suitable for this due to their design features. Watch the video that shows just this method of choosing a quarter.
How to choose
When it comes to purchasing a branded device, you first need to evaluate how much manual you need in your home arsenal. If we are talking about permanent use, it is recommended to carefully read the manual with the richest configuration with all bolts, clamps, conveyor and ruler. For occasional use, you can purchase basic equipment with a minimum set of functions.
When choosing, you also need to evaluate the characteristics of the circular saw. Saw diameter, motor power, platform size and functionality. From a practical point of view, it is necessary to evaluate the possibility of circular work with different materials. Wooden planks, boards, furniture panels
It is important to choose the correct length and width of the guide so that it is 2 lengths of the sole longer than the workpiece
READ How to Cut Tiles with a Glass Cutter
Our services
How to choose a quarter using a circular saw
Using a circular saw to make the quarter board will make the process much easier. If the tool is of high quality, has sharp blades and works at good power, this will help you a lot. After all, now you can set the necessary values and not be afraid to cut off the excess.
How to choose a quarter
on the board with a circular saw? The process does not have any special differences from the usual one, the only thing is that you now have a circular
saw
. A cut is made from the end of the board with a depth of half the height of the board. Next, a second cut is made in the center of the end. Next, we take the necessary measurements and cut it so that the quarter takes on the required shape.
Driving screws
You have a choice of mild steel, stainless steel, brass or aluminum screws with straight or Phillips slots and countersunk or pan heads. Semicircular heads stand out clearly on the surface of the wood, countersunk heads are either flush with the surface, or edged with brass washers, or hidden by wooden plugs. The screws are screwed in with a hand screwdriver, a drill with an appropriate attachment, or a screwdriver.
Driving screws with a drill or screwdriver
When using a drill, install the locking mechanism so that the screw is screwed in to the required depth. If the wood is soft, the installation hole can be made with an awl; if it is hard, drill it with a drill of a smaller diameter.
The installation hole can be made with an awl
To be able to hide the screws under the wooden plugs, you will have to drill a hole for the plug with a countersink drill and a corresponding cutter for the plug. Don't use steel screws on oak - they react with the wood and moisture and cause stains. Instead, choose plated steel, brass, or stainless steel screws.
Cutting a tenon with a router
If you have a lot of tenons to cut (or if you just like working with machines), a table router is the ideal tool. If the large size of the workpiece does not allow it to be placed on the milling table, it is better to press it with clamps to the workbench and process it while holding the router in your hands. Set the fence to the length of the tenon and the router to the desired height, then, holding the workpiece firmly against the fence, remove the excess wood in several passes. When the end of the tenon rests against the stop, turn the workpiece over and repeat the procedure on the other side. If you stop before the cutter reaches the shoulder line, trim the tenon with a chisel.
Cutting a tenon with a router
The most common mistakes made by beginners
The most annoying defects are the beveled corner and the “staircase”. Angle distortion is largely due to the fact that the workpiece is installed carelessly and incorrectly. And the “ladder” is the result of the fact that the end of the blade slightly does not reach the edge of the sole. Therefore, with each new pass, the tool leaves behind a stripe. The more the knives are recessed, the wider the “ladder” will be.
The groove turns out to be curved. This usually occurs because the miter gauge is moving along an uneven edge of the board or block. Such a defect will not occur if, before working with a plane, you carefully check the quality of the edges of the workpieces. In addition, while guiding the tool with one hand, you should press the stop firmly with the other.
Read also: How to disassemble an interskol sander
There are distortions and swaying during work. Such troubles are inevitable if the workpiece is not secured sufficiently or strictly horizontally. These deficiencies should be addressed immediately.
Pits and roughness usually appear when you work with a plane, changing the pressure on it while passing through the workpiece.
We should not forget that at the beginning of planing it is necessary to apply a little more pressure on the front, and at the end of the pass - on the back of the tool. But you can’t put the plane on your heel or toe.
Finally, you should always remember that you are working with a power tool. When stopping to adjust the blades or watch the picking progress, unplug it. If you accidentally turn on the electric planer, you may lose your fingers! By following all these rules (see video), you can significantly make your work easier and speed up its completion in complete safety.
When a person purchases an electric planer, first of all he thinks about the even and smooth surfaces on the wood that the tool will provide. But time passes, appetites grow, and the functionality of a conventional electric plane is no longer satisfactory.
Sometimes you need to chamfer or select a quarter. A simple operation at first glance requires care and certain skills.
How to select a quarter on a board using a circular saw?
To do this, set the required cutting depth. To sample a quarter measuring 20x20, the disk should extend from the platform by 20-22 mm (an increase for uneven surfaces of the board). To select a versatile quarter, for example, 15x20, the depth adjustment is set twice for each size, by 15-16 mm and by 20-22 mm.
Subsequently, the operation is performed in the same way as sawing an edged board: a guide bar on two rods is installed at the required distance, and a cut is made along a wide plane. Then the board is placed on the edge and a second cut is made.
Since the edge is narrow, difficulties may arise - on some models, the guide bar may not be pulled close to the platform. In this case, a beam is attached to the board (or plank) with clamps or self-tapping screws, which increases the width to the required size.
If you cannot make a cut along the edge using a guide, you can make it using pencil markings. It is difficult to hold a circular saw on the edge of a narrow board (20-30 mm). In such cases, it is sometimes more convenient to either screw the support beam, or place the workpiece between two bars (boards) along which the saw platform will move.
What does drying out lead to?
A typical case: you made a shed at your dacha to store household equipment and for other needs. They did it for themselves, so they pulled together the boards from which the walls were made, carefully, without the slightest crack. Two or three months pass; the boards dry out and the entire wall glows with cracks. In winter, snow blows through them; in summer, the wind blows dust inside the barn.
To prevent this from happening, you need to use quarter boards for wall cladding. A wall covered with such boards will never have through gaps. With their quarters, neighboring boards overlap each other and when they dry out, through cracks no longer appear.
Unfortunately, lumber is very rarely sold with a quarter finished. Therefore, an amateur craftsman should know the ways in which boards can be modified if necessary.
Types of groove boards
Many users have no idea how to choose a groove in a board, believing that the store will offer them only one option for connection and material.
This is far from true; there you will be greeted by a large assortment:
- Symmetrical groove. This is the simplest type. In it, the lengths of the upper and lower shelves are the same, and they protrude at the same distance.
- Asymmetrical groove. Here the upper shelves are longer than the lower ones.
- Block house, used mainly for finishing walls and ceilings. The planks often imitate the relief of timber and have a semicircular or shaped profile on the front side.
- Euro lining, like block house, is often supplied with a relief pattern.
- Decking boards, made of wood and polymer, also have tongues and grooves that simplify installation.
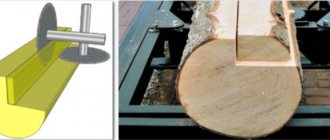
Rallying in a quarter
Rallying in a quarter
gives a tighter connection than butt jointing. Longitudinal side cuts (quarters) are made in the boards to be joined using a hand router, electric planer or circular saw. The depth and width of the quarter should be equal to half the thickness of the board. This type of connection leaves no cracks or gaps. Quarter bonding is useful for cladding external and internal surfaces. For example, to hide unevenness or defects in walls, insulation and flooring.
1. For an example of cutting a quarter with a circular saw, take 3 identical boards (photo 1).
2. At the beginning of work, mark 1/4 of their width on the boards on both sides. Prepare the circular saw. To do this, adjust the reach of the saw blade so that the cutting depth is equal to half the thickness of the board (photo 2).
3. For the required distance (half the thickness of the board) of the cut from the edge of the board, we adjust the parallel stop of the saw (photo 3).
4. We secure the workpiece on the work table with clamps and make a longitudinal cut with a circular saw (photo 4).
5. After this, we make longitudinal cuts on the back sides of the board (photo 5).
6. Again, secure the workpiece with clamps on the work table (photo 6.1) and make transverse cuts equal to half the thickness of the board (photo 6.2-6.4).
7. In this way we make 2 more blanks (photo 7).
8. Place the workpiece on 2 perpendicular boards (photo 8).
9. We nail the prepared blanks to their base (photo 9.1, 9.2).
10. When nailing the next workpiece, press it tightly against the previous one and fix it with nails using a hammer (photo 10).
11. The quarter joint is ready (photo 11).
What kind of plane and tools should you use?
Some conventional electric planers have sampling devices as an additional option. In principle, an electric planer is designed for planing surfaces. For selecting wide and deep folds, other tools are more convenient and effective - a router, a circular saw. And also a special plane for selecting quarters. Differences:
- deep, shorter knives;
- powerful engine;
- special design for holding the tool on both sides during sampling;
- adjustments for height and width of the passage.
In Russia, this instrument is rare, but it can be found on international platforms.
If the delivery set of a conventional electric planer includes a side stop-platform and a depth limiter, you can also use them to make a sample of the desired size. Electric planers with this function are arranged so that parts protruding beyond the edge of the knife do not interfere with the tool being immersed in the wood.
Other electric planers do not provide mounts for these devices, and they are not included in the delivery set. In addition, parts protruding beyond the width of the knife will prevent the plane from sinking to a significant cutting depth.
Types of groove boards
Many users have no idea how to choose a groove in a board, believing that the store will offer them only one option for connection and material.
This is far from true; there you will be greeted by a large assortment:
- Symmetrical groove. This is the simplest type. In it, the lengths of the upper and lower shelves are the same, and they protrude at the same distance.
- Asymmetrical groove. Here the upper shelves are longer than the lower ones.
- Block house, used mainly for finishing walls and ceilings. The planks often imitate the relief of timber and have a semicircular or shaped profile on the front side.
- Euro lining, like block house, is often supplied with a relief pattern.
- The decking board, made of wood and polymer, also has tongues and grooves for easy installation.
How to select a quarter on a board using a circular saw
Electric planer. How to choose a quarter on a board
Electric plane. This is a handy tool for woodworking. With its help, you can evenly cut wood and get a product of the desired shape. How to choose a quarter in an electric plane board? The process is no different from working with a circular saw. The only thing that can be an advantage of working with this particular tool. It's ease of use and clear vision when completing a task.
Such work will help you make a quality product yourself from a cheaper product, which is ideal for decorating and beautifying a room, both inside and outside.
Methods for making a quarter
You can select a quarter using several methods using different tools. For example:
- electric plane,
- milling cutter,
- hand circular saw,
- stationary circular saw.
The last method - selecting a quarter using a circular saw - is the most convenient and productive. Let's consider it.
If you require planed boards, then it is more convenient to plan the boards first and only then proceed to making quarters.
Making planks with grooves at home
Often you have to make furniture or make repairs at home, using the simplest methods and what is at hand.
If you need to make a groove in the board with your own hands, be patient and have the necessary tools:
- A circular saw. The most practical tool, but, unfortunately, not everyone has it.
- A regular hacksaw for wood. It will take longer to work with it, but this accessory can be found in every home.
- Electric drill. It is also quite accessible, but before making a groove in a board with a drill, it is advisable to practice on an unnecessary block, practicing the skill.
Making a groove with a circular saw
Making a groove with a circular saw.
The optimal materials are wooden boards, bars and the like. The price of raw materials is minimal; in extreme cases, what is available on the farm is used. The most successful solution is a through, single open straight end connection.
The joint will be strong and reliable:
- It is recommended to make tenons with a thickness of ¼ of the thickness of the plank and a groove of the same size.
- The height and length of the groove must correspond to the dimensions of the plank.
- Prepare a pencil and ruler for marking.
- Decide on the coordinates of the cut and mark it.
- The cut should be made along a line inside the side that will then be separated.
- For a circular saw, the instructions recommend a blade width of 2-4 mm.
- Sawing in the middle of the marked line removes 1-2 mm of excess, since two grooves are made on each plank.
Note! To prevent the workpiece from being damaged, make cuts along the inner sides of the drawn lines. In this case, a visual correction is made for the thickness of the canvas
- If you need to join two parts at a 90º angle, cut the pieces at 45º at the ends.
- For an end-to-end open miter connection (single straight), mark the cut locations on the oblique cuts of the planks.
- Before removing the groove from the board, double-check that the cut is correct on all sides.
- For an angular single connection that is not through the eye, an eye is made instead of a groove. In this case, the width of the tenon is left unchanged, and the length will be 0.3-0.8 of the width of the board being attached.
- Since the circular saw rounds the edges of the eye, leaving the shape of the tenon unchanged, it is advisable to refine the corners by turning them with a rasp.
Hand circular saw
Typically, gardeners think about buying a hand-held circular saw after they had to manually saw a couple of boards along their two-meter length or so. In other words, dissolve the boards.
For these purposes, there is a hand-held circular saw. Once you get used to working with it, you can no longer avoid the temptation to use a circular saw wherever it can replace a regular handsaw.
A couple of months after purchasing the saw, I realized that for any household needs it is enough to buy only wide boards of the required thickness. And from them you can “cut” any blanks. For benches, stools, various country furniture, garden trellises and a host of other things useful in the country.
For the frame of a small lightweight woodshed, it is quite enough to make 75x50 posts, which can be easily obtained from a standard 150x50 board. It’s easy to cut slats from it for decorative “chlamys” in the garden for climbing plants. Believe me, the savings are very significant.
Further more. Having learned how to select a quarter using a circular saw, you can quickly and efficiently make profiles for finishing door and window openings and lining external corners.
The blanks will look good, not like store-bought items that can be broken with just your fingers. At the same time, costs will be reduced threefold, or even more, taking into account the “exclusivity” of the product.
So, I won’t try to persuade you – a circular saw is an extremely useful household item!
Operating a circular saw is quite simple, but requires skill and care. I tried to demonstrate the general principles of adjustments in two interactive flash drives:
I would like to dwell in more detail on some of the features of working with a circular saw. I think that these points will help with choosing a tool.
1. Depth of cut. Always set the depth of cut equal to the thickness of the board you are cutting. Make this a rule for yourself. You can do less if you need to make a groove, but you shouldn't do more. Not only for security reasons. For example, you can saw by placing the board directly on the workbench. Barely noticeable grooves on the surface of your workbench after such cuts will not interfere with your work for many years.
The nominal cutting depth of the saw is selected based on your individual needs. In practice, to cut a 50 mm board at an angle of 900, you need a cutting depth of 50 mm. Anything larger than this size will only work for miter cuts. So, to make a cut at an angle of 450, you will need a saw that has the characteristic we are interested in at the level of 71 mm. Based on this, draw conclusions. How often will you have to cut at an angle?
2. Other structural elements. Lower saw blade guard (openable). Keep in mind that the guard will open the saw blade on its own only if nothing interferes with it. For example, as in option A, when the end of the board is like a canopy.
If the board is lying on a workbench, then an attempt to “automatically” open the casing can end disastrously: realizing that the casing is “in the way,” you will try to pry it off by lifting the back of the saw; the disc will enter the material when the saw is “in the air” , without emphasis. It can easily be thrown away, which in itself is unsafe. And you'll ruin the board.
In this case, you need to carefully manually move the protective cover aside. It’s good to get used to doing this in such a way that your left hand and saw firmly hold the tip of the latch of the retracted protective casing. Safety first!
First, think about how all the elements involved in the sawing process will behave, taking into account the specific situation - then act!
Align the front end of the striker plate with the marks where to start sawing, and press it firmly against the board. Please note that the disk does not touch (!) the workbench when turned on; for this purpose, the rear part of the support plate can be slightly raised. Turn on the saw, pick up the speed and feel free to start making cuts.
The ideal option with a board on a workbench: when the edge of the board, from which the cut begins, protrudes a few centimeters beyond the edge of the workbench.
You should absolutely not saw along a board that is in a very “suspended” state (it even bends!).
The “riving knife” is used to prevent the disk from getting pinched and to prevent you from “crashing” the disk into the board while moving it in the opposite direction. And you are almost guaranteed to receive a noticeable backlash, similar to what happens in similar situations with an angle grinder, a chain saw, and other “rotational-cutting” tools.
3. Parallel stop, or guide. If you have markings and the appropriate skill, you can make an even cut without a parallel stop, but I see the point in this only in those rare cases when you need a board of this shape:
In all other cases, the rip fence is indispensable:
4. Fixation of the workpiece. In all cases, the workpiece must be securely fixed. It is unacceptable when the workpiece begins to move with the saw or deviate somewhere to the side. Having secured the workpiece, before you start sawing, you must mentally go through it with a saw. It is important that there are no obstacles along the entire path of the saw’s future movement! The stops you use and other possible fasteners should not be anywhere in the path of the tool or its element.
In the photo above, I give only an example from my practice, although there are a lot of possible options. I think in this regard you should not blindly use other people’s recommendations. Take them as a basis (from various sources) and adapt them for yourself as a belt, tightened to your individual size.
On one side (blue color) I have a rail attached to the workbench, which serves as a counter so that the board being cut does not move sideways. It protrudes slightly below 2 cm, that is, less than the thickness of the boards that I usually process on this workbench. To prevent the sawn board from sliding forward, it is pressed against the second stop (green). This stop is tapped from below to the required height, so that in turn it also does not interfere with the saw when completing the wiring. I have developed this work scheme over several years, and it is convenient for me. In this configuration, you can use a plane and a router (for rough work). I don't pay attention to the grooves from old cuts. The workbench is already 7 years old and it always winters in the open air. I fastened the upper boards from below, so that the blade of the saw blade could never run into the screw.
Feature (1): When making longitudinal cuts, try to avoid situations where the next board follows closely behind the solid wood being cut, without reliable fixation:
In the border zone, the board can be twisted or dangerous chips can be torn out of it, and the saw can be thrown back. This, for example, can happen when, as in the case of my “green” stop A, if the saw blade runs into it.
In some difficult situations, when it is necessary to select a quarter for the profile, I additionally secure the workpiece with screws, which I tighten in places where the disk will not run into them, and which will then be cut off during the final trimming of the workpiece. A little advice: during “in-line” production, change the screws more often. Their quality is poor, the head wears out quickly, you can easily screw it in and not unscrew it.
When preparing the board for cutting, make sure that there are no internal stresses in it that could jam the disk.
5. Wiring. The saw should be driven gently, without overloading the motor. Try to rest the saw when making many long rip cuts. If you continuously unravel “wet” boards with a manual circular saw for several hours, it is easy to “burn out” the motor even in a reliable professional-grade saw.
After finishing the cut and lifting the saw up, hold it with the blade away from you, even if it is already covered with a protective cover. Place the saw on the floor or workbench only when you are sure that the blade has completely stopped and is “covered.” Cultivate a similar “habit” in yourself to the level of a reflex.
What to choose?
Despite the huge selection, almost 90% of commercially available circular saws represent one “medium” weight category. These are the most popular saws, capable of cutting the most popular boards in construction, up to 50 mm thick. The diameter of the discs used is from 180 to 200 mm. This saw is universal. The typical power range for such saws is 1100-1800 watts.
It makes sense to take smaller saws for regularly performing specific work. When you don't need to make deep cuts. Then you will be able to realize the absolute advantage of such a saw - its lighter weight.
Among the very “small” saws – “SUVs” – that have proven their reliability, we should especially highlight the Skilsaw with a power of 500W, although it is now already available in an 800W version. This model is, in fact, very convenient for working with lining, picket fences, OSB boards, and laminate. This is a super lightweight circular saw. So light that you quickly start using it with one hand, firmly “turning off” the lower protective casing, losing your vigilance in front of its insidious charms. Which is unacceptable! But perhaps this is its only drawback.
Therefore, let's return to middle-class saws.
External inspection - take the saw in your hands and feel how convenient it is for you. A saw is a dangerous tool. Prolonged work with a tool that is not comfortable in your hands is very tiring. When moving a circular saw, a person is always very focused on a subconscious level, and experiences incomparably more tension than running an “iron” along the same board, which can be much harder. Therefore, I put the ergonomic factor of a circular saw tool first.
This should also include an inspection of the quality of the instrument itself and the materials from which it is made. For example, a plastic top guard is not a good sign, but that's in my opinion. The lower protective cover should open and close smoothly and without play. At the same time, it should not look so that it can be easily bent if you do not “throw” (accidentally, of course) the saw on the floor too carefully.
Brand. A high-quality circular will cost from 4 to 6 thousand rubles. In this range, you can choose a worthy copy of a well-known brand with a reputation, and tailored exactly for you.
For some it will be Metabo, for others Black&Decker, for others Makita, but, in fact, a specific brand among “equals” as a decision-making factor will be less significant compared to ergonomics.
Other adjustments and features.
Please make sure that all settings are easy for the saw you like. For example, loosen the cutting depth locking lever, change the cutting depth and try to lock the lever in different positions. I won’t point fingers, but there are popular saws that have problems with this lever. In the minimum cut position, it is easily tightened firmly, but in the maximum position, it begins to rest against the sole, and it will not be easy to tighten it. If you try to correct this by changing the position of the lever on the slots, you will experience inconvenience when locking in a different position.
The lower protective casing can cause significant inconvenience when cutting at the maximum possible angle (450), or even simply prevent such a cut from being made due to the fact that it will simply protrude outward from the bottom of the sole, along with the saw blade.
In fact, the design of the saw is not simple. There are many elements that rotate in different planes - so carefully evaluate for yourself the convenience of each of these elements.
The most important thing is that after you have installed and fixed the saw in the desired position, the resulting structure does not “creep” in different directions due to work loads.
Convenient and easy access to brushes for independent replacement is important, which is especially important for powerful saws.
Possibility of permanent installation - for some this may be a useful option.
Electronics. Nowadays such modules are fashionable. In addition, for certain purposes they can be very useful. For example, an electric brake on the saw blade in case of jamming. It will not prevent a kickback, but will reduce its consequences (in this regard, a slip clutch works more effectively, ensuring free rotation when the saw blade is stationary). Otherwise, the same electronic bells and whistles are typical for circular saws as for all power tools.
This is a soft start system (solves the problem of “starting current”), a system for maintaining a constant speed under load, a speed control system (for example, to reduce speed and cut plastic without it melting), and an engine overload protection system.
Saw blades.
There are many saw blades. I will limit myself to those designed for sawing wood. Often, the best saw blade is the original one. As a rule, this is a strong, durable and versatile disc (of course, this only applies to brands with a well-deserved reputation). But sooner or later it wears out and requires replacement or sharpening. Sawing with a dull disk is extremely undesirable for many reasons. This puts excessive strain on the engine. This “rips” the wood instead of making a straight cut. And this is dangerous due to the higher probability of a kickback when blunt teeth become jammed in the array.
Almost all modern saw blades have carbide-tipped teeth, which provides them with a long service life.
The fewer the teeth (and they are, accordingly, relatively larger), the faster such a disk cuts, but the cut is rougher. Such discs are better suited for longitudinal sawing of wood.
Discs with more teeth are used for clean finishing cuts. These discs best reveal their advantages when cutting wood crosswise, although longitudinal cuts made by such discs also do not cause any complaints.
The inclination of the teeth can be positive or negative.
To better understand how this works, imagine peeling a potato or sharpening a peg by changing the angle of the knife. Obviously, the blade works differently, and the chips produced are not the same. Most wood blades have a positive tooth angle. A negative angle is useful for finishing cuts in plastic, laminate, and aluminum. Also, a slight negative tooth angle may be required for those discs that are installed on miter and plunge-cut saws. There, the trajectory of the “introduction” of the saw into the wood differs from the classical one. Accordingly, there is a different distribution of loads.
Compensation slots on the disks serve to prevent thermal deformation of the disk in case of overheating. This reduces noise and vibration, as well as the load on the engine when the saw is running. The friction and beating of a disk, even slightly bent by a propeller, is very unpleasant.
Not only the number of teeth and their inclination, but also their shape and sharpening geometry have a great influence on the speed and quality of sawing. In most cases, the subtleties of sharpening come down to the principles of setting a regular hand saw. But there is a peculiarity, rather a marketing subtlety. If the disk has become dull and you decide to try to sharpen it yourself, or take it to a workshop, then not all sharpening methods can be reproduced “makeshift” without special equipment. These are little tricks of saw blade manufacturers who benefit from you buying their blade again rather than sharpening it all your life.
When choosing a disk, you should also pay attention to such points.
The topic of saw blades is well discussed on the Internet, not only in an advertising sense, but also in an informational and educational way.
And one more thing: as a rule, manufacturers that respect themselves and the buyer place all the information about the disc on its packaging and directly on its surface.
Speaking about hand-held circular saws, one cannot fail to mention one rather interesting variety of them - plunge-cut circular saws.
Not all manufacturers have them in stock. Less common than miter saws. With the help of such saws it is much more convenient to cut rectangular holes in solid wood or plywood without touching the edges. I suggest looking at the operating principle and features of using such saws on the catalog page of the manufacturer of the same name - Grizzly. Those who are interested in this can go to the corresponding website using the link at the bottom of the picture.
And now the most important thing! A hand-held circular saw is an extremely dangerous tool. This needs to be repeated constantly. I suggest watching videos that clearly demonstrate the possible consequences of disrespectful handling of circular paper, everything is more than clear:
I think what you see will force you to once again carefully study the instructions and safety recommendations from the manufacturer of your tool. And I wish no one to see this in reality!
www.edicon.ru