Electric planers, which have been on the market since the mid-20th century, have become indispensable for craftsmen processing lumber. Their popularity is due to the presence of a number of advantages compared to conventional hand planes. When using power tools, the labor intensity of the process is reduced, labor productivity increases, and the quality of workpiece processing is improved. In addition to planing, specialists perform quarter cutting, chamfering and other operations using tools. To achieve a high-quality result, you need to know how to operate an electric planer correctly and follow safety rules.
Tool preparation
The purchased tool must be checked before use. First, you need to study the instructions on how to properly operate an electric planer. Then the preparation is carried out, and the following is checked:
- ease of shaft rotation;
- sole location;
- position of cutting elements;
- freely press the power key;
- the presence of various defects: integrity of the case, cable, etc.
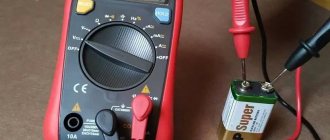
The complete set and working condition of the tool must be checked upon purchase. The integrity of the instrument is determined visually; the rotation of the drum can be checked by moving it with the palm of your hand. The operation of the start key is by pressing it. If no defects are found, a test run is performed.
Attention! Before working with an electric planer, it is best to first learn on boards that are not needed. This will help you get used to it in order to get a quality result if you have no experience.
Tool preparation is the key to a quality result Source topex.net.ua
Plate adjustment
Equipment adjustment begins with adjusting the location of the front part of the sole. Why do you need a ruler? The work is carried out in the following sequence:
- Using the adjustment knob, the moving part of the sole is set to a position that provides the smallest planing depth.
- Place the plane on a flat surface upside down.
- The drum is rotated so that one of the knives is on top of its axis.
- A ruler is placed on the slab: both parts must be at the same level.
If the pad on the sole is at an angle, then the defect is corrected as follows:
- remove the adjustment knob and the front element of the plate;
- clean the insides of the instrument from dirt;
- lubricate parts;
- install the sole and handle in place;
- Determine the location of the slab with a ruler.
Instead of a ruler, you can use any flat surface Source ytimg.com
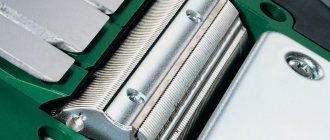
Knife attachment
The correct installation of knives on the electric planer is also checked using a ruler. Why is it applied to the edge of the sole? Afterwards it is determined whether the cutting elements touch the surface. When they do not touch the ruler, adjustment is required. The hexagon, which is included with the tool, loosens the knives. Afterwards, the cutting edges are installed parallel to the plate so that they protrude approximately 1 mm.
Knowing how to set knives on an electric planer, you can use this method for tools with one or more blades. After adjustment, the edges should be in the required position.
It should be taken into account that the depth of processing and smooth operation of the electric planer will depend on the protrusion of the blades above the stove. When installing the knives correctly, they should not catch the plate while the drum is operating.
Attaching the blades is not particularly difficult Source yandex.net
See also: Catalog of companies that specialize in finishing materials and related work
Knife sharpening
Before adjusting the knives on the electric planer, it is necessary, if necessary, to sharpen them. This can be done thanks to a special block. The process itself looks like this:
- First, an abrasive stone is prepared. Place it in water for 2-3 minutes. This will allow the abrasive to absorb it, and, accordingly, there will not be as much dust during the work process. The stone is then placed on the sharpening machine.
- Next, the knife is fixed with nuts in a special block. It will help you sharpen at the required angle (30 degrees).
- Afterwards sharpening is carried out directly. The most important thing in this case is not to disturb the balancing of the knife, otherwise the plane will not work properly.
Electric planer knives can also be sharpened using other devices. For example, stores sell special sharpeners that allow you to sharpen blades from tools from any manufacturer.
It is better to entrust sharpening of electric planer knives to specialists Source zatochka-ru.ru
Select the number of revolutions
The rotation speed of the working attachment directly affects the quality of processing of a wooden workpiece. There is such a dependence: the higher the speed, the “cleaner” the gash. We strongly do not recommend purchasing a plane with a drum rotation speed below 12,000 rpm, as the quality of processing will be unsatisfactory.
For fitting building structures that do not require perfectly smooth surfaces, devices with a blade rotation speed of 12,000 - 13,000 rpm are suitable. By the way, if you already have a grinding machine at home, then, in principle, with planes of this speed you can obtain structures with ideal surface treatment.
For the manufacture of furniture, where high precision and quality of wood processing is required, units with an attachment speed of 14,000 - 18,000 rpm are suitable. In some cases, after planing with a high-quality electric planer, additional polishing may not even be necessary.
Features of working with power tools
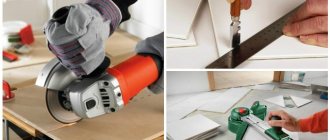
Electric planers are used to perform various types of work; they can be used to:
- chamfer;
- choose quarters;
- plan boards.
But it’s not enough just to know how to plan a wide board or other parts correctly with an electric planer; you also need to use high-quality lumber:
- thoroughly dried;
- without branches;
- without fasteners: bolts, nuts, etc.;
- with a smooth surface, without bulges;
- no cracks.
The part is firmly fixed in the machine. Which requires at least 2 stops. Free movement of the power cable is also ensured.
Working with an electric planer will require some experience Source equipnet.ru
Selection of quarters
To perform this operation you will need 2 stops:
- the first determines the sampling depth;
- the second controls the movement of the power tool along the part in the required direction.
The stops are installed according to the required dimensions, taking into account the instructions for the products used. Moreover, the distance is measured, focusing on the edge of the knife, which is in the upper position.
Work is carried out in several ways:
- moving the part around the machine;
- moving the electric planer over the workpiece.
Attention! One way or another, the movement of a tool or part must occur smoothly at the same speed.
Rating of the best models of electric planes: width and depth of cut
Electric planers can have planing widths from 15 to 330 mm. Essentially, this indicator shows how wide a workpiece the device can pass at one time. What planing width is needed for a home? For the most part, for domestic work, for example, planing roofing beams, window and door frames, as well as gable processing, models with a planing width of up to 82 mm are suitable.
If you need to plan a large volume of boards with a width of 100 mm or more, for example, in home carpentry, then you will need units with a cutting width from 100 to 130 mm. Too wide planes from 200 mm wide should only be taken if you have a sawmill where you need to carry out large commercial volumes.
The cutting depth for electric planes “floats” in the range from 0.6 to 4 mm. For most household tasks, a device with a cutting depth of 2 mm is quite enough - you shouldn’t take more serious ones, since you will rarely install a greater depth, and they cost quite a lot. But for large volumes of wood or for sampling a “large” quarter, you will need units with a planing depth of up to 4 mm.
Safety precautions
An electric planer is a device, when using which it is imperative to follow safety rules. The main danger is the current passing through the device and the operating drum.
Safety precautions:
- Do not use electric tools in rooms where there is a high probability of fires due to the presence of flammable liquid or gas compositions.
- the workplace must be clean and well lit;
- you should not be distracted by other things while working, as this will disrupt control of the power tool;
- It is forbidden to allow strangers near the switched-on plane; it must be stored in a place inaccessible to children;
- if an extension cord is used, it must be selected taking into account the load and be without damage;
- It is unacceptable for liquids to come into contact with a working electric tool, or to carry equipment while holding it by the cord;
When working with an electric planer, be sure to use safety glasses and headphones Source jet-online.ru
- When working with an electric planer, the operator must not come into contact with ungrounded surfaces (for example, batteries);
- The power cord must be located away from sources of high temperature and sharp objects;
- It is necessary to periodically perform preventive maintenance of the device;
- If you are intoxicated or under the influence of medications, you cannot use a power tool;
- Do not touch the rotating drum with your hands.
On a note! Connecting an electric planer via an RCD will increase the safety of using the tool. Protection is selected taking into account the load.
How much device power is needed?
Models on sale range from 450 to 2250 W. The power of the device directly affects the depth of cut and the density of wood that can be processed. Low-power devices will not be able to cope with hard wood, for example, ash or acacia, as the knives will “stick” and the quality of the processing will be poor. On the other hand, if you have to work mainly with pine or linden, then a powerful device will simply waste extra energy. Here is the approximate dependence of the power of the device on the density of wood:
- 450 – 600 W – suitable for soft wood with a wood density of up to 540 kg/m 3, for example, pine, chestnut, linden, poplar, alder and juniper.
- 600 – 1000 W – suitable for medium-density species from 540 kg/m3 to 730 kg/m3, for example, apple, birch, maple, larch, etc.
- 1000 – 1500 W – suitable for species with high wood density from 730 kg/m3 and above, for example, oak, ash, acacia, hornbeam, iron birch, etc.
Higher power models will only be needed if you are going to use an electric planer for production purposes, for example, if you are opening your own sawmill. In our rating of electric planes, we took exclusively models for household use, not exceeding a power of 1500 W.
Briefly about the main thing
To work effectively with an electric planer, you need to remember a number of rules:
- Before purchasing a plane, turn the tool on at idle speed several times. This way you can check the smoothness of operation, the presence of vibration, and determine some of the advantages and disadvantages of the device.
- Process boards in the direction of the grain.
- If the plane gets stuck or produces shaggy shavings, it is necessary to sharpen the blades on the knives. It is advisable to entrust this to specialists.
- Do not put pressure on the electric planer when working.
- The straighter the heel is relative to the drum, the better the cut will be.
- When working with the side stop, you need to take into account that it moves along the edge of the board, and, naturally, if the end is curved, then the notch will be “ribbed”.
- To ensure that the cutting depth is approximately the same throughout the entire board, at the beginning of the pass, apply more force to the front of the plane, and at the end - to the back.
- If you are working with a long beam, during processing you need to calmly move along it parallel to the tool. This way you can avoid steps.
An electric plane is a complex tool. Both during selection and during operation. One way or another, due to certain advantages, this is almost the only device for home carpentry work. If you decide to save money on planing boards, purchasing a plane will be the right decision.
Ratings 0
Basic techniques for quarter sampling
After the block is securely fastened, you need to stand in such a way that it is convenient to move while moving the electric planer. The body should not be overly tense, and the sleeves and hems of clothing should not interfere with movement.
Selecting a quarter begins with turning on the instrument. Before carrying out the procedure for removing a quarter, the electric planer should work a little without load to allow the tool knives to reach maximum speed. Only after this can you bring the power tool to the workpiece and perform the first approach. In this case, the sole of the electric planer should always be parallel to the surface of the part.
Table of main parameters of electric planers.
The electric planer is moved along the surface of the part very smoothly and evenly, making sure that no chips get under the sole. Sudden movements, stops, changes in speed or jerks will inevitably lead to surface deformation: pits or depressions will appear. It will no longer be possible to level the surface.
You also need to press the handles carefully while planing the plane. It is important to ensure that the force is the same. To avoid blockages, experts recommend slightly increasing the pressure on the front handle when starting planing, and on the rear handle when finishing.
When selecting a quarter, the sequence of work and the position of the hands will be slightly different. You need to advance the plane with one hand, and with the other you simultaneously press the side stop to the edge of the workpiece. The speed of movement should not be high: haste will only worsen the result. The optimal time for the first approach is up to 2 meters per minute, but not faster.
It is very important to ensure that the electric planer moves strictly along the intended path. As the depth increases, the side stop loses its importance. Gradually, after several approaches, the edge of the sample becomes a guide. The depth of the quarter is limited by the planer elements protruding from the side. They are slightly raised on one side, this makes it possible to make a quarter of great depth.
Additional features and functionality worth considering
Drop shoe
After turning off the start button, the working attachment on the plane continues to rotate for some time (sometimes up to 10 - 15 seconds), which is why you have to keep it suspended. The folding shoe lifts the sole slightly, allowing the knife to continue to rotate while suspended. This eliminates the need to hold the device suspended, and the workpiece will not be damaged in this position of the device.
Both expensive and cheap devices are equipped with a folding shoe, so choosing a suitable model will not be difficult.
Smooth start
Electric planers themselves are high-speed devices that quickly pick up speed when started. If the device is powerful and heavy (over 5 kg), then there is a possibility of dropping it from your hands and getting injured. Also, sharp jerks can damage the workpiece. And among other things, the unit’s engine consumes high starting currents when starting, which leads to voltage surges in the network.
The soft start function reduces starting currents and also accelerates the knife gradually without jerking. This is especially convenient when we work with powerful planes. If you are planning to buy a powerful, heavy device, then take a closer look at models with soft start. By the way, its presence does not significantly increase the cost of the device.