A DIY manual welding extruder is no longer a fantasy. With the development of technology, a real opportunity has arisen to create this unit yourself.
Let's first understand what it is and why it is necessary. It is with the help of this unit that polymer products without length restrictions are produced. This has its own areas of use and application. Do-it-yourself manual extruder – simplicity and ease of assembly and subsequent operation.
Construction and operation
The idea itself is more than sixty years old; it is not surprising that over the past time it has undergone some changes and has become almost ideal. Over time, a large number of machines have appeared with different methods of influence and almost the same in the area of the resulting products.
What heats the base of the future product? Everything is quite simple here, the energy from mechanical processes becomes heat, which equally helps to heat the plastic. External thermal influence is also possible. Here, for the most part, it depends on the original design of the extruder.
Variable elements of plastic processing using extrusion:
- compound;
- nature;
- humidity;
- intensity;
- duration;
- pressure and temperature.
Varieties
Kitchen apron made of plastic: features, types and installation tips
Manual welding units can be of several varieties. Each model has certain characteristics and functionality.
Screw
During the procedure, the filler material, which is located in the extrusion department, melts and is subsequently squeezed out by the screw. In this case, the filler material is rods or granules, which are placed in the screw section. In the same place, the material is exposed to high temperature. The result is a homogeneous mass that is ready for use.
Screwless
The second type of extruder is screwless equipment. In the plunger device, the rods are heated by an electric heater near the treated area. The purpose of the rear solid portion of the filler materials is to replace the piston for the more viscous mass located at the front.
Combined
Combined type extruders combine the characteristics of the above two types of thermomechanical devices.
Extruder operation
The extruder is a fairly simple unit, and all technical variations can be divided into three groups. Groups are divided according to working hours:
- cold molding;
- hot extrusion;
- heat treatment.
The most popular element at the moment is hot molding. This process is accompanied by high pressure and speed. For implementation, an extruder called a screw extruder is required. The main element of such units is a special type of auger. Here the molding process is located at the outlet. The raw materials are loaded into a specialized chamber, just like the selected additional components. These units have the factory ability to equip the screws with special elements. Mixing the composition and its movement depends on this.
Extrusion lines
In industrial settings, extrusion equipment should be considered as the main component of the line for the implementation of this process. In addition to the main equipment - the extruder, it also includes a whole set of other mechanisms and devices:
- winding and cutting mechanisms. They are used to bring products into the form required for warehousing and transportation;
- marking and laminating systems of various operating principles;
- mechanisms for drawing finished profiles;
- cooling system. Its installation is carried out at the exit of the extruder in order to increase the speed of the polymerization process of finished products. These systems can be of various types - air or in the form of a cooling bath;
- raw material preparation and loading system. In some cases, the semi-finished product must first be subjected to a drying procedure and subsequent calibration before feeding it into the loading hopper.
Other mechanisms can be used as part of the equipment, as well as technological devices can be used to automate the continuous production process.
Production
A manual extruder for polypropylene with your own hands is one of the simplest ways to purchase such a unit. It should be noted that the assembly process is not as complicated as it might seem, and anyone can do it.
The production of extruders is a rather interesting process, directly dependent on the configuration and purpose of the unit. Manufacturing differences:
- number of working chambers;
- availability of additional systems;
- design of elements.
The only thing that remains constant is the cylindrical shape. Today it is considered the most technologically advanced, and therefore remains itself.
Do-it-yourself granulator from a meat grinder: household for animal feed
Hello dear readers and subscribers of the blog, Andrey Noak is in touch with you! Today we will talk about how to make a granulator from a meat grinder with your own hands.
Introduction
Recently, home craftsmen have been modernizing and adapting more and more household appliances for the benefit of the household; for example, the engine from a washing machine can be attached to a lathe.
So they didn’t bypass the meat grinder. We decided to make a granulator out of it. I’ll say right away that it won’t be able to granulate anything solid, not under the right loads. Under increased load the rod will break, a household motor may not be able to withstand it, etc...
This granulator is ideal for feed:
- Mix several herbs for rabbits;
- Make some kind of compound feed for other pets.
What do we need
For our granulator from a meat grinder you will need:
- A sturdy table or workbench. You can either weld it from a corner or simply place our machine on a durable workbench;
- Meat grinder;
- Lathe;
- Drilling machine;
- A blank for making a matrix, approximately 6 cm thick. But I don’t know your feed right now and that’s why I’m talking approximately. Here, for each specific case, you need to make a matrix separately;
- An electric motor, perhaps from some kind of household appliance, for example, from a washing machine or from a vacuum cleaner. It is worth remembering that it will be more practical to install a 220 Volt engine, and 380 is more economical and profitable. 380 Volt engines are more powerful compared to 220 Volt analogues;
- Belt for connecting the meat grinder and the engine. When the meat grinder jams, the belt should slip, so there is no need to use a toothed belt;
- Two pulleys with a ratio of 1 to 2. We will lower the gear ratio to increase power and reduce the number of revolutions.
Step-by-step instructions for assembling a homemade granulator
The first thing we need to start with is, like any other event, creating drawings. On the drawings we describe how and what will happen.
What kind of engine will we have, how will it be located, and what do we generally need to make a mini granulator press. We draw everything out on paper so that there are fewer mismatches later.
In addition, do not forget that you will need to make a matrix, a lid and a knife for the meat grinder. To do this, you will need to take the dimensions from the mesh and make a matrix of the same diameter.
When making the matrix, you need to take into account that it should fit almost closely to the worm. Therefore, part of the matrix should be recessed.
If the ribs in the meat grinder get in the way for this operation, they should be removed.
So we begin assembling the granulator from the place where it will be located. We will need our sturdy table. We firmly attach our future press to it. Durable means bolted, for this you will need to drill holes in the legs.
After this we make the matrix. How to do it correctly is shown in the video below:
Next, you will need to sharpen a new cover for the matrix, since the old one most likely will not fit due to its increased thickness.
You need to sharpen the lid with an allowance so that if you decide to increase the thickness of the matrix, you do not need to make a new lid again.
After the lid is machined, you can weld pieces of 6 mm wire to it or cut grooves with a grinder. This way it will be easier to twist it by hand.
There are many versions of a pellet knife, and here are just a few of them:
- There is no need for a knife at all;
- You can drill a hole in the screw of the meat grinder and make a screw there, at the end of which a knife will be attached;
- You can weld a thin bolt onto which the knife is screwed.
Ultimately, it's up to you to decide. Our next step is to install the pulleys. Here I think there should be no problems if you are a person with a head.
The last step is to install the engine and tension the belt. We remember that you need to tension the belt so that it can slip if something happens, and the engine does not burn out at this moment.
We carry out commissioning and completion of our mechanism.
My services
If you want to build your own large-scale production or want to receive high-quality information about the production, heating or sale of pellets, then you can contact me at “SUPPORT” and always receive high-quality and up-to-date information.
I can provide advice on ENplus certification, help with the sale of your products, and help you choose equipment for pellets. And the most interesting thing is that I will even help you visit a real experimental production of pellets.
Write and we will organize everything!
Also, just recently I came out with a cool little book that explains why most companies deliver lines with defects. Which ones? And you will learn this from the book. Read more about it in the “MY BOOKS” section.
Good luck and see you again, Andrey Noak was with you!
Technological differences
The process of creating and operating an extruder is quite easy to understand. But there are still a few important points that need to be highlighted. In particular, the dry extrusion process requires lighting. Why is this so? Dry extrusion is based on the heat generated by the unit itself, due to the direct process of operation. At the same time, it remains possible to introduce steam into the work; for this, it has a special chamber. Why is steam needed? It is thanks to this that the wear resistance of the unit increases.
A special difference between this method is speed. The process lasts only half a minute. During this time, the unit manages to:
- grind;
- dehydrate;
- mix;
- disinfect;
- stabilize and increase volume.
A manual welding extruder with your own hands requires the purchase of several elements from which assembly is carried out. List of elements required for assembly:
- auger of proper configuration;
- Electrical engine;
- device body;
- supply container and output container;
- vacuum chamber.
Pipe manufacturing
In an area such as the production of tubular products, an important condition is the absence of gas bubbles in the homogenized mixture. For this reason, manufacturers equip extruders that are used in the production of such products with degassing systems. In most cases, screw installations are used. Among other things, barrier screws are used, which ensure reliable separation of the solid semi-finished product from the completely melted one. Due to this, the homogeneity of the composition is maintained, which has a positive effect on the quality of the manufactured pipe products and its performance characteristics.
Alternative unit
A manual extruder for polyethylene also belongs to the general cohort of extruders, although it has a slightly different purpose. What is this unit used for? For connecting various polymer products. The welding extruder is especially good in this area, applicable to various materials. This unit greatly facilitates working with small and very small plastic products.
I will have to make an extruder for plastic with my own hands for the following reasons. Firstly, I decided to make a 3D printer with my own hands, and I will need a lot of rather expensive rod for a 3D printer, which is much cheaper to produce myself using a plastic extruder than to buy a ready-made rod from ABS or PLA plastic for a 3D printer. Secondly, an extruder for plastic is one of the components of a thermoplastic machine (TPA), which I have been dreaming about for a long time. So, again, I'm trying to kill two birds with one stone and save myself a lot of money.
Let's figure out what a plastic extruder consists of and how to make one with your own hands at minimal cost. A plastic extruder consists of a tube ending in a removable brass nozzle from which the molten plastic will come out. A so-called auger (a large screw like in a meat grinder) will rotate inside the tube. This auger will push the plastic granules along the tube. Starting somewhere slightly to the middle, the tube will be heated by a special heating element, due to which the plastic inside the tube will melt and reach the nozzle in a fairly fluid state.
The auger is an ordinary large-sized wood drill, purchased at a tool store for 340 rubles. I messed around a little with the diameter and took 22mm, which I later regretted greatly, because it turned out to be quite difficult to find a pipe with the same internal diameter. Therefore, my advice to you is to first find a pipe, then look for a suitable drill (auger) for it.
As can be seen in the very first photo, the tube is divided into two parts, connected by flanges. This is necessary in order to separate the particularly hot part of the tube from the rest of the mechanism. Later, a heat-resistant insulating gasket will be sandwiched between the flanges. In general, heat will still be transferred through the screw, but a collapsible tube will make the extruder more maintainable and will leave space for experimentation (remove one tube and screw on another).
I made the flanges on my homemade CNC machine from 5mm steel sheet. As you can see, my machine chews steel quite well, despite its still flimsy and unfinished Z axis. Two flanges, twisted with bolts, were clamped into the vice. We want all the holes to match!
To ensure the parallelism of the two pieces of pipe, I welded the flanges to the frame before sawing it. We twist two flanges together (in one of them I cut M6 threads, in the other just through holes), and it is necessary to twist through washers, the thickness of which would then allow a hacksaw blade to fit between these flanges. By the way, do not forget to mark how the flanges should be attached. To do this, I sawed the mark at the end with a file. The flanges are connected correctly if the marks on them match.
Top 7 homemade equipment for plastic processing (PET, PVC)
Today we will talk about recycling waste in the form of plastic bottles and other polymers. This topic is relevant both in terms of building a business and in terms of improving the environment. Therefore, it concerns each of us.
It is impossible to cover all the nuances of working in this industry in one video. The purpose of this issue is to explain in accessible words how things are in this industry and at what stages money is made here.
The cost of industrial equipment for processing plastic bottles (PET, PVC) amounts to millions. We understand that this is not available to everyone. Therefore, we tried to make this review using the example of people with direct hands, who, without having multi-million dollar budgets, manage to take their small place in this industry with the help of homemade equipment.
Let's move on to the top:
Collection of raw materials and pressing
The plastic recycling process begins with the receipt of raw materials. No special license required.
Many stop at this stage and start a full-fledged business. It consists of collecting raw materials, pressing them and then selling them.
Garbage is actually only conditionally free and not everyone has access to city landfills. Therefore, if you do not do this on an industrial scale, you can try to exclude the landfill administration from this chain and receive raw materials directly from people and enterprises.
This can be done either through collection points or by installing special boxes around the city for collecting plastic bottles.
People throw bottles into such boxes for free, because they understand that in this way they are making their small contribution to improving the environment. You can also work with people’s awareness by hanging explanatory signs on such boxes.
To place such a box in the courtyard of an apartment building, you should first coordinate this issue with the management company or a representative of the HOA. The argument for installing a box is to help keep the yard clean.
You can also agree on the installation of separate boxes (for plastic, paper and glass) in the offices of large enterprises. Thus, the enterprise will not only receive an “eco-title” and free waste removal, but also additional funds for small consumables.
Subsequently, bottles from such points are removed and pressed into bales. For pressing you need a press. The most budget option is a manual press, which you can take with you when collecting raw materials. But for greater productivity, you need a hydraulic press.
Crushing with a shredder
The next step after collecting the raw materials is the process of obtaining flex (crushed plastic).
At this point we would like to introduce you to Dave Hakkens. Who, with the help of his YouTube channel, is trying to make the plastic recycling process more accessible.
Dave shows us how he builds a mini shredder in his garage step by step.
To obtain high-quality flex, bottles must be sorted by color and separated from caps before crushing. The lids are made of PVC material, which has different properties and is processed separately.
After sorting, the bottles are crushed using a shredder, washed and dried. In this way, you can get high-quality flex, which is in demand both domestically and abroad. The most valuable is flex from colorless bottles.
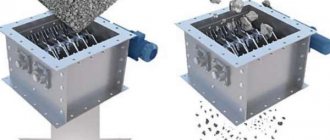
Granulation using an extruder
To get one step closer to the final product, flex can be processed into granules. This is done using extrusion. Dave also shows how he assembles a small extruder in his garage.
Crushed plastic is poured into the extruder, which moves inside the housing using a screw shaft (like a meat grinder).
The case is equipped with a heating system, which ensures the melting of the plastic. Next, the plastic is squeezed out through small holes in the form of rods.
The rods pass through a rotating knife and granules are obtained - a finished product for the production of various plastic products.
Homemade plastic recycling line
An example of the processes described above can be seen in the video from Oybek Kosimov’s channel. Where he reviews a homemade line for converting plastic into pellets.
Here the plastic also goes through a grinding process, washed, dried and fed into the extruder. The rods obtained at the exit from the extruder pass through a bath of water for cooling, are fed to the cutter and finished granules are obtained.
Injection molding machines (TPA)
The resulting granules are widely used in the production of products using injection molding machines.
It is difficult to name at least one industry where small plastic parts are not required. Therefore, the use of injection molding machines is very extensive.
Skillful hands manage to assemble them in their garages. We can see this in an example from a video from Grigory Uryvsky’s channel, where he demonstrates his homemade injection molding machine.
The granules poured into the injection molding machine are melted and the plastic is pressed into the prepared mold (matrix). The output is a finished product.
Making molds also costs good money, so only producing products in large quantities will be profitable.
Since we decided to cover this topic using the example of homemade equipment, then we will show several examples of the use of recycled plastic in handicraft production in India.
Polymer sand production
Using an example, we can see how crushed plastic mixed with a sand base is poured into the extruder. The output is a dough-like mass, which is placed in a mold. Next, the mold is placed under a hand press and after compression the finished product is obtained. Depending on the prepared form, the same polymer sand tiles or paving slabs can be used in this way.
Making building blocks
Here you can see how Indians use a homemade installation, similar to a heated concrete mixer. Some kind of slag is poured into it, plastic bottles are added and stirred until a homogeneous mass is obtained. The finished mass is placed in a prepared mold, pressed and cooled. The output is a finished building block.
Ropes made from plastic bottles
The video shows how you can make ropes from plastic bottles in your own garage:
Bottle brooms
In the video you can see how brooms are made from used plastic bottles:
Machine tools for small businesses in the garage:
Design and operating principle
A manual welding extruder is a thermomechanical device that sequentially carries out two processes - heating a low-melting plastic to a viscous state, and then squeezing the mass onto the surface in the joint area. There, HDPE, PVC and other low-melting plastics solidify, forming a strong weld.
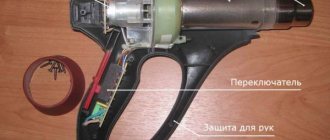
For compactness and ease of use, the equipment in question is usually designed in the form of a pistol with a handle (in which the drive electric motor is mounted) and an upper nozzle for heating the working mixture. The welding extruder consists of the following components:
- Electric motor.
- Feeder.
- Extrusion chamber.
- Crushing screw device.
- Chambers for melting plastic.
- Thermal heater.
- Welding nozzle.
- Control systems.
To operate, the device is pre-filled with a filler rod made of the material that will be used for welding. The process goes as follows. On the top panel of the extruder there is a receiving sleeve with a hole through which the filler rod is passed. The filling must be such that the free end of the rod falls into the area where it is captured by the auger. When the electric motor is turned on, two processes occur: heating the filler rod with a concentrated stream of hot air, and - after some time, which is determined by the device sensor - feeding the rod into the grinding zone.
There, a rotating auger crushes the plastic rod, turning it into a granular mass. The latter melts when heated, and, moving further, enters the melting zone. In this zone, the granulate is already mechanically and homogeneous. Under the influence of pressure from the screw, it passes into the welding zone, enters the welding nozzle and, in the process of pressing against the surface of the products being welded, is squeezed out into a uniform strip, the width of which depends on the configuration of the nozzle. Since the external temperature is much lower than that created by the thermal heater, the material of the filler rod instantly solidifies, forming a welding seam.
In less compact but more productive extruder models, the filler rod is heated using an external thermal heater, and air is supplied there from a small compressor. There may also be design differences in the method of heating the filler material: sometimes heating is carried out by ring heating elements coaxially placed in the thermal heater body.
The manual welding extruder control system performs the following functions:
- Pre-setting the heating temperature, which is determined by the melting temperature of the plastic (as is known, HDPE melts at 120...130ºС, PVC - at 150...220ºС, and polypropylene - at 170...190ºС).
- Turning on the thermal heater;
- Starting the drive of the auger grinder;
- “Cold start” blocking, when the screw can move still heterogeneous filler material;
- Switching off the thermal heater while the auger is still rotating, which eliminates the adhesion of granulate residues in the welding chamber.
For what materials is it applicable?
A high-quality welding extruder must have an adjustment unit with mechanical, touch or push-button control, which will allow you to change the heating temperature of the mixture.
The fact is that different plastics melt at different temperatures. It is lowest for HDPE - 120-130 °C (depending on the brand), the highest is for polyvinyl chloride - up to 220 °C. Other popular industrial polymers have a melting point in the range of 170-200 °C.
Only plastics from the group of thermoplastics can be subjected to extrusion welding
. Materials from the group of thermosets are not subjected to melting and subsequent reduction; at high temperatures they simply begin to burn.
Operating rules and selection of a manual welding extruder model
Before use, it is necessary to fulfill a number of conditions usual for plastic: clean the surface of the products to be joined from external contaminants and avoid working with wet material.
The success of the work also depends on the difference in the melting temperatures of the materials being joined, if they have different chemical compositions. For example, HDPE with polypropylene can be welded using the method under consideration, since their melting temperature ranges completely or partially overlap. On the contrary, welding HDPE with PVC, and even more so with polypropylene, is problematic or completely impossible. In such cases, a welding extruder can only be used to join products made from the same materials.
The compactness of the manual welding extruder allows its effective use even without stopping the operation of the connected devices. In particular, when welding polypropylene pipes, it is not necessary to turn off the water supply through them.
A number of mandatory checks are carried out first (especially if the extruder has not been used before):
- Checking the straightness of the feed of the filler rod in the extruder sleeve: with high roughness of the forming rod, the rod can move not in a straight line, but along a helical line, which will worsen the operating conditions of the screw crushing device and lead to the formation of granulates that are not uniform in size.
- Control check of the effectiveness of the heating temperature of the rod to the state of its viscosity: material from different manufacturers may have a different range of melting temperatures.
- Checking the reliability of pressing the welding nozzle to the surfaces being joined, especially if they have a complex configuration. Many models of manual welding extruders are equipped with replaceable nozzles for this purpose.
- Checking the possibility of melting the materials being joined with heat from a thermal heater, without supplying a filler rod. It is carried out in the absence of accurate information about the material of the products connected in this way.
The selection of a suitable manual extruder model is made according to the following parameters:
- By productivity per unit of time;
- For the convenience of managing process parameters;
- According to the thickness of the welded products;
- By equipping the device with replacement devices
- According to the range of rod diameters.
It should be noted that most brands are designed to work with filler material from a specific manufacturer (often the same one that produces extruders).
Theoretically, it is possible to make a household welding extruder with your own hands. To do this, a screw drive is attached to a conventional industrial hair dryer (for example, for grinding feed), and both units are designed in a compact form. Instead of a screw, a more affordable plunger drive is sometimes installed, but this option is unreliable: it all depends on the homogeneity of the material of the original rod. The electric motor for the drive is selected as a commutator type, which better tolerates constant changes in torque values.
Introduction
As they say, to each his own. Some people make tens of tons of pellets per day in a large modern production facility, while others need an ordinary small granulator for processing straw, sawdust or other waste. This is the small granulator we will look at today.
I would like to say right away that there should be a sieve in front of the press, or at least a mesh and a magnet, which will separate the large fraction from the small one and sort out metal impurities.
There are cases where nuts, keys, and metal objects get into the granulator; pebbles and pebbles may come across during feed processing. This immediately leads to failure of some parts of the extruder, and maybe even to its complete failure. Therefore, it is cheaper to play it safe and reduce the likelihood of getting something that shouldn’t.
Welding extruder manufacturers
The most popular devices in this market segment are:
- From the Munsch brand (Germany). Consumer advantages - ease of fastening of all components (which increases maintainability), undemandingness in the size of the filler material, the presence of a separate heating function (useful when using the extruder outdoors in the cold season), a convenient set of replaceable nozzles, and a perfect control and monitoring system. Plus - traditionally high German quality of manufacturing and assembly.
- From the Leister brand (Switzerland). The manufacturer produces a wide range of standard sizes of welding extruders: from small ones, with a productivity of up to 0.8...1.2 kg/h, to professional ones, designed for processing up to 6 kg/h. The devices are equipped with a modern control and monitoring system for welding progress and are ergonomic to use. The quality is also at a high level. There is a special line of machines for welding linoleum.
- From the Dohle brand (Germany). The company is known as a manufacturer of construction hair dryers, but recently it has been actively positioning itself as a manufacturer of manual welding extruders. Unlike the above brands, it uses purchased electric motors for drive. It produces the smallest extruder with a productivity of only 0.5 kg/h, which is equipped with a hose and a built-in mini-compressor.
- From the Stargun brand (Italy). With a small range of models, the extruders of this company differ in drive power and are designed for use primarily in professional settings. The highlight of the devices is the possibility of local illumination of the welding zone.
- Domestic extruders of the RSE type. They are equipped with a filler material supply drive and include most of the same options that have already been listed above.
Prices for extruders depend on their functionality and performance. On average, the cost of domestic devices ranges from 30,000 to 55,000 rubles, imported ones - from 50,000 rubles. and more.
- Author: Maria Sukhorukikh
Rate this article:
- 5
- 4
- 3
- 2
- 1
(0 votes, average: 0 out of 5)
Share with your friends!
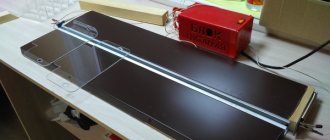
Feeder
Unipolar stepper motor circuit
First of all, you need to choose a stepper motor. It is best to buy an analogue of Nema17, but motors from old printers or scanners, which are sold very cheaply on radio markets, are also quite suitable. For our purpose, we need a bipolar motor with 4 terminals. Actually, you can also use unipolar, its diagram is shown in the figure. In this case, the yellow and white wires will simply remain unused and can be cut off.
As a rule, printer motors are weak, but the EM-257 (Epson), as in the figure below, with a shaft torque of 3.2 kg/cm, is quite suitable if you are going to use Ø 1.75 mm filament.
For a rod Ø 3 mm, or with a weaker engine, you will also need a gearbox. It can also be selected from disassembled old tools, for example, a planetary gearbox from a screwdriver.
Printer motors
The modification will be needed to fit the screwdriver motor gear onto the stepper and align the motor’s rotation axis with the gearbox. And the cover for the output shaft bearing also needs to be made. A gear is installed on the output axis, which will feed the plastic rod into the heating zone.
The extruder housing serves to mount the motor, pressure roller and hotend. One of the options is shown in the figure, where the red filament rod is clearly visible through the transparent wall.
You can make a case from different materials, come up with your own design, or, using a ready-made kit as a sample, order printing on a 3-D printer.
Extruder with transparent body
The main thing is that the pressure roller is adjusted by a spring, since the thickness of the rod is not always ideal. The adhesion of the material to the feeding mechanism should not be too strong to avoid pieces of plastic breaking off, but sufficient to push the filament into the hot-end.
It should be noted that when printing with nylon, it is better to use a feed gear with sharp teeth, otherwise it simply will not be able to engage the rod and will slip.
Usage
Extruders are used to make animal feed. The use of this technology can significantly reduce the cost of feeding animals. In addition, when animals are switched to feeding on extruded feed, the mortality of young animals is reduced.
Feed made using extruders has the ability to prevent gastrointestinal diseases in animals and significantly improve the digestive process!
Extruders are also used in the food industry. They are used to make breakfast cereals, corn sticks, chips, crackers, baby food, and diet bread.
Twin-screw extruders are also used in the production of polymers: films for bags, polystyrene and polypropylene.
However, the most common use of an extruder is to improve the feeding qualities of grain crops. Any cereal crops, soybeans, and legumes can be used as materials for making feed.
After processing, the taste of grains is significantly improved due to the release of oils. The food acquires a pleasant aroma and bready taste. At the same time, animals eat faster.
Certain models of extruders allow you to process waste from meat and fish production. Extruders are also used to process oil-containing products before pressing. This process facilitates extraction and increases the final volume of oils obtained.
Extruder E-500
The device is intended for the production of animal feed and cleaning grains from harmful microorganisms. Also used for preparing soybeans, rapeseed, sunflower for oil extraction.
Using the device, you can process wheat, rye, corn, barley, peas, amaranth, lupine, soybeans and sunflower. A magnetic catcher of metal particles is installed in the extruder funnel, which avoids unnecessary impurities from entering the apparatus and, subsequently, into the feed.
Soybean processing capacity reaches 500 kg. per hour, when processing grains up to 300 kg. at one o'clock. In this case, the power consumption is 55 kW/hour.
Extruder Dimensions:
- Length - 230 cm;
- Width - 210 cm;
- Height - 170 cm;
- Weight - 1400 kg.
A distinctive feature of this model is the presence of a humidification unit in the working area. This guarantees a soft and uniform grain processing process, and also reduces wear on working parts.
Extruder ES-1250
Powerful unit for use in large and medium-sized farms. The productivity of this model reaches 1250 kg/hour. At the same time, the extruder is able to work around the clock. Equipped with a side feed of raw materials from the bunker directly into the working area. This eliminates operational problems that are present when processing wet grain or complex mixtures in top-feed extruders.
In addition to standard materials for extrusion (wheat, oats, millet, barley), this model is suitable for processing biowaste, minced meat and bones, flour and other waste. The device is equipped with two hydraulic cylinders, which automatically remove the housings when disassembling the working part of the extruder or replacing screws. This greatly simplifies the long and labor-intensive process of maintenance and repair, especially in emergency situations. The extruder weight is 2130 kg and the power consumption is 110 kW.
This model allows you to adjust the gaps inside the working part of the extruder, making it possible to fine-tune the device for each raw material.
Extruder PE-900 USHK
Equipped with a grain conditioning and steam processing system. This technology makes it possible to impart softness and elasticity to the processed material, which significantly reduces energy costs for processing. In addition, it helps to increase the life of the main components of the extruder.
Used for processing wheat, soybeans, barley, corn, and peas. Productivity from 1300 to 1800 kg/hour. Power consumption from 97 kW/hour. Steam consumption is approximately 100 kg/hour at a pressure of 0.4-0.6 MPa. Dimensions 280*256*255 cm. The weight of the unit is 2500 kg.
The extruder of this model is characterized by high productivity and can be used to prepare soybeans and sunflowers for oil extraction.
A little history
Diagram of an extruder for plastic.
The extruder began to be used back in the nineteenth century. And mass production of this equipment began in the twenties of the last century. Extruders today are significantly different from what they used to be.
In modern industry, extruders are very popular, and you can choose from a wide variety of types. Buying a new extruder is quite expensive. But there are extruders that you can make yourself.
The easiest to manufacture are clay and feed extruders. To make other types of this equipment yourself, you must have at least some basic engineering knowledge. And these extruders don’t take much time to make, and the materials are inexpensive.