It is difficult, and sometimes unrealistic, to imagine how to carry out construction and repair work without using such an important tool as a building level. A good level is a guarantee of the quality of the work performed. It is thanks to the building levels, as well as in combination with the conscientiousness of the direct builders, that it will be possible to create perfectly even corners in a room with 90 degrees, a smooth surface of the walls, horizontal floors at the same level, correctly installed window and door openings. It’s impossible to imagine repairs of any complexity, even cosmetic ones, without using the level.
The building level is used for wallpapering a room and for laying tiles. But the most important thing is that you don’t have to buy it, and make a building level with your own hands, which is described in this article.
Making a water device
The type is water based. The device consists of two flasks connected by a special tube measuring 5-25 meters. A scale is applied to the flasks. The device weighs from 300 to 1100 g.
To make the device, take two syringes, first removing the needles from them. Make a hose from a dropper. First you need to get rid of the plunger in one syringe by inserting it into the hose. Fill the syringe with water, after tinting it with tea leaves. Prepare another syringe in the same way by connecting it to the other end of the hose.
The device operates on the principle of communicating vessels. On the surface of the flask, apply the markings necessary to determine the desired height. The work begins after attaching it to the desired object with tape. If the surfaces of the water meet smoothly, a perfectly flat surface is observed. It is necessary to prevent air bubbles from entering the tube to eliminate measurement errors.
Types of instruments
A building level is a device with which you can determine the horizontal and vertical positions of planes. It is through the use of a level that the building materials that are used during the renovation of an apartment/house and finishing can be installed as level, accurately and correctly as possible. The current level of industry offers users various levels for construction, for every taste and color, which can have different lengths and materials of manufacture. When choosing a device for a particular type of work, you should pay attention to the ease of use and accuracy of the tool.
The following main types of building levels should be highlighted:
Bubble level.- Water level.
- Pipe level.
- Magnetic level.
- Laser level.
Let's look at all of the listed varieties, as well as their advantages and disadvantages.
Water level
A water-type building level makes it possible to determine whether the surface deviates from the horizontal and by how much. It consists of a pair of flasks that are connected to each other by a tube. The length of the latter can be from 5 to 25 meters, and a scale is applied to the flask. The weight of a water-type building level will depend on the model, and range from 0.3 to 1.1 kg.
The main advantages of a water-type building level:
- Convenience and ease of use.
- Long hose length.
- Low cost.
When using a water level, a number of problems may arise, namely:
When filling the tube with water, do not allow air bubbles to get into it, as this can lead to large errors in measurements.- The device cannot be used near any heat source, so it should be placed no less than 150 cm from the heating device.
- The device is intended for work only on horizontal surfaces.
- Using very long hoses in small spaces will not be convenient.
Now let's look at the second type of device.
Bubble type building level
One of the most popular types of building level, which you cannot make with your own hands, is a bubble level. The device is made of a solid body in which one or more ampoules are built-in. The maximum possible number of ampoules is three. Each of them is filled with liquid, but most often with alcohol, and there is always an air bubble in the liquid. If the device has only one ampoule, then it is intended for working with horizontal surfaces.
But in the case when the device has two built-in ampoules, there are more opportunities to use it, namely to work even with vertical surfaces. Thanks to the built-in third ampoule, it is possible to display a rotary level. Most often, building levels of this type are made in the form of a rectangle, and the range of sizes is quite large. The length of the device will range from 20 cm to 250 cm. Separately, models are produced that are 400 cm in length, i.e. 4 meters! Wood, aluminum, impact-resistant polystyrene and much more are used as manufacturing materials for the housing. The main substance for filling ampoules is alcohol.
Among the main advantages of building bubble levels, I would like to highlight the following:
- Ease of use.
- High measurement accuracy.
- Moderate cost.
- A huge number of models.
The price range for such measuring instruments is quite wide, and the cost will depend on the selected size, the manufacturer, as well as a large number of other factors. It will simply be impractical to buy the cheapest instruments, since they are not accurate and are completely short-lived. Even if you plan to use such a device very rarely, a professional construction device will be the best choice, since it is made from very durable materials, withstands mechanical stress better and has high accuracy (and minimal error).
When purchasing bubble levels, you should pay attention to the following points:
The flasks must be installed very firmly. Under no circumstances should they wobble. You should also not choose models where the flasks are attached inside with screws. The ability to adjust with your own hands will only bring problems and unnecessary worries to consumers, since the adjustment will be lost almost immediately, and then the adjustment will need to be done again. The ideal option is flasks that are tightly mounted.- The divisions on the flask should be clear and the bubble should be clearly visible. The smaller the distance between adjacent divisions, the easier it will be to work with the device.
- It has long been noted that the larger the entire bubble level, the more accurate it is, so when choosing a tool you should pay attention to those models whose body is made of aluminum.
- The most popular among consumers will be those models that are made in the shape of the letter “X” and have rubber handles. Many home craftsmen and real professionals noted the ease of use.
We suggest moving to the next type of device.
Magnetic building level
There is another type of bubble level, namely a magnetic building level. Its main difference is that it has special magnetic mounts. Thanks to them, the level can be easily attached to a surface made of metal. They never fall or slip.
Construction levels for pipes
There is another type of building level, which you also cannot make with your own hands, is a subtype of the bubble type - pipe. A distinctive feature of pipe levels is their low weight and size. As a rule, it is made in the shape of a rectangle, but there is also a less popular option, namely a folding pipe level. The main area of use is working with pipes and profiles. For reliable attachment to the pipe, this type of measuring device was equipped with additional accessories in the form of perforated tape, magnets and a cord.
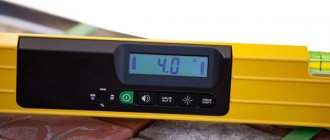
Laser level
A laser-type construction level is a small device that can be attached to all surfaces. Among the most popular types of fasteners, the following should be highlighted:
- Seams.
- Magnets.
- Fastening with belts.
There are laser levels that are used to perform directional constructions and for planar markings. The level, which is intended for constructing a direction, will simply beat off points, but the device for constructing a plane has an optical system that helps to turn the beam into a plane.
So, let’s highlight several types of construction laser levels:
Such devices rotate around their axis, and in doing so a line is obtained. It has a durable body, good protection from external influences, and is ideal for most repair work, for example, for installing a stretch ceiling.
Rotary –- Positional - two radiation sources make it possible to create visible planes. The main area of application is finishing work.
- Self-leveling - the laser level has an internal pendulum that is capable of emitting five beams at once, as well as a cross-shaped sight.
The main advantages of a laser construction level are:
- Long range, because some models are capable of operating even at a distance of 100 meters.
- High accuracy.
- Many models have cross lines.
But this type of building levels also has certain disadvantages, namely high cost. The price of the simplest level, with a minimum set of functions, will be the same as the cost of a professional bubble-type device.
Bubble option
You can make a bubble level using a syringe and a wooden block. Water is drawn in with a syringe so that there is minimal room for air. Use chewing gum to plug the hole for the syringe. Having secured the syringe with tape, you can begin the process. If the surface of the product is smooth, the bubble will be located directly in the center.
If you take two ampoules, you can work with vertical surfaces. One can determine the evenness of horizontal planes.
Method No. 3
For another option for making a laser level, you will need a basin of water. The fact is that the horizontal water plane can serve as a basis for tuning the laser beam.
They act this way:
- Pour water into a basin or wide bucket under the rim.
- Take a piece of foam plastic and fix the laser pointer strictly in the middle.
- The foam is placed on the water and the pointer is turned on.
- The container is placed at the level of the future line on the wall that needs to be marked.
- Turn the laser in the desired direction and mark points on the wall with a pencil.
Important! If this method is chosen to create a laser level, you need to take into account that if the pointer is not centered correctly and there is a skew to one side, the horizontality of the beam will be disrupted. The marks will be set incorrectly.
Tubular design
The pipe version is a type of bubble building level. To make it, you need to take several small tubes and a square element from the profile.
Place the cord on the tubes using perforated tape. Markings are applied to the profile. By applying it to any surface, you can make sure that the object, walls, door and window openings are even.
Marking the zero floor level
After the horizon level has been marked using a hydraulic level, a conventional or rotary laser, at a height of 1.0-1.5 meters from the existing floors, you can make a zero mark to perform concrete pouring. To do this, in all rooms it is necessary to measure the height from the base to the line previously drawn on the wall.
Where the height is the smallest, you should step back from the surface by 30 mm, measure the distance to the horizon line and remember it. In the corner, measure a reference height from the horizon line and screw a self-tapping screw into the wall. Repeat this operation in another corner. Pull a cord over the screws, which will show the zero level of the floor.
After this, you should check whether there are any places under the tensioned cord where the distance to the floor is less than 30 mm. If such places exist, then an error was made during the work and must be corrected.
How is the hydraulic level used?
It is more convenient to carry out the markings together, but if necessary, one person can handle this task. You will have to make several points on one plane. How can one performer use a water level? The process is performed in this order:
- You need to find the starting point on the plane of the wall using a metal ruler, tape measure or other method. Make the appropriate mark.
- Secure the flask or the end of the hose in this place using tape, a hook, or any fastener.
- Then move another flask a certain distance and wait until the liquid in it calms down.
- After this, you need to use smooth movements up and down to find a point that is equal in height to the starting point. Place a mark on the surface corresponding to the level of the first flask.
Similarly, work with the construction hydraulic level continues along the entire plane or perimeter. All high-altitude points are marked, between which a line of a given horizontal line must be drawn. When moving the device from place to place, you must clamp the edges of the hoses to prevent air from getting inside and water from splashing.