How to assemble a sandblasting machine at home
Sandblasting allows you to quickly and efficiently clean surfaces from dirt and frost glass. The first type of operation is in great demand in small auto repair shops and even private garages. The problem is that the equipment sets on the market are expensive. At the same time, let’s say a home craftsman has a fairly powerful compressor. In this case, you can assemble a sandblasting machine with your own hands, using, literally, discarded items and parts that can be bought at any hardware store.
Design and operating principle of a sandblasting machine
Do-it-yourself sandblasting can be assembled based on two design schemes that differ in the physics of supplying abrasive material to the output path. However, they will have almost the same list of significant nodes.
- A compressor is the main device for pumping air.
- A receiver that can be made from a gas cylinder.
- The container for the abrasive material is of a fairly small volume, which is made from a freon cylinder or a fire extinguisher.
- The pistol is the main tool of the installation operator.
- Connecting hoses.
Important! To ensure long-term operation and stable parameters of the abrasive mixture, the sandblasting machine must include a moisture separator. If a piston compressor is used, it is recommended to install an oil filtration system in the air inlet path.
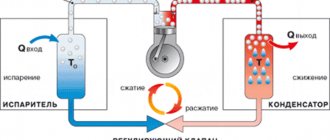
Any homemade sandblaster should produce a stream of air-abrasive mixture at the output. In this case, the pressure circuit uses pressure to supply abrasive to the outlet pipe, where it is mixed with the air flow from the compressor. A household ejector-type sandblasting machine uses the Bernoulli effect to create a vacuum in the abrasive intake path. The latter enters the mixing zone under the influence of the atmosphere.
The drawings and diagram of a homemade sandblaster, according to which you can assemble the device at home, are extremely diverse. The reason is that artisans use what is at hand for their products. Therefore, it is reasonable to consider the general principles by which homemade sandblasting equipment is built.
What tools and materials will be needed
The set of materials and tools for a sandblasting machine depends on what available means the device will be made from. To construct a unit based on a blow gun, you will need to prepare:
- plastic bottle 1-1.5 l;
- a compressor designed for a pressure of about 5 bar;
- blow gun;
- reinforced hose;
- glue gun;
- drill;
- file;
- sharp knife;
- marker for marking.
If you make a sandblasting machine based on a compressor and a conventional sprayer, the list of tools and materials will be slightly different. You will need to take:
- glue gun;
- plastic bottle 0.5 l;
- compressor with low power ratings;
- drill;
- inexpensive sprayer;
- Teflon tape;
- file;
- coupling for transition from external to internal thread;
- knife.
In all cases, when creating a home apparatus for removing corrosion, it is also necessary to prepare an abrasive material in advance. For homemade devices, sand is usually used.
What can sandblasting be made from?
To understand how easy it is to make sandblasting with your own hands, it is enough to dwell on the operating features of each structural unit. In this case, the selection of available parts or finished products becomes obvious.
- Mixing unit. Sand for sandblasting and compressed air from the compressor come here from two hoses. The output is a ready-made air-abrasive mixture. In this case, no requirements, for example, the volume of the mixing chamber, are imposed on the unit. On this basis, you can use a regular plumbing tee to make it.
- Control devices. A normal manual sandblaster should be able to adjust the air flow and the intensity of the abrasive material. In this case, no requirements are imposed on the control device. At home, this role is well performed by water ball valves made of steel.
- Connection points. To connect the hoses, conventional fittings are installed on the portable sandblasting machine. They can be equipped with clamps for secure fastening. All these components are easy to buy in stores.
- Receiver. This part of the design is needed to facilitate the operation of the compressor and stabilize the pressure. You will definitely need a receiver if you want to get a powerful sandblast with your own hands. This device can be made from a powder type fire extinguisher with a large housing capacity. Another option is to make a receiver from a gas cylinder.
- Abrasive chamber. The components for its manufacture may differ depending on the type of installation being created. For example, an ejector-type mini sandblasting machine is assembled with a plastic bottle for abrasive. A pressure installation will require a durable container made from a fire extinguisher or a freon cylinder.
Important! The connection diagram for moisture separation and oil collection devices depends on the specific product purchased for this purpose. However, most of the models on the market will only require the manufacture of an outlet from a plumbing tee onto which the hose fittings are mounted.
Optional equipment
When working with sandblasting equipment, we must not forget about the danger of accumulation of rust and other deposits. Therefore, it is important to promptly clean equipment from polluting particles, dust, sand and other contaminants. You should also not forget about the possible humidity of the atmosphere, which, in addition to water, may contain various oils that can interfere with the operation of the device and shorten its service life.
In order to prevent the occurrence of this type of pollution, a special filtration system has been created, which consists of the following equipment:
- Oil and moisture separator – ensures the absence of water and oil in the air duct. Install it in the air inlet of the sandblasting machine;
- Coalescence filter – protects the device from water ingress, thanks to the fact that it retains water vapor and combines it into droplets. Install this device in the outlet of the compressor;
- Air cooler – cools the air to condense moisture.
All this equipment is recommended for installation so that your sandblaster and compressor last much longer.
Popular brands
Quite a lot of companies offer compressors for sandblasting:
- Atlas Copco Compressors of this brand are reliable and energy efficient. Their range includes lines that are ideal for painting and sandblasting work. These are the XAMS, XAHS, XATS and XAVS lines: The characteristics of the XAMS 287 Dd, XAMS 407 Cd, XAMS 527 Cd models are pressure equal to 8.6 bar and power, which, depending on the model, can be from 128-224 kW.
- For models XAVS 166 Dd, XAVS 307 Cd, the pressure is 14 bar and the power is 104-186 kW.
You can find all these models and many others in our online store. If you have any questions, you can contact our managers.
Algorithm for making sandblasting from a gas cylinder or fire extinguisher
The simplest sandblasting design that you can do yourself is a pressure-type installation . To make it you will need (the principles of selection and purpose of the components are described above):
- ball valves, 2 pcs;
- freon cylinder, gas or fire extinguisher;
- a piece of pipe to create a funnel for pouring abrasive into the chamber;
- tees, 2 pcs;
- hoses with internal diameters of 10 and 14 mm for releasing abrasive and supplying air from the compressor, respectively;
- fittings and clamps for fastening hoses;
- plumbing fum tape for connecting structural elements.
What to make a nozzle and gun from
A homemade sandblasting gun is also not difficult. It can be made using a nozzle on a ball water valve installed at the end of the air-abrasive mixture supply hose. This output element is a clamping nut that secures the nozzle for ejecting the abrasive.
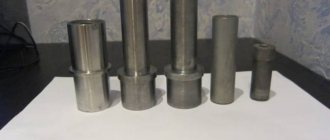
The last structural element - the nozzle - can be made of metal by turning the part on a lathe. However, it makes more sense to make the nozzle from a spark plug. To do this, the old part is cut with a grinder, separating the durable ceramic pillar from the metal structural elements and forming a suitable length.
Important! The process of separating the desired part of the candle inevitably results in the formation of a huge amount of dust and an unpleasant odor. Therefore, if you do not have the skills to work with an angle grinder and a workshop, it is recommended to buy a ceramic nozzle in a store.
It is worth especially noting: homemade designs often show better results than a ready-made sandblasting gun, many models of which are presented in retail sales. Therefore, it is wise to spend time creating your own solution, which does not require significant financial investments.
Alternative manufacturing methods
The many options for homemade sandblasting are determined by the needs of the owners and the different materials available. You can make your own effective installation using products intended for other work. For example, a high-pressure washer unit will help you assemble a dust-free sandblasting machine with your own hands. Below are several working and effective options for homemade installations.
From a pressure washer
You can assemble a sandblaster from Karcher. This car wash creates high water pressure with low water flow. To obtain an efficiently operating dust-free installation, you just need to assemble a special nozzle for the outlet tube. Required:
- a self-made or store-bought ceramic nozzle;
- reinforced hose;
- mixing block, a tee with a suitable fit diameter is suitable;
- feed adjustment unit, cylindrical type dispenser;
- a tube for collecting abrasive, equipped with an air supply path into a closed container with sand or other material.
Water sandblasting from Karcher operates on an ejector circuit. High-pressure water passing through the mixing unit at high speed creates a vacuum in the abrasive supply path. Sand flows in and out with high pressure fluid.
The water sandblaster of this design has some features.
- The flow intensity is high with low water flow. This allows the installation to be used for glass, frosting or other processing.
- For stable feeding, an abrasive of uniform dispersion and small fraction must be used. For domestic use, fine, sifted river sand is suitable.
From a blow gun
Small and efficient - this is how sandblasting from a blow gun can be described. This device will allow you to carry out, for example, body work with fairly high efficiency. However, the performance depends entirely on the compressor used. To assemble the device you will need:
- ready-made pneumatic blow gun;
- plumbing tee;
- ball valve for adjusting the abrasive supply;
- outlet nozzle with clamping nut.
The design is not complicated. How to assemble it can be seen in the next photo.
Hydrosandblasting
Hydrosandblasting can be carried out regularly in a normal garage or on-site environment, also using regular PPE. The bodies of old cars, after cleaning with hydrosandblasting, are quite suitable for painting; distance of the site or workshop from the above objects - from 50 m. Hydrosand jet is used without a compressor from a portable car wash or household “sprinkler” for windows and display cases
Therefore, special attention should be paid to hydrosandblasting
The design diagram of a hydrosandblasting installation driven by a portable washing machine is shown on the left in the figure:
Diagram of a hydrosandblasting installation and a simple nozzle for hydrosandblasting
A drawing of a simple nozzle made from parts of a water supply system for hydrosandblasting is on the right; The inset shows its appearance. The operating principle is ejection. However, such a nozzle works with some washers, but not with others, and the limits for adjusting the jet density and abrasive flow rate with a suitable drive are insufficient. The reason is the oblique concentrated supply of the abrasive-air mixture to the ejector.
The nozzle with coaxial supply of water and abrasive-air mixture works stably with any car and household washing installations. For example, the nozzle, the drawings of which are shown in Fig., was originally developed for the Kärcher car wash. But it is also suitable for any other thread with a standard G1/4” tip. And if the standard fit is different, then it is enough to make a connecting socket for it (see item 1).
Drawings of a universal hydrosandblasting nozzle for portable washers
How to make a hydrosandblasting nozzle for a portable car wash, see also the video:
Compressor designs for self-production
The main types of air compressors that you can make yourself are:
- Piston - in them the piston makes a reciprocating movement. The operation is controlled by the intake and exhaust valves. Such devices are most widespread.
- Screw - compression and pushing of gas is carried out by two screws that rotate towards each other. The space between the rotating shafts decreases, so the gas entering it is compressed.
- Diaphragm - they have a crank mechanism, it acts on the membrane through the drive fluid. As in piston devices, valves are responsible for the suction and injection of gas. The productivity of such installations is low, although they can create quite strong pressure.
- Gears have a chamber in which the gears rotate towards each other. The compressed gas moves around the periphery. Such devices have good performance, but high pressure can only be developed when working with liquids.
- Rotary-vane - they have a rotor and a stator. The stator is a hollow cylinder with polished internal surfaces. The rotor has grooves in which the plates move. As it rotates, the volume in the space between the moving and stationary elements constantly changes. The compressed gas is pushed into the supply line. So far, such installations have not become widespread. The problem is the seal between the plates and the walls.
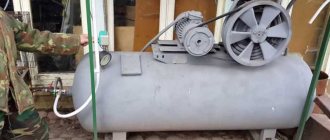
Homemade compressor for sandblasting
I don’t know whether this goes here or to “finished projects”...
In general, for periodic pampering with sandblasting, we naturally need a powerful compressor. We immediately discard any garage China, even for two cylinders... as well as a battery of receivers with a volume of 5 cubic meters: the compressor should blow like a hurricane on its own, without any receivers! Of course, in ferrous metals, ready-made compressor heads of very serious sizes periodically appear and disappear (not counting the banal CO 7B) - but we don’t need such a size yet... and the hassle with the transport of that monster, the drive for it, takes up space... In general, we need something mobile and affordable (otherwise, for those same dead CO7Bs, even in ferrous metals, prices have gotten into the habit of being set at far below the same price as scrap... we can’t even talk about buying some used scraps of the “made in Italy” type from a service station for a couple of evergreen mowers I would like to let them continue to work with them themselves - after repairing them first..
So what should we do?
And here the long-standing passion for the domestic heavy motorcycle comes to the rescue, thanks to which we know that the Dnepr is better than the Ural - and on its basis you can make anything you want... Even a compressor... After all, we, the capital, are spoiled by a wide range of choices of hardware in Chermet - but what about the province?... After all, even the chairman there, worn out by three generations of collective farmers, will give CO 7 only if you marry his daughter...
But let's get to the point!
I didn’t keep any notes or drawings - a smart person will understand everything from the photo
We take the engine from the Dnieper. We throw out everything unnecessary: the camshaft, the pushers, the clutch... we leave only the CPG, the flywheel and the oil pump. From the unusable clutch discs and the elastic cardan coupling we make a drive - everything can be seen from the photo - for an engine from a milling cutter (at 3 F naturally) 1500 rpm and it seems 2.8 (3.8?) kW... No pulleys - direct drive. We ensure rotation in the right direction - so that the oil pump pumps correctly.
The original heads are right there - don’t even try to adapt them. waste of time.
Next, we take the pistons from the Ural motorcycle engine (they have a flat bottom) - and accordingly shorten the Dnieper cylinders for them, so that the piston at TDC is level/slightly below the end of the cylinder. This is for maximum performance.
Next, we tear out two banal iron pancakes, bore a boring to fit on the cylinder belt and the holes for the studs.
we drill two holes: I have 18 mm for the outlet and 20 mm for the inlet
We construct an arbitrary valve system around these holes. In my case, the outlet is just a patch of millimeter stainless steel (Chinese 0.35mm spatulas didn’t last long... the rubber doesn’t hold up here either) with a diameter of 33 mm with a stroke limit of 6mm (I haven’t installed a return spring yet) - but the inlet is already made of 3mm rubber with a diameter of 45 mm and a stroke of 5mm
We sharpen the necessary seats, where necessary we harden and weld them.
Let's collect and rejoice.
The result is a compressor with an approximate capacity of 1000 liters per minute, lightweight, mobile, reliable, repairable... It’s easy to build up a pressure of 10 atm. Sandblasting with a 5mm nozzle is tricky (for a 3mm nozzle it’s even too much in terms of performance)
With the correct calculation, it does not even require forced cooling, because if you provide sufficient cross-sections for the outlet, practically no heating occurs: the outlet fitting and seat parts heat up in this version by a maximum of 80 -100 degrees (approximately) even after an hour of continuous operation - but the intermediate the version with homemade aluminum heads - but clumsy valves - heated up much more: the rubber receiving hose swollen from overheating. Now everything is fine, probably the purchased stainless steel corrugation is not needed. Well, those who want to work around the clock, for example, can organize simple water cooling and automation...
Well, of course I’ll install air filters - but a little later.
Modified on September 28, 2014 by brave
What can a compressor unit be made of?
The installation uses a number of auxiliary devices. They are needed to regulate the work process and supply compressed air.
1 – pipeline for filling oil; 2 – starting relay; 3 – piston compressor; 4 – copper-plated pipelines; 5 – reinforced hoses; 6 – air filter; 7 – filter for liquids and fuels and lubricants; 8 – suction hole; 9 – pressure control relay; 10 – distributor; 11 – safety device; 12 – tee; 13 – receiver (capacity for accumulating compressed gas); 14 – pressure gauge installed on the pressure reducer; 15 – compressed air dryer (oil and moisture condenser); 16 – pneumatic automatic engine start.
A compressor unit can be assembled from individual components; they are used to complete the device being created. It is worth considering what and how the structure is assembled.
Recommendations for operating compressors in winter conditions
Those who are going to use a compressor as part of a sandblasting system should definitely know how to avoid the formation and concentration of moisture-oil condensate in the lines, which not only reduces the performance of the device, but can also lead to its complete stop. The presence of such condensate in the supply lines leads to the wetting of the abrasive material, its sticking and the formation of lumps, and if metal shot is used as such material, then the condensate contributes to its corrosion and, as a result, to a decrease in its quality characteristics. Compressor oil, which is also present in the condensate, if it gets on the surface being treated, negatively affects the quality of the cleaning performed.
When operating the compressor in winter, replace the “summer” oil with oil with a pour point of at least 25 degrees
In order to remove already formed condensate from the system, special moisture-oil separators are used, operating on the principle of a cyclone separator, but they are unable to stop the process of its formation. To solve this problem, various devices can be used in sandblasting systems, the most common of which include:
- compressed air coolers;
- coalescent filters;
- refrigerated dryers.
You can make a moisture separator yourself, for example, from an oil filter from a Volgov engine
When operating compressor units at low temperatures (from minus 5 degrees), they must be additionally equipped with pre-heaters and “cold start” systems. Naturally, the oil used in compressors in such cases must also be designed for winter operation.