It’s not a big problem to make a compressor from a refrigerator with your own hands. Few people know how to properly operate the device. Standard DXM produces a pressure of 10 atmospheres (enough to inflate the tires of a passenger car), special professional stations are often made for 2 atmospheres. It’s not difficult to guess - the factory compressor has a number of advantages. Today we will try to test the theses for consistency with common sense, we will tell you what a compressor is. Let's start with 10 hallmarks of a homegrown solution.
Which is better: a homemade option or a professional device?
In fact, which compressor is better, the one made in a home workshop, or the one designed and assembled at a factory.
The compressor is subject to certain requirements, which are determined by its area of application. For example, a compressor assembled from a refrigerator with your own hands must provide a uniform supply of gas, and at the same time it must not contain dust or other particles, such as oil. The presence of dust and oil in the air flow leads to the formation of grain and various surface irregularities. If there is an uneven supply of air mixed with paint, drips may form on the parts.
Undoubtedly, compressors developed and manufactured by companies specializing in these products are equipped with all the functionality necessary for high-quality supply of atmospheric gas. But their significant drawback is their high cost and demands on the oils used.
In order not to waste money and at the same time create a truly working model, you must have certain knowledge about compressors made on the basis of a refrigerator, in particular about the operating principle of these devices and, of course, skills in working with hand and electric tools.
Compressor operating principle
The operation of refrigerator-based compressor equipment, regardless of whether it is factory-made or home-made, is the same. Excess pressure is created in the compressed air storage tank (receiver); the method of pumping it can be different, manual or mechanical. If you pump air with your hands, a certain amount of money is saved, but a large amount of muscular energy is consumed.
The mechanical method ensures a quick supply of gas to the container, and the pressure gauge installed on it always reports the pressure in the container. But in a mechanically driven compressor, there is a need for regular oil changes.
Maintenance of a homemade compressor from a refrigerator
Compressor maintenance involves regularly changing both filters and draining any accumulated oil in the receiver. But the main factor affecting the service life of the compressor is the frequency of oil changes. It is better to change it the first time before assembling the compressor. There is a third sealed tube on the motor. We cut off the sealed end from it and drain the oil from it, turning the engine over. About a glass of oil will spill out. Now, using a syringe through the same tube, fill in fresh motor oil, a little more than the amount that was drained.
Afterwards, in order not to solder the drain tube, we screw a bolt of a suitable size into it. The next time you change the oil, simply unscrew the bolt.
Dismantling works
Before you begin assembling a compressor unit from an old refrigerator, you need to remove the compressor from it, which ensures the movement of refrigerant through the cooling system. As a rule, this unit is installed at the rear in the lower part. The compressor is secured to the housing using standard fasteners. Before removing it, you need to bleed off the freon and bite off the brass tubes. You cannot use a hacksaw to separate them from the housing of the compressor unit. Just like when sawing, sawdust is formed, which can get inside the unit and cause irreparable harm to it. Therefore, the tubes must be disconnected using wire cutters. After the tubes are disconnected, the junction box must be removed. As a rule, it is black and made of plastic. It includes several wires. Then, you can dismantle the compressor itself. All parts and fasteners that were formed after removing the compressor must be left intact; they will be required later when assembling the compressor.
Airbrush
This type of art involves the use of a device with which the drawing will be applied. To assemble the unit use:
- compressor;
- filters for cleaning;
- furniture screws;
- rubber tube;
- clamps for fasteners;
- PVC tube.
- Before starting assembly, change the oil in the unit by adding car oil.
- Connect the receiver.
- Connect the start relay and charging tube.
- Attach the gasoline filter to the compressor, and the diesel filter to the receiver.
- Connect everything with pipes.
Home craftsmen with certain skills in working with equipment can easily find various uses for an old refrigerator component.
Functionality check
This operation is necessary so that the master can make sure that all the components that will be used in the manufacture of homemade compressor equipment based on the refrigerator are intact and have retained their functionality.
Compressor check
Before performing this operation, it is necessary to drain the old oil, flush the refrigerator compressor and refill with fresh oil. In this case, it is permissible to use only oil specifically designed for use in compressors built on the basis of a refrigerator. Otherwise, the node will quickly fail.
There are three brass tubes installed on it, the third, as a rule, is sealed. To remove waste, you need to remove the sealed tip and drain it. Washing liquid and fresh oil are poured through it. After filling is completed, the drain tube must be sealed.
At the end of the oil change, you will need to install the previously removed relay in place. Take a piece of electrical cord with a socket and connect its free end to the wires coming out of the relay.
After this, you can turn on the compressor from the refrigerator to the electrical network, as a result of which the engine will start moving and the gas flow will begin to move through the tubes through which the refrigerant previously moved. It is advisable to mark the tubes, that is, the one through which air enters the compressor and the one through which it exits.
Checking the receiver
To make a homemade compressor, you can use a car tire chamber as a container for storing compressed gas. To check its tightness, simply pump it up and place it in a container of water. If there are holes or other damage in it, then most likely air will escape through them; it is advisable to repair the detected defects using rubber patches.
Features of the air compression idea
Before deciding to implement an idea, it is advisable to decide exactly: is this idea really worth taking on? Let's consider several important aspects of the topic in order to help future designers make the right decision:
- Refrigeration compressors are not designed to work with air.
- The compressor performance of domestic refrigerators is low.
- To lubricate the mechanism of refrigeration compressors, special oil is required.
The corresponding conclusions follow from this. When working with air, the device will not be able to function for a long time without good cooling. When a refrigeration compressor operates with freon, the housing is cooled due to other temperature parameters of the refrigerant.
Compression of the air mixture by a refrigeration compressor occurs under completely different temperature conditions, which will lead to an increase in operating temperature by an order of magnitude. Ultimately, without good cooling, the compressor will simply burn out.
A burnt-out refrigerator compressor as a result of a violation of technological operating conditions. The same fate awaits the device that is supposed to be used in the project if special protective equipment is not used.
The low performance of home refrigeration units is another factor limiting the use of such equipment for producing compressed air.
For example, to pump a 5-liter receiver to a pressure of 5-7 atm, it will take at least 15-20 minutes of operation of the refrigeration unit.
Meanwhile, this volume of air is not enough even to inflate a car tire in one sitting or spray paint one wall of a small garage room.
Poor performance of the refrigerator system is common for such equipment. But for an air compression system, especially with a high flow rate, a high-performance system is required
Finally, another important factor is compressor oil. To lubricate the mechanism of refrigeration compressors, a special freon oil is used, the properties of which change dramatically in contact with air.
If you do not change the oil to another type of lubricant that is structurally friendly to air, after a certain time the compressor mechanism will simply “close up” due to rapid wear of parts.
DIY design
So, if, despite all the noted nuances, a decision has been made to assemble an air compressor from a refrigerator, you can proceed directly to action.
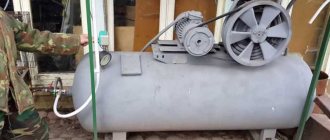
Approximately this design should result from the implementation of the conceived idea. In appearance there are no complaints. The device looks more than flawless and quite impressive
The first step is to collect all the necessary parts of the project equipment:
- Air receiver.
- Oil separator.
- Differential pressure switch.
- Copper tube.
- Inlet air filter.
- Shut-off control and control valves.
A compressed air cylinder from a KAMAZ vehicle is optimally suited for the air receiver. The five-liter container has dimensions acceptable for a domestic environment and meets the requirements for pressure vessels.
It is best to equip a home compressor made from a refrigerator with one of the cylinders that are used on KAMAZ truck tractors. These vessels comply with Rostechnadzor standards
The oil separator, also known as an oil separator, is made of a pipe with a diameter of 50 mm and a length of 2/3 of the length of the receiver. A metal mesh (sponge) is placed inside the pipe, which is used for washing dishes. Both ends of the pipe are closed with metal pancakes equipped with fittings.
Additionally, a feed-through fitting is installed on the pipe wall with a slight indentation from any of the ends. The end fittings of the oil separator are designed for air inlet and outlet, and the side fitting is needed to drain the oil cut off by a metal sponge inserted inside.
An oil separator design option that is recommended for use as part of the installation. For reliable operation of the system, high-quality separation of oil from air is required.
A differential pressure switch (for example, from the RT series) is used from among those used in industrial refrigeration units.
Copper tube is available in sufficient quantities in the design of the condenser of a domestic refrigerator. Its diameter matches the outlet pipe of the refrigerator compressor.
An air filter at the compressor inlet can be easily made from any suitable plastic container by placing a regular foam sponge inside. Shut-off control and control valves - valves, check valves, pressure gauges - can be bought in the store.
Air unit assembly
An air receiver (for example, an air cylinder from a KAMAZ vehicle) is mounted on a chassis made of a metal corner. Additionally, it is recommended to install a pair of wheels on the chassis for ease of movement, a support “leg” and a handle.
A platform for installing a refrigerator compressor and a bracket for mounting a differential pressure switch are fixed above the upper area of the cylinder. An oil separator is attached to the side of the receiver, through a clamp and an outlet fitting.
DIY oil separator. For fastening, one clamp with a bracket is used on the left side of the separator, and the right part is attached to the fitting of the receiver inlet pipe
An air filter must be installed on the inlet pipe of the refrigerator compressor. An air filter is required to reduce the entry of foreign particles present in the air into the system.
An air filter can be easily made from any plastic container by attaching it through an angle threaded transition to the inlet pipe.
Air filter on the inlet pipe of the unit. It’s easy to make one with your own hands from suitable plastic containers. There is a foam sponge inside the filter housing
The outlet pipe of the compressor is connected through a compensation copper tube-heat exchanger to the inlet fitting of the separator (oil separator). The outlet pipe of the separator is connected to the receiver through an angle adapter.
A tee and a shut-off ball valve (compressed air outlet) are installed at the receiver outlet. Through the tee taps, the receiver output is additionally connected by copper tubes to a differential relay and a pressure gauge. A safety valve is also installed there.
Electrical part and principle of operation
The electrical circuit diagram actually remains untouched, with the exception of minor changes. That is, the compressor from the refrigerator was powered from the AC mains through the starting relay, so this option is left unchanged.
Another question is that the circuit can be slightly modernized. For example, supplement it with a switch installed on the body of the assembled installation. Still, this option is more convenient than periodically plugging and unplugging the plug from the socket every time you use the device in action.
This design does not provide a separate power switch. The compressor is connected to the network with a two-wire cord with a plug through the contact group of the pressure switch
Also, the voltage supply circuit to the compressor must be configured taking into account the inclusion of the contact group of the differential pressure switch.
Some technical data and service features
In fact, it is quite difficult to find out what pressure a homemade compressor from a refrigerator will create. But, nevertheless, any supercharger is characterized by two parameters:
- power;
- productivity.
The first speaks of the device’s ability to generate high pressure without creating additional load on the power plant. By the way, automobile electric pumps can create pressure up to 6 atm without any problems. The working pressure in car tires is 2-3 atm. And achieving this characteristic will take about 10 minutes. This is due to their low productivity.
Performance characterizes the product’s ability to pump a given amount of air in a certain period of time. That is, the higher it is, the faster the compressed gas storage tank is filled.
In order for these characteristics to be combined, either a piston unit with a large cylinder volume, or one on which a powerful power unit is installed, will be in demand.
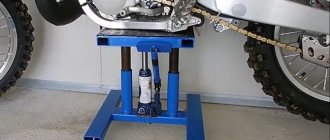
Pros and cons of compressors from cars and refrigerators
The good thing about a car compressor is that it can run on a battery. True, if you use it for some stationary crafts, then this is not an argument at all.
The car compressor works a little faster than its opponent. However, the difference is not so big as to draw clear conclusions.
We recommend: Do-it-yourself folding wheel chock
The advantage of a refrigeration compressor is that it is more durable than a car compressor. By and large, he is able to work for years. It also pumps up to 30 atmospheres.
The speed test showed that the compressor from the refrigerator creates a pressure in the wheel of 2 atmospheres in 2 minutes 45 seconds.
Whereas a car compressor copes with the same task in just 1 minute 29 seconds.
We recommend watching a detailed review of compressors in the video on our website.
Does the compressor need to be repaired?
As a rule, refrigerator components have a long service life. Moreover, the superchargers that were used on older models can last much longer than all other components. If the compressor removed from the refrigerator is inoperative, then it will be easier to purchase another unit; moreover, they have a fairly low price.
Before you make a refrigerator compressor with your own hands, you need to do some preparatory work. That is, it is necessary to assemble all the components that are required for its manufacture, in addition to this, it will be necessary to assemble a certain tool. To assemble a high-pressure compressor with your own hands, you will need the following components:
- a car inner tube installed in a tire and used instead of a container for storing compressed air;
- a pump with a pressure gauge instead of a supercharger;
- chambered nipple;
- repair kit;
- ordinary awl.
In order to assemble the compressor with your own hands, you will need the following tool:
- screwdriver or drill;
- metal cutters with titanium coating;
- turbine or drill with abrasive attachments;
- metal brush;
- roller for copper tubes;
- adjustable wrenches, pliers.
Assembling a compressor with your own hands, if properly prepared, should not take much time.
Device diagram and preparatory work
Check the operation of the compressor by performing a test run: connect the relay to the compressor, placing it in the position in which it was originally attached to the refrigerator. Please note: relays work due to gravity and heating of special metal plates - if you change the position of the device, it will not work correctly or will be damaged .
Attach the wire with the plug to the structure with electrical tape, securing the place where the wire is attached with it. The device can now be plugged into a power outlet. Don't be alarmed if there is a slight pop or the device sparks - the heavy load is to blame. A working compressor rumbles steadily, releasing hot air from the outlet tube.
When everything is working, you can begin preparing to assemble the airbrush. the necessary parts at a special car market or at a car parts store :
- 1 liter of motor oil – mineral or semi-synthetic is suitable. If you are lucky enough to find a seller who offers oil in bulk, take 500 ml, this is enough for a small compressor.
- Rubber tube one meter long. Please note that its diameter should be no more and no less than 4 millimeters. To make choosing a tube more convenient, take a “stub” of a copper compressor tube with you to the store - this way you won’t go wrong with the size.
Do it yourself
After all the necessary components and tools have been assembled, you can make a compressor from the refrigerator.
A hole must be made in the chamber that has been tested for leaks. To do this you need to use an awl. A chambered nipple will be installed into the resulting hole. Its task is to remove compressed air from the chamber.
The additional fitting is installed by gluing; this will require the use of a repair kit. After this, the fitting must be installed on the spray gun. To check the escaping air flow, the nipple must be removed. Yes, by the way, the original nipple should be left in place, it will act as a valve and hold excess pressure that occurs during operation of the compressor. To determine the pressure level, you can try applying a layer of paint to the prepared surface. If it lies evenly, it means that the installation is operating normally. You can use a pressure gauge to check the pressure level. Its level should be stable. It is not so difficult to design a compressor and assemble it, but the fact remains that the use of such a device will greatly facilitate the work of painting a car, etc.
Semi-professional air blower
To create a semi-professional compressed air installation, you will need a larger number of components and tools. In particular, instead of a rubber bladder, it is advisable to use a propane cylinder. In addition to this you will need:
- Fittings for fastening metal hoses.
- Metal plates, the width of which should be 30-40 mm and the thickness 3-4 mm.
- Two wheels with a platform for attaching it to the receiver.
- Compressor.
- Hardware.
- Fittings for pressure adjustment.
Tools:
- Welding machine – inverter.
- Screwdriver.
- Metal cutters.
- Grinder with abrasive wheels.
- Metal brush;
- Adjustable wrenches, pliers.
Working mechanism
To assemble a semi-professional air blower, you can use a compressor from a non-working refrigerator made in the USSR. These refrigerators are superior to their imported counterparts in that they are capable of producing higher air pressure.
Air container
Propane cylinders and old fire extinguishers can be used as containers for compressed air. This is due to the fact that these containers are able to withstand quite high pressure and have a large margin of safety.
As an example, let's take a supercharger made from an OU 10 fire extinguisher. Its volume is 10 liters. Such a receiver can easily withstand operating pressures of up to 15 atm. The starting device is removed from it and the adapter is installed.
Of course, if traces of corrosion are detected, they must be removed using a converter. This matter is quite simple, the outer surface can simply be treated with a dampened rag, and to clean the inside you will have to pour a certain amount of liquid and shake it for quite a long time.
After the container is cleaned, you can begin installing the plumbing cross. After this, we can assume that two parts of the future installation are ready.
Installation of parts
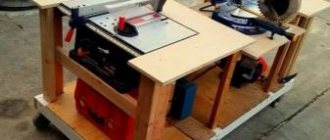
To simplify the assembly process, it is best to collect all the parts in one place. Thus, it is permissible to use a thick board to install the injection unit and air tank.
To fasten the units, you can use studs, pre-equipped with washers and nuts. The receiver is installed in a vertical position. For this you can use three sheets of plywood. In some of them, a hole the size of the diameter of the receiver is made. The remaining sheets are secured to the base board using self-tapping screws.
By the way, it wouldn’t hurt to prepare a place for the receiver. To ensure the mobility of a homemade compressor, wheels are screwed to the base of the board.
After the work has been done, it is necessary to provide compresses against dust. To do this, you can use a coarse fuel filter installed on internal combustion engines. This part will act as an air intake. To make this system, you will have to use a rubber sleeve and an inlet tube.
Here we must remember that the input pressure is quite low, and therefore it makes no sense to strengthen the connection with a clamp.
Upon completion of the above operations, the master will receive a ready-made air intake system equipped with a filter. But we must not forget about installing an oil and water separator. Its task is to remove moisture and oil particles. This unit will use a fuel system filter. And therefore, automotive clamps must be used to install these components.
This filter must be connected to the compressor inlet. Its task is to ensure decoupling of the receiver and the outlet from the supercharger. In other words, on one side of the cross the output is installed, and on the other there is a pressure gauge that controls the pressure in the receiver. In the same unit it is necessary to provide space for installing an adjusting relay. Practice shows that for this purpose the optimal solution would be to use a standard product of the PM5 brand or its analogues. The purpose of this product is to turn off the engine when the maximum pressure in the tank is reached and turn it on when it drops to the permissible minimum.
Adjusting the pressure
The required pressure is adjusted using two springs installed in the PM5 device. The large spring is designed to set the minimum pressure level, and the small one to set the maximum. This is how the limits for turning on/off the compressor motor from the refrigerator are set.
Undoubtedly, all electrical connections must be insulated and soldered.
Tests
After assembling the homemade installation, you can begin testing it. That is, an air hose with an attached spray gun and paint poured into it is connected to the receiver output. Then, carefully following the technology, apply a layer of paint to the prepared surface. That is, it must be cleaned of the old coating layer and degreased. If, after applying a layer of paint, there are no drips, dull spots, or unpainted areas, then the installation is operating normally and can be used when performing various types of work.
Assembling a compressor unit
The compressor from the refrigerator is equipped with a start relay, to which the thermostat is initially connected. It is not involved in this assembly, so it must be disconnected by first marking the contacts on the starting relay and closing them with a piece of insulated wire.
We select an oxygen hose according to the diameter of the pipe, and install an air filter at the compressor inlet. One of its plastic air intake pipes can be cut off, leaving a hole free. The connection can be made without clamps, since this element of our installation is not under pressure. The pipe for it should not be made long. We cut it off with a knife and install the filter by hand. To prevent the copper tubes of the compressor from being on the same line and interfering with each other, they can be bent in different directions.
Next we attach the second air filter to the outlet. If necessary, the copper pipe can be shortened to accommodate it using wire cutters.
As the author’s own practice has shown, even with relatively low pressure, such an assembly cannot do without clamps. We place them on the pipes and tighten the connection. The author plugged the second copper pipe coming out of the compressor with a self-tapping screw and electrical tape.
We attach a small piece of oxygen hose to the air filter, and connect a spiral hose for compressor work. This can also be done through a quick-release adapter.
Now you can connect an air gun to inflate the wheels to the spiral hose and check the functionality of our installation. To avoid excess pressure in the hoses and filter, you can crimp the trigger of the air gun with a nylon tie.
As you can see, the author of the homemade product managed to obtain a working pressure of about 3 atm, which is quite enough for quickly inflating wheels in the garage. By the way, such an installation can be used for a wide variety of work, for example, for painting with a spray gun.
Step-by-step assembly instructions
Before you begin, you should prepare all the necessary tools and materials. Such kits may differ from each other depending on what the future owner of the compressor expects.
In addition to the compressor itself, which is removed from the refrigerator, you need to prepare the following:
- Receiver. As an alternative, a housing from an old fire extinguisher is suitable. You can also weld such a body from a sheet of metal or pipe.
- Set of various hoses. You can use car hoses. One must be 100 millimeters, and two must be at least 600 millimeters.
- Consumables. A gasoline filter from a car, a pressure gauge, clamps, wire, etc.
- Bonding tool. Pliers, screwdrivers, drill with a set of drills.
- Additionally, you will need a wooden board, which will be the basis for the entire structure. The compressor must be screwed to it using ordinary self-tapping screws. You need to attach the device to the board in the position in which it was placed directly on the refrigerator.
Then you should take a plastic container of any size from three liters. In the upper part of the container you need to drill several holes for the compressor tubes. Then insert the tubes into the holes made and fill everything with resin. In this case, the inlet tube should be located at a distance of 200 mm from the edge of the receiver. The outlet tube should be placed 10 mm inside the container.
The receiver can be made of plastic, and nothing bad will happen here. But for greater reliability, it is recommended to make it from a metal box. With this outcome, there is no need to fill everything with resin for a good seal, and the hoses are closed. Moreover, only a pressure gauge can be installed on a metal body.
To do this, you need to drill a hole in the receiver for a nut, which needs to be welded in such a hole. Then there is the option of screwing the pressure gauge into the nut. After this, work on creating a homemade compressor from a refrigerator ends. You can use any materials for painting, but first you can clean and prime them to avoid corrosion. After this, you just need to attach the receiver to the base using a wire.
Features of operation and safety measures
When operating this device, it is necessary to remember that the engine will be operated in almost extreme conditions, this can lead to its overheating and failure. Therefore, it is advisable to use it, providing it with a short technological break, which will allow the engine to cool.
When working with a compressor, certain safety measures must be observed, namely:
- It is prohibited to operate the mechanism if there is damage to the surface of the connecting sleeves and electrical wiring.
- It is strictly prohibited to operate the product if there is damage to the surface of the receiver or devices mounted on it.
- If oil leaks are detected, measures must be taken immediately to eliminate them.
- Ensure that the device is turned off if foreign odors and noises appear, which indicate the appearance of some operating problems.
It is advisable not to allow minor children to work with the compressor device.
What you need to assemble the installation
To assemble a compressor for inflating tires, you need to prepare the necessary materials. Including this:
- compressor from a freezing system or refrigerator;
- cable with plug for connecting equipment to the network;
- automobile air filters (2 pcs);
- oxygen supply hose (installed on the pipes);
- spiral hose for oxygen with removable adapters;
- device for inflating wheels (air gun)4
- wires and clamps.
You will also need tools, namely: pliers, a screwdriver, a knife.