An airbrush is a device whose operating principle is based on spraying paint with an air stream. It began to be used back in the 19th century, when airbrushing had just begun to be used by craftsmen to create paintings. Now this pneumatic tool is used both in creativity and in construction or design, for painting work and painting surfaces of various sizes.
Excellent tool for car airbrushing
Spray gun + auto compressor.
Let me explain right away that the idea is a failure. I wanted to try it - I tried it. The maximum that can be painted like this is...
Assembling the airbrush yourself
The design of this device is quite simple, so assembling an airbrush with your own hands is not at all difficult for a person who has some idea of its operating principle. To organize such a unit as a homemade external mixing airbrush, you will need the following elements:
- ballpoint pen body and refill;
- a small container with a tight-fitting lid;
- hospital IV tube;
- air pump.
We remove the head of the rod, and rinse the rod itself until the ink is completely removed. Next, we move on to the container: you need to make a hole in its lid so that the prepared rod fits clearly into it. We insert the rod, not bringing it to the bottom of the container by about 5 centimeters, and fix it with hot glue or epoxy glue.
Homemade airbrush powered by a car pump? We fix the free edge of the rod at an angle of 90 degrees to the handle body: our task is to ensure the direction of the air that will exit the handle body from the side of the narrow hole towards the end of the rod.
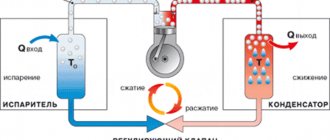
The opposite end of the handle is connected to the pump using a tube from a medical dropper. The airbrush assembly is complete and now you can check how it works. We fill the container with paint or solution that is supposed to be used to treat the surface. Air is forced into the handle body, resulting in a zone of reduced pressure at the outlet. Due to this pressure, the paint moves up the rod, where it is met by an air flow, and atomization occurs.
The size of the ink jet changes if you change the distance between the rod and the outlet of the pen. This airbrush cannot be used for fine work, but it is quite suitable for acquiring general skills and becoming familiar with the principle of operation, as well as performing some simple work.
The simplest design, not for professional painting
The pump plays a very important role when working with an airbrush. It is necessary to select the appropriate compressor if the goal is to achieve good coloring. In addition, this device is selected taking into account the type of spray gun and its purpose.
To work with small objects, you can take an auto compressor, and if the volume of work is large, such as, for example, painting walls or a car body, a high-pressure compressor is needed.
It is easy to install such a device. With enough knowledge, you can make a fairly high-quality compressor for airbrushing with your own hands even in your garage. A homemade high-pressure compressor produces up to 10 atmospheres and is capable of providing operation to any pneumatic tool.
But the container is selected that can withstand the appropriate pressure - a fire extinguisher or a welded pipe fragment.
Airbrushes - what they are and how to use them
The main task of the device is to create a smooth transition between different colors. This is possible due to its similarity to a conventional spray gun. So, what is an airbrush? It is a combination of several elements:
- Container for coloring composition;
- Start button;
- Adjustment unit;
- Nozzle;
- Needle.
The main task of the device is to create a smooth transition between different colors.
Making a compressor for an airbrush
First of all, you will need a working compressor from a broken refrigerator.
If possible, it is better to take this device manufactured abroad: such a compressor, unlike a domestically produced unit, makes less noise and is more economical.
Most likely, you can take a pressure switch along with the compressor; a receiver will also come in handy.
This is a fairly simple way to make a compressor - this way you don’t have to carry out turning work or connect certain elements by welding. Another, sometimes decisive, factor that pushes a craftsman to organize a homemade compressor is minimal costs.
So, we remove the unit from the refrigerator and at the same time remove the relay, if it is also in good condition. Make sure that no dirt or small debris gets into the compressor. Next, you need to acquire a capacity for the receiver.
A hydraulic accumulator from a 24-liter water pump is best suited for this purpose. Along with it, you will need to purchase an RDM-5 pressure switch at a hardware store. You will also need an emergency valve with a pressure sensor. Although the relay is designed to operate at pressures up to 2.8 bar, it maintains trouble-free operation up to 6 bar.
An emergency valve is installed in case of automation failure.
In order to assemble the airbrush compressor together, you will need additional adapters and fittings. Some auxiliary parts are also needed:
The check valve must be installed in front of the receiver. It is attached to the plywood. An oil-water separator regulator, as well as a compressor with a start relay are also attached there. Install two filters: one on the inlet pipe, the second between the compressor and the receiver. There should be a switching relay at the bottom of the structure, and a check valve at the inlet.
Use sealant where necessary.
How to choose
When choosing a compressor for beginners, they need to clearly understand why the unit will be needed. An automobile air compressor is expensive, but performs its functions perfectly. You need to choose a good compressor for airbrushing according to the following characteristics:
- Type: piston, diaphragm or screw.
- Performance level.
- Power. The higher the maximum performance indicator, the greater the opportunities available to the owner.
- Firm. Products from well-known companies are highly reliable and more expensive.
- Equipment. Additional devices are supplied with the compressor.
Consider plans. Remember: a miniature small compressor will not cope with a large-scale job.
Price
The price depends on the type of device and place of purchase. For example, on Avito, a Japanese small device Iwata costs 5,000 rubles.
“Fork” Aliexpress - 700–3000 rubles.
On the official website Jas without a receiver costs 3-10 thousand rubles.
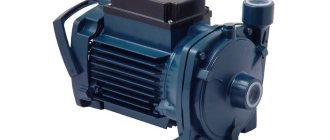
Compressor based on a diaphragm pump
A mini compressor for an airbrush can be built from a car pump without much expense. Of course, it will be inferior to professional devices in terms of performance, but it is quite suitable for processing small-sized parts.
An airbrush with a membrane-type compressor has a lower cost, and the choice of such a unit is justified when it is necessary to perform small-scale work that does not take a long time.
A membrane compressor supplies air by oscillating the membrane and can supply pressure up to 3.5 atm. In the most common case, the airbrush is connected to a membrane compressor via a hose. The system must be supplemented with a receiver to avoid air flow pulsations, due to which the paint may be distributed unevenly.
For this purpose, you can use a regular five-liter plastic canister. A car expansion tank is also suitable; due to the presence of outlet pipes, its installation will be much easier. The hoses are put on the pipes, secured with clamps, and the compressor can be used for its intended purpose.
Additional Information:
We bolt a receiver tank, a repaired compressor, a starting relay and an oil separator regulator onto a plywood sheet or chipboard board. Filters are installed on the inlet pipe, between the compressor and the receiver.
A check valve is also mounted at the inlet, and a relay is placed below to turn it on.
- with external mixing.
This is the easiest type of airbrush to assemble and operate. It is precisely such devices that, as a rule, are assembled by hand (in this case, a part of an old vacuum cleaner or an ordinary ballpoint pen can be taken as a basis). This type of airbrush is intended mainly for painting large surfaces and is perfect for creating a background pattern on a car;
Airbrush with external mix
- with internal mixing
. This is a more complex type of airbrush. Its peculiarity lies in the fact that the mixing of air with paint occurs directly inside the tool, the body of which is represented by a special spray head.
Airbrush with internal mix
Using the regulator, I increase the pressure - it gets better. Several trial attempts - and it becomes clear that pressure in the range from 2.0 to 2.2 atm is necessary and sufficient. It is this range that allows you to hold this receiver perfectly, but if you constantly bleed air through a completely open airbrush, there is no longer enough air.
First of all, you need to assemble the cartridge and needle retainer. You need to make it from a syringe, a gel pen refill, a fountain pen spring and a bolt. Remove the piston from the body, lower the spring inside (it should be next to the thin nozzle), make a hole in the rod and insert a bolt, and they should be perpendicular to each other.
This structure is subsequently inserted into the housing.
- Next, you should cut off a small part of the handle body 35 mm long. Make a mark in the desired location and cut off part of the tube using a hacksaw.
- Clamp the sawn-off part of the handle body in a vice in a vertical position.
- Using a triangular file, make a cut in the end of the tube, as shown in the following photo.
The simplest design is an airbrush connected directly to a diaphragm compressor hose. Given the pulsation of the air flow created by the pump, the layers of paint will lie unevenly. To avoid this, you need to include at least the most primitive receiver in the system.Don’t forget that you should also have a container for paint (for example, a hand-friendly jar with a lid). And for greater convenience, you can make something like a paint supply valve. To do this, you need to drill a hole with a diameter of about 3 mm in the handle body.
When you close the hole with your finger, the air will flow as expected - through the nozzle, a vacuum will be created at the end of the rod, and the paint, rising along the rod, will splash. If you remove your finger from the hole, then all the air will pass through it and no splashing will occur.
I have been using a nebulizer inhaler for the last 7 years. Practical, convenient, you can work for quite a long time, although of course it gets hot. At the same time, when God forbid someone is sick, the airbrush is replaced with a standard mask and the device is used for its intended purpose. Works quietly.
By definition, there is no oil in it. The flow pulsation is evened out in the hose; a receiver is not needed. All junk is put away in place of the mask, inside the body.
Works quietly. The sizes are small. There is a handle on top, you can carry it.
The cost is about 3,500 rubles, it has already paid for itself a long time ago. And the colleagues whom I convinced to use this unit are also happy. So there is an alternative. The only drawback is that you cannot work with dual-action airbrushes. However, the latter requires a proprietary compressor.
Car owners have recently begun to frequently use airbrushing - each of them dreams that his car will be special among the many vehicles. Airbrushing is the application of a design to a body using special paints using an airbrush. Such work can be done not only by professional artists, but also by ordinary car enthusiasts.
How to do airbrush with your own hands for beginners? You can use stencils. But to make images beautiful and vibrant, expensive tools are required. Fortunately, you can get by with more affordable options...
A compressor from an older refrigerator is usually quiet, although not particularly powerful in comparison with industrial models. But it’s great for airbrushing, tire inflation, blowing, and painting auto parts. Such a compressor is necessary in any home or garage workshop. Gives 6-7 atmospheres, and more is usually not required. A homemade compressor has a number of advantages. Firstly, due to quiet operation, and secondly, due to cost. A self-made compressor from a refrigerator will cost on average about a thousand rubles.
If you do everything correctly and take care of depreciation, then there will be almost no noise at all. For those who like to make things with their own hands, and this usually happens at night, this moment is extremely important. A compressor is needed for painting parts for modeling and other hobbies that are usually done after the main job. Therefore, noise level restrictions are very important.
ATTENTION! A completely simple way to reduce fuel consumption has been found! Don't believe me? An auto mechanic with 15 years of experience also didn’t believe it until he tried it. And now he saves 35,000 rubles a year on gasoline!
The design of a refrigerator compressor is extremely simple. A container is attached to the compressor from the refrigerator to equalize the pressure, since direct airflow is not stable. This container acts as a receiver and air flow mixer.
Popular manufacturers
In an auto shop, your eyes are usually wide open from the number of manufacturers and companies. The multi-colored mass is confusing; people stop evaluating a compressor only by its technical characteristics. A well-known manufacturer guarantees reliability; its high-quality products have already earned the trust of customers. Small companies that have just emerged cannot boast of this.
Chinese compressors have taken pride of place in the sales market. These are the companies Fengda and Jas, their products are distinguished by an ideal level of performance and an affordable price. The cost ranges from 3,000 to 8,000 rubles. The small device comes complete with an airbrush stand, a spare pressure gauge and a carrying handle.
Jas 1203
Silent compressor for airbrush. Main characteristics:
- power – 150 W;
- productivity – 23 l/min;
- noise level – 42 dB;
- weight – 5.2 kg;
- price for 2014 – 4500 rubles.
- built-in receiver and filter;
- pressure gauge;
- pressure switch or auto shut-off system;
- low weight and dimensions;
- comfortable handle;
- reasonable price.
Cons: the device gets very hot.
Iwata Power Jet Pro IS-975
Japanese oil-free compressor of average cost.
- maximum pressure indicator 4.8 bar;
- performance level 34 liters of air per minute;
- power: 1/6 hp;
- noise level: 55 dB;
- receiver 2 l;
- weight: 11.9 kg;
- dimensions: 33*23*18 cm.
What do you need to make a compressor with your own hands and where can you buy all this?
- Refrigerator compressor. You can unscrew it from your old one, or you can buy it at a repair shop that specializes in refrigerators. To avoid confusion, let us explain that the refrigerator motor is the compressor.
- Sealed container that holds pressure well. Receiver. Many people use fire extinguisher cylinders, but there are also plastic containers that are quite resistant to stress. It is important that the container is large enough to mix the air and equalize the pressure from the refrigerator compressor. You can make a receiver from a suitable plastic container from garden sprayers. If the container is plastic, you will need epoxy resin for fastenings
. - Start-up relay. You can take it from the same refrigerator or buy it. But usually the motor and the relay are together; it is from the relay that the power cord with a plug comes.
- Gasoline filter, diesel filter.
- Pressure gauge. Sold at a plumbing store. Not mandatory, but desirable detail. Installed on a metal receiver.
- FUM tape for connections.
- Three pieces of fuel hose. 2 of 10 centimeters and 1 of about 70.
- A hose that will remove air. You can attach a standard hose from an airbrush or a thicker hose if the equipment will be used for painting cars.
- Clamps, fastenings, electrical tape.
Some DIY experience preferred.
Required filters
The air supplied to the airbrush must be cleaned, otherwise grains of dust, dirt, and drops of oil will get into the spray paint, thereby ruining the work. A special air filter will help against such failures. A dehumidifier will also be an important purchase. It is needed to collect droplets of condensate that appear during compressor operation.
A device for regulating the pressure of the released air and an automatic shutdown system when the maximum pressure level is reached will also be useful.
Manufacturing process
The most fuss will be with the receiver. If you use an old fire extinguisher as a receiver, be prepared for the fact that there will be quite a lot of metal work. In addition, it will be necessary to ensure tightness. If we do not have significant experience working with metal with our own hands, it is better to take a plastic receiver.
If you use heavy parts, you should be mentally prepared for the fact that the compressor will be stationary. It is better to immediately prepare a reliable base and fasteners for it.
Compressor preparation
Determine where the compressor has a tube for the incoming air flow and where the outgoing air flow is. To do this, you can briefly plug in the compressor and determine which tube the air is blowing from. Be sure to mark the tubes at the base so as not to mix them up. This can be done with colored electrical tape or a piece of medical tape.
Carefully trim the tubes to about 10cm. This is necessary for easy connection of hoses.
The vertical position is important for the compressor. The relay body has an arrow pointing up.
It will be convenient if we fix the compressor in the correct position.
Receiver
Let's consider a simplified version with a plastic canister. Let's cut two holes in the lid for the tubes. The inlet tube must be made long, almost to the bottom. The outgoing one can be made short, about 10cm.
Small sections of about 2-3 cm remain outside. The structure should be secured with epoxy resin to ensure tightness. In the case of an old fire extinguisher, the same actions will have to be done by soldering and welding the fittings. But you can install a pressure gauge on the metal case.
Do not solder parts tightly. It is better to weld nuts and cut threads where possible.
Connecting parts
Attach a gasoline filter to a short piece of fuel hose. Place the other end onto the compressor inlet tube. The filter is needed to prevent dust from falling into the compressor.
Use a second piece of fuel hose to connect the compressor outlet pipe and the receiver inlet tank. The air flow will go from the compressor to the receiver. We put clamps on the hoses, since the air flows under pressure. Another short piece of fuel hose is needed to secure the diesel filter. The filter is needed to clean the air flow. A hose and equipment can be attached to the outlet fitting.
What to look for when choosing a compressor?
To select the most competent compressor for an airbrush, you must rely on the following criteria:
- Performance level. It is measured in the total number of liters supplied by the device per minute of operation.
- Maximum pressure indicator. It is measured in kilograms per square centimeter.
- If the compressor has its own receiver, you will need to take into account its volume, measured in liters.
- Weight and dimensions. There are mini-compressors, and there are those that have significant dimensions.
- The degree of noise produced.
It is equally important to pay attention when choosing to the various additional devices and components included in the basic kit.
Compressor Maintenance
Transformer or motor oil in the compressor must be changed periodically. It is advisable to change the gasoline filter approximately every six months. Replacing the filter is a routine maintenance that any car enthusiast can understand. All maintenance can be done yourself.
How to change oil
Inspect the motor. There should be a sealed tube coming out of the refrigerator compressor. Carefully cut off and drain the oil from the engine. Usually there is about a glass of it. However, if you purchased the compressor from a workshop, the oil has most likely already been drained. Using a syringe, you need to pump in new oil and take care of how to close the hole. It will be most convenient to glue the external thread with FUM tape and make a screw cap.
Compressor application
Mainly used for painting
Anyone who is interested in airbrushing knows well that this activity requires the presence of an appropriate compressor. The cost of such a device is quite high. Therefore, many are interested in the answer to the question: how to make a compressor for an airbrush with your own hands?
To ensure an uninterrupted air supply during the airbrushing process, you will need a compressor; it is not difficult to design it yourself.
The air supply is provided by a mini airbrush compressor. The operation is carried out through the connected hose. When choosing a compressor, pay attention to very important characteristics:
- performance;
- pressure.
To determine the values of these parameters, it is necessary first of all to determine the conditions where the work will be carried out. In domestic conditions, it is best to use a silent device. You can install a higher power device in the garage. It is very important to know several basic characteristics:
- excess pressure;
- total volume of air.
Compact option
The oil-free and tankless mini compressor is the most compact of all airbrush compressors. It is quiet, works from a regular outlet, but the pressure it produces will not exceed 1.6 A. The mini device will do an excellent job with miniature work not exceeding the size of a sheet. It is ideal for artists who work outdoors, in confined spaces or on limited surfaces.
The small unit operates almost silently. It has only one pressure mode, the “baby” also overheats quite quickly. This forces you to pause during work and let it cool. But the small size still makes this model very popular among creative people. Its hose is more compact and does not stretch to a large size.
Compressor technical parameters
- Pressure.
Manufacturers usually report compressed air flow parameters in documentation. There are two such indicators:
- operating pressure;
- maximum pressure.
Operating pressure refers to the pressure when the compressor unit operates at maximum efficiency.
The device, having such excess pressure, is able to function for quite a long time.
No damage to the main parts occurs. The maximum pressure is the pressure at which the greatest compression of the gas occurs, which can cause the unit to break down.
- Performance.
This value shows the volume of air that a mini compressor can create. It is measured in m³/min. Foreign manufacturers consider the performance of the device by the amount of air absorbed.
Russian companies calculate productivity by the volume of gas leaving the device.
Since large losses occur in the discharge valves, the performance indicator is reduced by forty percent in comparison with the input parameters.
Consequently, the indicated performance of imported compressors is much inferior to that of domestic devices.
Return to contents
Types and their features
There are 4 types of compressors:
- Membrane. The membrane is made of rubber or rubberized paper. The clear advantages are its low cost and compactness. Short operating life and noise spoil the impression of such a device.
- Piston. The most popular type. It is used by both amateurs and professionals. It works due to the movement of pistons that pump air into the receiver. It is very noisy, but at the same time has good performance and is inexpensive to maintain. There are two types: oil-free and oil-based. The former operate without lubrication, which makes the device light and cheap, but reduces its operating time. The latter operate on lubricant, which needs to be changed periodically, but at the same time they can boast of their performance and reliability.
- Screw. The devices are quite quiet, reliable, and can provide long-term continuous operation. Their main drawback is their high price. It is the cost of maintenance that most often becomes the reason why craftsmen choose piston devices.
- Mini compressor. It is oil-free and tankless. This is a very convenient option for artists working with small details or paintings no larger than an A4 sheet. Also suitable for painters who create outdoors or in confined spaces. It works quietly, has one pressure mode, but overheats very quickly.
Main types of compressors
It is quite difficult to choose a mini compressor. These airbrush devices come in many varieties. Moreover, each has its own positive and negative sides. Before you start making your own spray guns, you need to get acquainted with their main types.
- Membrane. One of the advantages is low cost. Due to the oscillation of the membrane, air is supplied. This type is ideal for carrying out small jobs that require a short period of time. Each model is capable of creating a specific pressure, which reaches a maximum of 3.5 atmospheres. Air is pumped at a low speed, so only one airbrush can be connected to the device. The design of the device may contribute to the occurrence of pressure surges. At first, the pressure is minimal, but gradually it increases, which negatively affects the painting and its quality.
- Piston. This type of compressor, used in airbrushing, is considered the most productive. Pressure is created by a piston moving in the cylinder. The mini compressor is compact and very easy to maintain. Since the power of such a device is quite high, it becomes possible to connect several airbrushes at once.
- Oil-free piston. The main advantage is the absence of mandatory maintenance. The air leaving the device does not contain gas vapors or toxic oils.
- Special mini compressor. These compressors can be of two types:
- oil-free;
- non-resistive.
The device is connected to the mains and operates with a pressure of no more than 1.6 atm. Its productivity reaches 6 l/min. The generated power is quite enough to draw a picture on an A3 sheet. This type of spray gun is used by artists who have to work in a small space.
Even with a single mode, the mini compressor has one characteristic advantage. It does not create any noise during operation. Its negative side is the inability to change the pressure, in addition, it heats up very quickly. Therefore, you need to often turn off the device and wait for it to cool completely.
The mini compressor for airbrushing, made in Japan, is highly reliable. Each of these models has a separate receiver adjustment, you can adjust the desired pressure. Safety is ensured by an emergency valve that abruptly releases the pressure if it exceeds the maximum values.
Return to contents
To make your own compressor for airbrushing, it is enough to take a working compressor designed for a refrigerator. It is desirable that the device be imported. Such devices are highly economical and create minimal noise during operation.
This compressor will have pressure regulation. It is equipped with a separate receiver. Production will require small financial investments.
It is best to take the compressor from a non-working refrigerator. It must be carefully removed from the mount. No need to saw through the tubes. Possible accidental entry of chips. Together with the compressor, you need to remove the operating relay.
Then to complete the work you will need to have:
- receiver tank;
- emergency valve;
- pressure gauge;
- pressure switch.
A hydraulic accumulator with a capacity of 24 liters can be used as a tank. The relay should measure pressure within 2.8 bar. Basically, it will remain operational even when it reaches six bar.
A pressure gauge and emergency valve will be needed in case of automation failure. Devices need to be purchased based on the response pressure indicator. If necessary, you can relieve the pressure yourself: just turn the regulator knob.
To connect all the parts, you must have:
- fittings;
- clamps;
- adapters;
- check valve;
- fuel filter;
- hoses;
- sealant;
- plywood;
- oil/water separator;
- welding machine;
- reducer regulating outlet pressure;
- nuts and bolts.
Before starting assembly work, it is necessary to change the compressor oil. For this purpose, a tube is soldered through which the old oil is drained and new oil is poured. The tube is sealed by a sealant.
After that, a sheet of thick plywood is taken, to which the following is mounted using bolts and nuts:
- oil/water separator;
- compressor;
- trigger relay;
- receiver tank.
The inlet tube is equipped with a special filter. Another filter is installed between the receiver tank and the attached airbrush compressor. A check valve is installed at the inlet, and a connection relay is installed below. All connections are treated with silicone sealant. When connecting the relay, you must punctually follow the attached instructions.
Decorative painting of a car and applying designs to body parts are complex, specific tasks. To solve them, it is necessary to use a professional set of equipment with high quality and stable operation. To apply paint you will need a blower as well as a quality paint gun. In this case, we are talking about an airbrush, which helps to apply paint with precise boundaries, repeating a pre-prepared layout. Considering the high cost of a set of equipment, many people prefer to assemble a homemade compressor for painting a car and applying drawings to parts.
This is quite complex equipment, but the principle of its operation is found quite often in everyday life. Many industrial and household tools and household appliances operate on the principle of air injection. Therefore, you can create a good compressor with your own hands quite simply and inexpensively. But first, research the market. It is quite possible that you can afford to buy all the equipment for your airbrush and not have to spend time and your own labor on a DIY project. It will be easier and faster for the buyer himself.
Today, many potential specialists are wondering how to make a compressor for an airbrush with their own hands. Using old compressor equipment, you can create all the necessary technical means yourself. But the problem is that a product made by yourself is unlikely to be able to work in professional modes. Let's first decide what costs for a compressor will be worthwhile. There are several different areas to consider:
- an air blower for a home airbrush and for amateur purposes should not cost more than 2-3 thousand rubles;
- when assembling the tool yourself for more professional painting, you should set a limit of 5 thousand rubles;
- the compressor unit for the airbrush at the station has a ceiling of 15-16 thousand rubles when assembled;
- an industrial device with a long resource can cost up to 30,000 rubles to create;
- a comprehensive universal installation for painting and drawing will cost up to 100,000 rubles.
If your calculations are beyond this budget, a homemade airbrush compressor will not be a profitable solution. The problem is that many people buy all the necessary equipment and decide that it will be much more profitable to assemble everything themselves. But in reality, such DIY work results in the simplest compressor, which does not always fulfill all the requirements and conditions of a good airbrush. So before assembling, you should calculate all the financial costs yourself.
What paint to use
The choice of airbrush paint depends on the surface on which the design needs to be applied and the conditions in which it will be located. For example, you shouldn’t use watercolors to airbrush a car, and you shouldn’t do a drawing on paper with nitro paint. Let's look at some types of paints for use in airbrushing:
- Acrylic paints are used in two types - solvent and water-based. The former are diluted with special solvents and are quite toxic. When working with them, it is necessary to use personal protective equipment - a respirator and gloves. This type is not recommended for beginners. Water-acrylic paint is used to apply designs on fabric, walls, and is also used to paint plastic models. It is non-toxic, easy to use and environmentally friendly. It can be diluted with water, vodka or alcohol - depending on the manufacturer.
- Water-based polyurethane paint. Used for drawings on paper and for manicure airbrushing. It is non-toxic, odorless and dries quickly - the next layer can be applied in 2-3 minutes, and final drying occurs within 30 minutes. This creates a smooth and elastic semi-matte coating. The paint is diluted with a water-alcohol solution or proprietary thinners.
- Nitroenamel is very popular in automotive airbrushing. It is used to apply designs on cars, motorcycles, and various accessories. This type of paint has its pros and cons. Working with it is somewhat more difficult, but you can get a variety of effects that are unattainable when working with acrylic. A significant disadvantage of nitro enamel is its toxicity. When painting, personal protective equipment is required, and the work area must be equipped with ventilation.
- Watercolor is a paint familiar to everyone since childhood. It is perfect for working on paper and plaster. It is non-toxic, mixes well, forming a variety of shades, sprays well, and is easily diluted with water. It is recommended to start airbrush classes with watercolors.
What can a compressor be made of for airbrush purposes?
Proper painting is impossible if your device does not create constant pressure. Products with an air injection tank will require several important sensors. If the pressure sensors do not work well, all the DIY work will be useless. To paint with an airbrush, you should use the following technology for assembling a compressor device:
- the air blower itself can be stolen from an old refrigerator that is no longer needed on the household;
- you will also have to organize a receiver (a tank for air pressure), this could be a membrane tank of a pumping station;
- It is important to install a pressure gauge and a pressure switch on the tank to automatically turn off air pumping;
- you will have to choose your own set of adapters and fittings for connection, since the set will be individual;
- You will also need hoses that are resistant to pressure and aggressive environments such as paint and solvents;
- The last stage will be connecting and checking all the work done, connecting the airbrush.
After this, high-quality painting of car parts with your own hands is possible. The outlet pressure can be small; for airbrushing you will need a maximum of 2.5 atmospheres, so all of the above equipment is perfect. You can use other types of devices that you have available. Such a do-it-yourself airbrush compressor will serve and work for quite a long time and without unnecessary breakdowns.
Cleaning the airbrush after use
After finishing work, you must thoroughly clean the airbrush of any remaining paint. To do this, first pour the solvent into the tank and rinse it well, then carefully pull out and wipe the needle. To clean the internal surfaces of the nozzle and small parts, use cotton swabs soaked in solvent. After cleaning all parts, the device is assembled and blown well with compressed air. Remember that proper cleaning and regular lubrication of rubbing parts will extend the life of your airbrush for a long time!
How much would it cost to build a supercharger like this?
The issue of cost greatly depends on what you have available. You can quite easily find an old refrigerator at your dacha (at least, buy it from your neighbor in your dacha for a couple of hundred). You can also find a very cheap membrane tank for the receiver on the classifieds website. You will have to buy new hoses and connectors, but relays and sensors will be the biggest expense. The calculation will be individual for everyone, and we will perform an approximate calculation:
- Compressor - you can and should use a used version (200 rubles).
- Receiver - we buy an old rusty tank and bring it to condition with our own hands (200 rubles).
- Connectors - here everyone will have their own set, you need good materials (1000 rubles).
- Sensors and relays - the set will also be individual, so the cost is different (300 rubles).
- Airbrush and other accessories for work - a completely individual budget.
Since we are talking directly about pumping equipment for painting, the airbrush itself can be overlooked. In total, it turns out that for 1,700 rubles you can create a completely functional and high-quality supercharger with good settings for airbrushing. You can also make a compressor for painting a car completely in a similar way, but the pressure in this case should be higher.
Compare the cost with new painting devices
As an alternative, you can theoretically find a compressor device on the market for the same money. But this will be a Chinese-made device, without a receiver, with a maximum capacity of 10 liters per hour. You will have to replace the hoses soon, and it also makes sense to change many other parts.
As a result, paying a couple of thousand rubles will be only the beginning of your costs. If you decide to buy a device for painting work, you should give preference to a high-quality and reliable equipment option. This will cost many times more than assembling compressor equipment from scrap materials. Therefore, self-assembly is still a relevant and profitable task.
Conclusion
You can buy an airbrush for painting work or make it yourself. The choice of approach will depend on the goals, capabilities and abilities of the individual.
It is hardly possible to make a beautiful drawing with thin lines on the hood or fender of a car, paint small items, or create body art with a homemade device. For such purposes, it is better to choose a budget model of a ready-made device.
For painting toys, models, small equipment and parts without elegant elements, a homemade airbrush on a tire pump is quite suitable. Refrigeration compressors will allow you to obtain more powerful units. But even with a homemade high-pressure airbrush, you shouldn’t start painting your car right away. The first experiment may fail. It is better to gain skills from the example of old cars or other large equipment.
In conclusion, another option, from a car compressor
In general, a handmade airbrush with a homemade compressor is not a bad option for people with a steady hand and technical savvy. It is quite suitable for household purposes and to satisfy the desire to try the operation of an airbrush.