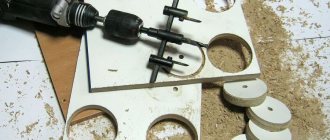
When laying communications, installing lighting fixtures or installing household appliances, it is almost always necessary to drill round holes of large diameters in walls, ceilings or interior items. A comfortable ballerina drill will be a good helper in your work.
You can drill a small diameter hole (10-12 mm) in the surface using a simple electric drill. But even when trying to cut large diameter holes in the working surface, even a metal drill begins to vibrate and deviate from the vertical axis.
Specifications
To obtain a high-quality hole of the required size in such cases, you will need a special tool - a ballerina (round drill).
| Tool Options | Parameter values |
| Tool weight | 0.1-0.110 kg |
| Length | 90-120 mm |
| Shank type | Cylindrical |
| Shank length | 8-9 mm |
| Maximum outer circle diameter | 140-160 mm |
| Minimum outer circle diameter | 20-30 mm |
| Diameter of support bar | 7 mm |
| Working surface processing depth | 30 mm |
| Number of working cycles (for ballerina on tiles) | 30-40 |
Characteristics of metal for drill
The ballerina is made of high-quality carbon (tool) steel, which does not contain alloying additives or impurities. Carbon steel is used for the manufacture of high-strength static cutting tools that experience significant mechanical and physical stress.
The properties of carbon steel provide the ballerina with the following characteristics:
| Characteristic | Content |
| Hardness | Ensures that the drill remains in a vertical position when working with it |
| Strength | Ensures uninterrupted operation of the ballerina when drilling deep layers of the working surface |
| Cyclic strength | Maintains performance characteristics after repeated use |
| Plastic | Possibility of adjusting cutters |
| Heat resistance | Possibility of maintaining the working qualities of the tool when drilling at high speeds and heating |
| Wear resistance | Long tool life and resistance to corrosion processes |
Characteristics of a metal drill
The ballerina allows craftsmen to work with metal surfaces (steel, cast iron, brass, aluminum, bronze) up to 14 mm thick. Using this type of drill, mounted in a drill or in a tabletop drilling machine, you can cut a hole with a radius of 22-105 mm in a metal surface.
Drilling tiles for a socket or pipe
How to drill tiles, what tools can be used for this?
Drilling with a hammer drill with a diamond-coated crown installed
The cost of diamond-coated crowns depends directly on their quality, but it is still an expensive pleasure.
- Before drilling into a tile, it must be placed on a flat, not very hard surface (possibly wood).
- Mark the drilling location on the front side of the tile.
- Using a hammer drill, drill a hole of the required size.
This method is the fastest and safest.
Drilling with a diamond bit
How to drill tiles correctly?
You need to do the following:
- Mark the location for the hole.
- Drill into the face of the tile without pressing too hard on the drill.
- If the diamond-coated crown is in good condition, you can make a hole of the required diameter in two to five minutes.
Drilling tiles with a drill
Drilling with a circular tile drill – “ballerina”
How to drill tiles if you need to drill a hole of a non-standard size?
- Set the desired hole diameter (for example, if it is 5 cm, then the distance between the drills must be set to 2.5 cm).
- Mark the drilling location.
- Start drilling the tile.
Advice: you cannot swing the drill while drilling; you can use a special tripod for the drill.
Drilling with a drill with a diamond tip installed
This method can be used in cases where it is not possible to purchase a crown.
How to drill tiles?
- On the front side of the tile, mark the diameter of the desired hole. If it is a switch or socket, then you can take a box of a certain size, attach it to the tile and trace it with a pencil. If the hole is for a water pipe, then you can use a compass.
- Drill a drill along the entire contour of the hole so that the edge protrudes beyond the intended line by at least 1-2 mm (up to 20 holes 4-6 mm in diameter).
- Carefully knock out the core.
- The remaining teeth must be broken out with wire cutters or pliers.
- Sand the cut surface.
This method is the longest and requires a lot of patience and skill.
Drilling along the contour
Drilling with a tungsten core bit and a center drill
This method is suitable when the tiles have already been laid.
- To prevent the crown from slipping or moving during the drilling process, it is advisable to use a special template with the required hole diameter.
- Press the template against the wall.
- Press down with a drill and make a hole.
Drilling ceramic tiles is a rather difficult task for many people, because they do not know how and what to drill into tiles.
Most often you have to drill through tiles that have already been laid on a wall or floor, so you have to act carefully so as not to damage the entire masonry. The main thing is to select the right drill, which is better than others for the intended purpose. When the walls in the bathroom and toilet shine with brand new tiles, it’s a pleasure to look at them
But the renovation is not finished yet - we need to hang the shelves and fix the mirror. But not everyone knows how to drill ceramic tiles correctly to prevent accidental chips. Alas, fragile ceramics are very easy to damage, and then a wonderful repair will go down the drain. In order not to rack your brains about where to get tiles to replace damaged ones, you need to know how to work with them. Read more about it
When the walls in the bathroom and toilet shine with brand new tiles, it’s a pleasure to look at them. But the renovation is not finished yet - we need to hang the shelves and fix the mirror. But not everyone knows how to drill ceramic tiles correctly to prevent accidental chips. Alas, fragile ceramics are very easy to damage, and then a wonderful repair will go down the drain. In order not to rack your brains about where to get tiles to replace damaged ones, you need to know how to work with them. Read about it further.
Adjustable tool overview
Ballerina – adjustable drill. One of its structural elements is a bracket with a scale printed on it. With its help, you can independently set the required diameter. And in a three-cut drill, the cutting elements move synchronously along special grooves.
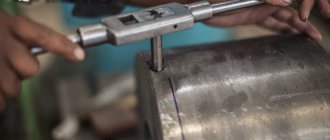
Before starting work (drilling), it is necessary to set both cutters at the same distance from the central hole.
Criterias of choice
Before choosing a “ballerina”, you need to know its main advantages over other devices for cutting large holes, be it crowns, jigsaws, etc.
Advantages of adjustable circular devices:
- the ability to replace the central drill or lateral incisors at any time;
- reliability of design;
- if necessary, cutting elements can be sharpened;
- adjustable hole width.
Now let's look at the parameters you need to pay attention to when purchasing
- Reliability. It is unlikely that you will be able to determine this criterion visually, so it would be better to check the quality certificates for the products from the seller. For low-quality goods, they most likely will not be available.
- Workmanship. Before purchasing, you need to carefully inspect the device for shells, chips and other flaws. The cutters must be well and accurately sharpened. If the drill is very long, then you need to check whether it is even. Usually these defects are visible immediately and by eye.
- Package. Quality products from well-known manufacturers usually come with bright and good packaging. There will be no grammatical errors in the text accompaniment. None of the well-known brands can afford to package their products poorly.
- Price. Cost can also be considered an indicator of quality. Inexpensive models last a very short time.
Famous brands care about their reputation, and their products will meet all quality criteria. Therefore, it is better to contact official dealers so that the money is not wasted.
The following video talks about the ballerina drill.
Ballerina design
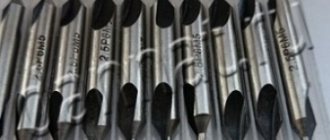
- Centering drill.
- Working incisors (from one to three)
The main drill can be firmly fixed on the work surface (drilled) and prevent the tool from slipping when working with tiles or laminated surfaces. The cutters move in a circle and cut a groove in the working surface. The drill is driven using power tools (drill, machine, hammer drill) or manually (using a brace).
A tool with replaceable cutters is used to work with surfaces of varying strengths - from soft plastic to porcelain stoneware. The master can independently set the working cutters to obtain a hole of a given diameter. This operation can be performed using an adjustable wood ballerina.
Features of the device
The design of the device is simple, reliable and high-performance. A circular drill, or ballerina drill for cutting gaskets, consists of a central drill with a groove, a round or triangular shank, two carriages and cutters located on the arms of the bracket.
The purpose of the drill is to mark the center for the hole and provide support for the device during rotation. There are special markings on the bracket rod for installing the sliding carriage in the desired position. The cutters are fixed with screws, and the spread of the working edges is checked with a caliper.
A distinctive feature of a ballerina with one knife is the asymmetrical design and a noticeable lever that counteracts rotation, creating a high range of oscillation of the instrument. For this reason, experts recommend using the device on a stationary drilling machine. This will help prevent the work material from falling off and protect the worker.
The best option when working with a drill, screwdriver, hammer drill or rotary hammer is a system of two cutters that compensate each other in terms of balance during rotation. The disadvantage of the design is the rapid heating of the cutting part; the drill must cool down several times during the task. To maintain the functionality of the tool, it is recommended to maintain an operating mode ranging from 1000 to 1400 rpm.
Types of ballerinas
To work with materials of different densities and structures - soft and hard wood, plastic, plasterboard, concrete, stone, brick, porcelain stoneware - drills made from various grades of steel and having special designs are used.
For woodworking
You can drill a large diameter hole in a wooden surface using a 200 mm wood ballerina.
Before you start drilling in a wooden surface (especially laminated or veneered), you need to make a shallow hole with an awl. This will allow you to accurately comply with the specified dimensions. Drill at low or medium speeds (1000-1200 rpm) to avoid chipping at the exit (if necessary, drill a through hole).
To work with hard wood, use wood ballerina 40 (300). In some cases (hardwoods) a wood ballerina with a diameter of 30 200 mm mk is used (category Strong -stk, 057)
Drilling drywall
The design of the ballerina on plasterboard includes a centering tip and a rod attached above. The rod mount can rotate around its own axis.
At one end of the rod there is a disk cutter. It easily withstands several drilling cycles, holds tightly to the rod during operation and does not require sharpening for a long time.
For tiles
To drill hard tiles, a tile ballerina is used. The main difficulty in performing this operation is the need to cut through the glazed coating.
Immediately after this, experienced craftsmen advise drilling a groove on the back side of the tile. And then complete the drilling from the front side. For ballerinas on tiles 300 (057), a pobedit tip is often used, with which you can cut neat holes.
It is recommended to start working with a ballerina drill on tiles at low speeds (about 1000 rpm). And lubricate the drawn contour of the future hole with machine oil.
For porcelain stoneware
Porcelain stoneware is a very hard material. Working with him is always a difficult task. If it is necessary to cut a hole in porcelain stoneware, a ballerina with special cutting edges and a diamond tip is used. Its use extends the service life of the tool and significantly increases the speed of the operation.
On ceramics
When using a ballerina when working with ceramics, you should apply minimal physical effort. Ceramics is a fragile material. And even slight vibration can lead to cracks and chips. To avoid this, drilling should be carried out at low speeds (about 1000 rpm). Typically, diamond-coated tips are used for work.
For metal
A metal-cutting tool that makes it possible to obtain a hole with a diameter of 40-150 mm in sheet iron is a metal drill. Before starting the operation, a depression (up to 9 mm) is made in the center of the required cutout. It will be possible to install and securely fix the central axis of the ballerina.
For cutting gaskets
Car enthusiasts often encounter wear on the oil pump and overdrive gaskets. Of course, you can order and buy a new one in auto supply stores and online stores. But even in a home workshop, with the help of a ballerina, you can cut out a gasket from paronite. You need to have a sheet of paronite 0.5 mm thick, a measuring tool (ruler, tape), glue, several blades for stationery knives and a marker for marking. Place the worn gasket on the paronite sheet, glue it (without drying the glue) and trace along the contour.
To cut out the gasket along the outer and inner contours, a wood ballerina is used. Internal holes and grooves are cut with blades and finished with a round file or sandpaper.
For plastic
Plastic is a soft material and can be easily processed. But there is always a danger of cracking of the working surface. Therefore, when drilling plastic, you should not use much physical effort.
This material is quickly exposed to high temperatures and melts. It is necessary to work with it at low drill speeds (about 1000 rpm).
Compass ballerina
This type of drill is used for working with tiled surfaces. The design of the instrument includes:
- The pen tip acts as the main axis.
- Movable part (fastening mechanism, extension lever, cutting edge).
The cutting edge should be 5-8 mm shorter than the pen tip. This is due to the difficulty of processing tiles (there is a danger of the drill slipping).
You can use masking tape (adhesive tape) to firmly hold the markings. It also improves the adhesion of the drill to the surface, allowing it to be fixed on the drilling axis and make a central recess.
Due to the difficulties with sharpening a cutter made of hard alloys at home, a compass is considered a disposable tool. However, you can find sales of drills with replaceable bits.
Types by number of incisors
On sale you can find three types of drills, differing in the number of working cutters. A special bracket with a perpendicular tightening screw has a single-cut drill. Before starting the operation, the working cutter is simply set to a given length and tightened with a screw.
But in a double-cut ballerina, the bolts for fastening are located on the holders of the working cutters. The master sets them at the same distance from the central axis before starting work. The most complex design is a circular tile drill with three cutters. They are fixed on a circular platform and are aligned when moving along the grooves provided for this purpose.
Basic principles of drilling holes in ceramics
The tile does not have plasticity, it cannot be bent, so it is problematic to drill.
When drilling, consider the following:
At first there are only small revolutions, then they gradually increase. You can only work with a tool that has a speed control. If you are drilling with a drill, make sure you turn off the jackhammer function
If you don't do this, expect cracked tiles. Apply optimal pressure on the tool: enough to drill through the glaze layer and ceramic, but not too much so that it cracks. Important condition: the tile and tool should not overheat. Wet the surface and the tile drill with water.
Check the strength of the base: the tiles must be securely fixed, the glue underneath must dry and harden. There should be no voids under the tiles: tap the ceramics. If the sound is booming, there is emptiness there, so it is not advisable to drill here.
Drilling small holes
Small holes are made for dowels, onto which shelves, hangers, hooks, etc. will then be attached.
Make markings. A pencil doesn't write well on ceramics, so it's better to use a marker.
Please note: Make the markings on top of the masking tape. This way the mark will be clearly visible, and the tape will serve as a kind of fixation for the drill at the beginning of work
The tape will secure the drill bit so it doesn't jump off and scratch the icing.
- The glaze and the top layer of ceramics are passed at low speeds. Apply gentle pressure to the tool, remembering that too much pressure will cause the tile to crack.
- Gradually increase the speed until you feel the drill go through the ceramic.
- You need to drill to the length of the dowel so that it can be securely driven into the base.
- Once you've gone through the ceramic layer, replace the tile drill bit with a brick or concrete drill bit. There is no need to dull an expensive ceramic drill bit on brick or concrete.
Which tool to use
- Drill with speed control. Remember to adjust the speed to avoid damaging the tiles.
- A screwdriver with a rotation speed of at least 800-1000 rpm.
To work with ceramics, it is better to use special spear-shaped drills. In common parlance they are called “feathers”. Such “feathers” easily bite into ceramics, and the pobedite tip will serve you for a long time.
Buy a diamond drill bit for porcelain tiles. Porcelain stoneware has greater density and strength, so you will need a hard alloy and a sharp tip. Diamond drills have these qualities. A regular concrete drill is suitable for working with ceramics. It must be made of hard alloy and have a pobedite tip.
You need to work carefully and carefully, but you can drill a few holes anyway
Large holes
How to arrange a hole for a meter, mixer or pipes? Drills and crowns with diamond coating. Kits with crowns of various diameters are sold, so you can choose which diameter you need.
When working with diamond core bits, do not forget to wet the tile and tool with water, because overheating will wear off the diamond coating faster.
It is better to buy crowns with a centering drill. Otherwise, it will be difficult to control the crown and it will slip on the tile.
But small crowns do not have a centering drill. In this case, you need to work carefully and slowly. There are jigs on sale - devices for fixing crowns.
- Crown with pobedite teeth. There are different diameters, but up to a maximum of 15 cm, so you get holes for pipes, for a mixer or socket. The pobedit analogue of diamond coating will not last long; after 10-15 holes, the crown can be thrown away. But the affordable price encourages some to buy such crowns. You need to work with them carefully so that the edges are as smooth and neat as possible.
- Ballerina. Old fashioned but practical. In the tail part of the ballerina there is a bracket with which you can adjust the diameter of the hole. A spear or cylinder tile drill bit will go through the ceramic and make a clean hole. The advantage of the tool is that it is handmade, which makes it possible to regulate the speed of rotation. The cheapness of the ballerina allows every novice master to have one.
Making a ballerina cutter
A ballerina drill significantly saves time when processing (milling) the contours of a cut hole. Processing is carried out automatically using power tools (drill, hammer drill).
Therefore, the physical effort expended when working with a ballerina is also insignificant. Given these advantages, home craftsmen want to have such a tool in their workshop. Moreover, making a ballerina with your own hands is not at all difficult for a competent craftsman.
For this you will need materials:
- Working (metal) plate with dimensions 200x25x4-6 mm.
- Bolts: M8 grade - 2 pieces (in addition to them you need to take 2 nuts and 4 washers) and M10 grade - 1 piece (in addition to them you need to take 2 nuts and 1 washer).
To work you will need tools:
- To mark the work surface: a marker and a ruler with centimeter divisions.
- Painting tape.
- Stationary machine or power tools (hammer, drill).
- Vise.
- File.
- Kern.
- Grinder equipped with grinding and cutting discs.
- Drills for metal with a diameter from 9 mm to 10.5 mm.
- Keys: open-end and adjustable.
- Screw clamps.
Step-by-step instructions on how to make it yourself
- Marking and processing of the work plate.
- Creation and processing of working grooves.
- Manufacturing of cutters.
- Connection of cutters to the working plate.
- Marking (gradation) of the finished drill.
- At the first stage, we cut a 20 cm long strip from the metal sheet. This will be the basis of the tool being created.
- Using a drill with a diameter of 10.5 mm, we drill a through hole on the machine in the pre-punched center of the work plate.
- Stepping back 1 cm from the drilled hole to the edges of the working plate (at the same level as the central hole), we make marks (punch) on the plate for future drilling.
- The distance between the marks must exceed the diameter of the holes that will subsequently be drilled. This precaution will help preserve the drill.
- Using a grinder cutting disc, you need to create two oblong grooves by combining the existing holes. The working plate is in a vice during this operation.
- Using a file (square or flat), we process the resulting holes. The free movement of the incisors will depend on the thoroughness of this operation (we remove irregularities, hangnails, and tubercles).
- Pressing the work plate tightly against the table (we use clamps or a vice), we smooth out all the irregularities and sharp corners with a grinding disc. We insert an M10 bolt into the central hole and screw one of the nuts onto it from the reverse side.
- We put the second nut (lock nut) on it and press it tightly using an open-end (or adjustable) wrench. To make the cutters, we wrap the upper parts of the M8 bolts with masking tape. We fix the bolt heads in a vice.
- Using a grinder's grinding disc, we cut off the thread, processing the bolt on both sides until a metal handle 4-5 mm thick is formed.
- The pointed ends of the bolt, shaped like a one-sided hook, will serve as the working cutters of the drill. The resulting cutters must be inserted into the grooves, having previously been laid with washers on both sides.
- This will increase the area of their contact with the working plate.
- The rod of the future tool and the cutters should be located in opposite directions. The thread sections remaining on the side surfaces of the bolts will allow you to screw on the nuts and secure the cutters tightly.
- Using a ruler and a marker, we mark the entire plane of the working plate, making marks every 0.5 cm. Later on these marks it is necessary to make notches that will be clearly visible during operation.
Drilling technique
The purposes of drilling tiles can be very different - from creating a small hole for a screw to drilling an entire circle for a pipe or socket.
Large holes
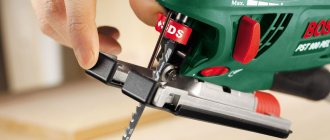
The best option for creating capacious perforation is to use a ballerina with a tip of the required diameter. It is recommended to first practice on waste tiles in order to “feel” the tool. If a ballerina is not at hand, a hole saw will come to the rescue, which even an owner inexperienced in construction can successfully handle.
Another method of drilling step by step:
- Mark the center of the planned hole and draw a circle of the required diameter.
- Using any tile drill, make several holes along the diameter of the circle, trying to place them close to each other.
- The drilled sectors are carefully pressed, and the remaining pieces are removed with wire cutters.
- The edges are sanded to give the correct shape.
Small holes
Step-by-step instruction:
- Marks are placed on the surface of the ceramic for the hole.
- To prevent the drill from slipping, stick masking tape or lightly chip off the enamel in the center of the future hole.
- Disable the impact mode function on the drill and connect the device to the network.
- Place the drill at an angle of 90° to the tile and start drilling at low speed.
- Gradually the speed is increased, punching the tile to the very base.
- Change the drill to a new one, suitable for the type of wall base (concrete, brick, wood) and continue drilling to the required depth.
The diameter of the second drill should not exceed the size of the first, otherwise the tile will be damaged.
Advantages and disadvantages
Working with a ballerina is not particularly difficult for a home craftsman. However, even when using a three-cut drill, special skills are required.
| Advantages | Flaws |
| Saves time when you need to make a large diameter hole Exact compliance with specified dimensions Carefully processing the contour of the drilled hole Saving physical strength | Possibility of vibration when working with a single-tip drill Wear and destruction of cutters Clamp screw breakage The need to take breaks during work, which prevents overheating of the nozzle |
Choosing equipment
This tool can be used to install various types of attachments designed for ceramic tiles and porcelain stoneware:
Feather on tiles
A special drill for ceramics, the tip of which has the shape of a spear with two blades. For drilling holes for dowels at home, this is one of the best options (provided that the amount of work is small). The convenience of the pen is that it does not require preliminary punching due to its sharpness. Provides high safety of the material.
The downside is the low resource: on tiles the pen will be enough for a couple of dozen holes, on porcelain tiles it will be possible to drill no more than 10 times.
If you have to “pull out” everything that is possible from the pen on the tile, drill at low speed - this will preserve the coating and prevent overheating. It would also be a good idea to use water for cooling.
Expert opinion Mezentsev Sergey Petrovich Master of repair and finishing of residential premises
On a note. The simplest water cooler can be made in a matter of minutes from scrap materials - a PET drink bottle and a plastic juice or cola straw. A hole is drilled or pierced in the lid into which the tube is inserted. The joint is treated with glue, sealant, plasticine or even used chewing gum. When pressing on the bottle, the jet is directed using a tube to the drilling site.
Concrete drill
Unlike a drill, a drill has fairly blunt blades, the purpose of which is to chisel, not drill.
However, this will not work with tiles - we switch the hammer drill to non-impact mode and, little by little, applying force, we begin to drill a hole in the tile or porcelain stoneware.
It may take a lot of time, but it is better not to increase the pressure. After passing through the ceramic material, hammer drilling is started again.
Tubular drill
It is used in cases where a hole needs to be made of medium diameter - from 8 to 20 mm. A tubular drill is a kind of hybrid of standard drill equipment and a miniature elongated bit.
It has a cutting edge coated with abrasive, as well as a window for removing crushed material. A tubular drill also requires cooling - in this case it will last much longer.
Due to alignment difficulties when working with a tubular tile drill, it is advisable to use a template or jig.
Ballerina
Under this beautiful name, a circular drill appears among craftsmen. This is a standard feather base, located in the center and clamped in a chuck, as well as a side cutter, which is moved back and fixed at the desired distance from the center.
The equipment works on the principle of a compass - the side cutter outlines a circle as it rotates.
It is advisable to use a ballerina for drilling large holes in tiles. It is not suitable for porcelain stoneware - it is too hard.
Precautionary measures
- All parts of clothing (work apron, robe, shirt cuffs) must be secured (tied, buttoned).
- To prevent metal shavings and dust from getting into your eyes, you must wear work glasses.
- It is advisable to tuck long hair under a cap (beret, bandana).
- Rotating parts of drills and power tools (machine) must be securely fastened.
- It is advisable to use a ballerina equipped with a protective grille.
The working surface should be less hard than the steel from which the drill is made. Bring the already rotating drill to the surface. These tips will help extend the life of your tool.
How to choose the right one
When purchasing a drill, be sure to evaluate the configuration of the ballerina. Three-cut drills are considered the most reliable and in demand.
They have good mounting screws that firmly secure the working cutters. The length of the working cutters should be 4-5 mm less than the length of the centering cutter.
Some models use standard clamps to secure the incisors. They require a Phillips screwdriver and are much less reliable than models with hex screws.
- For drilling tiles, it is better to choose a ballerina with two incisors. With its help, you can make a hole with a diameter of up to 160 mm, whereas when working with a single-cut tool, the maximum diameter will be only 120 mm.
- A double-sided wood ballerina will allow you to make a hole with a diameter of up to 300 mm. And for working with thin (less than 5 mm) sheets of wood, a special drill is included in the kit.
- To work with hard surfaces (metal, porcelain stoneware, stone), use a one-sided ballerina. Before drilling begins, its central axis is securely clamped in the drill chuck.
On the brackets of branded ballerina models there is a ruler with clearly visible divisions. As a rule, the movement of the cutters is carried out synchronously. You should also pay attention to the width of the incisor run (it can be up to 150 mm). This parameter determines the radius of the future hole. Usually, the quality of the working surface (wood, metal, tile) is taken into account when choosing the permissible width of the cutters.
Some models are equipped with a protective plastic grid that holds large sawdust.
What is required for drilling
An electric drill or screwdriver will be needed in any case.
When choosing a drill, it is important to pay attention to whether the intensity of rotation can be adjusted. The higher the speed, the more difficult it will be to achieve a quality result. The ideal mode for drilling tiles is low speed, i.e.
low rotation speed of the drill. For screwdrivers, this indicator is at the optimal level, so there are no problems, but not every tool is able to withstand long-term loads. To make large holes, it is better to use a drill. For a low-speed drill, you will need a set of cutting and measuring tools. For marking you will need:
The ideal mode for drilling tiles is low speed, i.e. low rotation speed of the drill. For screwdrivers, this indicator is at the optimal level, so there are no problems, but not every tool is able to withstand long-term loads. To make large holes, it is better to use a drill. For a low-speed drill, you will need a set of cutting and measuring tools. For marking you will need:
- square, to maintain a right angle;
- tape measure to accurately transfer specified dimensions;
- a pencil, or better yet a marker, for making marks on the glossy surface of the tile;
- building level to achieve perfect horizontal or vertical lines;
- masking tape.
The selection of cutting tools depends on the tile material, size and number of holes. A couple of holes can be made even with not the most suitable tool. If you need to drill a lot, then it is better to stock up on the necessary materials and tools in advance.
Choosing a drill or auger
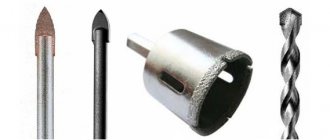
Tile is a hard surface material that requires special tools to process. These are different types of drills:
- with carbide tipped;
- with diamond-coated spear-shaped;
- crown (diamond-coated tube);
- drill with SDS shank (for hammer drill).
The most affordable option is a carbide-tipped pen drill. When sharpened, it copes with the task quite well, but “shrinks” quickly and requires periodic sharpening. Poor contact with concrete and metal.
A spear-shaped drill with two or four edges is more expensive due to diamond coating, but also lasts longer. It is used for drilling ceramics and glass.
A tube-shaped drill with a diamond edge (crown) is most often used for drilling porcelain stoneware. Such a tool has a minimal cutting area, makes the process easier, but requires some skill. The tube is thin-walled and can be easily damaged if excessive force is applied. But diamond coating can cut any materials.
If the only power tool you have is a hammer drill, then you can make a hole in the tile using a drill with an SDS shank. This is an extreme case that requires more effort.
The diameter of the drill must correspond to the size of the dowel for which the hole is made.
What other tools can you use?
It happens that you need to make a large hole. What to do in this case? A ballerina drill will help here. This is a device equipped with a central (axial) drill and carbide cutters that can be adjusted to the required size. This is a universal tool, since each “ballerina” has its own range of possible drilling sizes.
A carbide cutter does not have such flexibility in size. Here the diameter is fixed. As a rule, cutters have standard (the most popular) dimensions, so they are often sold in sets.
When the tiles have not yet been glued to the wall, but you need to make a large hole, you can use a hacksaw. To do this, you will need a tungsten-coated cloth.
Other tools used for the same purposes
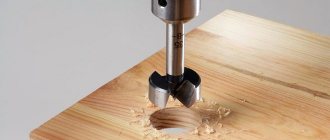
Craftsmen can use several more tools to produce large-diameter holes. When drilling wooden surfaces (the diameter of the required hole exceeds 25 mm), you can use a Faustner drill.
Unlike a ballerina, it has a number of disadvantages:
- A large contact area with the working surface is accompanied by strong heating of the drill.
- It is difficult to align the central tip with the applied markings, because only the outer circle with the working incisors is visible.
- The Fostner drill bit is primarily intended for drilling blind holes (to hide the head of a nail if necessary).
- High price (due to the high heat resistance of the drill).
A hole saw is useful for drilling large diameter holes in hardwood, drywall, brick, and laminated surfaces. Some models of this tool are adjustable; you can set the required diameter yourself. When drilling hard surfaces (stone, porcelain tiles, concrete, tiles), you can use crowns. However, they are already produced with a given diameter. And the master has to buy several pieces of crowns or even a whole set. Such financial costs are not always justified. In addition, when working with crowns, a lot of fragments and construction dust are formed. Therefore, drilling using crowns in an already finished and furnished room is impossible.
Drill
And let's start considering the issue by choosing a drill. Choosing this tool is quite simple if you understand the needs. Some experts still recommend using a hand tool because it allows you to more sensitively control the speed of the drill. As a result, sudden jerks are eliminated, which will allow you to leave the tile intact.
It is also important that there is no vibration in this procedure, which negatively affects the material. But such a tool is quite difficult to find and purchase today.
Besides, why use outdated products if the market is full of useful new products?
But such a tool is quite difficult to find and purchase today. Besides, why use outdated products if the market is full of useful new products?