A compressor from an older refrigerator is usually quiet, although not particularly powerful in comparison with industrial models. But it’s great for airbrushing, tire inflation, blowing, and painting auto parts. Such a compressor is necessary in any home or garage workshop. Gives 6-7 atmospheres, and more is usually not required. A homemade compressor has a number of advantages. Firstly, due to quiet operation, and secondly, due to cost. A self-made compressor from a refrigerator will cost on average about a thousand rubles.
If you do everything correctly and take care of depreciation, then there will be almost no noise at all. For those who like to make things with their own hands, and this usually happens at night, this moment is extremely important. parts for modeling and other hobbies that are usually done after the main job. Therefore, noise level restrictions are very important.
The design of a refrigerator compressor is extremely simple. A container is attached to the compressor from the refrigerator to equalize the pressure, since direct airflow is not stable. This container acts as a receiver and air flow mixer.
Manufacturing process
The most fuss will be with the receiver. If you use an old fire extinguisher as a receiver, be prepared for the fact that there will be quite a lot of metal work. In addition, it will be necessary to ensure tightness. If we do not have significant experience working with metal with our own hands, it is better to take a plastic receiver.
If you use heavy parts, you should be mentally prepared for the fact that the compressor will be stationary. It is better to immediately prepare a reliable base and fasteners for it.
Compressor preparation
Determine where the compressor has a tube for the incoming air flow and where the outgoing air flow is. To do this, you can briefly plug in the compressor and determine which tube the air is blowing from. Be sure to mark the tubes at the base so as not to mix them up. This can be done with colored electrical tape or a piece of medical tape.
Carefully trim the tubes to about 10cm. This is necessary for easy connection of hoses.
The vertical position is important for the compressor. The relay body has an arrow pointing up.
It will be convenient if we fix the compressor in the correct position.
Receiver
Let's consider a simplified version with a plastic canister. Let's cut two holes in the lid for the tubes. The inlet tube must be made long, almost to the bottom. The outgoing one can be made short, about 10cm.
Small sections of about 2-3 cm remain outside. The structure should be secured with epoxy resin to ensure tightness. In the case of an old fire extinguisher, the same actions will have to be done by soldering and welding the fittings. But you can install a pressure gauge on the metal case.
Do not solder parts tightly. It is better to weld nuts and cut threads where possible.
Connecting parts
Attach a gasoline filter to a short piece of fuel hose. Place the other end onto the compressor inlet tube. The filter is needed to prevent dust from falling into the compressor.
Use a second piece of fuel hose to connect the compressor outlet pipe and the receiver inlet tank. The air flow will go from the compressor to the receiver. We put clamps on the hoses, since the air flows under pressure. Another short piece of fuel hose is needed to secure the diesel filter. The filter is needed to clean the air flow. A hose and equipment can be attached to the outlet fitting.
Is it worth extracting copper from household appliances?
The question about the advisability of selling copper scrap can be answered unequivocally - yes, it is quite profitable and, moreover, saves natural resources. The second argument may seem insignificant, but if you think about it, all natural resources are exhaustible, and according to expert estimates, there are 5 billion tons of copper left in the bowels of the earth, which is quite a bit in comparison with other metals.
Is there copper in refrigerator parts?
In addition, copper is not contained in its pure form; ores have a large percentage of impurities and waste rock - from 70 to 95%. Currently, technologies make it possible to develop deposits containing 0.5% copper. When beneficiating such ore, a large amount of energy is expended; quarries and underground mines have a detrimental effect on the environment. This is why the metal recycling industry, including copper, is so developed.
If we consider the benefits of selling scrap metal in monetary terms, then for each kilogram of ferrous metal you can get about 6 rubles, in a standard old refrigerator about 60 - 80 kg. There are also two-chamber models weighing 100 kg, so you can earn up to 500 rubles, but if you disassemble the refrigerator and remove the copper from the compressor, you can still add 300 rubles to the price.
If the freezers are made of aluminum, then this is about another two kilograms or 200 rubles. In total, you can earn 1000 rubles if you put in minimal effort.
Compressor Maintenance
Transformer or motor oil in the compressor must be changed periodically. It is advisable to change the gasoline filter approximately every six months. Replacing the filter is a routine maintenance that any car enthusiast can understand. All maintenance can be done yourself.
How to change oil
Inspect the motor. There should be a sealed tube coming out of the refrigerator compressor. Carefully cut off and drain the oil from the engine. Usually there is about a glass of it. However, if you purchased the compressor from a workshop, the oil has most likely already been drained. Using a syringe, you need to pump in new oil and take care of how to close the hole. It will be most convenient to glue the external thread with FUM tape and make a screw cap.
Video: How much copper is in a small refrigerator compressor?
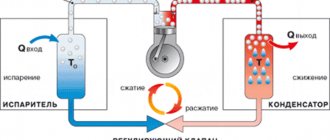
The operation of household and industrial refrigeration equipment directly depends on the circulation of the refrigerant; the compressor unit is responsible for this process. In fact, this is the most important design element, without which a home refrigerator will only be of interest to those who accept recyclables. To repair or replace this device, it is important to understand how it works. In this publication we will talk about the internal structure of various compressors of household refrigerators and their features.
Compressor application
Mainly used for painting
- For painting with an airbrush. Airbrush allows you to draw fine details and apply artistic images.
- For painting auto parts using a spray gun
- For quick painting during repairs. To do this, you need to attach wheels to the compressor platform, like a vacuum cleaner. The accuracy of painting using a compressor is much higher and is used in luxury interior design.
It is not necessary to buy a compressor for painting work or inflating wheels - you can make it yourself from used parts and assemblies removed from old equipment. We will tell you about structures that are assembled from scrap materials.
In order to make a compressor from used parts and assemblies, you need to be well prepared: study the diagram, find it on the farm or buy some additional parts. Let's consider several possible options for independently designing an air compressor.
Checking the operation of a homemade compressor
After connecting all the parts and connecting the power wires, a test run is performed and the operating mode is adjusted. The compressor is connected to the network, and using the adjusting assembly, the mode of turning the device on/off is adjusted when a certain pressure is reached.
It is not recommended to immediately set high values, since a leak in the welded joint on one of the fittings may be detected. Defects found must be eliminated, for which the device is disconnected from the network, the pressure accumulated during the test run is released, and the detected defects are eliminated. After this, the device is reconnected to the network and put into operation.
Article on the topic: How to put a belt on an Indesit washing machine
Related video: Do-it-yourself compressor from the refrigerator
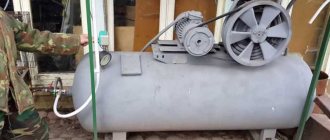
Air compressor made from refrigerator and fire extinguisher parts
This unit operates almost silently. Let's look at the diagram of the future design and make a list of the necessary components and parts.
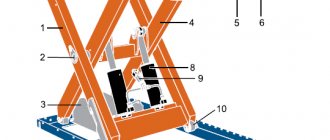
1 — tube for filling oil; 2 - starting relay; 3 - compressor; 4 - copper tubes; 5 — hoses; 6 — diesel filter; 7 — gasoline filter; 8 — air inlet; 9 — pressure switch; 10 — crosspiece; 11 - safety valve; 12 - tee; 13 — receiver from a fire extinguisher; 14 — pressure reducer with pressure gauge; 15 — moisture-oil trap; 16 — pneumatic socket
Necessary parts, materials and tools
The main elements taken are: a motor-compressor from a refrigerator (preferably made in the USSR) and a fire extinguisher cylinder, which will be used as a receiver. If they are not available, then you can look for a compressor from a non-working refrigerator at repair shops or at metal collection points. A fire extinguisher can be purchased on the secondary market or you can involve friends in the search, who at work may have written off fire extinguisher, fire extinguisher, fire extinguisher for 10 liters. The fire extinguisher cylinder must be emptied safely.
In addition you will need:
- pressure gauge (as for a pump, water heater);
- diesel filter;
- filter for a gasoline engine;
- pressure switch;
- electric toggle switch;
- pressure regulator (reducer) with pressure gauge;
- reinforced hose;
- water pipes, tees, adapters, fittings + clamps, hardware;
- materials for creating a frame - metal or wood + furniture wheels;
- safety valve (to relieve excess pressure);
- self-closing air inlet (for connection, for example, to an airbrush).
Another viable receiver came from a tubeless car wheel. An extremely budget-friendly, although not very productive model.
Wheel receiver
We invite you to watch a video about this experience from the author of the design.
A garage compressor is a necessary piece of equipment for your garage. With its help, you can paint a car, inflate tires, and supply air for operating pneumatic tools.
To do this, they are subject to certain requirements in order to create the required air flow with the required pressure. This article explains how to make a compressor for a garage.
An air compressor is always needed in the garage. It can be used both to blow away dust from the surfaces of parts processed with abrasives, and to obtain excess pressure in pneumatic tools.
Often the working life of a compressor is necessary to paint a car, which imposes certain requirements on the air flow created:
- The flow must be strictly uniform without any impurities in the form of drops of liquid, oil or suspended solids. On a freshly applied paint coating, graininess, cavities and shagreens occur due to the penetration of foreign particles into the air stream.
- Uneven flow of the mixture leads to paint drips and dull spots on the enamel.
- Branded air compressors produced by industry have all the functions for such a process, but are quite expensive.
- Not inferior to professional ones, you can create a model of the product yourself or use a garage compressor from a refrigerator.
- In this case, excess pressure occurs in the device for containing compressed air, which is called a “receiver”. The air flow can be pumped manually and mechanically.
- Manual feeding saves money, but at the same time a lot of energy and effort is spent on controlling the process.
- These shortcomings are eliminated with automatic injection, but in this case the oil in the air pump is replaced manually.
- Then the compressed air is uniformly supplied through the outlet fitting to the actuators.
Conclusion
Having studied how a homemade compressor is made, it is worth understanding that this work requires the performer to have certain knowledge and experience. You also need a lot of different tools, some of which can be quite expensive.
However, if you need to get a special device that has individual parameters that are ideal for a specific tool or type of work, then you will have to assemble it yourself. At the same time, you must immediately understand that such products require quite a lot of costs, although if you use components or parts that have already been used, then costs can be significantly reduced.
How to make a simple compressor from a refrigerator
The simplest compressor for the garage can be made from an old refrigerator.
To make it you will need to purchase:
- Air filter from a car, designed for different pressures. Its price is quite low.
- A plumbing bypass valve, which can be restrictive and disruptive, combined with a six-bar check valve.
- Any plumbing hose that can withstand more than six atmospheres.
- Chinese pistol without pressure gauge.
- Any capacity storage cylinder. The larger it is, the less often it will need to be turned on.
- From copper tubes, connecting communications or hoses of any formation.
Tip: The cylinder is an accumulator for storing air. As work progresses, the pressure will decrease, which is not very important when inflating tires, where no more than three atmospheres is sufficient. But for pneumatic tools this will be insufficient and critical.
Instructions for manufacturing the device are as follows:
- The tank is being assembled. Its device includes at least three pipes:
- input;
- day off;
- to drain condensate. The element is installed after mounting the container strictly at the bottom so that the liquid can be drained without problems.
- The problem with the compressor may be that it will spit out oil, so you need to close the outlet pipe so that it is directed straight up.
- The hose to the tank should go in the same direction.
- The intake pipe is bent upward and equipped with a short rubber tube; an air filter from the car is attached to its end.
- A reverse water bypass valve is placed between the cylinder and the compressor, which prevents air from escaping back, and is the simplest indicator that the pressure has reached a given value. When it reaches six atmospheres it will begin to hiss, which means it is time to turn off the compressor motor.
Advice: A conventional refrigeration unit produces over 15 atmospheres, so there is no need to worry about the engine. You can further increase safety by screwing in a valve at the outlet of the cylinder; a plumbing valve will do. When filling the cylinder, the tap can be blocked.
- Everything comes together.
- The balloon is strengthened.
- After starting the compressor, air will be drawn in until the bypass valve operates, in which case its supply should be stopped by turning off the engine.
Tip: When such a compressor is operating, you should not move away from the device to ensure safety when turning it on.
The disadvantage of this device is:
- If the valve jams, if it does not work, the compressor will burn out or something will rupture. Therefore, you should install a pressure gauge.
- It is necessary for control - any automation can break. To do this, it is recommended to leave a check/bypass valve in the system.
The entire assembled structure will look like this:
- Through the pipe, which is equipped with a filter, the compressor takes in air.
- The outlet hose leading to the tank is equipped with a check/bypass valve.
- At the outlet of the tank there is a control valve, and after it a shut-off valve is installed.
- There is a pipe at the bottom of the tank through which condensate drains.
- A hose goes from the control valve to the gun.
- The pressure switch closes and opens the contacts that supply the compressor with electric current.
The photo shows a diagram of the assembly of a compressor from an older model of a refrigerator.
Recommendations from experts
- If a homemade compressor is not mounted in a housing or on a frame, it will be very difficult to transport. This may damage the connections. However, when fixing to a common frame, it is very important to solve the vibration problem.
- When purchasing a pressure gauge, you should immediately look for a seal or tag on it that would indicate the date of its last check. If it is not there, then such a device is not worth purchasing. Even new products have similar markings.
- Sometimes it is much easier to purchase a ready-made unit than to create it yourself. However, some things are simply not available for sale. They are either very rare or have other characteristics that do not meet the design requirements.
- It is worth making a small tap on the receiver itself so that the air can be released. This will allow the unit to be transported without residual pressure in the system. Also, such a faucet will make it possible to drain liquid that will accumulate in the system, despite the presence of a large number of filters and other measures to separate moisture from the air.
- Some craftsmen, in order not to make unnecessary holes in the container, prefer to create one branched output, installing all the necessary components on it. This is a fairly practical solution, but according to safety regulations, the overpressure valve must be located on the receiver itself.
- If when working with the device it is necessary to obtain a suction effect, then you additionally need to make a special device from two thin pipes welded together at an angle of 45 degrees. By supplying air from the side of an acute angle, you can get the necessary impact from the welded end.
- Before starting work, it is worth studying the market for finished products of this type and assessing your expected costs. It may be much cheaper and easier to purchase a product in a store than to create it yourself.
How to make a simple compressor for painting a car
To manufacture the device you must purchase:
- Receiver
, which can be a car tube with or without a tire. - Supercharger
. For this, a car pump with a pressure gauge is used. - Nipple from an old camera.
- Repair kit for rubber.
- Tailor's awl.
After preparing the necessary materials, you can proceed to manufacturing the device.
For this:
- An unnecessary car inner tube is checked for leaks by inflating it with a pump. If the air holds, you can perform the next step. If there are leaks, the damaged areas are sealed or vulcanized with raw rubber.
- A hole is drilled in the prepared receiver to install an additional nipple, through which a stream of compressed air will flow evenly.
- An additional fitting is glued in and connected to the spray gun.
- The nipple in the remote control is unscrewed to allow free air flow.
- In the original nipple of the car camera, the nipple remains and will work instead of a valve, holding excess pressure.
- The required level of air pressure in the receiver is determined experimentally. In this case, you should spray paint on any surface. The enamel should lie down evenly, without jerking. The pressure gauge determines the amount of excess pressure.
Advice: The only condition when using the device is to ensure that no moisture or dust gets into the chamber, and then into the spray gun. Otherwise, everything will have to be done again.
The video will show you in detail how to make a compressor from a vacuum cleaner, refrigerator or other devices.
The compressor can be used in a variety of areas - for inflating tires, airbrushing, painting spare parts
etc.
Having the necessary tools and certain technical knowledge, it is quite possible to independently manufacture this unit based on a conventional refrigerator. A homemade compressor produces about 7 atmospheres, which is quite enough for an ordinary garage workshop, so many people are increasingly thinking about how to make such a compressor? A DIY refrigerator compressor will be quite quiet and, most importantly, cheap in terms of cost
.
On average, the production of this unit will require about one thousand rubles
for all components.
Aquarium and decorative devices
Typically, small and low-power compressors are used for similar products such as aquariums, Jacuzzis or other devices. At the same time, they do not need a receiver at all or use small containers for it. Therefore, a homemade compressor for an aquarium is usually connected directly, although it is equipped with a check valve.
Considering this, it makes no sense to use a large unit for such products. However, it is worth considering that sometimes it is much easier and cheaper to purchase a device from a refrigerator than a small specialized compressor.
Which is better - a homemade option or a professional device?
Before trying to make our compressor out of an old refrigerator, it is necessary to compare these two options, i.e. a ready-made compressor sold in specialized stores, and our homemade version. In total, there are several main differences
between them:
- The design of the factory compressor contains an electric motor that transmits torque to the working chamber through a belt drive. As for the homemade compressor, it consists of a housing and the engine itself, without belts.
- The factory version already has automatic pressure relief systems, inlet and outlet filters, pressure meters, etc. installed. In a compressor from a refrigerator, you will have to install the control equipment yourself, taking into account all the features.
- Despite the fact that most factory compressors are equipped with automatic systems, some budget models do not have this feature. In other words, these units will have to be turned off independently, noting the time on the clock. Homemade compressors are mainly equipped with a protective relay that turns off the engine if there is a risk of overheating.
- Some factory models may not have any lubrication at all. Of course, their service life is short, but they do not emit various emissions. This circumstance is very important, especially if the spray gun behaves rather capriciously, not tolerating various impurities. As for homemade compressors, there is plenty of this oil. By the way, you need to pay attention to what kind of oil you fill in - synthetic oil does not combine very well with regular oil, so you don’t need to pour in just anything.
- The main feature of a homemade compressor is that it works very quietly, especially if you put all the tubes on it correctly, maintaining a tight seal. As for factory compressors, they are noisier, so their use is only possible outside the home.
- The cost of manufacturing a homemade compressor is very low, because we take the main components from old equipment, and the control equipment will cost us one thousand rubles. As for the factory compressor, the situation is different.
- It is impossible to make any technical changes to the factory compressor. In other words, if the unit is not powerful enough, then it can only be used as a pump, nothing more. Homemade options are good because you can add some parts to them, for example, a large receiver, thanks to which you can significantly increase the power of the device.
- A factory compressor is a complete technical device, so any improvisation with it is impossible. With a homemade unit, you can do almost anything - take some parts outside the body, or hide everything in one box and attach a handle on top for easy transportation.
- You can install a fan on a homemade compressor to cool the device from the outside.
Most refrigeration compressors have some limitations in terms of their operation.
. There are several modes in total:
- Normal - from 16 to 32 0 C.
- Subnormal - from 10 to 32 0 C.
- Tropical - from 18 to 43 0 C.
- Subtropical - from 18 to 38 0 C.
However, combined modes are more common, having a different range.
Thus, a homemade compressor can be much more efficient than factory ones
, in terms of working with air.
The video shows a version of a homemade compressor for inflating wheels
Professional and homemade compressors: 10 differences
Buying a pneumatic tool is cheaper (the difference is up to an order of magnitude). We consider the extensive possibilities of use to be an additional advantage. Think about it. There is a rebar in the middle of the field. Will you make cuts with an electric tool? Imagine dry forest trees. Bears do not know electric generators, but a pneumatic saw will do the job (on par with a gasoline one).
We recommend that you start reading the review from the end. 10 differences that characterize a refrigerator motor-compressor cannot be understood without knowing the operating principles.
- A professional compressor uses an ordinary asynchronous electric motor, through a belt drive or directly transmitting the torque to the working chamber with a freon pumping mechanism. More often, the actuator is an ordinary piston. The refrigeration compressor is assembled in one housing with the engine and without belts.
- A factory professional compressor for technical needs is equipped with the correct set of automation and units: emergency pressure relief valve, pressure meter-switch, inlet filter, outlet filter, pressure gauges, receiver (steel cylinder). The refrigeration compressor will have to be installed by independently calculating the options and selecting control equipment.
- The factory compressor often operates automatically. The simplest models constantly have to be turned off using a timer. Time is recorded manually on a watch. Refrigeration compressors are equipped with protective relays (in addition to starting ones). The engine turns off when the sensitive element overheats and will not burn out.
- Lubrication of a factory compressor is a separate problem. The industry even produces dry models of pistons equipped with graphite rings. The engine life is less, as is the cost. But there is no need to lubricate, the air will be clean. This is important for those using capricious spray guns that do not tolerate impurities when inflating tires in the garage (pneumatic tools, on the contrary, love oil and require installation of lubricator nipples on the hose). Refrigeration compressors are bathed in oil, just like air conditioning compressors. They float in the bathtub, you can drill holes on the body to fill in grease and other suitable substances, or use a service pipe. Synthetic oil is an antagonist to natural oil; beware of thoughtlessly pouring arbitrary components inside.
- The refrigeration compressor is manufactured to meet the standards for the production of household appliances and operates silently. If all the tubes are sealed, the condition will be maintained. None of the neighbors of the garage cooperative will hear that the humble servant of the board has decided to pump up the tires. A factory compressor for technical purposes behaves more pretentiously, because the requirements are different.
Article on the topic: How to defrost the Atlant MX 367 refrigerator
- A refrigeration compressor is purchased cheaply; we remove the unit from old household appliances. You will have to purchase additional control valves; the price is within one thousand rubles. A factory compressor station is purchased in a store according to the general conditions. For comparison, an Airline Classic-2 CA-030-02 automobile pump with a capacity of 30 liters per minute and a working pressure of 7 atm costs 1,400 rubles; it is not equipped with a receiver (more precisely, a small cylinder), therefore it is of little use for a whole that exceeds the volume of work on inflating wheels.
- Using a refrigeration compressor as a basis, build a station according to your needs. It is not possible to configure a purchased unit. If productivity is low, the bicycle wheels will be left to pump. Equip your homemade compressor with a large receiver. Having pumped 8 atm inside, using most pneumatic equipment (screwdrivers, drills, saws) will be a joy. A tangible plus.
- The layout of the compressor station is predetermined. The author's gentleman's device is free to place according to your spiritual needs. Some enclose the assembly parts inside a hangar-shaped case, which was previously equipped with sewing machines, and provide the structure with a handle, simplifying manual transportation.
- The refrigerator compressor housing is made black, it transfers heat better; craftsmen cut off the upper part of the casing, enhancing cooling. We recommend instead installing a fan that blows air around the outside of the device.
- The refrigeration compressor comes in the UHL design, therefore, it is constrained by certain operating conditions restrictions. Temperature limit above 10 ºС. Here are the approximate values of climatic versions:
- N (normal) – 16-32 ºС.
- SN (subnormal) – 10-32 ºС.
- T (tropical) – 18-43 ºС.
- ST (subtropical) – 18-38 ºС.
Much more common are combined classes, designated by a dash, which include both ranges by addition: 16-38 ºС. These differences are not the only ones; the authors tried to make it clear: a homemade station made from a refrigeration compressor will sometimes give a 100-point head start over a purchased one, although the device is not intended to work with the atmosphere. During normal operation, oil, water, and air get inside. The refrigeration compressor will faint when it sees oxygen diluted with nitrogen inside the casing.
The operating pressure of refrigerators reaches 25 atm (depending on the model), sufficient for domestic needs. The main thing is to stock up on more receivers. Beware of the explosion. Most equipment deliberately uses low pressure for safety reasons.
Dismantling works
To make a homemade compressor from a refrigerator, you need to make initial preparations. It consists of certain dismantling works, i.e. We simply need to remove the compressor from the refrigerator itself. It is located at the back of the refrigerator, in the lower part. To remove it, we need a basic set of tools: pliers, spanners and two screwdrivers (positive and negative).
On the compressor there are tubes that are connected to the cooling system. These tubes must be bitten off using pliers, but under no circumstances should they be sawed off with a hacksaw. The fact is that with this method, small chips inevitably form, which can get inside the compensator.
Then we move on to removing the start relay - it is an ordinary black box with wires sticking out of it. We unscrew the fasteners, then cut the wires that lead to the plug. We must remember to mark the top and bottom of the starting relay - this will be useful to us in the future. By the way, we also take all fastening elements along with the unit itself.
Wiring
When creating a homemade compressor, you should not skimp on automatic control systems. They greatly help save time and allow you to leave the unit unattended. Therefore, it is very important to purchase a pressure gauge with a limiter and an additional contact pair.
The power system connection diagram is quite simple. Power is supplied to the pressure gauge contact group. In this case, its arrows are set so that it is in a closed state until the pressure rises to the desired value, and is connected again at another, minimum value.
Then from there the wires are connected to the relay on the compressor itself. In this case, it will turn on only when the minimum pressure is reached, and turn off when the maximum value is reached. It is also a good idea to install an additional power line with a button, which can be used in manual mode in parallel.
It is best to take a pressure gauge for work in which the contacts of the working group can withstand the network voltage. However, they are quite difficult to find, and more often you come across products rated at 24 Volts. In this case, it is necessary to use a transformer that will be included in the circuit with contacts and relays.
Functionality check
After we have removed the compressor, we need to check its functionality
.
The fact is that we are removing the device from an old refrigerator, so we need to make sure that our unit is still “alive”. So, we flatten the tubes with pliers - this is necessary so that air flow passes through them. Next, we need to put the start relay in the position in which it was in the refrigerator design. This is very important, because if the position is incorrect, there is a risk of damage to the device, as well as failure of the compressor winding.
There are wires on the relay body to which you need to screw a piece of wire with a plug. It is better to wrap the connection point with electrical tape to eliminate the risk of electric shock. We plug the device into a power outlet. If you did everything correctly, the compressor will work, and air will flow from its tubes. By the way, it is necessary to mark which tube the air flow comes out of and which one it goes into.
Professional approach
As already noted at the very beginning, if you do not have special specialized knowledge and skills in repairing refrigeration equipment, namely replacing the compressor, then it is, of course, better to seek help from a specialist.
But, if you are confident in your abilities, have an understanding of the basic principles of electrical engineering and/or just want to save some money, then you can try to replace the compressor yourself. But only after you have read all the necessary instructions, tips and recommendations. Because this is still a serious matter.
Step-by-step instruction
Before you start making your own, you need to make sure that you have all the necessary materials and tools.
We invite you to watch a video with a detailed description of the process of one of the manufacturing options
In addition to the compressor itself, which we previously removed from the refrigerator, we will need
:
- Receiver. In this case, you can use the body of an old fire extinguisher, or weld a sheet metal body and pipes.
- Various hoses. In this case, the length of one hose must be at least 600 mm, and the other two - about 100 mm. In this case, you can take hoses from the car.
- Various consumables - gasoline and diesel filters, wire, clamps, pressure gauge and epoxy.
- Related tools, i.e. screwdrivers, pliers, drills, etc.
- In addition, we will need a regular wooden board, which will be the basis of the entire structure. We attach the compressor to it using ordinary self-tapping screws. The fastening should be carried out exactly in the same position that it occupied in the refrigerator design.
We take any plastic container of suitable volume (from 3 liters or more). In the upper part you need to drill a couple of holes to fit the size of the outlet tubes. We insert the tubes, and then fill everything with epoxy resin. The inlet tube into which the air enters must be located in such a way that there is about 200 mm from its end to the bottom of the receiver. The outlet tube should be immersed ten centimeters inside.
This is a description of a plastic receiver, but for greater tightness it is best to make the receiver in an iron case. In this case, there is no need to fill everything with resin, and the hoses are simply welded. In addition, only an iron receiver can install a pressure gauge.
To install it, you need to drill a hole for the nut on the receiver body. We insert it, and then brew it. Only then do we screw the pressure gauge into this nut, after which the work is completed. Now we attach the receiver to our base using wire. The scheme will be something like this:
Our homemade unit is almost ready.
There are quite a lot of photos and videos of its work on the Internet, for example, it is shown how it is used for painting various spare parts, so the feasibility of its manufacture is quite obvious. Finally, we need to add a few additional touches to our device.
You need to take one of the hoses, which is ten centimeters long, and put it on the filter. If this is difficult, you can slightly heat the end of the hose to make it easier to fit onto the fitting. We put the second end of the hose on the inlet of our device. In this case, the filter will protect against dust from entering the housing. The second 10-centimeter hose needs to connect the inlet of the receiver and the outlet of the compressor. In this case, it is better to tighten the connection points with clamps. Our third hose needs to be put on the diesel filter, and the other end must be inserted into the outlet of the receiver. At the same time, the free filter fitting will subsequently be connected to various equipment for airbrushing, a spray gun for painting, etc.
Another video on the topic
Compressor replacement instructions
To replace the compressor yourself, you will need the following tools:
- burner (best oxygen-propane);
- freon storage;
- valves for puncture and selection.
The first step is, of course, to unplug the refrigerator, turn it around, freeing it from everything that is inside, including drawers, racks and shelves, and also provide access to the faulty compressor. Then you can begin the actual repair.
Lifting it slightly, pull out the compressor and break the filling pipe, running the device for five minutes so that all the freon is completely transferred to the condenser. Next, connect the piercing valve with a hose connected to the cylinder. About thirty seconds is enough to unscrew the valve and collect all the gas from the system.
The copper pipe, for which the burner will actually be needed, must be welded instead of the filling pipe. If, despite all the preparations, you were unable to get a heating pad, then you can use a soldering iron. However, this will complicate the process and at the same time make it longer. After this, a cut of several centimeters is made on the capillary expander, and the tube breaks, then the filter is unsoldered from the condenser.
After all these manipulations, the compressor must be completely unsoldered from all remaining pipes, of which there are often two - to suck out gas and build up pressure. Well, to install a new compressor, you will need to repeat all the steps, only in reverse order. Well, the first launch after the replacement will instantly let you know whether all these manipulations were completed successfully or not.
Some technical data and service features
It is quite difficult to say unambiguously what pressure a particular compressor will show. Much depends on the specific brand and service life of the device itself. By the way, old units show even better performance than modern ones.
Maintenance of our homemade device is a very important point in operation.
The main work will consist of replacing diesel and gasoline filters, as well as changing the oil in the device. The design of compressors usually contains three copper tubes. We used two of them earlier, and the third remained untouched. It is the shortest and sealed at the end. So, the oil is drained through it. To do this, it is necessary to cut off the sealed part, and then drain the treatment. Filling is done through it.
Advantages and disadvantages
There are mainly three reasons why users are interested in inverter models:
- absence of cyclic starting, which significantly increases the service life of such a compressor;
- more economical energy consumption;
- Quite quiet operation.
But, as usually happens, where there are advantages, there may also be disadvantages. And in this case, we have, firstly, a higher cost compared to linear models, and secondly, increased sensitivity to voltage drops, which is also not very good.
From this we get the clear advantages of linear models. However, it is important to understand that the model you will have to purchase if you need to replace it depends on the refrigerator itself. Because, for example, if a linear air conditioner breaks down, your refrigerator will most likely be older than the age when the systems began to support inverters. It follows from this that these types of superchargers are not interchangeable.
So that everything is not “like clockwork”...
The main difference between a refrigerator compressor and industrial compressors is that it is initially designed to operate in a closed system. That's why he literally bathes in oil!
Oil is mixed with freon, freon with oil, then separated, then mixed again... That is, the lubrication system in the refrigerator compressor is in no way isolated from the flow of the main reagent that this compressor pumps!
Therefore, when you start pumping air with this compressor, oil will inevitably splash out of the outlet pipe. The first thing to do is to make this pipe in the shape of an inverted letter “L”.
At the top, in front of the second L-shaped bend, behind which the receiver is located, an oil filter is installed.
In it, just below the middle, a conical plate directed upward is installed. Gaps are left between the plate and the walls of the chamber. The air flow from the compressor, entering the chamber from below, is slowed down by the conical plate and the drops of oil that it carries with it roll back down.
Important!
Although you need to understand that microparticles of oil and moisture still remain in this air flow. Therefore, firstly, don’t even think about “filling” air into scuba tanks with this compressor!
And secondly, the receiver will gradually fill at the bottom with oil-water condensate. In order not to unscrew the entire system each time to clean it, it is better to provide a drain hole in the bottom of your presumably fire extinguisher.
Helpful maintenance tips
Finally, here are some tips:
- the new unit always hums quite loudly; it takes some time for it to enter stable mode (most often about a week); after this time the noise level decreases;
- strong humming is possible if the household appliance is installed incorrectly; it should not be moved close to the wall or furniture - there should be a gap of 5 cm between them and the refrigerator;
- The cause of rattling may be the banal contact of a pan, jar or plate with neighboring containers; to stop it, just move them apart a little;
- for uninterrupted operation of the unit, it should be installed strictly horizontally; To do this, you need to adjust the height of the legs;
- if voltage drops in the network are too frequent, you should think about purchasing a voltage stabilizer, especially if an inert appliance is installed in the house, because its repair is not cheap, and a complete replacement of electronics can cost 2/3 of the cost of the refrigerator itself.
important tips for replacing a compressor
Classification of compressors in refrigeration equipment
Despite the general principle of operation, the design of the mechanisms may differ significantly. The classification is made according to the principle of action into three subtypes:
- Dynamic. In such devices, the refrigerant is circulated under the influence of a fan. Depending on the design of the latter, they are usually divided into axial and centrifugal. The first ones are installed inside the system, and during operation they build up pressure. Their operating principle is the same as that of a conventional fan.
Axial compressor
The latter have a higher efficiency due to an increase in kinetic energy under the influence of centrifugal force.
Cross-section of a centrifugal compressor
The main disadvantage of such systems is the deformation of the blades due to the torsion effect that occurs under the influence of torque. Dynamic settings are not used in household equipment, so they are not of interest to us.
- Volume. In such devices, the compression effect is produced using a mechanical device driven by an engine (electric motor). The efficiency of this type of equipment is much higher than that of screw units. Widely used before the advent of inexpensive rotary devices.
- Rotary. This subtype is distinguished by its durability and reliability; modern household units use just such a design.
Considering that the last two subtypes are used in household devices, it makes sense to consider their structure in more detail.
Receiver problem
Homemade welded receiver
Cylinders for homemade compressor equipment cannot be found on sale. For this purpose, cylinders of various purposes and capacities are converted into receivers:
- Propane and methane cylinders.
- Fire extinguishers.
- Cylinders for storing compressed air, carbon dioxide, oxygen and others.
- Homemade welded structures.
The simplest option is a medium-diameter steel pipe with sealed plugs. The receiver body must contain at least 3 throughput units:
- Inlet for compressed air from the compressor.
- Outlet.
- The condensate drain unit from the cylinder, which should be located at the lowest point.
When using steel cylinders, the inlet and outlet tubes are welded together. The housing must withstand more than 10 atmospheres.
When to check the compressor - signs of malfunction
The motor-compressor is an important working unit of the refrigerator, which ensures the circulation of refrigerant through the piping system. The motor is located at the rear at the bottom of the refrigerator. It can be located in a closed compartment behind the panel or in an open niche.
Most old and new models have linear compressors connected via a relay.
In improved modern ones - inverter ones controlled through a current converter. The motor is connected to them via a terminal block.
By design, compressors are divided into piston (the majority of them) and rotary. But the signs of a malfunction are common to all. The main list includes:
- elevated temperature in only one or both compartments;
- the compressor works constantly, with very short rest periods;
- the unit turns on, works for a few seconds, then the relay clicks and the motor turns off, after a while the cycle repeats, the compressor housing gets very hot;
- The engine does not start, the body does not heat up.
Malfunctions may be associated with defects in the start-up relay or compressor.
Compressor design through the eyes of Kulibin
The compressor motor is often equipped with three pipes:
- freon input;
- freon output;
- technological master.
The engine is bathed in oil, which also dissolves freon. It is difficult to change the brand (type) of refrigerant correctly. When vacuumizing, wait a quarter of an hour: the oil will release old freon. The compressor will have to run idle for 15 minutes. The oil change process is not easy, although the procedure can be followed. Before refueling, make sure: there is no water, air, or replaceable freon inside. For what? The old R12 is considered the worst enemy of the ozone layer, and is being replaced everywhere by a new, explosive one, but not in the concentrations inherent in rooms operating refrigerators, should there be a leak into the environment.
During operation, experimenters note that oil is thrown out of the outlet pipe. As part of the refrigerator, the nuance is devoid of lethal consequences. The liquid flows back into the oil bath. When you build a homemade compressor from a refrigerator, equip the outlet path with cleaning filters. Accessories are required to stop oil and water. Car enthusiasts use Lada Kalina fine fuel filters that cost 100 rubles apiece. Turn it on, it will be visible through the light-transmitting case: the paper filling swells. The main thing is that it doesn’t break.
It will be useful to install a safety valve; a Chinese pistol equipped with a pressure gauge is not a problem to buy. A couple of words characterizing the device. Let's call the main components of a homemade compressor station:
- compressor;
- receiver;
- control valves;
- connecting hoses.
The receiver is represented by a tank. Experienced citizens recommend making a suitable container out of a fire extinguisher; the authors prefer the idea of welding a part from a piece of thick pipe or sheet steel. Select the size according to your location and needs; the reinforcement fits in random places. You will need four holes:
- inlet from the compressor;
- day off for use;
- control for pressure gauge;
- service for draining condensate.
The latter is located near the bottom of the container. Before making a compressor yourself, find documentation for the unit removed from the refrigerator. Laziness tormented me - calculate the working pressure of 8 atm. Enough to pump up the wheels and blow out the engine - with interest. When blowing out candles, reserve a limit of 15 atm. When choosing fittings, calculate the maximum pressure, making a reserve.
The control pipe is equipped with a pressure gauge and pressure sensor, which automatically switches off when the set value is reached. Remove the compressor from the refrigerator with your own hands along with the start-up relay (there are two relays in separate housings). The set of mechanisms is powered by a 230 V mains voltage. It would be better to find a surge filter similar to that protecting an old washing machine. The unit will protect the device. Residents of the garage cooperative often cook, voltage stability leaves much to be desired. The nominal value differs from the standard one, often contradicting GOST requirements for the quality of electricity supply services.
A few words about the operation of the compressor. The receiver needs to stabilize the pressure and allow the running engine to rest. The compressor pumps air into the cylinder, controlled by the control valve. The bypass valve protects the system from an accident, the start-up relay controls the normal operation of the engine and protects against overheating. Air is pumped into the receiver and taken in by an outlet hose equipped with a filter. Entering the compressor, the outside air is purified, dust is eliminated, and, if possible, moisture. Some motorists pump the receiver with 8 atmospheres and store the device for weeks. This cannot be done, although it is possible!
A humorous note with serious consequences allows for a useful farewell to end the subsection.
Compressors using all sorts of unnecessary things as receivers
If, when choosing compressors and motors, craftsmen settled on components from refrigerators and cars, then they do not use anything as receivers - even bottles of champagne and Coca-Cola (at pressures up to 2 atm). Let's list a few worthwhile ideas.
If you have a receiver from KrAZ at hand, you can get a unit with minimal labor costs: all the pipes are already screwed into it.
If you are the owner of unnecessary diving equipment, you can use it at work.
Almost every summer resident with a stove on gas cylinders will have these unnecessary containers.
If the hydraulic accumulator in the water supply system has a leaky bulb, there is no need to throw it away. Use it as a receiver by removing the rubber membrane.
An expansion tank from a VAZ is an inexpensive purchase, even if it is new.
The next idea is for air conditioner installers who have leftover freon cylinders and split system parts.
Freon cylinder as a receiver
Another viable receiver came from a tubeless car wheel. An extremely budget-friendly, although not very productive model.
Wheel receiver
We invite you to watch a video about this experience from the author of the design.
Design of rotor mechanisms
To be precise, such devices must be called double-rotor, since the necessary pressure is created by two counter-rotating rotors.
Design of a linear rotary compressor in diagrammatic form
Designations:
- Outlet pipe.
- Oil separator.
- Sealed casing.
- Stator fixed to the casing.
- Designation of the inner diameter of the casing.
- Designation of armature diameter.
- Anchor.
- Shaft.
- Sleeve.
- Blades.
- Bearing on the armature shaft.
- Stator cover.
- Inlet tube with valve.
- Camera battery.
Assembling a compressor for an airbrush with your own hands
For those who want to get an excellent pumping station literally from improvised means, two paths are open. However, one note must be made immediately. To assemble a homemade compressor for an airbrush with good data, you need to immediately plan to create a piping in the form of a receiver of sufficiently high capacity. A gas cylinder or fire extinguisher body, which is easy to obtain, is suitable for this.
Creating a receiver
The ideal option for a homemade receiver is the housing of a fire-acid fire extinguisher. OHP-10 is convenient. It holds 8.7 liters of liquid carbon dioxide, the total volume is 10 liters. For the design you will need a pressure switch, an adapter, a cross, valves, a tee, it is also recommended to immediately install a reducer and moisture traps (automotive, fine). The design creation process is as follows.
- The fire extinguisher releases the remaining gas under pressure.
- All starting and supply devices are removed.
- The crosspiece and pressure switch are installed.
- A tee is mounted to connect a pressure gauge and a gearbox with a separator - moisture trap. This phase of the work must be carried out carefully. The gearbox must be correctly oriented to ensure the correct location of the drain hole.
- The inlet moisture filter is assembled and connected through a hose to the receiver inlet.
This piping block will allow you to assemble any injection station, with condensate filtration and full control of the outlet pressure.
Station based on a compressor from a refrigerator
To simplify the consideration of homemade products, the creation of a receiver with a control system was considered separately. Any supercharger can be connected to such a unit. For example, assemble a compressor for an airbrush with your own hands from the refrigerator. For this you will need:
- dismantle the refrigerator compressor and its power supply and protection system;
- carry out the necessary work on creating electrical wiring;
- place the receiver and compressor on the same platform;
- install an air filter at the compressor inlet, connect a pressure switch to control the start.
The assembled system looks like this:
Advice! Before assembling the structure, it is worth changing the oil in the compressor. To do this, the sealed tube (one of three) coming out of its body is cut off. The old oil is drained, and instead of it, an appropriate volume is filled with automotive oil, which practically does not absorb moisture and protects the supercharger much better from wear.
Automobile compressor
A compressor with a receiver for an airbrush can be created from a car one intended for inflating tires. In this case, for individual models the problem of providing power will have to be solved. Compressors designed to operate from a cigarette lighter can be connected to a conversion unit from a PC.
- Rectifier units are parallelized to deliver maximum current. The yellow wires are being bitten off from the motherboard connector and any power supply to the hard drive.
- The external switching control system is blocked. To do this, cut off the green wire and any of the black wires indicated in the diagram from the motherboard connector. The wires are soldered together.
Now the power supply can be turned on without the participation of the motherboard. Depending on its design, this occurs either when it is plugged into an outlet, or by pressing a button on the case.
To connect a car compressor, just connect the yellow wire from any power interface of the hard drive to the power supply to the plus of the interface, and the black wire to the minus. You can use the appropriate socket, or disassemble the plug.
For a neat appearance, the power station and compressor are assembled on one platform.
Using a car compressor powered by 220V is as simple as possible. It is enough to connect it to the receiver. This unit will do all the necessary work to adjust the air flow parameters of the airbrush. How to assemble the receiver is described above.
Turn-on moment
Reinsurance with automatic switching off and on means that the connection line must go through the relay. You need to read the instructions that came with the compressor
This is especially important since it works in unusual conditions. It often becomes necessary to install a condenser (depending on the type of compressor and the refrigerator from which it was removed)
From the outlet we go to the switch. Then we connect the phase wire to the desired relay terminal. The neutral wire can go in two directions. If there is a ground wire, leave it; if not, connect it to the ground terminal on the relay. The second option is better.
As a result, we get protection using nulling. Then the phase and neutral wires go to the compressor starting drive. According to the indicated diagram, the wires are connected to the required terminals. Everything is ready for painting. Let's summarize the materials used:
- compressor (can be used from the refrigerator);
- receiver (fire extinguisher, for example);
- pressure switch;
- pressure gauges;
- flexible hose (oil resistant);
- adapters, plumbing gaskets, FUM tapes, etc.;
- Chipboard or board for stand.
Popular articles Mayonnaise
This is a superficial list, but it covers all the major paint compressor parts. In addition, the entire product can be put into a box or case, built with a lid, or otherwise decorated and given a solid and professional look. As mentioned above, in order to get a compressor, it is not necessary to break the refrigerator. Automotive electric pumps are often used and give good results. But their assembly system is slightly different, and there are more difficulties in connecting to the power supply and cooling system.