Material selection
Having decided on a place for a workbench and drawn a drawing, the question of choosing materials for the product logically arises. Much here will depend on what is more accessible to you - metal or wood. As a base, you can use a wooden beam or a 40 mm board, or you can make a frame from a metal corner, from a profile pipe or from an aluminum profile. For the countertop, you can use chipboard, MDF, but you can also build it from scrap materials, for example, from the same pallets or pallets.
Working with metal often involves treating with oils or other chemical liquids that are well absorbed into wood, so to prevent saturation of the countertop and possible fire, you need to equip a mechanic's corner. Plywood or perforated metal strip is perfect for an apron. We will also need self-tapping screws, screws, studs, glue and other small consumables.
Base
The base of the structure when placed permanently is best made from a wooden beam with a size of no less than 150*50, so the workbench can easily withstand a static load of up to 200 kg/cm and a dynamic load of up to 750 kg/cm. Among other things, wood is more ductile than metal and perfectly absorbs vibration. Of course, such legs must be made of dry hardwood or softwood and treated with impregnation.
If for some reason you don’t want to make a wooden base, you can weld it from metal. This has its pros and cons, for example, you can make adjustable supports - this is a plus. It is impossible, without losing the ability to bear a dynamic load, to make an opening for the legs in the frame - this is already a minus. Boxes for such a base are made of galvanized metal.
What to make the countertop from?
The workbench top must be durable. The best option would be a glued panel made of dry boards with a thickness of at least 25 mm. However, chipboard or MDF sheets covered with steel sheet or hardboard are also suitable. Instead of purchased boards, you can also use waste materials at hand, such as timber from pallets (pallets). The table can also be divided into two sections: one made of wood, and the second made of a rectangular metal pipe (instead of a thick metal plate). The boards will need to be treated with drying oil and a fire retardant to prevent fire.
Protective screen
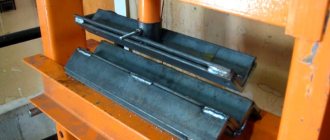
Making a tabletop protective screen is very simple - just cover the entire tabletop or part of it with metal.
Such a screen allows you to significantly increase the usable area, because thanks to the holes you can make a good storage system for tools or various small items, leaving shelves and drawers for larger things.
Optional equipment
A universal workbench should be equipped not only with a vice, but also with clamps and various clamps. In addition, various equipment is additionally installed, for example, a jigsaw, a milling machine, additional power and lighting points, grinding equipment, and a dust extraction system.
Tools
To make a compact and convenient folding table for the garage, you will need to prepare the following consumables :
corners;- square pipe;
- steel strip;
- steel sheets;
- boards;
- plywood;
- guides and fittings;
- screws, self-tapping screws, nails;
- paints and varnishes.
The tools we will need are:
- welding machine;
- electric jigsaw;
- drill;
- screwdriver
Ways to minimize the cost of organizing a garage
You can minimize the cost of arranging a garage by making your own racks, shelves, and storage systems. Advice from experienced car owners will help reduce costs:
- Heating and cooling a room can be done using the same device: an air conditioner.
- Proper installation of natural ventilation will help you avoid buying a fan for a forced ventilation device. For this purpose, one pipe built into the wall is placed at a distance of 20-30 cm above the floor, and the second - on the opposite wall at a distance of 30-40 cm from the ceiling.
- The best insulation for walls and ceilings is polystyrene foam. Unlike mineral wool, it does not absorb moisture and does not lose its thermal insulation properties.
- The most inexpensive method of interior finishing is plastering followed by whitewashing with water-based emulsion.
- For wall cladding, you can make your own gypsum tiles with a “brick” or “natural stone” surface.
- Instead of expensive store-bought storage systems with many drawers, you can sew (or order from a studio) fabrics with numerous pockets.
Which material to choose
The material of the workbench is determined by the purpose of the device. If the table is needed for simple work, and heavy loads will not be placed on it, then wood will do just fine. To make a workbench, a 50x100 mm timber is suitable, from which the frame is assembled, fastening it with bolts or self-tapping screws. To make the structure stronger, wooden spacers are used between the legs at the top and bottom. The lower spacers are mounted at a level of 15 cm from the floor.
For the countertop, it is better to use planed hardwood boards, such as oak. In the absence of such, moisture-resistant plywood will do. Its thickness must be at least 40 mm.
Despite the ease of making a workbench from wood, it still has some disadvantages:
- not designed for heavy loads;
- it is problematic to install several tools, for example, a drilling machine, a vice, etc.;
- fragility of the material;
- wood absorbs oil and other substances, metal shavings get stuck in it;
- there is a risk of fire.
A metal workbench is devoid of the listed disadvantages. This table has:
- high reliability;
- small in size;
- sustainability;
- possibility of reliable fastening of tools;
- ease of care;
- safety in case of fire.
However, in terms of financial and time costs, such a table is inferior to a wooden structure.
Selection criteria: wood or metal
For many car enthusiasts, the garage is a second home, so they approach its arrangement with due attention. A particularly important point is the purchase of a workbench; the selection criterion may be the purpose for which it is intended. In most cases, such equipment is installed to perform the following work:
For regular inspection and maintenance
car.
For small plumbing work
, minor repairs, correction of defects associated with the maintenance of the house and garden area.
If plumbing or carpentry is part of your hobby
.
The first question that arises when choosing is the material of manufacture. There are wooden (most often homemade) and metal workbenches offered by various manufacturers, both domestic and foreign.
Workplace for the soul
Wooden workbenches
A wooden workbench for the garage, made entirely or partially from wood, is suitable for periodic and short-term work with simple parts; it is not well suited for machining complex metal components. The frame of such models is made of strong wood (beech or oak) and secured with self-tapping screws. The stability of the table is ensured by additional spacers, transverse or x-shaped. Wooden models are usually equipped with shelves or drawers for storage. The wooden tabletop is trimmed with metal along the edge.
A common model is a design of two massive cabinets connected by a tabletop. This option looks quite practical, since it solves most of the problems associated with the placement of tools. Despite the relative cheapness and good (albeit somewhat limited) functionality, many believe that a workbench in a wooden garage has significant disadvantages:
The wooden bench is not designed for heavy loads
.
With intensive use
The service life of the frame is significantly
reduced
.
On our website you can find contacts of construction companies that offer metal structure installation services. You can communicate directly with representatives by visiting the “Low-Rise Country” exhibition of houses.
The table area does not allow for placing
several types of equipment at the same time.
becomes unusable over time under the influence of chemical agents (paints, solvents) and metal dust.
, and traces of oils remain forever.
Wood is a fire hazardous material
; in combination with the collection of chemical substances located nearby, this property increases many times over.
Metal workbenches
To assemble a functional metal bench, you will need special equipment and skills in working with metal (the fragments are connected by welding). Metal models, assembled in workshop conditions, have a durable construction and modern design. Despite the higher price due to the cost of metal and a more complex assembly process, metal equipment has many advantages, including:
Long service life
. Stainless steel models boast an impeccable service life of 50 years.
Large selection of models
and their configurations. Manufacturers offer both universal and highly specialized options.
Multifunctionality
. You can perform any type of work, including turning, cutting, grinding.
Mobility and compactness
. Many models can be disassembled (in whole or in part), and, if necessary, new tools (vises, clamps) can be added.
Light weight
while maintaining strength. The tabletop is resistant to deformation and damage (scratches).
Minimal care
. The design is characterized by increased resistance to corrosion processes and does not require painting. Cleaning metal dust and shavings from the surface of the countertop does not take much time.
Types of workbenches
There are carpentry and metal workbenches. The former are used for working with wood, the latter are intended for metals and other complex materials. There are options for dividing according to other criteria, for example, into single-seat and multi-seat, but they are not so important.
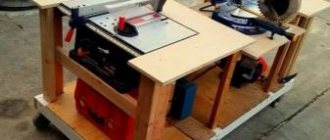
Next, we will consider the manufacture of an outdoor workbench. Its specificity is that it should not be placed in a workshop, but directly in the fresh air - for example, on a plot. Often such workbenches are placed on wheels so that they can be rolled into a dry place in bad weather, or they have a folding table top. The examples will examine the creation of a single-seat carpentry workbench.
Installing a vice on a bench
A vice is an indispensable attribute of a mechanic's workbench. It is not recommended to attach a clamping tool that weighs several tens of kilograms to the tabletop itself. It is best to place a metal gasket 1 cm thick between the metal of the table and the tool. You need to drill holes in the gasket for the anchor bolts. Then, in the same places, drill holes of the same size in the tabletop. The entire structure is fastened with anchor bolts.
Covering the workbench with plywood and installing a vice
Covering the workbench with plywood and installing a vice
Covering the workbench with plywood and installing a vice
What material is better to make a workbench for the garage with your own hands?
There are several options for making a desktop. According to the type of material used for manufacturing, workbenches are:
- wooden;
- metal;
- combined.
Combination workbenches use a wooden base and a metal sheet to reinforce the worktop. In addition, the design contains metal combs, as well as threaded screws. Combined devices include metal tables with drawers and tool shelves made of wood.
Advantages and disadvantages of a wooden workbench in the garage
The choice of material for making a table is primarily determined by its purpose. A wooden workbench in a garage is usually installed in cases where you need to quickly organize a workspace to perform simple operations. To create the frame part, you can use boards measuring 4x8 cm or timber measuring 5x10 cm. The rectangular base is assembled taking into account standard dimensions, and its components are fixed with nails or self-tapping screws.
A wooden workbench is installed in cases where it is necessary to quickly organize a workplace
To strengthen the structure, wooden spacers are installed in the upper and lower parts between the legs. The lower ones, which are located at a height of 15 cm from the floor, can be used as a basis for a shelf. To assemble the tabletop, a planed tongue-and-groove board made of oak or beech is suitable. You can also use a couple of sheets of moisture-resistant plywood 1.8 cm thick, which are glued together and sheathed along the edges.
To create a workbench in your garage out of wood with your own hands, you don’t need much effort or skill in handling a welding machine. The set of tools is minimal (electric jigsaw and drill), and the process itself takes much less time than manufacturing a metal structure.
On the other hand, a wooden table has many disadvantages:
- not able to withstand significant power loads;
- the working surface is not intended for the installation of several tools, which does not allow the simultaneous use of a heavy bench vice and sharpening or drilling;
- the wooden frame is short-lived;
- wood reacts poorly to humidity and contact with various paints, oils and other substances;
- there is a risk of fire.
The disadvantage of a wooden workbench is its inability to withstand large force loads
Advantages and disadvantages of a metal workbench for a garage
To assemble a welding table with your own hands, you will need special equipment and skills in handling it. The workbench elements are connected by welding. Not every craftsman can produce a high-quality metal structure. In addition, the table turns out to be very heavy, and the material itself, unlike wood, is not cheap.
Related article:
On the other hand, workbenches in a metal garage have many advantages that many car owners will appreciate:
- compactness with a high degree of reliability;
- ability to withstand severe mechanical loads;
- increased weight of the structure, making it more stable;
- a large selection of modifications (the design can be folding, mobile, shortened or with a folding tabletop);
- strength and reliability of all connections;
- fire safety;
- durability and ease of maintenance;
- the absence of sharp corners makes the tabletop safe;
- the working surface allows you to install two sets of vices;
- due to the high strength of the material, the table can be used for cutting and sawing, as well as grinding and turning metal and wooden parts;
- the space under the tabletop can be used to install shelves, organizers, grids and tool boxes;
- metal shavings do not damage the surface.
What is a workbench: structure and features of the desktop
A workbench is a multifunctional table in the garage, which is used for assembly, carpentry and plumbing, as well as electromechanical work. It serves as an ideal place for repairing or manufacturing parts, processing various materials (wood, plastic, metal), assembling and disassembling mechanisms, etc. If you properly organize the work surface, the workbench can be used for convenient storage of electric and manual tools.
The workbench is an excellent place for processing various materials, as well as repairing or making parts
Setting up a standard workbench in the garage
Most garages have limited space, so you need to be very careful when choosing a workbench design and its dimensions. The table should be compact, but at the same time as functional as possible. The size of a regular garage box is 4x6 m. If you subtract from its area the space occupied by a car, there won’t be much space left for setting up a desktop in the garage with your own hands.
Despite the fact that the designs of workbenches may differ from each other, there is a standard set of elements without which it is impossible to make a comfortable and functional table.
A metal frame must be taken as the basis for creating a workplace. This material has an increased margin of safety. The metal structure can withstand heavy weight loads, which, depending on the model, vary between 70-300 kg.
Important! If the table will be used for processing massive, large-sized parts, its frame part must be strengthened using diagonal connections.
Workbench designs may differ from each other, but there is a standard set of necessary elements
An essential component of a workbench is the tabletop. The material for its creation is selected taking into account the expected types of work that will be performed in the workshop. The table top of a workbench for a garage can be made from stainless or galvanized steel. MDF, moisture-resistant plywood or chipboard are also suitable for these purposes. It is allowed to use wood with a dense structure. Machine tools, clamps and other metalwork tools are installed on the surface of the tabletop.
Regardless of the material chosen, the tabletop must withstand not only shock and dynamic loads, but also contact with various chemicals, for example, solvents, paints, machine oil, varnish, etc. In conventional factory-made workbenches, the working surface is designed for a load of 300- 350 kg. In reinforced models, this figure is 400 kg or more.
Improved versions of workbenches in the garage with your own hands: photos of functional tables
A workbench without a cabinet in the standard version has the simplest structure. This option is the easiest to assemble and costs less. To increase the working surface and at the same time save free space, folding (folding) structures are usually installed.
The stability of the folding workbench in the garage is ensured by adjustable legs. At the same time, its tabletop is fixed to the wall. When the device is not in use, the working surface is in a raised state.
Single-pedestal workbench designs are more stable and reliable
Creating a folding workbench in the garage is resorted to only in cases where it is necessary to organize a compact workplace in a limited area. In this case, it is assumed that the table will be used extremely rarely. This design cannot be called a well-equipped workplace. In addition, the space under the folding tabletop must remain free, so it will not be possible to install cabinets or shelves for storing tools.
Helpful advice! It is still possible to organize places to store tools in tight spaces. For example, using life hacks for a garage workshop, you can easily install bearing guides with drawers with your own hands, or supplement a folding tabletop with cabinets on wheels, which can be easily moved to another location when the workbench is not in use.
Single-pedestal structures are more reliable and stable. The weight of such models is about 100 kg. These workbenches have a reinforced work surface and a cabinet equipped with drivers. The movement of the drawers is ensured by ball guides. In addition, the design may contain adjustable shelves. A central lock is used to lock the drawers. Some functional models may have a toolbar.
Models with two cabinets weigh 110-115 kg. Provided that the weight is evenly distributed, each box can support up to 30 kg of load. To make your workbench in the garage more convenient and functional with your own hands, it is recommended to supplement the structure with shelves or racks. A perforated screen can also be included in the package. It is a panel where hooks and holders are installed.
The space under the tabletop can be used to store tools
Types of workbenches in the garage: photos of structures for various purposes
According to their intended purpose, there are several types of workbenches, and each of them has its own dimensions. The carpenter's workbench is used less often. The design of such a table for a garage reaches 6 m in length. This size is necessary so that long and thick boards can be placed on the surface. Lumber clamps are also installed on the tabletop. They allow you to fix the boards in a stationary position, which greatly simplifies the process of processing them.
Carpentry workbenches are installed in the garage much more often. The working surface in the structure is usually fixed to a durable frame. The lid of such tables is made of iron or wood (dense species are used, for example, beech or oak). Due to the high strength characteristics, metal parts can be processed on this surface without the risk of damaging the coating.
To create a wooden workbench in the garage with your own hands, a pair of support posts are taken as the basis, which are fastened together using longitudinal beams. A vice is installed on one side of the tabletop, designed for fixing metal workpieces, and a rectangular cutout is made on the other. It is necessary so that additional vices can be moved along the working surface.
Note! The workbench tabletop must have holes that will be used for mounting clamps and stops. Without these devices it is impossible to carry out carpentry work.
To create a wooden workbench you will need a pair of support posts and beams to hold them together
Installing a locksmith table in a garage can be called a universal solution. In this case, the working surface is made of metal, thanks to which the master can safely work with heavy and hard materials.
A metal workbench with a vice is suitable for performing the following types of work:
- sawing;
- disassembly of mechanisms and engine;
- grinding;
- cutting;
- sharpening, etc.
Such structures are much more stable and durable than other workbenches, although they are quite heavy.
Workbench: this is the main element of the woodworker's workshop
In any workshop where they work with wood, there is always a carpentry workbench. Regardless of how the material is processed (manually or using a power tool), the presence of this element allows not only to properly organize the workspace, but also to make it more convenient and comfortable. All this ultimately affects the result. In such conditions, the productivity of the master and the quality of his work increase.
Any carpenter cannot do his work without a workbench.
A workbench is a work table that is used for processing wooden products manually or mechanically. Its design and ergonomic capabilities are designed in such a way that it is convenient for the master to fix parts in different positions to perform various tasks.
The workbench allows you to perform the following operations:
- assembly of wooden structures;
- production of wood parts;
- processing of workpieces with varnishing compounds and other means.
A carpentry workbench is a table on which a craftsman processes wood products. Note! A traditional carpenter's workbench is designed for working with lumber whose length does not exceed 3-3.5 m. To work with longer workpieces, you will have to use a carpenter's workbench.
Basic equipment
A workbench in a garage is an equipped workbench consisting of various modular elements, which include:
Metal carcass
(table). Its design is designed for a significant weight, from 70 to 300 kg (depending on the model). Tables designed for working with heavy and large parts (for example, wheels) are strengthened with additional diagonal connections.
Tabletop
for carpentry and plumbing work. Depending on the functions performed, it can be made of galvanized or stainless steel, chipboard, or plywood. The safety margin of the tabletop is designed to withstand dynamic and shock loads, and contact with chemically active compounds.
Accessories
. The workbench serves not only as a work area, but also as a place to store tools, spare parts and other equipment. Therefore, the mandatory components of the design are cabinets, screens, drivers (drawers), shelves, and hanging holders.
Every thing has its place
How to make a wooden workbench
An alternative to inexpensive and easy-to-use equipment is a wooden workbench table, made in the garage with your own hands. To make it, you will need:
- board with a treated surface, 40-50 mm long;
- rectangular box made of timber;
- self-tapping screws, nails, screws.
Tool:
- screwdriver or screwdriver;
- saw (hand or circular);
- hacksaw;
- roulette.
Cutting and assembling material for a wooden workbench will not be difficult for one person. The basic rule is to follow the sequence during the assembly stages:
- The first step is to make the vertical legs of the future design.
- The next stage is the assembly of two spatial devices. To do this, we connect the base of the table surface and the frame. The resulting design is a finished frame.
- We install the countertop in the selected location in the garage. We fix it with a beam on the back side for a stable position and rigidity. Attach carefully - be careful not to get into the transition points of the crossbars into the frames.
- Finally, we put a shelf at the bottom. The board can be taken with a small thickness.
- We treat the entire wooden surface with a special fire-retardant compound and water-based varnish.
Examples of arrangement
There are many options for placing DIY workbenches in your garage. The most successful of them are presented in the pictures.
You need to install the workbench in the garage so that it does not interfere with the car in any position. Also, it should not make it difficult to pass through the room and move bulky spare parts. It is advisable to place the structure in some distant corner.
Assembling a workbench yourself is quite simple. The process takes little time and allows you to save money on purchasing a finished device.
A garage is a multifunctional space. In it you can install and repair cars, design and make various things and mechanisms with your own hands.
Do-it-yourself workbench in the garage
Contents of step-by-step instructions:
Design Features
A workbench is a multifunctional table on which various work is carried out on the manufacture and repair of any metal, wood or other products. It is complemented by various drawers and shelves for power tools, spare parts, small parts, fastening and construction items. The universal table is useful for both welders and motorists, and thanks to its simple design it is quite easy to assemble.
You can make a workbench with your own hands in other sizes, taking into account your individual characteristics. Making a workbench is not difficult; materials that can be found in any hardware store, in the country house or in the garage are suitable for this. You can set up a work area in an apartment on a balcony or loggia, in a private house in the basement (if there is no garage or separate workshop) or under a canopy (outdoor option). The unpretentiousness of the design allows you to install workbenches not only for the home, but also in a home car service.
You need to choose not only a suitable workbench model, you also need to take into account its location in the room. The table should be located near a window or other source of lighting and be equipped with additional lighting. The drawing must be drawn up taking into account whether you are right-handed or left-handed.
You need to think through the design down to the smallest detail: what the base materials will be, whether the table will be roll-out or stationary, the number of sockets that may be needed, and much more. The more detailed you are about your ideal workplace, the easier it will be to bring your idea to life. There is no need to use industrial workbenches as a basis; it is labor-intensive and requires a lot of financial investment.
Design options
The functionality of a garage workbench depends on its design. For convenience, it is equipped with additional elements. Depending on the type of occupation, a workplace in the garage includes:
- Frame with legs. Serves as a supporting element on which the remaining parts are supported.
- Tabletop. The surface chosen is powerful, capable of withstanding hammer blows and the weight of placed objects. It can be made from a thick board or sheet metal; a combined design is relevant.
- Nightstand. Equip one or two compartments along the edges of the workbench. The internal content may consist of shelves and drawers designed for storing small tools in the garage.
- Additional shelf. Located on the wall in front of the workbench, its function is also to store available tools.
For work, it is better to choose a table or wall lamp with the ability to adjust the direction of light. There must be an outlet near the desktop, which is designed not only to provide lighting, but also to operate all power tools.
The idea of making a folding workbench in the garage with your own hands is not very practical. The main purpose of the folding structure on two legs is to save free space in the garage. In this case, the tabletop will be attached to the wall and will be in a raised state when it is not needed. But the essence of a workbench is a well-equipped workplace, when everything you need is at hand. And with a folding tabletop, the space under it should be free; there can be no talk of any bedside tables or shelves. This option is acceptable for garage owners who have limited space and who rarely need a workbench.
Manufacturing instructions
The workbench, which will be constructed from the specified materials, has a length of 2.2 m and a width of 75 cm. Such impressive dimensions will allow you to place a vice, emery and other tools in the corners of the table.
Assembling the base
The construction of the workbench frame is carried out according to the following algorithm:
- The material is cut into its constituent particles. A profile pipe is necessary to form the base. A steel angle is required to create ribs that give the mechanism strength. It is divided into several parts, after which the power base is assembled on it. It will be useful in making edging for the table top. Boards will subsequently be placed on top of it. In order to construct the guides on which the side panels will be fixed, it is necessary to use a steel strip. It will be useful as the basis of the brackets that hold the plywood and boxes together. The table drawers are made of plywood sheets.
- After this, they proceed to welding the power base of the device. The procedure begins with connecting the parts of the tabletop - two pipes of 220 cm and two of 75 cm. The frame must be welded in such a way that another base, which would consist of corners, is placed on top of it. Boards from the table top are laid inside it. In order to reinforce the tabletop, it is necessary to weld another series of steel pipes every 40 cm. They are needed to serve as strength ribs.
- The next step in assembling the workbench is to weld the four side legs along its edges. The length of each of them is 90 cm. In order to make the structure stronger, it is necessary to weld the power gaps between the legs of the device.
- After this, the basic base should be considered complete and we proceed to welding the structure for the boxes. In this case, steel pipes are used, on the basis of which square-shaped frames are made. They must be welded to the tabletop on both sides of the table. Due to the presence of longitudinal strength ribs, they are strengthened.
- Then they begin to make the base for the tabletop. To do this you will need four steel corners. The length of two of them is 220 cm, and the length of the other two is 75 cm. It is necessary to weld this structure so that wooden boards are placed inside it.
- The frame based on the angle is placed on a pipe base and then welded. The result should be a reinforced tabletop. Its height is 8 cm, and there are stiffening ribs inside the device.
- The final step in constructing a metal workbench is to weld the panel sheathing onto which the tool will be attached. In this case, one metal corner is required, the length of which is 220 cm, and four more corners with a length of 95 cm. Two of these elements are fixed on the side parts of the structure, and two more are located in the center. They are necessary for the overall strengthening of the device. The tool panel is fixed to the tabletop by welding.
- The base, made of pipes and corners, is completely ready. This structure needs to be strengthened. Brackets cut from a strip of steel are welded to the side parts of the table. The number of these parts is 24.
- One through hole must be drilled in the central part of all brackets. They are needed to attach the back and sides of the plywood table to the metal base of the workbench.
Read also: Storing sheet metal vertically
Assembling desk drawers
This process consists of the following steps:
- The plywood sheet must be cut into pieces that are connected to each other using screws. The number of boxes produced should vary depending on what kind of tools are planned to be stored inside them. For small parts you will need about three boxes, while for storing large parts, two boxes will be enough. They can be placed on both sides of the table, or retractable structures can be constructed on one side, and regular open shelves can be placed on the other side.
- Upon completion of the assembly of the drawers, it is necessary to weld metal strips for boxes equipped with special holes between the side parts of the sections. On the inside, the slides for the guide boxes will be attached to these holes.
- After this, boards begin to be laid into the base of the tabletop. Their thickness should be 50 mm. The wooden material needs to be cut into various pieces of the required length. If there are long boards available, then you will need three blanks 219 cm long and 24.5 cm wide. If you only have short boards, make blanks that can be placed across the table. For this purpose, wood 20.5 cm wide is crushed into ten pieces, the length of which is 74 cm.
Final work
After assembling the boxes, follow these steps:
- Before the wood is placed inside the table base, it must be thoroughly treated with an antiseptic. This will protect the workpieces from damage by beetles and other harmful insects, as well as from rotting.
- An important step in constructing a workbench is painting all metal elements. This procedure is used to protect the device from damage by rust. It is preferable to use an anti-corrosion, weather-resistant type of coating. Particular attention must be paid to welding seams.
- If there are any irregularities or drops of metal on the surface of the mechanism, they must be thoroughly cleaned before proceeding to painting. For this purpose, an angle grinder equipped with a disk for metal processing is used.
- The device is given time for the paint to dry, after which the boards begin to be laid on the tabletop. Do not press them too tightly together inside the base. The reason for this is the ability of wood to dry out and expand after changes in humidity and temperature conditions. It is necessary to maintain a gap of several millimeters between the workpieces.
- The surface of the boards is pre-sanded. This will help to lay a sheet of metal on top of the wood. Along the entire perimeter of the table, it is necessary to fix the boards to the frame using self-tapping screws.
- After this, they begin to attach the top sheet of steel. It is possible to weld it to the countertop, but there are wooden pieces inside the device, and there is a risk that they will ignite from a spark. Therefore, for safety reasons, the sheet is attached to wooden boards using hidden screws.
- Before this, it is necessary to treat the metal surfaces with a rust converting agent. This covering material looks like a transparent paint coating. It has the ability to quickly recover and prevents the development of corrosion.
- The steel tabletop can be painted with the same paint that was used to paint the frame. This will improve the aesthetic appearance of the device, but after some time the paint will begin to scratch.
- The assembled boxes are placed on the guides, after which the plywood sheet is attached to the sides, power panel and shelves. After this, the plywood should be coated with a special protective compound.
- Then you need to properly design the power shield. You can attach screws or hooks to it for some things. For the convenience of working at a workbench, you can attach a table lamp with a bending stand to it.
- A vise is installed on the workbench. This is a heavy tool, so it is not recommended to attach it directly to the tabletop. Instead, a 10mm thick metal spacer should be placed between the steel sheet and the vice. It is necessary to make through holes in it. Holes are drilled in the same places on the tabletop, after which the structure is fastened with anchor bolts.
Construction of an inspection pit
Of course, you should take care of the presence of an inspection hole at the construction stage of the structure itself, strengthening the foundation and constructing the base. But no one forbids adding it to the garage when it has already been built.
Of course, when there is no particular desire to completely immerse yourself in the nuances of construction work, you can turn to qualified specialists for help, who will help you complete the garage with such a plinth for a monetary reward.
The inspection hole, in addition to its main purpose, can also be used as a cellar. This, by the way, is a very interesting idea. In addition, entering the cellar through an inspection hole, especially when it is equipped with a stepped entrance, is much more practical than in the case of a free-standing basement with a vertical iron staircase.
When constructing a viewing hole, you should adhere to the following basic principles:
- The inspection pit is concreted and waterproofed along the entire perimeter: walls, floor. This will prevent further penetration of moisture during rising groundwater, precipitation and melting snow. Also, concrete walls crumble, thereby not endangering the motorist who is under the car while it is being serviced.
- As was previously the case, in order to comfortably descend into the inspection hole, it is better to equip it with a convenient ladder.
- It is advisable to equip the inspection hole with a drain hole. This will allow water and other liquids that accidentally fall on the floor to drain away. This hole is equipped with a grate.
- Don’t forget to think about opening/closing the inspection hole. Keeping it open all the time is unsafe. The optimal solution would be a sliding deck equipped with small handles.
- Also, at the stage of constructing an inspection pit, it is worth thinking about organizing work directly in it. Everything necessary for carrying out repair work should be at hand. You can make shelves and niches in the walls where the owner stores tools.
- And yes, it is definitely worthwhile to provide lighting in the inspection hole. Having good lighting makes working much easier.
Safety requirements for a homemade workbench design
Any design must first be safe, and then functional and practical.
Drawing of a workbench for garage work.
Working on a workbench carries potential danger, so it must meet the following requirements:
The workbench must be securely fixed to the floor and not wobble during work. A table covered with sheet steel must be equipped with a protective mesh at least 1 meter high, running along the entire length of the workbench. The workplace should be designed conveniently and ergonomically: everything is at hand and nothing interferes with the work process. The corners of the tabletop should not have sharp edges. The wedges in the holes should be attached firmly, but not so tightly that the edges do not chip. The holes are made the same size. The screws are well lubricated to ensure smooth movement of the workbench running parts. They are made of metal, less often wooden
At the end of the work, they should be loosened slightly and kept loose. The surface of the tabletop is sanded; it is important to achieve smoothness and absence of defects. The working surface must be constantly cleaned of chips and oil. Keep the floor near the workbench clean, otherwise injury may occur. The jaws of the vice must have soft gaskets to ensure reliable fixation of the workpieces. When using multiple vises, they should be spaced at least one meter apart. It is necessary to use vibration-damping rubber pads when working with power tools. You should not place hot things on the workbench, spill water on them, or place heating appliances near it. When drilling, sawing and other work that can damage the surface of the tabletop, you should place a protective board under the workpiece. A properly designed workbench can withstand a load of about 200 kilograms.
Important! The master must also remember about his safety. The workplace should be well lit, the tools should be in good working order, the vice should be equipped with an unworked notch and the parts should be firmly secured
You should work in special safety glasses.
More advanced requirements for work tables are described in GOST 20400 and GOST 22046. The workbench must meet all safety requirements and only after all conditions have been met should you start working.
Drawings and dimensions of workbenches
The workbench can be assembled of any size, but for ease of work it is better to stick to the optimal dimensions. Therefore, first you need to prepare drawings and diagrams where all the exact parameters of the table will be displayed.
The main indicators include:
- length. The parameter is determined by what work will be done on the table, as well as the free space in the room. On average, the length chosen is about 2 m;
- width. The workbench is installed, as a rule, along the wall, and it should be possible to reach the tools located on the shelf or in the bedside table. It is recommended to make the width no more than 60 cm when placing the workbench next to the wall;
- height. This parameter depends on the person’s height. The standard value is 0.8-1 m.
The structure of a universal workbench
A workbench, like any other specialized furniture, has several options that differ in shape, size, type of construction and purpose. But traditionally, the workbench model has several components:
- The tabletop is the right size.
- An underframe with compartments for storing tools and drawers.
Directly on the tabletop itself there are vices (clamps), carpentry tools, planes, and wood processing machines.
Other types of tools can be installed on the surface of the workbench, depending on the purpose of the structure and the professional occupation of the owner of the workshop or garage.
Let's sum it up
Now you know how and what to make a workbench from, which means you can set up a garage or home workshop. Additional details on the topic can be found by watching the video in this article.
Did you like the article? Subscribe to our Yandex.Zen channel
November 28, 2022
Garage,Furniture
If you want to express gratitude, add a clarification or objection, or ask the author something, add a comment or say thank you!
DIY garage compressor
A compressor is needed in any garage. And, by the way, this is not the most difficult homemade product for the garage. A low-power compressor for the garage for inflating tires and other small jobs can be made with your own hands from auxiliary materials. For example, from a compressor from a refrigerator. For this you will need:
- refrigerator compressor;
- a sealed cylinder with thick walls (you can use a fire extinguisher flask or a small gas cylinder);
- safety valve 8 atm;
- pressure gauge;
- fitting;
- oxygen hoses with couplings (select the length based on the size of your spare parts);
- base for the compressor - a thick board or piece of plywood will do.
In order not to pump any nasty stuff into the tires, it is advisable to also install a filter to separate oils, dust and other contaminants. The diagram of a homemade compressor is shown in the photo.
Homemade compressor diagram
The compressor must have a starting device. We plug it into the network, see which tube the air is sucked into, and mark it. You can put a car filter on it - clean air will be pumped in.
We assemble an oil separator receiver from a cylinder and a safety valve. To do this, we cut two fittings into the cylinder - for air inlet and outlet. We place a safety valve on the inlet hole and connect the compressor outlet to it using an oxygen hose.
Homemade compressor for the garage based on a compressor from a refrigerator
We install another automobile oil filter at the outlet of the oil separator receiver to completely remove the oil. We connect the filter to the pressure gauge, and from it comes a hose, which is connected to the tire through the appropriate adapter.
Assembly is complete. But in order to carry this device comfortably, everything needs to be secured in some way. You can weld the frame to size, attach wheels and a handle for easy transportation. One of the compressor options for inflating wheels is described in the video. There is no receiver, but its functions are performed by an oil filter. You can do it this way, but with a receiver the design is more reliable.
Since the compressor in the refrigerator is low-power, it may take a long time to inflate the tires. You can make it more powerful by installing two compressors that will start simultaneously. Accordingly, the pressure will build up twice as fast. But such an installation requires a more robust security group. Such homemade products require a little more equipment, since the circuit is still more complicated.
Requirements for a workbench in the garage: dimensions of the structure
In order not to lose sight of anything important, you must make a preliminary plan for the manufacture and assembly of a workbench with your own hands; a drawing with dimensions is one of its main points. This takes into account the area of the garage and the size of the vehicle.
On average, the length of a workbench in a garage is about 1.5-2 m.
The length of the table depends on the amount of free space in the garage, as well as on the intended types of work. On average, this figure is about 1.5-2 m. When choosing the width for a future workbench, you need to take into account the nature of the placement of tools and other objects around the table. Shelves on the wall must be freely accessible. For this reason, it is undesirable to make a tabletop more than 60 cm wide, otherwise you will not be able to reach the necessary tools with your hand. If the workbench is located in the center of the room, then the width of its working surface can be increased.
The height of the bench is selected individually. The dimensions of a desktop differ significantly from the dimensions of a dining table. They are calculated taking into account the height of the master, as well as the position in which he is used to working. The standard figure is 80 cm. However, working at such a table in a standing position will be inconvenient. To prevent your back from getting tired, it is recommended to increase the height to 100 cm.
There is an effective way to accurately determine the optimal height of the workbench. To do this, you need to take a position in which it will be comfortable to rest your elbows on the table while standing. All that remains is to measure the distance from the elbows to the floor.
On a note! If the design of the workbench is designed for work in a standing position, it is necessary to provide a wooden stand for the chair in case you want to sit at the table. The standard height of a table in a garage is 80 cm.
On one side of the workbench a power tool is installed. This edge of the tabletop should protrude beyond the frame by about 20-30 cm. If the work surface is made of wood, it should be protected with a metal sheet. Stainless steel with a thickness of 1.5-2 mm is best suited for these purposes. Although a regular steel sheet 1.5 mm thick will be cheaper.
Workbench options
To determine the size of the workbench, you need to understand how much space in the garage you are willing to allocate for a workplace. The choice of design for arranging a garage is based on several indicators:
Depth
. Most garages have modest dimensions. Taking into account this limitation, for use at home, workbenches with a tabletop depth (width) not exceeding 0.5-0.6 m are preferable.
Length
. An important parameter that should not be reduced unless absolutely necessary. The longer the tabletop, the more convenient it is to perform metalwork work on it and install auxiliary tools. If you intend to use a circular saw or an electric jigsaw, you will also have to allocate part of the countertop for this work. In practice, most garage owners prefer to install workbenches about 1.5-2 m long.
Compactness is one of the advantages
This might be interesting!
In the article at the following link, read about calculating a garage for 1 car.
Workbench height
in the garage. It is determined by the convenience of the owner and depends on his height. On average, the location of the tabletop at the level of the middle of the hands is considered convenient (if you stand next to each other).
Technical clearance
. For high-quality cleaning, it is convenient for the lower part of the structure to be raised above the floor by 15 cm.
Strength
. Welded structures with a supporting frame support of 6-8 legs have the necessary strength. Since most car maintenance work is metalworking, a metal workbench is the best choice.
Functionality
. To make work comfortable, a spacious countertop is not enough. Racks, shelves and drawers are of great importance. All of them should be located at a convenient distance from the working area; It’s good when tools, power points, materials and containers for small items do not interfere with the work, but are always at hand.
Preparatory work
Creating a drawing of a workbench is an obligatory part of the preparatory stage
Preparation for assembling a workbench consists of determining the design features, choosing the dimensions and installation location of the structure. In order to ensure that not a single moment escapes attention or is forgotten, it is recommended to create a working drawing of the workbench, made to scale with reference to the size of the garage
Particular attention should be paid to the height of the tabletop - it differs significantly from the height of a regular dining table. The optimal option is the height from the floor to the bend of the elbows of a person standing straight
Considering the difference in height between different people, assembling the optimal workbench for yourself can be a very useful exercise.
In addition, we must remember that the width of the tabletop should not be too large. The size of the garage is relatively small; you often have to work next to a car parked inside.
You will need space for a person to pass through, so the optimal width is considered to be 50 cm. You also need to decide on the size of the shield for the tools that are needed most often.
Features of the workbench design
A workbench for a garage is often compared to a desk because it provides convenience for a variety of tasks and makes it possible to keep all the necessary tools at hand. Thus, in addition to the tabletop, it has a large number of shelves and drawers. The design of the workbench consists of the following elements:
- The supporting element is a frame with legs. Everything else rests on it.
- Tabletop. Presented as a thick and powerful surface that can withstand hammer blows. Made from sheet metal or thick board.
- Nightstand. There may be one or two and they are located at the edges of the tabletop. They are equipped with shelves, drawers, or both. They usually store small tools or spare parts.
- Additional shelf. It is mounted under the countertop and is most often used for storing various fixtures, tools and other necessary things that may be needed during repair work.
The workbench must be well lit. To do this, install a stationary rotating lamp, which is plugged into an outlet. It can be installed on the wall, near the workbench, but it is much more practical to build electrical equipment directly into it. In this case, there will be no problems with electrification if you need to install the table in a new place.
Workbenches for garage
Workplace organization
The average garage doesn't have a lot of free space. In addition to compactness, the criterion that influences the parameters of a desktop is the amount of work to which you are going to devote your time. If you expect that you will not only drill and hammer nails, but also do more complex manipulations, you should think about a larger table. It is more convenient to carry out periodic processing of parts or workpieces if the vice and the sharpening or drilling machine are in assembled condition. The garage owner will have to find a solution for several more problems:
Read also: Cross-sectional area unit of measurement
Storage
. Due to limited space, the workbench has another important task - providing convenient storage conditions. The right workbench is used not only as a work desk, but also as a convenient container for consumables, spare parts and tools.
When everything is at hand
Selecting a location
. A specific garage task is choosing a place for a workbench. Two conditions must be met. Firstly, the distance between the car and the workbench and shelves in the garage must be at least one meter. The second condition is that you must be comfortable working near the machine without the risk of damaging it.
Electrical connections
. Electrification must be safe, taking into account the influence of dampness and aggressive liquids common in garage work. Electrical wiring must be laid in fireproof corrugation or hidden in grooves. If your electrical panel has a metal casing, it must be grounded.
The car should not be a hindrance
Lighting
. Considering that there are always shadow areas in the garage (from the car, shelves and racks), a combined system of several light sources designed for different tasks would be a practical option. Above the workbench, in the work area, it is convenient to install a bright turning lamp, protected by a lampshade. The lamp can be made removable; It is also convenient to build it into a workbench, rather than fixing it on the wall - if you want to move the table, there will be no problems with electrification.
This might be interesting!
In the article at the following link, read about the interior decoration of the garage.
Technology for creating a carpentry workbench with your own hands: drawings, dimensions and procedure
The most convenient option for a private home or garage is a design with a hinged lid. Unlike a folding workbench, its working surface rotates rather than unfolds. This design option has a completely different structure, although it is no less functional and compact.
Drawing of a wooden carpentry workbench with dimensions.
Mobility is achieved due to the presence of wheels installed on the bottom. To prevent arbitrary movement of the structure, it is advisable to use rollers with a locking function. As a last resort, you can install a wedge under the wheels, but this option is not so convenient and practical.
On the right side of the design there are pull-out drawers for convenient storage of small items. If the table will be used by a left-handed master, they should be placed on the other side so that everything you need is at hand. In addition, the workbench is equipped with a special holder. It is made of perforated plywood and mounted on the back of the cabinet. Thus, it becomes possible to make maximum use of the surface of the workbench and organize additional space for storing small tools for carpentry.
On the left or right (for left-handers) there is an open compartment in the design. It is suitable for placing narrow, tall equipment such as a drilling machine. Thanks to the roller mounted on the edge of the tabletop, the process of processing long lumber is greatly simplified, and due to the multi-socket outlet, you can simultaneously connect several tools to the network.
Racks and tool boxes
If you type the phrase into a search engine: “how best to place tools in a garage or workshop,” the Internet will return dozens of options and hundreds of photos. Often, these are beautiful and expensive devices from foreign sites. We need something of our own - native, and preferably cheap or even free. And we have it! Let's turn to the personal experience of FORUMHOUSE users.
Vreeon
Tell us how you place the tool in the workshop so that it is out of the way and always at hand? Especially if there is a lot of it.
Andrey 203Administrator FORUMHOUSE
I try to buy power tools in cases. If there is no case, then I store the tools in the original box.
vreeon
What to do if there are no cases or boxes?
OlegychModerator FORUMHOUSE
I cut strips from 5 to 25 cm wide from plywood 1 cm thick. I run them through a woodworking machine with a saw blade. It turns out to be a groove. Then I assemble boxes with a sliding lid from these strips. Box size for a specific tool. If you need to store small items, I make an additional compartment.
A description is, of course, good, but when it comes to storing tools, it is better to see once than to hear a hundred times. See what portal users offer.
Qzmich-NN
I refused to buy ready-made “organizers” for the tool. I made a drawer. I drilled holes in the laminated chipboard cover for a specific tool. Now you can’t put a flat-head screwdriver in place of a Phillips head.
And these are life hacks from Ivanrin. All tools are laid out in their places on the shelves.
To maintain order in the workshop, immediately, and not later, put the tool back where you got it from.
Ivanrin
I was lucky, I was able to buy used metal shelving from a store on the cheap. I took 7 pcs. The width of the shelves is 500 mm. Now my instrument has room to roam.
The shelves can withstand loads of up to 50 kg.
This “storage” looks neat and there is enough space for everything.
Experience shows that the optimal depth of shelves is no more than 40-50 cm. If it is deeper, then you will have to climb far to get the tool. It is not comfortable. True, there is a nuance: storing various small things in jars and containers is more convenient on shallow shelves, 15-20 cm wide.
Convenient containers for small items, made from plastic meat or salad trays.
Ivanrin's workshop after putting things in order.
And this is a homemade plywood box for storing a jigsaw, which was made by ShmulikShleperson.
Comfortable. Practical. Mobile.
Making your own compressor
An air compressor is a useful craft that can spray paint. To make it yourself, you will need a car accessory used to inflate wheels. The compressor must be powerful - quickly create pressure up to six atmospheres, without loading the engine, and also productive - release compressed air quickly, giving a strong flow. To combine both performance and power, you need a high-speed engine equipped with a positive displacement piston system. The device can overheat, which will inevitably lead to stops during operation, so you will have to organize sufficient cooling for the cylinders. To reduce the cost of the design, a receiver is used - a storage tank, which is a steel cylinder. To make a small compressor, take an electric motor from a toy or a device that supplies water to an aquarium with fish.