A tool storage box is necessary for everyone who does carpentry or plumbing work. It is necessary for safety during transportation and quick access to the necessary tool.
Industrially produced tool organizers often do not meet the needs of customers. Besides, they are too expensive.
There is a way out of this situation - making a tool organizer for plumbing and carpentry tools with your own hands.
Tool organizers
There are 3 ways to store tools:
Special holders on the wall, bedside table and other places. This option is suitable for those who have their own workshop and spend a lot of time there.
A fabric organizer or backpack will satisfy those who have few and small tools. Its disadvantage is its short service life and insufficient capacity.
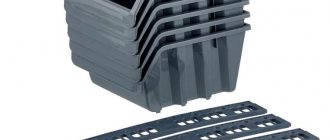
Tool organizer in the form of a box with removable or fixed compartments. This option is suitable for mobile craftsmen moving to work with different customers.Interesting ideas
In addition to the basic options for organizers, which are used for systematic and convenient placement of equipment, there are also more interesting and creative options.
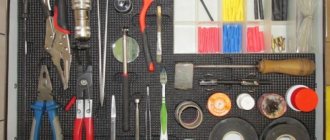
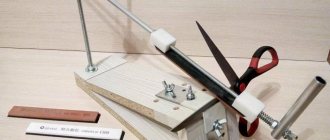
A true master easily uses available tools to place certain tools. Metal keys, if there are not very many of them, can be hung on a magnetic strip; for small round parts, drill the same holes in a wooden shelf, and for equipment with handles, there is an option to place them on special hooks that are simply screwed into the wall.
If there are not too many tools at home, then you can carefully place them on one wall, building your own holders for each tool. Using wooden and plastic elements, you can make supports in the form of protruding elements on which tools are placed, drill holes for miniature equipment, make a simple shelf for various useful little things, and also supplement the organizer with hooks or screws screwed into a wooden surface.
The most convenient would be a wall organizer that looks like a cabinet with opening doors. When closed, all the contents are not visible, and the room seems much cleaner and tidier, and thanks to the doors, there is additional work space that can be rationally used by placing small tools on it.
To learn how to make a tool organizer, watch the following video.
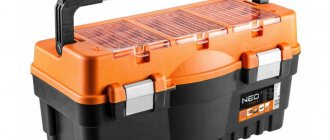
Tool box
Before you make a box for plumbing tools at home with your own hands, you should decide for yourself the question of the number of items to be carried and its structure.
For manufacturing, plywood sheets or wooden boards are most often used, and their thickness must correspond to the weight of the load.
For storing lightweight consumables and accessories, the wall thickness can be from 5 to 8 mm. For heavy tools and devices, their thickness should be at least 1.2 cm.
For ease of transportation and access to small fasteners, for example, nails, screws and others, it is necessary to provide removable or retractable compartments in the organizer design.
To make the best choice of model, you should familiarize yourself with photos posted on the Internet of various types of handmade tool boxes that you have made yourself, which do not require special equipment for manufacturing.
What do we need?
Tool cabinet – very convenient for storing small items
To create a tool cabinet you will need:
- Boards. The best option for such furniture is pine. If we talk about quantity, you are guided by the dimensions of the future device. To organize space, you can use not only shelves, but also walls on which it is convenient to place heavy tools. Based on this, you should choose thick boards for the general box and thinner ones for the shelves.
- Plywood. With its help, partitions and a back wall are made in case it will not be used to store tools. We select the amount of material used based on the dimensions of the product and the number of partitions in it.
- Metal corners. It is important to use special furniture fittings. It is this that will ensure the finished product’s reliability and strength. If you plan to make a tool cabinet where the doors will open, stock up on hinges.
- Screwdriver. Grab your bits and drills right away so you don't have to search for them while working.
- Power saw. A hacksaw might also come in handy.
- Screws with nuts. Brass fittings are considered the most reliable, as they are durable and can withstand moisture and stress.
Self-tapping screws will be used for additional and temporary fastenings.
Device
The box consists of a bottom, walls, 2 sides and a device for a handle. These parts are used to assemble a structure in the form of a box that does not close at the top, with a small tray for small components.
Before starting work, you need to prepare drawings of a box for plumbing tools of the chosen design, which you will have to make yourself at home.
The material for the manufacture of walls, internal partitions and tray is a plywood sheet with a thickness of 0.6 to 0.8 cm.
Another sheet, 1.2 to 1.5 cm thick, is used for the bottom and carrying structure. The handle is made of a steel rod Ø 1.2 - Ø 1.5 cm or a wooden block Ø 2.0 - Ø 2.5 cm.
Assembly
The initial stage of assembling a cabinet is creating a frame . A frame is assembled from boards, as mentioned above. The boards should be cut to specific dimensions indicated in the drawing. The side walls, bottom and lid are assembled from the boards.
Advice . Make sure there are no wide gaps between the boards.
For assembly you need:
The boards should be joined according to the drawing, and then secured with auxiliary fastening (nails or self-tapping screws).
This type of fastening will not hold the structure under load too firmly, but will significantly facilitate the fastening procedure itself.- Having assembled the frame on the “temporary fasteners”, you can proceed to the installation of the main fastening. Take furniture corners and secure all the joints with them (using self-tapping screws, of course). When the structure is firmly fixed, you can begin to install furniture screws and nuts. For this purpose, the ends of the walls are drilled in the places where the shelves and the lid are attached. Please note that the length of the drill and screw must match.
- The next step is to drill holes for the furniture nuts. They need to be made perpendicular to the already drilled holes in the shelves, roof and bottom. This is the most difficult and responsible stage. Once all the holes are ready, install the main fasteners.
Congratulations, the frame with shelves is now complete!
The next stage is creating the legs . To do this, a beam is attached to the bottom of the frame (only on the reverse side), as if runners were attached. You don’t have to worry about overly strong fasteners - just use cheap self-tapping screws. After this, pre-prepared legs are attached to them in the corners.
The final stage is boxes . They are created by knocking down a frame of the desired shape and size. The bottom is attached to this frame from below. If it is necessary to add shelves, cuts are made on the inside where the partitions will be mounted.
Advice . If the creative passion has not passed, you should start making a cabinet for books or clothes.
Stages of work
Sequence of operations for making a simple box for plumbing tools from plywood with your own hands. The bottom, walls and other parts are cut out using a pre-prepared template, the contours of which are transferred to a plywood sheet with a marker or a special pencil.
To remove burrs, the edges of the holes are ground with abrasive paper. Then the tray parts are glued together and fixed using tenon joints. This will give the structure strength.The manufactured tray is glued to the bottom between the parts that have holes for the handle, and is additionally secured with small nails.
Using glue, the bottom and sides are assembled in the shape of rectangles; the strength must be further increased with nails. Then you should insert the handle and secure it with nails or any other way.
A metal rod with threads at the ends is secured with nuts and washers. It should be taken into account that the hardening time of the glue directly depends on its brand and the temperature at which gluing occurs.
Internal connections are strengthened by gluing bars of rectangular or triangular cross-section at the joints between the walls, sides and bottom. The bars are additionally secured with screws or nails.
Let's start production
Choosing wood
We take traditional material - edged coniferous boards. As for processing, this is the simplest and most affordable material, which also has good strength properties.
As planned, it will be a wooden box, and our task now is to materialize the drawing itself into material. For this task we will need a ruler and a pencil. After this, we mark the material and use a hacksaw or jigsaw to cut out the component parts of the product. If we planned a regular non-closing option, then we need to make five planes: four walls and a bottom.
We need 5 parts
After this operation, we can further strengthen the box with fasteners - self-tapping screws. Secured. Now you need to make a handle. This could be an ordinary wooden strip, which we need to nail or screw to the upper edges of the side elements.
The box is ready
So we made the box. Then, so to speak, according to taste, you can sand the edges of the product a little with sandpaper of different grains and even open the product with varnish, and then, one might say, the product is ready for use.
Tools in the drawer
Organizer
Following the principle “from simple to complex,” let’s now talk about the organizer. It is clear that in the open-top box, which was described above, you can put large tools: a hand saw, a hammer, a mallet and much, much more.
Where do you put the little things? There are all sorts of screws, bolts, nuts, etc. These small fasteners tend to get lost or not be there exactly at the moment when they are especially needed. This is where we need an organizer.
Wooden box with organizer
As already noted, this type of box by its design is the most functional in operation. What is he? This is kind of like a box on a box, or rather, many drawers in one section for storing not only medium-sized tools, but also all sorts of small things. Of course, at first glance, it may seem that making such a structure would not be easy. But it only seems. Difficulties mainly arise in the manufacture of the sliding mechanism. Everything else is much easier to do. Now in more detail about the manufacturing technology.
- We start by making the main body. It must be open and deep so that we can place various medium-sized tools (hammers, wrenches, etc.) in it. We can say that the design of this main body is quite simple, but in essence it is an ordinary box that can be divided into several sections using vertical planes.
- The next stage is the production of 4 smaller boxes. You probably noticed that the number of these sections is even, and we mentally divide them into pairs, trying to adhere to the dimensions of their lower large brother when manufacturing. They will be installed on top of each other. One pair of boxes (top) will have lids. They will either be folding on piano hinges, or retractable like a Soviet school pencil case.
- Now all that remains is to connect these boxes together. We will do this using metal connecting strips. We will need 6 pieces. On one side, as well as on the other side, we hook one plate at a time (short) to connect the two lower boxes - small and large. Two more plates (long) will connect all the boxes together. And finally, the longest bar will serve as a handle, and at the same time connect the two upper floors of the organizer. As you can see, there is nothing complicated here, and the sliding mechanism is extremely simplified, as is shown in the example of a metal organizer - the principle is the same.
Folding tool organizer
Made from curved metal sheet. At joints, structural parts are fastened with rivets and welding.
The design of this folding box for plumbing tools, made at home with your own hands, makes it easy to find and remove the tool needed for the job. Its production does not require professional qualifications.
The main requirements are precise adherence to the locations of the tool fastening elements and the availability of materials of the required strength. The folding book-type tool organizer is easy to manufacture and easy to use.Materials and design principle
To make a homemade organizer, choose the material according to availability and preferences. You can make a tool box with your own hands from:
- wood;
- plastics;
- metal
You can quickly and efficiently build a box for repair equipment if you select a container that is suitable in size and equip it with convenient compartments and drawers. The design depends on the idea conceived. It is important to ensure the tightness of the compartments, select a material that will support the weight of the contents, and equip the device with reliable loops, hooks, and runners.