If you are planning to equip your own workshop or just a workbench or work table, you will need a lot of tools and equipment. Some of them you can make yourself, for example, it’s not difficult to make a vice with your own hands, since in any case you can’t do without them.
There are many types of clamping devices, but for a small workshop or garage workbench, a bench or carpenter's vice is usually used. This article presents more than twenty options for homemade vices - carpentry and metalworking , as well as instructions for restoring and improving factory models.
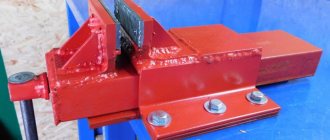
What to paint with?
Products for painting bench vices can be like this.
- Hammer enamel. This type of painting leaves behind an attractive appearance of the instrument. But it is worth considering that the paint easily chips under mechanical stress.
- Epoxy paint. Reliable type of painting. It has no cons. A minor drawback is the small color palette of the presented assortment.
- Sadolin paint. Car paint. Before work, the surface should be well primed.
- Set for painting bathtubs. White epoxy two-component paint is suitable for bench vices.
Those parts that are not planned to be painted can be sealed with tape. Some craftsmen advise using soapy newspaper. It also adheres well to the surface. There is no need to paint the threads and those places where some parts move or are inserted. With further use, turning the handle will be quite problematic.
As you can see, it is quite possible to restore a mechanic’s tool at home. Of course, you should not bring the device to a deplorable state. But some recommendations will help restore even those instruments that have not been used for a long time and are covered with a coating of rust.
It is also necessary to observe safety precautions when performing work. It is worth remembering that you should wear a mask and safety glasses when working with paints and sanding tools.
Restoration of a bench vice is presented in the video below.
Tools and materials
To process steel elements of a carpentry vice you will need:
- Bulgarian.
- Brush attachment.
- Metal disc.
- Welding inverter.
- Electrodes.
- Drill and drill bits.
To make wooden parts you need a power saw, a plane and a sander.
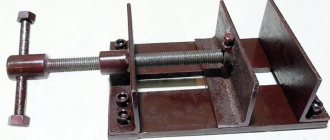
Select two round or square steel pipes so that one pipe fits snugly into the other. Use a threaded rod with a diameter of 12–18 mm as a lead screw. Prepare corners for the ties, the walls of which should be 2 times wider than the hole drilled for the screw.
Vise for a carpenter's workbench - drawing.
Red dots mark lubrication points.
A table of significant details and dimensions of the metal part of the carpentry vice that explains the drawing.
| № | Detail | Explanation |
| 1 | fixed guide | pipe 25x25x2 mm |
| 2 | auxiliary hole | |
| 3 | screed support | corner 24x24 mm |
| 4 | lead screw nut | |
| 5 | mounting hole | |
| 6 | lead screw | 300 mm long |
| 7 | movable guide | pipe 20x20x2 mm |
| 8 | thrust washer | |
| 9 | rack | corner 24x24 mm |
| 10 | screed | corner 32x32 mm |
| 11 | knob | pipe or rod |
| 12 | jaw mounting holes | |
| 13 | movable sleeve | |
| 14 | collar sleeve | |
| 15 | fixed bushing |
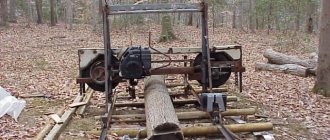
Carpentry tools from auto parts
With some creativity, it's easy to make a vice out of old scrap parts, such as car shock absorbers. You should also choose:
Homemade bench vise
- steel corner profile;
- M20 nut;
- hairpin;
- rod from the gas stop for the knob.
The vice is attached to the workbench through holes drilled in the corner parts of the shock absorbers. Bolts with conical heads are used; if the car parts are annealed, their movement will become easier.
Any non-professional can make this simple but very effective device on his own, if he has never had to do plumbing or carpentry work before. But the benefits for the economy will be significant.
Wooden structure
It is a copy of a regular vice , only made of wood. Of the metal parts, only a screw 45 cm long and 8 cm thick should be used here. Massive pine plywood, well dried, is suitable.
The vise jaws are made from separate blocks, which are subsequently glued together. To give them their final shape, sand their edges with sandpaper. In this case, for one block it is worth choosing a thicker tree. This compensates for the space between the moving and fixed parts. The handle should fit through the head into the hole freely, then add the knob and anvil. When finished, remove the mounting screws, coat the vise elements with two coats of oil-based polyurethane and leave to dry overnight. Bolt the vise to the workbench.
Oak vice
The design of this structure is based on ancient drawings , the body is made of oak sleepers. The jaws can be cut by hand or with a saw. Grooves are punched down on both sides of the base. The brackets add strength to the rear jaw and secure it well to the base.
The top of the tee is on top of the clamping bolt. You will also need a large bolt and a square head that fits into the housing groove at the base of the vise. A steel strip should be added to each side of the base at the bottom to protect the side brackets from wear.
Making a homemade vice , as we see, turns out to be not so difficult. There are many sites and articles on the Internet that talk in detail about the manufacture of devices for various workbenches and desktops. Making oak vices is very interesting, since solid pine plywood is ideal for them. A steel strip is a good addition as it prevents wear and tear on the brackets and vice in general. Happy work and making homemade workbenches!
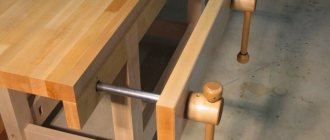
Moxon Mini Vise
For ready-made work tables, it is very convenient to make a Moxon mini-vise . To get started you will need the following materials and tools:
- Wood blanks;
- Screws, nuts and washer;
- Leather for vice;
- Table saw and router;
- Sandpaper;
- Chisel and glue.
After the workpiece has been cut, it is necessary to sand the edges using sandpaper. We round the edges of the wheels with a drill and the same sandpaper. To make screws, you need to purchase a long threaded rod and cut metal blanks into two parts.
After this, you need to insert the nuts into the holes. Glue the skin onto the clips and remove all excess. Surface protection is provided by tung oil. It, unlike other wood impregnation agents, polymerizes inside and outside the tree with rapid penetration into the lower layers. After the oil has dried, all that remains is to connect all the resulting parts together - and the vice will be ready for use.