Wood is popular in private construction. The material is inexpensive, accessible, and easy to process. Many people prefer to cut the logs themselves. It's cheaper and sometimes better quality. In addition, sawing wood is an exciting hobby. For such a hobby you will need a band sawmill, which you can make yourself.
Design and operating principles
The main advantage of the sawmill is that it cuts logs lengthwise. Doing this manually is incredibly difficult.
To understand the principle of operation of the machine, you need to get acquainted with its structure. The design consists of several parts:
- saws;
- drive (usually electric, sometimes gasoline engine);
- saw carriages;
- guides;
- frames
The base of the U-shaped structure is metal beams or channels fastened together, along which rollers mounted on the frame move. On one side of the frame there is a stationary main wheel, on the other there is a movable one that moves along the frame.
At the base of the machine, above the rollers, there are guides, on which support posts are attached on top. The frame moves along the beams using a chain mechanism.
The cutting tool is a band saw approximately 6 cm wide. It is tensioned using hydraulics. The tape is held in place by special locks attached to the base of the main wheel.
The design is complemented by a ruler and a container with a special liquid that flows into the cutting area and protects the tape from the adhesion of sawdust.
There are several types of sawmills. The most common are belt, disk and chain. Almost any of them can be done independently, if you take as a basis a competent drawing of a homemade sawmill and carefully watch the video with step-by-step instructions. Mechanisms constructed using a chainsaw are also popular.
Note!
- DIY induction heater ♨️ - reviews of the best manufacturing options. Varieties of homemade device designs + step-by-step master class (160 photos)
Do-it-yourself Gauss cannon: TOP-130 photos of the best ways to create it yourself. Design features + master class for beginners
- DIY clamps - a step-by-step master class for beginners. Schemes for manufacturing different designs + 170 photos
Carriage, grips, clamps
There remains such a problem as a frame with additional components. The one on pos. 1 pic. the left is far from optimal. For one-time sawing for self-construction, it is too complex and expensive. It is also not suitable for long-term regular use: even if the supporting frame is made of a 200 mm channel, it will not sag after the first or second dozen logs, which means the machine is completely unsuitable. A stationary sawmill should be made with separate concrete rail tracks and a carriage for logs (item 2; in this case we will not focus on safety precautions - the topic of this article is different).
Irrational and rational designs of the frame, carriage and log grippers of a homemade sawmill
The next tasks are leveling and holding the log. In industrial woodworking, hydraulic jacks with hooks are used for this purpose. The log is hung on the hoist, lowered onto the carriage without touching it, the jacks turn on and grab it tightly. In automated carriages, a log is placed on it and hydraulics, based on sensor signals, immediately levels the timber.
In amateur conditions, the first is not feasible; the second is in no way feasible. In many homemade sawmills, log grippers are made as shown in Fig. below. The log is hung on automatic jacks (see below), hooks are brought to it, sliding along a guide (pipe, thick rod). The hooks are tapped with a hammer according to the principle of “lightly tapping with a sledgehammer”, they are wedged on the guides and hold the log.
An unreliable and inconvenient way to attach a log to a sawmill carriage
Firstly, such fastening is simply dangerous: vibrations during sawing can cause the grips to become wedged, and this is an accident most likely with serious consequences. Secondly, it is impossible to grab the wood by the very “bottom” in this way. This means that you will have to turn the log over before finishing it halfway. As a result, the cutting quality and material waste will be the same as on a vertical single-disc sawmill, see above.
Carriage
Let's try to develop technical requirements for a log carriage suitable, incl. for use with a portable mini sawmill when working on the road:
- materials – ordinary rolled metal without preliminary screening for evenness;
- for strength, reliability and durability - welded;
- the influence of the quality of welding and warping of the metal from it on the quality of sawing is absent;
- prepared base (support) surface – not required;
- weight and dimensions - suitable for transportation in a mini-truck, pickup truck and on the top trunk of a car;
- the maximum length of the processed log is 6 m;
- its maximum diameter is up to 1 m;
- leveling and hanging the log - in any way independent of the carriage, see below;
- the influence of the flatness of the carriage along the horizon on the quality of sawing - no;
- the reliability of holding the most clumsy, unrooted forest is absolute;
- the ability to dismantle the sawn blocks into edged measuring boards/beams without readjusting the sawmill - a must;
- security – sufficient for non-production conditions, when access to the site of untrained outsiders is easily controlled.
Drawings of a log carriage for a sawmill, incl. minis that satisfy the specified conditions are shown in Fig. (left/center – top view). Material – channel 120x60, rod 14 and 16 mm.
Exactly under the M14 holes in the upper flange of the channel, D15 holes are drilled in the lower flange for the passage of the shanks of the hook holders (on the right in the figure). The M16 holes in the bottom shelf (marked in green) are for threaded feet. The plan configuration and location of the grip holders make it possible to reliably hold both full-length logs and short logs. Use this carriage like this:
- the log is hung and leveled on a pair of auto jacks. An option is to use one jack at a time: put something suitable under the raised end, rearrange the jack and lift the other one;
- the carriage is slipped under the middle of the log with the widened part towards the butt and aligned along the axis of the timber. If the log was hung on a hoist, then the middle pair of legs should fall under its center of gravity;
- the holder hooks are turned out until they touch the log so that their points look inward exactly at each other. A slip by one turn (by M14 thread pitch) does not affect the cutting accuracy;
- the log is lowered onto the hooks. If the timber was hung on one jack and a support, then first release the jack, and then knock out the support with one sharp blow;
- to securely hold a thin light log, you can sit on it and jump;
- saw the log using any sawmill using horizontal cuts. The thickness of the last slab in the vast majority will not exceed 40 mm.
Clamps
Full functionality of this carriage will be ensured by 2-5 clamps (3 are almost always enough) for sawing blocks into dimensional lumber. The design of the clamp to the log carriage is clear from Fig. below. The clamps are bolted into the standard holes of the M14 carriage, so their bases and the distances between the axes of the mounting holes are different: unlike the hook holders, the clamps are not interchangeable! Before dissolving into boards/beams, the logs are first sawn into blocks. Then the blocks are sorted and collected into packages of blocks of a similar configuration to each other. The next package is clamped with clamps on a gun carriage and cut into boards/beams using horizontal cuts.
Design of a clamp for sawing unedged blocks into boards and beams with horizontal cuts on a sawmill
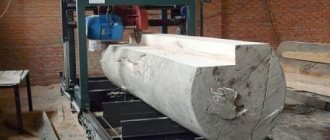
Homemade band sawmill
Self-assembly of a complex unit is not an easy process. It is necessary to correctly install and adjust all structural parts to ensure their smooth, uninterrupted operation. This will help you with instructions on how to make a homemade sawmill, following which you can acquire your own home woodworking complex.
To assemble the sawmill, a suitable site should be identified and prepared. Then the assembly of the frame of the future structure begins. First, a kind of rails are prepared along which the working saw will move with the help of rollers. The rails are fastened together with profile pipes that act as sleepers. Fasteners are welded to them to secure the logs.
At the next stage, a trolley is mounted on which special wheels for the tape are installed. Many craftsmen who assemble homemade band sawmills with their own hands have thought of adapting old car wheels for these purposes.
The assembly of the structure is completed by installing an electric motor connected to the moving mechanism using a drive belt.
Introduction
The crisis forces us to look at old processes with new eyes. Somewhere sawmills are closing, and somewhere, on the contrary, they decide to open a sawmill. As a rule, private owners have recently opened sawmills; their costs are lower and efficiency is higher. Here you don’t need a business plan for a sawmill, but if it comes in handy, come here!
Sometimes the word “open” is too strong. They simply set up a sawmill for use at home, for example to build a house, or, in extreme cases, to cut a log for a neighbor. This is the case we are considering.
When opening your own sawmill, there are several options on how best to do this:
- Buy inexpensive equipment;
- Do it yourself.
Again, to build a house and get 3 - 5 cubic meters of boards, buying a sawmill for 50 - 150 thousand is just some kind of waste. After all, our boards will cost several times less: 18 - 30 thousand rubles.
There is a way out, make a sawmill from a chainsaw. This will not take you much time if you have hands that grow from the right place. In addition, it will serve you faithfully for a long time, because having your own sawmill is a fairly profitable business today.
DIY chain sawmill
The design of this unit is simpler and smaller in size than its belt counterpart. It works on the same principle, differing only in the type of saw. In this case, a special chain stretched over a tire is used to cut logs.
It is much easier to make it; you just need to strictly follow the tips on how to make a homemade chain-type sawmill.
Note!
- Do-it-yourself electric scooter - a master class with step-by-step instructions for doing it yourself. Tips and simple patterns for beginners + the best photo reviews
- DIY rocking chair: TOP-120 photos of the best manufacturing options. Master class on creating a rocking chair at home
Smokehouse from a gas cylinder - the best master class on making a homemade smokehouse with step-by-step photo diagrams for beginners
Tools
0 votes
+
Vote for!
—
Vote against!
For those who live outside the city, especially if it is possible to “acquire” round timber, purchasing a sawmill is very important. Its presence will provide the owner with boards and timber at a very reasonable cost. And besides, it will allow you to earn money; wood has been and remains the main building material.
If we decide to purchase a frame sawmill, then we have two options: buy a finished product, since the choice is varied, or build it with your own hands. The appropriateness of a particular decision will depend on our plans. That is, depending on the volume of cubic meters of wood that we plan to process. In order to make an informed decision, let's get acquainted with the types of frame saws, their main characteristics and consider their cost. And in the final part of the article we will learn how to build a sawmill with your own hands.
Content
- A type of frame saw.
- Main characteristics, models and their costs.
- We make it ourselves.
Type of frame saws
Frame sawmill video
Let us immediately note that in our understanding, a frame sawmill is somewhat different from the standard understanding of this equipment. In the article we will look at options for sawmills that have a base - a frame. A standard factory frame sawmill is professional and expensive equipment with high productivity and functionality. There is no need for such a sawmill in the yard of an ordinary farmer, and if there is a need for it, then they buy it. There is simply no point in reinventing the wheel when the finished unit pays for itself in 2–3 months. The cost of such sawmills is from 500,000 rubles and above. Of course, if there is the required volume of forest. Therefore, we will look at the types of sawmills that you can buy or assemble yourself, the so-called mini-sawmills.
There is a large selection of equipment for sawing round timber. For a homestead, most of them are a very expensive pleasure. In addition, their wood processing volume is on an industrial scale, from several thousand cubic meters per day. In our case, we will be interested in three types of sawmills: band, disk (circular) and tire (chain). Let's look at the features and positive aspects of each sawing technology.
Tape is the most profitable technology. It produces the least amount of waste (sawdust) and is the least demanding of climatic conditions. But at the same time, it is also the most difficult to create with your own hands. Its use is suitable for working with wood with a diameter of up to 70 mm.
Circular saws are one of the most common “home” saws. Simplicity of design, reliability, versatility - these are the main advantages of this cutting technology. The disadvantages include the cost of high-quality discs and a slightly larger volume of waste compared to band sawmills. But in “home” conditions, the amount of waste is not significant, since the volumes of sawing are still modest.
A mini bus sawmill is the most common type of sawmill among “hobbyists”. But, despite the unpretentiousness of this technology, it gives very good wood processing performance at a fairly high quality. The sawmill is the easiest to create with your own hands.
Main characteristics, models and their costs
Let's look at several factory models of sawmills, we will know what to focus on and the price of a frame sawmill will help you decide whether to buy a finished product or make it yourself.
Tire mini-sawmill PCM-3B (Stihl MS 660) - this device is capable of processing logs up to 60 cm, length up to 9 meters. The Stihl chainsaw model is professional, motor power is 5.2 kW. The saw is capable of processing up to 6 cubic meters of wood per shift, i.e. in 8 hours. Its cost is from 60,000 thousand rubles.
Mini sawmill PCM-1E (380V) – also processes wood up to 60 cm thick, maximum log length is 9.5 meters. The main difference is the presence of a three-phase electric motor with a power of 5.5 to 7.5 kW. Cost 30 - 40 thousand rubles.
The Wood-Mizer LT-15 band sawmill is capable of processing logs up to 70 cm thick and unlimited in length, with a maximum weight of up to 2 tons. Available in two versions, with an 11 kW electric motor and an 18 hp petrol engine. The cost of such equipment is 220,000 rubles.
Disc sawmill Taiga DP-1 – logs up to 90 cm and 7 meters long. Produces all types of lumber. The engine power is 11 kW, and is capable of processing from 10 m3 of lumber per shift. Cost 190 thousand rubles.
Making our own
After we have become acquainted with some models of sawmills, we know what we are aiming for when designing and assembling - we can begin to draw up a plan for creating a homemade frame sawmill. Note that if this equipment is needed for business, it is better to buy ready-made equipment, it will be faster and more profitable. It’s worth making it yourself only if we don’t need such a device all the time, or we have at least some of the necessary materials (engine, metal profile, etc.).
Homemade equipment will have lower performance, and this is quite normal. If we need to produce a board for the floor or beams for the roof, a self-made frame sawmill is also quite suitable.
First, we need to decide on our needs:
- productivity, how many cubic meters of wood we are going to process;
- estimated thickness and length of logs;
- installation location (stationary or will need to be moved);
- type of energy (electricity or gasoline).
Depending on these characteristics, you will have to choose the materials and type of construction of the sawmill. The construction of a frame sawmill will be as follows:
- base, bed or frame. Regardless of the type of sawmill, it must be reliable and stable. The quality of the cut and, more importantly, our own safety will depend on this. Its length will depend on the length of the logs that we are going to cut. To create guides, the material can be a corner, a pipe, a U-shaped profile or other types. The thickness of the metal will also depend on the expected weight of the round timber. For a carriage with a saw, metal with a thickness of 3–4 mm will be enough for us; it will withstand the weight of the engine and saw fittings;
- engine. It depends more on what is more accessible to us. We have a three-phase electric motor with a power of 3 kW or more - we install it. If you have a semi-professional chainsaw, you can adapt the carriage to it. An electric chain saw will not work; its motor is not designed for such types of work. Household chainsaws are also not suitable, they are rather weak, which means they will quickly fail under heavy loads;
- device for fastening logs. As a rule, it is easier to make it stationary and low. The thickness of the metal will depend on the weight of the log for cutting, depending on the needs. You can also use hardwood, it is easier to work with;
- tire or disk. The length of the disk and tire is approximately the same, 40 - 50 cm. There is a special type of tire and chain with a smaller cut thickness, so there will be significantly less waste. You also need a special chain with a sharpening angle of 10 degrees.
Let's look at an example of how to make a frame sawmill. This is only an approximate diagram; depending on the required parameters and the chosen design, it may differ. The main thing is to understand in general terms, and then everything will come as you design and assemble. Moreover, over time, no one bothers to modernize it. Let's take the factory model shown in the photo as a basis.
Let's take a sawmill with a disc as an example. The carriage will be on top. First, we decide on the guides, which will be a 50 mm corner, the length of the “rail” is 5 meters. According to the plan, the sawmill will be stationary and will be located in a barn. Therefore, at intervals of 15 cm, we drill holes in the corner and in the concrete, and fasten them to the floor using dowels.
We will make a device for fastening the log from a U-shaped profile or channel, the edges of which are welded to the corner. To fix the logs in the profile, we make holes for bolts. Since the maximum thickness of the log will be around 40 cm, we measure 10, 15 and 20 cm from the center of the profile. There we make holes for the stops. For more reliable fixation, we will install a special movable clamp with teeth on the first and last profile. It can be made from a piece of metal sheet 4 mm thick. Using a grinder, we cut out the teeth; a few pieces will be enough so that the log moves. We drill holes in the profile and in the clamp; using two cotter pins, you can easily remove and install the clamp.
After the frame is ready, we make the carriage. Since the motor is three-phase, with a power of 3 kW, we will need a reliable design. The height of the carriage is 1 - 1.2 meters. We mark a corner of 40 mm, with a thickness of 4 mm. You can use this profile.
We cut into elements. The carriage structure will be welded, we will connect everything into a single structure. Drill holes for the wheels at the ends of the corners of the carriage. The carriage frame is ready.
It is necessary to install a motor with a disk. As planned, the engine height will be adjustable. In addition, the saw motor will operate in two positions: horizontal and vertical. To adjust the height we use two pipes. We weld them to the carriage frame.
We will need a steel sheet 6 mm thick and two channels welded to each other (two square profiles or similar). Using U-shaped clamps with a diameter of at least 10 mm, we attach the channel to the pipes; to do this, you will need to weld pieces of metal with holes for the clamps to the ends of the channel. The U-clamp should fit snugly on the pipe, but at the same time it should slide along the pipe. To adjust the height, we use two threaded rods (preferably M24). In the upper part of the carriage, in the profile, we drill two holes for the rods. We weld a nut on both sides to the ends of the profile on which the motor will be located. We screw our threaded rod into the nut, and weld a regular bicycle sprocket to its upper part. Thus, on both sides you should get two threaded rods and two sprockets. Between them we install two large sprockets from a bicycle and firmly connect them to each other. We tighten the chains, and when the handle rotates, two sprockets along the edges should move simultaneously. As the sprockets rotate, our motor will either rise or fall.
In order to have two disk positions, it is necessary to create the ability to rotate the engine in two positions - horizontal and vertical. We assemble the frame according to the dimensions of the engine and disk. We weld it to our movable profile. We attach two bearings. We drill 4 holes in the steel sheet for mounting the electric motor and weld two metal rods to it along the diameter of the bearings. We attach the structure to the frame. On the back side we install a handle with stops. We make a protective casing from stainless steel and fasten it with self-tapping screws to the frame with the engine. We attach the motor with the disk, connect the control panel (consists of a start and stop button).
It can be made simpler, as shown below, a sawmill frame diagram, but the disk with the motor is located on the side.
The principle is something like this; you can provide and come up with other devices that regulate the cutting process. The main thing is to remember safety and do everything conscientiously. If in doubt, it’s better not to do it, buy a ready-made factory sawmill. Health and life are worth much more than the amount saved.
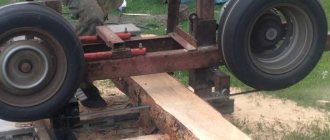
Assembly of a chain (tire) sawmill
Before starting assembly work, prepare a flat, open area. Then a metal frame is assembled, onto which the racks are attached and the frame is installed as the basis of the chain structure.
At the next stage, the trolley is assembled, on which the mounts for the electric motor are mounted.
Next, the cart is installed on the frame, and the engine and saw are mounted on it.
The last assembly step is to tension the chain onto the bar, and the sawmill is ready for use.
What needs to be provided?
Before making, you need to pay attention to the following things:
- The diameter of the logs being cut, if there are large diameters, then you need a more powerful saw, a longer bar with chain;
- Loading heavy logs for sawing, for this it is necessary to provide some kind of mechanism, or they can be rolled up either by additional jacks or, ideally, by a loader;
- The log must be fixed so that it does not play during sawing and the boards are even;
- The chainsaw guide and sled should not play, so they need to be strengthened;
- The more powerful the saw, the easier production will be. Therefore, when purchasing a saw, you need to take the most powerful one;
- Using electricity as an energy source allows you to save a lot;
- Do not forget that the chain must be for longitudinal sawing, this will significantly increase the speed of the process. Experts recommend using a 3*8 chain.
- It is advisable to buy a carbide chain. This is what he is doing today. Conventional circuits fail quite quickly;
- The length of the logs to be cut must take into account the maximum and minimum. So that the longest ones fit in, and the shortest ones don’t fall between the guides;
- Calculate in such a way that the saw does not vibrate or play on the guides during operation;
- The power of the saw, in some cases you want it to be both more powerful and more economical. In this case, folk craftsmen do the following. Instead of a chainsaw, an electric motor is installed, and the tire is left for sawing, see photo below;
- The height of the sawmill. It is necessary to provide in such a way that the back does not hurt to bend over and the logs do not need to be lifted high. If the wood is not heavy, it is better to make it higher. If the forest is heavy, you can go lower.
- Sawing of wood can be carried out either by the upper part of the tire or by the lower part. When sawing with the lower part, sawdust flies towards the chainsaw and clogs it. The upper part throws out sawdust from the chainsaw, this allows you to increase both the service life of the saw and the downtime during sawing;
- During the sawing process, the chain very often stretches on the saw and needs tensioning. Therefore, when installing the saw, it is necessary to provide access to the chain tension and secure the saw with access to the mechanism;
- When sawing, it is better to fix the position of the chainsaw handle, this simplifies the process;
- The cable, clothesline or lace should not drag, since the sawing process should be uniform over time.
Homemade circular sawmill
A unit that is capable of sawing logs horizontally, vertically or at an angle is called an angle-rotating disc sawmill. This type of woodworking machines is very popular due to its versatility. Ready-made equipment of this type is not cheap, so it will be much more profitable to make a circular sawmill with your own hands.
Note!
Do-it-yourself compressor: TOP-130 photo reviews of finished compressors. Step-by-step instructions + diagrams and drawings
Do-it-yourself wind generator: TOP-170 photo reviews of finished devices. Detailed DIY instructions for beginners
- Do-it-yourself spot welding - the best master class on making homemade spot welding with step-by-step photo diagrams of do-it-yourself work
The design of this mechanism is not particularly complicated, so it will be easy to assemble it yourself. A drawing, instructions and visual pictures of a homemade disc-type sawmill will help with this.
What materials are needed to create a sawmill?
It should be noted that materials are selected depending on whether drawings are made or not, because it is the correct drawing that is the basis of a quality product, thanks to which the calculation of materials is made:
- Pulleys can be taken new or old in good condition;
- Pipes of different diameters;
- Rails - you can make it yourself from corners. It is better to place the corners edge up, this is necessary in order to extend the “life” of the wheels;
- Profile pipes for creating sleepers;
- Channel.
In addition to materials, you will need the following tools:
- welding machine;
- milling machine;
- Bulgarian;
- drill, it is more convenient to use an electric one;
- hammer;
- pliers;
- sets of screwdrivers and wrenches;
- clamp;
- bolts, nuts and other fasteners;
- rulers, tape measure, squares, etc.;
- hacksaw.
Self-assembly of a disk unit
The work begins with the acquisition of the necessary parts, assemblies and components. Then you can begin assembling the frame. Metal pipes and high-strength guides are used, which are attached by welding. The next step is to assemble the carriage.
A powerful engine is required to rotate the metal disk, so in most cases a gasoline version is used. The working elements of the unit are connected to the engine through special holes.
This usually happens using a chain drive, but in this case the sawmill will not be able to operate continuously for a long time - the drive will constantly overheat.
A rapidly rotating saw blade is a source of increased danger, therefore, during installation, all risks should be taken into account and all safety conditions must be observed.
An important point - drawings
In order for you to get a reliable and stable structure, you need to calculate everything correctly and make the necessary drawings. They must be as clear and studied as possible, otherwise you risk losing time and money. It is most convenient to use programs for creating drawings: AutoCAD, Compass or Visio, who worked in which. If this is your first time working with such programs, then it is undoubtedly easier to start with Visio or Compass, since AutoCAD is the most complex.
When drawing up a drawing, you need to take into account the following components of the structure:
- Frame with a pair of guides (for moving the saw blade);
- Screw mechanism for lifting the saw blade;
- Tension unit (spring or hydraulic);
- Pulleys;
- Tape holder;
- Wheel guard casing;
- Engine (electric or gasoline);
- V-belt transmission;
- Rails (for saw movement);
- Wood holding clamps (eccentric);
- Liquid for wetting the saw (usually diesel fuel is used);
- Emphasis.
Mobile chainsaw design
Complex structures are more often used in those cases when the harvesting of lumber reaches an industrial scale. In particular cases, simpler and smaller mobile devices are required, which can be made independently.
One of the best options for such a mini-machine is considered to be a homemade sawmill made from a chainsaw, which plays a major role in the design. The product is light in weight and compact in size, allowing it to be moved from one place to another.
What to make it from?
Let's look at how you can assemble the design of a circular sawmill (popularly known as a sawmill). The simplest option is the desktop. The cutting disc is placed above the table surface. From an economic point of view, this option is ideal, but of course there are disadvantages:
- Low performance;
- The supply of lumber to the cutting site is carried out manually;
- Processing only sheet lumber or small workpieces.
If you still have the financial resources, you will have to fork out for the purchase of equipment for installing a corner sawmill. The advantages of this equipment:
- Carrying out cutting of material in two planes;
- Saving time for cutting;
- Energy-intensive indicators.
The disadvantages of this design include:
- Additional costs for the purchase of additional equipment;
- Difficult installation of equipment.
Making a homemade chainsaw machine
The main structural elements required for assembly are a chainsaw, a pair of channels, metal angles and rails.
First, a frame is assembled, in which holes are drilled for installing ties from metal pipes. During assembly work, it is imperative to ensure the accuracy of dimensions and observance of right angles. To strengthen the frame, it is recommended to weld several stiffeners.
At the next stage, the movable cart is assembled. Its basis is a steel plate, to which corners are welded from below and rollers are mounted. Fasteners for gas-powered tools are installed in the upper part.
At the last stage, a structure with fastenings for logs is installed on the frame.
Mini
A further development of Logosol’s idea is a mini sawmill without a frame, guide and rails, see fig. on right. Instead of a guide, an existing saw cut is used; With careful manual sawing, its accuracy within the log is maintained. In this case, in addition to the tire and drive, only the support platform and handles for holding and moving remain on the carriage.
The pioneer cut is made according to a template (a flat board, top right in the figure), a channel, a frame from an angle, etc., longer than a log. Subsequent horizontal ones are the same as the previous one, in the center on the right. If a vertical cut is necessary, place a channel (bottom right), because in this case, a flat lateral supporting surface is needed. However, all this does not eliminate the last problems: installing the log on the carriage, leveling it and holding it.
Mini sawmill without a frame and how to use it
Homemade product based on the “logosol” principle
The idea of creating a machine of this type appeared thanks to a well-known Swedish company that produces portable sawmills of various types. The main features of such woodworking complexes include their mobility and an original way of adjusting the thickness of the board.
The machine can be moved from one place to another thanks to wheels mounted on the structure and a towing mechanism that allows it to be attached to a vehicle.
The thickness of the board on such a sawmill is adjusted both in the usual way by changing the height of the saw, and by changing the height of the log. The second option is convenient for small logs and comfortable work for the operator who does not need to work at an angle.
Otherwise, the assembly principle of a “logosol” type machine does not differ from traditional analogues. In this way, a gasoline band sawmill, an electric disk sawmill, and a chain sawmill can be assembled.
Difficulties in production
- Installation. When installing the structure, the master will have to use various tools, from welding to a milling machine.
- Sustainability. Due to the fact that the structure will be subject to large dynamic loads (up to 1000 kg, approximately how much a large and thick log can weigh), it must be more than stable.
- Daily preparation for work. Every time before work you need to sharpen the saw and wire the working part.
- Safety. As with any complex installation, safety regulations must be followed. If the tape is electric, it is necessary to remove the grounding.
Tips and tricks for making a sawmill
A woodworking unit is an object with a high level of danger due to moving cutting elements. It is also quite large in size. Therefore, the location for assembling the structure should be chosen very carefully.
The site for installing the sawmill should be level and spacious, allowing access from any side. For these purposes, you can use a well-lit garage, barn or other utility rooms. You can install the machine outdoors, but in this case you should build a canopy.
If the unit is equipped with an electric motor, it is necessary to follow all electrical safety rules and monitor the condition of power and grounding cables.
The machine must be in a stable position, and the log must be firmly secured so that it does not fall off during cutting and injure the operator.
Before starting the assembled unit, you must make sure that all components and connections are reliable.
A sawmill is a woodworking system that has a not very complex design. It is easy to assemble it with your own hands. You just need to carefully follow all the recommendations, carefully read the drawings and rely on the provided videos and photos of the homemade sawmill.
How does a sawmill work?
The principle of operation of a band sawmill is very easy to explain using the example of spools of thread.
The whole design resembles the rotation of two spools, between which a thread is stretched. This thread plays the role of a saw, and the distance between the coils is the maximum size of the log.
What a band sawmill allows you to do:
- Prepare logs, that is, adjust them to the same size and shape;
- Sawing logs according to a given pattern after setting up the equipment;
- After sawing, small defects remain that cannot be eliminated using homemade sawmills, so further processing of the wood is done manually.
The band sawmill works as follows: the log is fixed on the platform and remains motionless, the mobile cart begins its movement and cuts the tree, the saw is in a horizontal position.
In order to ultimately get a board of the desired size, it is necessary to initially set the parameters by the operator. The saw acts as a saw blade, which must be well tensioned.
How a homemade sawmill works, see the video.
Before work, you need to prepare the equipment: to do this, sharpen the saw and set the teeth.
Photo of a homemade sawmill
Peculiarities
The design features of the circular include the following:
- Disc cutting carriage. On this design, engines are mounted in horizontal and vertical planes, and cutting discs are attached to the shaft. The carriage moves along a stationary platform along mounted guides. In this case, it is necessary to mount a mechanism so that it is possible to adjust the position of the cutting discs;
- The platform is stationary. Log clamps are mounted on such a platform. If the platform is without clamps, the log may move, which will lead to damage to the lumber.
- Debarker. You can equip your chainsaw with this element. Serves as an attachment for a chainsaw. You can peel the bark off the log. There are disc and drum attachments.
All materials are almost always at your fingertips, but if you still lack something, you can use the help of a hardware store. Naturally, this will lead to additional costs, but in such a place you can purchase all the equipment and tools that will be useful for installation. Also take into account materials from foreign manufacturers. The equipment will also cope with the vibration that will appear during the process of working with lumber.