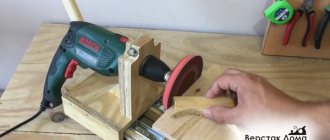
The most common drilling machine can be considered the one made from an ordinary or electric drill. In such a machine, the drill can be placed either permanently or made removable. In the first case, the power button can be moved to the drilling machine for greater convenience; in the second, the drill can be removed and used as a separate tool.
Components for a homemade drilling machine:
- Drill;
- Base;
- Rack;
- Drill mount;
- Feeding mechanism.
Drilling machine for the home workshop.
The base (bed) for a homemade drilling machine can be made of hard wood, chipboard or furniture board, but it is better to use a channel, metal plate or brand. To ensure the stability of the structure and obtain a good result, the frame must be made massive so that it can compensate for vibration from drilling. The size for wooden satin is 600x600x30 mm, metal - 500x500x15 mm. There must be mounting holes on the base of the machine so that it can be mounted on a workbench.
The stand for the drilling machine can be made from timber, round or square steel pipe. You can also use an old frame of a photographic enlarger, an old school microscope or another device of a similar configuration that has a large mass and high strength.
The drill is secured using clamps or brackets. It is better to use a bracket with a central hole, this will allow you to achieve better results when drilling.
Homemade drilling machine with your own hands.
The device of the drill feed mechanism on the machine.
Using this mechanism, the drill can move vertically along the stand, it can be:
- Spring;
- Articulated;
- Similar to a screw jack.
Depending on the chosen mechanism, you will need to make a stand.
Photo diagrams and drawings show the main types of designs of homemade drilling machines on which a drill is used.
With a spring mechanism: 1 - stand; 2 - metal or wooden profile; 3 — slider; 4 - hand drill; 5 — clamp for fastening the drill; 6 — screws for fastening the clamp; 7 - spring; 8 — square for securing the stand 2 pcs.; 9 - screws; 10 — stop for the spring; 11 — wing bolt for fastening the stop; 12 - base of the machine.
With spring-lever mechanism.
With a spring-hinged mechanism: 1 - bed; 2 — washer; 3 — M16 nut; 4 — shock-absorbing struts 4 pcs.; 5 - plate; 6 — bolt M6x16; 7 - power supply; 8 — thrust; 9 - spring; 10 — M8x20 bolt with nut and washers; 11 — drill chuck; 12 - shaft; 13 - cover; 14 — handle; 15 — bolt M8x20; 16 — holder; 17 — rack; 18 — cup with bearing; 19 - engine.
A homemade machine made from a drill with a hinged, springless mechanism.
A stand operating on the principle of a screw jack: 1 - frame; 2 - guide groove; 3 - M16 thread; 4 - bushing; 5 - nut welded to the bushing; 6 - drill; 7 - handle, when rotated, the drill moves up or down.
Drilling and milling machine: 1 - base of the machine; 2 — supports for the table lifting plate 2 pcs.; 3 - lifting plate; 4 — handle for lifting the table; 5 - movable drill holder; 6 — additional rack; 7 — screw for fixing the drill holder; 8 — clamp for fastening the drill; 9 — main rack; 10 — lead screw; 11 - drum with Vernier scale.
Homemade drilling machine from a car jack and drill.
The carriage is made of furniture guides.
Mini-machine from a decommissioned microscope.
The base and stand are made from an old photographic enlarger for a homemade drilling machine.
Machine made from a hand drill: 1 - bed; 2 — steel clamps; 3 — grooves for attaching a drill; 4 — drill fastening nut; 5 - drill; 6 - slider; 7 — guide tubes.
Homemade drilling machine from a steering rack.
The steering rack from a car is a fairly massive device, so the frame for it must be massive and attached to the workbench. All connections on such a machine are made by welding.
Homemade drilling machine from a steering rack.
The thickness of the base should be about 5 mm; it can be welded from channels. The drain on which the steering rack is attached should be 7–8 cm higher. It is attached through the eyes of the steering column.
Since such a homemade machine becomes massive, it is better to place the control unit separately from the drill.
Video of a homemade drilling machine based on a steering rack from a car.
The procedure for assembling such a homemade machine:
- Preparation of parts;
- Installing the stand on the frame;
- Assembling the moving device;
- Installing the device on a rack;
- Drill installation.
All joints must be securely fastened, preferably by welding. If guides are used, then you need to make sure that there is no transverse play. For greater convenience, such a machine can be equipped with a vice for fixing the workpiece for drilling.
In stores you can also find racks ready for drilling. When purchasing, you should pay attention to the dimensions of its frame and weight. Often, inexpensive designs are only suitable for drilling thin plywood.
Metal drill stand: option No. 2
If you don’t have time to study drawings and various options for rack designs, then we invite you to watch an informative video about creating a very functional mechanism that can satisfy the needs of most home craftsmen.
The result of the work will be a stand like this with an original cable drive of the carriage
Homemade drilling machine based on an asynchronous motor.
You can replace a drill in a homemade machine with an asynchronous motor, for example from an old washing machine. The manufacturing process for such a machine is complex, so it is better if it is done by a specialist with experience in turning and milling, and assembling electrical circuits.
Diagram and design of a machine based on a motor from household appliances.
Below are all the drawings, parts and their characteristics, and specifications.
General drawing of a drilling machine based on an engine.
A table of all the parts and materials needed to make the machine yourself.
| Pos. | Detail | Characteristic | Description |
| 1 | bed | Textolite plate, 300×175 mm, δ 16 mm | |
| 2 | Heel | Steel circle, Ø 80 mm | Can be welded |
| 3 | Main stand | Steel circle, Ø 28 mm, L = 430 mm | One end is turned to a length of 20 mm and has an M12 thread cut into it |
| 4 | Spring | L = 100–120 mm | |
| 5 | Sleeve | Steel circle, Ø 45 mm | |
| 6 | Locking screw | M6 with plastic head | |
| 7 | Lead screw | Tr16x2, L = 200 mm | From the clamp |
| 8 | Matrix nut | Tr16x2 | |
| 9 | Drive console | Steel sheet, δ 5 mm | |
| 10 | Lead screw bracket | Duralumin sheet, δ 10 mm | |
| 11 | Special nut | M12 | |
| 12 | Lead screw flywheel | Plastic | |
| 13 | Washers | ||
| 14 | Four-strand block of drive pulleys for V-belt transmission | Duralumin circle, Ø 69 mm | Changing the spindle speed is done by moving the drive belt from one stream to another |
| 15 | Electric motor | ||
| 16 | Capacitor block | ||
| 17 | Driven pulley block | Duralumin circle, Ø 98 mm | |
| 18 | Return spring limit rod | M5 screw with plastic mushroom | |
| 19 | Spindle return spring | L = 86, 8 turns, Ø25, from wire Ø1.2 | |
| 20 | Split clamp | Duralumin circle, Ø 76 mm | |
| 21 | Spindle head | see below | |
| 22 | Spindle head console | Duralumin sheet, δ 10 mm | |
| 23 | Drive belt | Profile 0 | The drive V-belt has a “zero” profile, so the grooves of the pulley block also have the same profile |
| 24 | Switch | ||
| 25 | Network cable with plug | ||
| 26 | Tool feed lever | Steel sheet, δ 4 mm | |
| 27 | Removable lever handle | Steel pipe, Ø 12 mm | |
| 28 | Cartridge | Tool chuck no. 2 | |
| 29 | Screw | M6 with washer |
Drive console for a homemade drilling machine.
Four-strand block of driving drive pulleys.
Driven pulley block.
Return spring limit rod.
Split clamp.
Spindle head console.
The spindle head has its own base - a duralumin console and creates translational and rotational motion.
Drawing of a spindle head for a homemade drilling machine.
Materials and parts necessary for the manufacture of the spindle head.
| Pos. | Detail | Characteristic |
| 1 | Spindle | Steel circle Ø 12 mm |
| 2 | Running sleeve | Steel pipe Ø 28x3 mm |
| 3 | Bearing 2 pcs. | Radial rolling bearing No. 1000900 |
| 4 | Screw | M6 |
| 5 | Washers-spacers | Bronze |
| 6 | Lever arm | Steel sheet δ 4 mm |
| 7 | Bushing stopper | Special M6 screw with knurled button |
| 8 | screw | Low nut M12 |
| 9 | Stationary bushing | Steel circle Ø 50 mm or pipe Ø 50x11 mm |
| 10 | Bearing | Radial thrust |
| 11 | Split retaining ring | |
| 12 | End adapter sleeve | Steel circle Ø 20 mm |
Spindle.
Running sleeve.
Running sleeve stopper.
Stationary bushing.
End adapter sleeve.
Drilling head assembled.
A ready-made homemade drilling machine based on a motor from household appliances.
The connection depends on the motor itself.
A simple electrical circuit for a factory machine 2M112.
Design advantages
Machines for drilling deep holes assembled using an electric drill are distinguished by a range of operational advantages:
- optimal compactness and low weight of the structure;
- Possibility to carry and use batteries;
- obtaining high-quality and accurate hole parameters;
- quick assembly and dismantling of equipment without wasting time;
- performing various works and processing all materials.
For repairs and home maintenance, a machine will be enough, but for a garage and larger-scale procedures it is better to choose a different type of device.
How to make a drilling machine for printed circuit boards with your own hands.
To manufacture a drilling machine for printing circuit boards, a low-power device drive is required. As a lever, you can use a mechanism from a photo cutter or a soldering iron. Illumination of the drilling site can be done using an LED flashlight. In general, this machine is rich in the flight of creative thoughts.
Do-it-yourself drilling machine for printed circuit boards.
Electric drill
The power tools market offers the buyer a wide range of drills, both domestic and imported. The products of domestic enterprises occupy a small segment compared to the gushing flow of electrical goods from China. Imported equipment is mainly represented by licensed models from well-known manufacturers.
It should be noted that the vast majority of power tools are high quality products, with rare exceptions.
Drills that are designed only for drilling without any additional impact devices are suitable for a drilling machine. Inserting a hammer drill into a machine is a great luxury, so for power equipment it will be enough to install a drill with a minimum of options - such as:
- adjustment of the number of revolutions;
- reverse;
- power button lock.
