All templates are made of St3, 4mm thick.
The templates are marked with: name, the amount of indentation of the template from the line of connection of the workpieces.
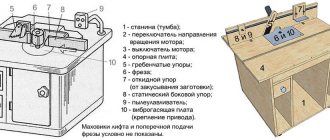
General view of the templates:
and parameters (pitch, diameter of the copy sleeve, Enkor cutter code, size of the template indentation from the workpiece connection line)
The quality of the cut can be assessed from the following photos:
Templates are divided into groups in the following sequence:
To work with templates, there are jigs and gauges that make setting easier.
The following tables indicate the names of the templates and their parameters:
Templates called ISOLOK allow you to make connections with the following profiles:
The pitch is from 24mm to 63mm (depending on the profile), the minimum thickness of the workpiece is 16.3+-0.5mm, also depends on the profile, the maximum is determined only by the working length of the cutter. All templates are made for an 8mm cutter and a 12.7mm sleeve.
Source: pekas.ru
Universal device for tongue and groove connection
factory plate for making a tongue and groove connection
Used with a router to cut the corresponding grooves and tenons, it is installed in a vice and the part is pressed against the device with a clamp. Typically sold in stores.
connection appearance
Consider devices for milling grooves
Cut out the top part - a tabletop from 18 mm plywood, 40 cm long and sufficiently wide to process the thickest workpiece that you plan to join with a tenon.
Cut two 5x10 cm bars, sawing them to the same length as the top. The bars will subsequently play the role of pressing the workpiece and centering it relative to the groove in the tabletop. To prepare the top, draw a line down the center of the top, then rout a mortise along the line at one end.
schematic representation of equipment
To use our equipment, draw a groove on the workpiece and mark the center line on it. Loosen the screws and place the workpieces between the bars so that the center line is connected to the top line of the jig, check that the edge of the workpiece is opposite the edge of the top.
Pinch the lambs. Align the router bit to one end of the mortise drawing, then mark guide lines on the top surface of the table along the edge of the router base.
How to work correctly with tongue and groove equipment
Repeat this again to mark the lines of the other end. Route the slot by starting the cut at the bottom by aligning the router base with the first construction line, and stop routing when the insert reaches the second construction line.
Let's make a device for making spikes with our own hands
Product for making spikes
The wood and plywood jig shown above allows you to cut rectangular tenons with two shoulders. The object being processed is located with its front surface underneath the jig, while the router moves along the stop from above, removing excess in two passes.
The piece consists of two parallel base bars, a stopper and a stop - all made from wood of the same thickness as the piece, in this case from 25x75mm bars, and a top surface and support made from 18mm plywood.
The base bars should be approximately 400 mm long; cut out the top surface of plywood approximately 200 by 250 mm and screw it to the bars as shown in the figure. Screw the stopper onto the ends of the base bars along with the support. Place the stop approximately 25mm from the end of the top surface.
cut out the tenon using the device
Countersink holes for all screw heads and make sure all corners are square. Drill an inspection hole in the top surface to accurately position the workpiece exactly according to the markings.
You also need to make a plate from plexiglass. It should be at least as wide as the base of your router and long enough to extend from the stop and beyond the jig stop: 250 by 300 mm will be sufficient.
Install the 3/4-inch router bit, then remove the standard plate from the tool and use it as a template to mark the screw holes and router bit hole in the plexiglass plate.
To start using the product, press the end of the workpiece against the end of the stopper and against the base block. Clamp it all together with a clamp. Set the depth of cut on the router and rout the part to half a tenon, moving the insert along the fence throughout the cut. (You'll also be cutting through the base bars at the same time.) Turn the piece over and repeat to finish the tenon (bottom).
Principle of operation
When forming pegs, a sawing and milling procedure is usually used. An appropriate cutting tool is used to obtain the tenon joint surfaces.
Attention! Whatever the shape of the tenons, the initial operation is to trim the workpiece.
For the most common models that use milling during processing, the machines are equipped with four spindles - three milling and one sawing. One or more workpieces can be loaded onto the carriage table, and they are aligned with their edges along the ruler and their ends along the stop bar.
The tenon is formed as a result of end milling. When the cutting tool comes out, chips may appear on the edges, so to prevent them, a support block is mounted on the ruler, and some machines also provide for the application of glue to the surface being processed.
After turning on the feed mechanism, the product is automatically fixed due to the side and top hydraulic clamps. The carriage with the workpiece begins to move at a certain speed along two guides relative to the cutting tools.
In this case, during the movement of the carriage, a spike of the desired configuration is formed on the structure, then the device, having reached the stop (limit switch), returns to its original position. Here the finished product is replaced with a blank, and the cycle repeats again.
If the machine is double-sided, the process of forming tenons occurs on both sides of the workpiece.
Device for milling the dovetail-dovetail joint
The illustration shows a tooling that allows you to mill a series of evenly spaced slots for straight or dovetail inserts. Cut a V-shaped notch in the workpiece, then install a 3/4-inch straight bit in the router and set the tool in the router table.
equipment for making a dovetail-dovetail connection
Screw the equipment to the miter gauge and feed it onto the cutter to make a turnkey groove. Install and glue the wooden key into the groove, reinstall the device on the miter gauge so that there is a distance between the key and the cutter and it is equal to the interval that you want to make between inserts.
Feed the jig onto the router bit to mill the second slot. Install a 1/2-inch dovetail bit and adjust the depth of cut so that the full dovetail shape is above the base of the recess.
To use the jig, clamp the workpiece into the V-shaped notch of the jig, pressing the workpiece against the key, and rout the first slot. To mill the next grooves, just move the workpiece with the groove onto the key, and you can feed the workpiece to the cutter again.
Types of tenoning machines
A tenon saw is a type of woodworking machine. There are samples of both imported and domestic production on the market. The fixing elements on it can be processed for subsequent connection of products at an angle, as well as for their merging (dovetail folds are used).
Machines for milling tenons are divided into frame machines and box machines according to their intended purpose.
In this case, frame units are:
Naturally, the productivity of double-sided tenoning machines is much higher than their analogues. There are several types of units, which differ in length, and they come in 2, 2.5, and 3 meters.
The cutting tools for them are cross-cut saws and cutters (disc and end) for processing straight tenons, lugs on frames and frames of various wooden structures.
The formation of box and dovetail tenons is done on specialized machines, mainly in large-scale and mass production. At the same time, there are two types of dovetail fixation: with rounded and sharp corners.
The first category is produced on multi-spindle tenoning machines. Such shaped protrusions are processed simultaneously on the mating surfaces using modular cutters. It is this connection that guarantees the durability and reliability of the fixing unit.
When producing the most complex oval dowels (small tenons) and those with a round shape, automatic tenoning machines with numerical control are used.
Manufacturing of equipment for box connection
This product allows you to mill box joint grooves one at a time on a milling table. In our case, it is simply an additional board, screwed onto an angle stop and having a key, with which we will determine the exact interval between the grooves.
simple device for making box joints
Install a straight cutter with the diameter of the required groove width; Place the router on the table. Set the routing depth equal to the thickness of the existing board and mill a groove into it. After this, unscrew the board from the miter gauge and move it so that the gap between the groove and the cutter is equal to the width of the cutter.
Mill a groove in the board again, this time the second one (on the right). Cut a key out of the wood so that it fits exactly into the first groove and place it on the glue, so that it will be approximately 25 mm from the groove on the additional board.
Milling grooves in the first workpiece
Place the workpiece with its front surface against the additional miter fence board, pressing one of its edges against the key. Turn on the router and, holding the workpiece firmly against the fence, move it onto the cutter, milling the first groove. U
Specifications
The operator’s functions when working on an automatic machine are reduced to loading and turning workpieces, starting or stopping the cycle. Important indicators of tenoning units are:
- largest peg size;
- the smallest thickness;
- groove height;
- width;
- maximum workpiece size;
- spindle speed;
- engine power.
In addition to the characteristics for classifying the machine, the parameters of the cutting tool are indicated: saw diameter, type and size of cutter.
Often on large production lines such equipment is installed to the ceiling. The machines are additionally fixed with clamping devices, where the workpieces are processed by scoring saws, followed by the formation of tenons on milling supports.
The feed is adjusted smoothly using a variator. To create a high-quality surface of the mating elements, the spindle speed should be about 700 rpm.
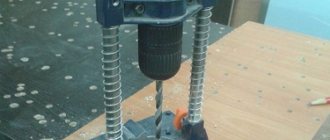
Do-it-yourself tenoning
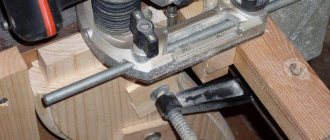
Therefore, I decided to assemble a jig for making tenon joints using a hand router. The idea was to make a device for quickly and conveniently cutting grooves for Domino insert tenons, because... ready-made solutions are too expensive. It all started with searching for a suitable idea on the Internet. Next, adapt the idea to your needs and, finally, execute the drawings. The operating principle is simple (see next photo).
The position of the groove relative to the edge of the workpiece is adjusted using the blue stop. It will be used as a special cabinet. The width of the groove is determined accordingly by the width of the cutter, the length of the groove is determined by the position of the brown latch. The black part is a 40 mm wide copy sleeve that fits in the resulting groove.
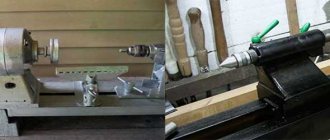
Next is the search for material. It seemed to me a good idea to make a jig from a 6 mm duralumin sheet. Although, probably, it can be made from any sheet material - plywood, plexiglass, textolite. The search for a suitable duralumin sheet at the local poultry market and at local metal collection sites did not yield any results: “Suitable pieces sometimes slip through, but now they don’t and it’s not known when they will. Call back later". We managed to find the required material at metal warehouses. They even offered to cut it to size, but the problem is that they would have to take the entire sheet. And this is, firstly, expensive, and secondly, what should I do with the remaining 70% of the sheet. As a result, I found an individual entrepreneur selling D16T duralumin sheets at retail on the Internet. https://dural16.ru/. Maybe someone will find it useful. You can order a piece of duralumin sheet from them of the required size and thickness. But not everything is smooth here either. If you take not the whole sheet, but a part, then there is a serious markup. I bought from them a suitable duralumin sheet 800×500 with a thickness of 6 mm for 4130 rubles, i.e. 614.58 rubles per kilogram. Yes, quite a lot.
In parallel with the search for material, the search for a turner-milling machine began. I scoured a couple of all-Russian thematic forums in search of fellow countrymen. As a result, I found a couple of dozen accounts to which I sent personal messages. Of these, eight people responded, to whom I later sent drawings with a question about the cost of the work. The price range for working with my material was significant - from two to eight thousand rubles.
Repairing an old kettle
Over the many years of its life, the kettle lost the nut securing the handle, it seemed like nothing special, they screwed on a regular one and used it, then they bought a new one, and this one was offered to me. Although I have all sorts of teapots, I somehow liked this one. It’s potbellied and, as it turns out, it swings funny when you fill it with cold water and put it on a hot burner. He begins to swing himself. But these are details; in the video I’ll show you how he does it.
I decided to change the plastic handle. There is a choice of pieces of wood, but I couldn’t decide on the color. First from pecan wood, then from eucalyptus, then from apple tree, and settled on a handle made of boxwood. After tinting the handle with stain, the teapot looked quite decent.
The kettle is a kettle, but the nut from the handle is lost
To choose from: pear, apple, plum, persimmon and laurel
But I settled on boxwood
Collective farm. I will redo it
I redid it, added a handle to the lid and stained it slightly with stain, smeared it a little with linseed oil and beeswax so that the drops would roll off. Well, here it is, with dancing! Sometimes the lid rattles