Tools used
The creation of tenons and grooves, with the help of which the connection of two wooden blanks will be ensured, involves taking a sample of material on the side surface of a beam or board using a hand router.
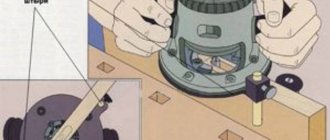
In this case, all geometric parameters of the elements of the future connection must be strictly maintained. To perform this operation with a hand router, you can use tools with shanks with a diameter of both 8 and 12 mm. The most universal in this case is a groove cutter, the cutting part of which works as follows:
- the lateral surface forms the walls of the groove and the sides of the tenon;
- the end side processes the bottom of the groove and removes a layer of material of the required thickness from the base of the tenon.
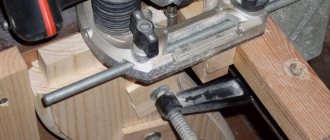
Cutting a tenon with a mortise cutter
Thus, using a tool of this type, it is possible to form both a tenon and a groove on the side surface of a beam or board. Moreover, their sizes can be adjusted within a fairly wide range.
In cases where higher demands are placed on the reliability of the connection of wooden parts, the grooves and tenons are made not of a rectangular shape, but of a shape called “dovetail”. Grooves and tenons of this configuration are created using dovetail cutters. It is also possible to perform the procedure for forming grooves and tenons of this shape with a manual milling cutter, but for these purposes you should use devices of a different design.
Dovetail sampling using a template
So that the question of how to make a groove in a board or beam or a tenon on their side surface does not cause any particular difficulties, it is better to use a power tool equipped with comfortable side handles, a wide guide sole and the option of protecting the spindle from turning during the process of replacing the cutter. In addition, it is desirable that such equipment have a side stopper, due to which the overhang of the cutter used with it will always remain constant.
Required Tools
In order to design a carriage for a circular saw with your own hands and then use it comfortably in a home workshop, first of all, you should prepare a set of materials and tools for its manufacture:
- Stationary circular saw on a sawing table;
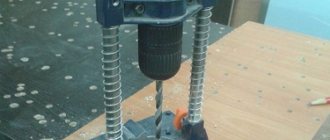
- A screwdriver or drill, as well as a hand router;
- Assembly adhesive – epoxy resin is suitable;
- Hacksaw or grinder - you may need to saw off protruding parts of the structure;
- Self-tapping screws to secure parts of the product;
- Metal nuts are smaller in diameter than the thickness of the profile hole - they will be buried in it for a short time;
- 2 U-shaped corrugated channel pipes made of metal (for example: aluminum);
- Two slats made of plywood or wood - they will serve as guides. In terms of thickness, they should fit freely into the U-hole of the profile;
- Square thin plywood strip for the base;
- Two wooden walls - for the manufacture of thrust walls of the carriage.
Reference. Additionally, it is recommended to keep a vacuum cleaner “ready” to blow the structure away from shavings and wood “dust” after cutting or drilling.
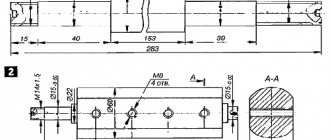
Drawing 1 Drawing 2
Selecting the right equipment
A manual milling machine is selected according to the type of work and the planned load. There are main types of equipment for woodworking:
- vertical – top type;
- lamellar;
- edge
Horizontal lamellar router. A disk with teeth along the edge moves parallel to the sole and cuts grooves in the side surface for flat keys in the mating parts without marking. The use of the tool is narrow. The lamellar type of tool is in demand in the production of furniture and building wooden structures. It is rarely purchased for a home workshop if the owner is seriously interested in making furniture and has models of universal hand routers available.
The top type router is universal for wood processing. It is he who is capable of performing almost all operations. Its kit includes several devices that allow you to process the ends and work along the plane of the board. Basically this is a parallel fence with rods, milling bushings and a set of cutters of various types. The former guide the machine exactly along a straight cutting line or help make an even circle. The bushings guide the machine along the template, repeating its shape of any complexity.
To make grooves, cuts for locks and canopies, and create beautiful edges of any configuration in wood, a top-type router is suitable.
DIY guides and carriages for CNC: types, designs
The mechanics of each machine, regardless of its purpose and type, contains components that are considered basic. Therefore, it is unacceptable to ignore their parameters. It is generally accepted that guides are considered such an important component for metal-cutting or woodworking devices. They will determine error-free and cyclical work.
Therefore, anyone who decides to create a machine must ensure that its design uses high-quality CNC guides, which have a positive effect on the functionality of the device. They don’t skimp on purchasing components.
Main types of guides
In the process of designing and installing machines (factory-made and home-made), different types of guide devices are used. This is due to their purpose - milling, drilling or turning. They can be of two types.
Sliding guides
They are used in low-power equipment that does not require special precision and high productivity. Table-top drilling and turning units and woodworking machines are equipped with such parts.
The polished shaft, as a type of guide, belongs to the budget category. It is the most common.
IMPORTANT! It is made of high-alloy steel, induction hardened and subsequently ground. This treatment increases the operating time, and the shaft wears less.
The polished shaft has disadvantages:
- fastening at the end points, there is no fastening with the bed, which is why there is a lack of rigid connection with the table and the presence of errors in processing;
- sagging with increased length, so we allow a maximum of 1 meter. It is recommended to have an optimal ratio of shaft diameter to length (0.06-0.1) in order to achieve normal results.
Rolling guides
They are designed using rolling bearings.
Linear bearings have more play than the carriage of rail guides; they are less loaded. But it has a number of disadvantages:
- low level of carrying capacity;
- fragility;
- manufacturing with significant play;
- sensitive to the effects of dust and chips on the shaft.
The material for the production of bushings is bronze, brass, caprolon. If tolerances are maintained, bronze plain bearings are as good as rolling bearings. From time to time, if the plain bearing is worn out, it is adjusted to eliminate the gaps. Therefore, the linear bushing is preferred due to its availability and interchangeability.
It is worth giving a brief description of the other types.
- The spline shaft is characterized by the presence of a special track for the bushing balls. Characterized by greater rigidity and wear resistance, compared to a conventional shaft, it is suitable for mechanisms in which it is desirable to install guides at the ends. They are used extremely rarely in the design of machine tools due to their high cost.
- The shaft on a support in the form of cylindrical rails of a linear type does not allow sagging under load and its own weight. It is mounted on the frame, securely fixing it. Despite the disadvantages, expressed in the presence of large play in the bushings and their short service life, cylindrical rails have a large load capacity. Different from linear bearings, the carriage reacts differently to the degree of load. A small CNC machine that has a heavy spindle has the potential for reduced accuracy.
- The purpose of profile rail guides is greater accuracy. They are also attached to the frame. Thanks to special raceways, the loads on the carriage are distributed evenly over the surface, and the contact profile of the ball to the rail is an arc. Among the advantages are the presence of good load capacity and wear resistance, and backlash is minimized. The difficulties of producing such rails have a negative impact on pricing; they are expensive. This especially applies to guides supplied by well-known brands whose machines are numerically controlled.
- Roller rails have flat raceways, and in the support module, in place of the balls, rollers are installed that improve all the parameters of the guide. They are used in machines that mill ferrous metals, steel and stone.
- Dovetail is chosen for industrial metalworking equipment if increased fastening rigidity is required. In guides of this type, flat surfaces slide with a maximum contact area. They are made in the form of a monolith with a frame. Due to the complexity and labor-intensive manufacturing and repair process, these guides are therefore not accepted by the hobby machine tool industry.
Which designs to choose?
Not everyone can afford to purchase, say, a CNC machining center for the production of small-scale parts at home, a format-type machine or for turning. But a homemade CNC unit, made with your own hands, is real. The assembled device in capable hands will demonstrate examples of correct processing of parts.
When assembling the mechanics of programmable machines, homemade linear guides are usually used, since there is no need for devices with circular motion. Let us pay attention to some of the designs used in this case.
Galvanized or chrome-plated pipes
They come with different diameters and can be used as rods when installing low-power devices - surface grinders, drilling or lathes. The bronze bushing moves along a polished cylindrical rod.
Sometimes a support is made without it. Pipes have low prices and are easy to process.
Although there is a minus: a short resource (the protective layer wears off after 15-20 penetrations, after which the steel wears out more intensively); there is no required level of strength under high loads.
Fraser
An effective router is one in which the guide mechanism is made from a used dot-matrix printer or Yantar typewriter. With this option it will last a long time. There is no need to look for very wide bearings; their internal diameter should be equal to the diameter of the bolts.
How to do it yourself?
From the very beginning, it’s worth making a reservation that you shouldn’t make a universal carriage for a hand router yourself. This is an almost precision product, and it is almost impossible to make such a model at home. If you need to carry out important work at a professional level (for example, produce and install doors on a large scale), then you can get by with simpler solutions (which will be discussed now). We are talking about sets of templates that are made from:
- become;
- plexiglass;
- textolite.
But it follows precisely from this that it is stupid to limit yourself only to the offers of official suppliers. They mainly sell carriages for the most popular hinges and other parts, and the range of such types of fittings is not even covered by a third.
When making a template (carriage), you should ensure that the dimensions are set as accurately as possible from the very beginning. The simplest design, designed to work with workpieces from 50 cm and larger, is made from:
- metal corner 30x30;
- studs category M10 (complete with suitable washers and nuts);
- plywood sheet 60x20 cm with a thickness of 0.8 cm.
The studs should be secured to the tabletop. To fix them, use holes for bench stops. The nuts are tightened from below. The work takes approximately 2-2.5 hours. Since the carriage is movable, it is easy to adjust it to a certain height.
You just have to move the nuts on each of the studs. In the same way, it is possible to set a slight tilt of the router. To work with workpieces that require fastening under the carriage, the edges are clamped with clamps on the workbench. An alternative solution is to pull the edges to the studs. The choice depends on your own taste and technical feasibility.
It is imperative to use drawings of milling carriages. The photo shows one schematic version - without indicating the dimensions, but everything should be clear. Alas, you will either have to draw diagrams with dimensions yourself, or search long and hard - it is quite difficult to find ready-made samples in open sources. Another manufacturing option is possible - obtaining a carriage with a slide. It will be able to level the surface over fairly large areas.
For completely independent work you will need a circular saw. If you don’t have it, you can always order a complete set of parts from the nearest furniture manufacturer. In addition to the circular saw, you will need to prepare:
- MDF in sheets;
- wood screws;
- a router for which the carriage is prepared (as a sample, for precise fitting);
- miter saw;
- set of clamps;
- drills and a screwdriver for tightening them;
- Swenson's square;
- construction tape;
- pencil or marker;
- ruler.
The width of the strips is determined by what height of the sides is considered optimal by the craftsmen themselves. The next step is to measure the width of the router base. A wide strip should be made with some margin to guarantee freedom of maneuver during work. The preparation of the milling carriage is completed by sawing out the sides. What remains next is:
- mount the base, tightening the sidewalls with clamps;
- check the exact fit of the corners;
- punch pilot holes for screws;
- attach the sides using 5 cm self-tapping screws;
- cut the panel to length;
- cut the sides;
- If desired, trim the walls along the edges (if this is aesthetically necessary).
Build quality and materials from which UVK-PROFI is made
Main frame
Manufactured from rigid, structural and anodized aluminum. Anodizing aluminum protects against scratches and gives a beautiful aesthetic appearance. The already reinforced structure is additionally tightened with hardened and polished shafts with a diameter of 16 mm.
- Thanks to this design, the geometry of the universal milling carriage turned out to be perfectly accurate. UVK-PROFI does not interfere when used in work, and it is simply not possible to disrupt the geometry with physical impact.
Mobile matrix
The mobile matrix has a built-in “Y” axis. For perfect sliding without play or biting, engineers came up with a non-standard solution. The matrix consists of 3 layers. Dural aluminum, structural textolite and steel layer along the “Y” axis. Thanks to only this combination of materials, the “Y” axis moves smoothly, without play to the sides, and does not bite.
Clamps and fastenings to interior doors.
Particular attention is paid to the built-in vice with two independent elements. First, let's talk about the design features of the vice.
- The clamping elements are made of very durable kapralon material. This unique material is not inferior to steel in strength and toughness, is not subject to deformation and is very easy to process. Also, the clamps are equipped with wide rubber pads with anti-slip relief.
- The shafts (pins) along which the clamps move are made of steel rods with a diameter of 8 mm. with trapezoidal thread. Trapezoidal thread differs from ordinary metric thread in that it is almost eternal and smoothly clamps the workpiece. This thread is used on drive shafts of industrial machines and vices.
- In order for the vices to move independently of each other, there are two such pins on each side of the carriage, and between them there is a spring mechanism to prevent biting.
- The rotating elements (handles) are made of polyacetal, which cannot be broken even with a hammer blow.
The vice performs not only the function of reliable fastening.
- There is no error or loss of settings when clamping (as was the case with clamps on the previous UVK model).
- The built-in vice has reduced the size of the carriage (it has become more compact and easier to use), and its technical characteristics have increased. The working width of the workpiece is now 165 mm. The travel along the “X” and “Y” axes has also increased.
- Thanks to two independent elements, with ufk-pro you can quickly move the center of the insert forward or backward. When working with non-standard fittings, wide canvases and boxes, shifting the insertion center simplifies setup and speeds up insertion of fittings.
- Thanks to a vice with two independent elements, you can embed regular and hidden hinges simultaneously into the box and the canvas. This possibility not only doubles the speed of fitting fittings, but also ensures perfect synchronization of insertion of all types of hinges relative to the edge on the door leaf and frame.
The template for inserting hinges and locks UVK-PROFI is made to work for many years, which will work perfectly even after 10 years of use. There is simply nothing to break here! It can even be compared with a Soviet instrument, which lasts for 20-30 years and does not lose its accuracy in operation.
Circle milling
To perform tasks at home, a device that can make it easier to cut round blanks may be useful.
For example, a compass is often used, which you can create with your own hands.
This device is made according to the following scheme:
From available elements, a piece of plywood, self-tapping screws, a wooden wing and a bolt with a nut are used to make the device. You will also need a router, saw and screwdriver. A small marking is made on a piece of plywood. A platform is outlined on it, the length of which is 15 cm and the width is 5 cm.
It is important that the length exceeds the processing radius, and the width exceeds the size of the router pad. Holes are made for the mounting bolts (their diameter is 2-3 cm). Perka is used for drilling. A groove is cut through the middle strip
It is necessary to ensure that its width does not exceed the size of the axle bolt. A recess is made at the bottom of the plywood sheet to accommodate the nut and washer. Another nut is secured in a wooden wing. Now you can assemble the main axis. Instead of a stud, use a bolt with a sufficient length, having first sawed off its head. The compass is installed on the router and the functionality is checked.
Guide rail
use a piece of chipboard
First you need to find out the distance from the edge of the milling base to the center of rotation, and it is always the same. To do this, you need to screw a guide to the unnecessary part of the material and make a test cut. Then you should measure the gap from the edge of the cut to the tire, to which the radius of the cutter is added. As a result, it will be possible to obtain the required value. For example, it is 59 mm, and the diameter of the groove cutter is 14 mm, that is, its radius is 7 mm.
Then you should draw a line for the cut, from which we retreat a distance of 52 mm (59-7), and draw another one. We fix the guide along it and make the cut.
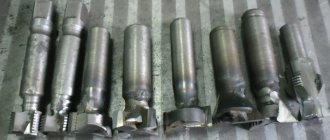
Main types of nozzles
A cutter is a rotating part that is dotted with teeth over its entire surface. Such elements can be found in different configurations. Using a cutter, you can process not only wood, but also plastic or metal, but they are still usually used for wood.
There are the following types of products:
- End.
- Edges.
- Grooved.
It should be noted that it is worth periodically applying lubricant to the support bearing. Thus, the parts will last much longer.
End mills
This type of part works not only because of the use of axial load. Such cutters involve the use of side edges, which makes it possible to move the cutting element within the support area. The result is neat selections that are formed in the tree.
The number of cutting edges may vary and this will affect the cleanliness of the cut. Typically, this type of attachment has a monolithic design, but there are also crown attachments that are used for wood drilling. This option should be used in a situation where there is no router at hand.
This category has several varieties:
- Spiral.
- End
- Burrs.
- Conical.
- Profile.
- Spherical.
End ones are used to form grooves that have different configurations and sizes. They can be used not only for processing wood, but also to create a groove/tenon.
A profile cutter can perform certain tasks:
- End processing.
- Creation of grooves with a rather complex configuration.
- Decorative design of ornaments.
Wood edging
Edge cutters for hand routers represent the largest group and are most often used for hand tools. They are used to make edges on wood. This option is often preferred by home craftsmen, since even in the largest sets the bulk of the parts are edging attachments. It is much easier to purchase such a set of cutters than to select everything separately.
This variety includes:
- Profiles, which are used to create complex shapes of the edges of parts.
- Shaped or molded, which are indispensable for rounding and rounding edges.
- Conical, which are used to remove the corner chamfer.
- Disc-type, with the help of which grooves are formed in the edge parts.
- Rebated ones that remove quarters in the edge parts.
- Wood fillet cutter. Typically used to make grooves.
- Figirey, used to create panels.
Typically, edge cutters are equipped with a bearing. This way you can limit the stroke of the tool, and thereby prevent excessive penetration into the surface of the tree. It is worth noting that the cutting edge will not be placed at the same level as the bearing. Using the support platform, you can adjust the depth into which the cutter will plunge.
If the nozzle produces too large cuts, then the work must be done in stages, each time deepening the tool into the material until the desired configuration is achieved.
The figurine cutter has a large weight, as well as a diameter. With the help of such tools you can work on stationary structures.
Grooving equipment
Using a wood groove cutter for a hand router, grooves are created. There are several types of nozzles:
- Fillets, with the help of which semicircular grooves are made.
- Conical, thanks to which you can apply threads to a flat surface.
- T-shaped, creating a corresponding pattern.
- Shaped.
- Elements called “Dovetail”.
- Straight grooves, which are intended for cylindrical parts.
- Combined, with the help of which large-sized wooden panels are connected.
Bearings in the carriage for a router
There are two types of bearings when installing guides:
- Bushings for ball elements.
- Bearings to provide a sliding surface.
Disadvantages of this type of bearings:
- Withstands light load.
- Formation of high pressure due to low operating life. The need to periodically replace the shaft due to the formation of a groove.
- Sawdust and sticky dust clog the slots.
Bearings to ensure sliding on the surface are made from non-hard metals such as caprolon. If all tolerances are maintained, the load-carrying capacity and precision of the sliding bearing are quite high. However, sawdust and dirt cannot harm the unit. But this only applies to bronze parts that are well processed.
Over time, wear occurs on the product, which requires periodic adjustment to get rid of gaps. As a rule, more affordable bearings are used for making them yourself.
Support board
The box blanks in my design are attached with clamps to the support board. To make it last longer and not be wrinkled by clamps, I used a larch deck board to make it, which I leveled using a surface planer.
At first I planned to make the support a single board, but it would require a clamp at the bottom and, in addition, the bottom edge would be damaged by the saw when cutting the tenons. If I raised the backing board above the level of the tenons, then there would be a problem with chipping on the workpieces, especially those made of plywood. Therefore, I made the support board from two parts.
4. The lower, narrower and shorter part of the support board was rigidly attached to the stop of the tenoner base, and the upper part was left movable. It is moved using a wooden block with a nut and a pin along a groove in the bottom of the support board.
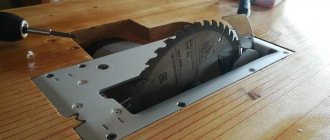
5. At the bottom I installed a replaceable anti-splinter lining made of MDF. I installed a side stop on the moving part of the support board - strictly perpendicular to both the board and the base plate. Then I attached a block to the edge of the base as an additional fastening and made a cut in the base to allow the disk to pass through.
6. For safety, I glued a protective block in the front part where the disk comes out. There is a space left on the sides of this block where handles will be installed to make it easier to move the tenon cutter along the runners of the saw table.
7. To control the position of the disk, I installed two pointers. The first shows when the support board is set to the “zero” position, that is, when the disk is in close contact with the side stop. The second helps to count revolutions when turning the hairpin. As a second counter, I used a wooden “barrel”, rigidly attached to a pin, onto which I marked marks in 1/4 turn increments.
8. To ensure faster operation, I used a “sandwich” of two identical disks and a spacer between them. There are special kits for setting the exact width of the groove, but they are expensive and I don’t have one. To get the gasket of the required thickness, I cut a duralumin washer with a thickness slightly less than required and adjusted it to the required dimensions using self-adhesive aluminum tape. I would like to note that it is better to use new identical disks. I had one new, and the second was already a little used, as a result, when cutting, a small step appears at the base of the tenon.
9. After a lot of testing and tweaking, I got a “sandwich” with a cutting width of 5.25 mm, which corresponds to 3 turns of the pin (1.75 mm x 3 = 5.25 mm). This made it possible to make 5.25mm wide tenons by turning the pin 6 full turns between cuts. If it was necessary to make larger spikes, then the number of revolutions was proportionally increased.
10. The tenoner is ready for use.
Nuances when working
In conclusion, here are a few subtleties that are useful to know if you want to make a homemade carriage for a circular saw:
- It is recommended to install a thick block on the supporting wall in the place where the disk passes through it, which will prevent the saw from jumping over the edge of the wall, which can lead to injury.
- In order to give the structure greater slip, it is recommended to clean the runners with sandpaper, and periodically lubricate the grooves with a candle stub (paraffin or stearin). Sometimes wax is used, but it is not recommended to use it, since it melts during use and sticks to the runners.
- Before applying glue to parts, blow the structure away from particles of wood dust and shavings to avoid unevenness after gluing.
- After cutting through the walls, make sure that the saw passes through them freely. To do this, you can make a sawn hole slightly larger than the thickness of the disk.
Important . The master, no matter how experienced he is, should not forget that a circular saw is a unit with an increased risk of injury, therefore, when making a carriage and working on a saw with its help, you should always be careful and careful and remember about safety precautions.
Having made an end carriage in such a simple way in a home workshop, the craftsman will have at hand an easy-to-use, universal tool that can be used in most types of carpentry work.
Assembling the turning fixture
Scheme of a simple lathe.
The assembly method will be like this:
- The basis of the unit will be a 3-phase electric motor. Therefore, its power supply must be three-phase, otherwise the automatic fuse in the house will constantly blow out.
- Engine speed is no more than 1500/min.
- Place a faceplate on the motor shaft for large parts and a removable analogue for small ones. Secure the other side of the knot with a corner. There are special peaks on the faceplates; the workpieces are pressed onto them with a hammer.
- Next, center the workpiece and secure it with counter washers. The homemade woodworking machine is ready.
Working on the machine
The photo shows the production part.
Operating rules:
- Turn on the machine and insert the first cutter (ordinary chisel). It will remove the initial layer (1-3 mm).
- After rough processing, the workpiece will be 1 mm thicker than necessary. Remove the remaining layer with a finishing cutter, which will give the product its final shape.
The dimensions of the workpieces can be controlled with a micrometer or a template. Contours and cuts can be made with the sharp side of a chisel, and grinding can be done with a finishing cutter.
You can also smooth the parts with sandpaper. Polish with wood shavings, holding them in your fist and bringing them to the workpiece.
How to do it yourself?
For those who intend to thoroughly study other people's useful practices, get involved in improvements and inventions, and try how good homemade tools for a router are in practical activities, below are several videos from the domestic Kulibins.
A list of useful devices available to the home handyman.
Rip fence – you can simply purchase this and install it on the edge of your workbench (if it is level enough) or workpiece. You can add a wooden block to it. However, you need to work with such a device with extreme care, because it adds an element of instability. With a rip fence at your disposal, you can securely hold the workpiece during machining in order to machine edges and grooves
The peculiarity of every creative person is the ability to orientate oneself in a timely manner, to assimilate existing work or, if necessary, create one’s own. It is not always possible to purchase what is needed for work (for financial reasons or due to lack of availability). This is where someone else’s useful experience or your own resourcefulness and ingenuity comes to the rescue. The global information space has greatly facilitated this task.
Watch the video for all about the tools for the router.
Do-it-yourself carriage for a milling machine
For accurate operation, a milling cutter requires auxiliary devices; at the same time, the sales package of the device includes a limited set of such items.
The market for milling attachments extends from protractors to numerous attachments. The user, for whom this is not enough, can make auxiliary devices himself.
Templates and copy sleeve
The copying ring is a circle with a protrusion that slides along a template, guaranteeing accuracy of processing.
The ring can be screwed to the base of the router or secured with antennae.
The diameter of the device is selected so that it does not come into contact with the working part of the tool.
The ring template is fixed on the material being processed, firmly adhering to the tabletop.
Reliable clamping is provided by double-sided tape and clamps.
Having finished the part, you need to make sure that the sleeve fits tightly along the edge of the template when working.
A self-made template for a router can also be used for processing the corners of a part, when it is necessary for them to be round. Depending on the location and dimensions of the template, the radius size of the rounding can be any.
The template design often includes bearings or rings. If this is a ring, then it should be selected according to the size of the cutter.
If there is a difference in diameters, it is necessary to add stops to the template design, with the help of which you can move the device away from the edge of the part.
The special design of the accessory makes it possible to effectively create recesses for door hinges.
Using a template, you can even carry out decorative work with a router, for example, cutting out wooden patterns.
Compass
This auxiliary tool is designed to create round and oval cutouts.
The basic compass design includes a rod with a pin fastening at the end.
By inserting the fastener into the hole in the center of the circle along which the groove is made, you can change the size of the circle by simply moving the rod.
Note! The convenience and reliability of the design is increased by adding a second rod.
There are various auxiliary elements that work on the circular principle.
They offer the advantage of creating different radii of circular grooves.
A mandatory component of such auxiliary devices is a pin with a screw for adjusting the length of the radius.
If a small hole is cut, the compass structure must be adapted for mounting on the base of the router. When processing a part, the pin is located directly under the tool.
A wood router, in addition to round ones, is also capable of cutting elliptical holes. The device for this can be assembled with your own hands from the following parts:
- base with fixation on material made of screws or suction cups;
- shoes moved on crossing guides – 2 pcs.;
- rods for installation – 2 pcs.;
- bracket for connecting the structure to the tool.
The fastening bracket, thanks to the grooves intended for this purpose, allows the frame of the structure to be in the same plane as the base of the router.
Cutting round openings is done using one shoe. If you need an oval hole, both are used.
This auxiliary design makes it possible to make holes more accurately and faster than other tools, such as a band saw or jigsaw.
For grooves on narrow surfaces
Recesses for locks or door hinges can be made with a drill and chisel, but a router is much better suited for this. You just need to equip the tool with a certain device.
It consists of a flat plate that is attached to the base of the device. The shape of the plate can be round or rectangular.
2 pins are made on it, ensuring smooth movement of the tool during operation.
The main parameter that must be adhered to when manufacturing such an element is that the axis of each pin must be on the same line as the center of the cutter.
If this parameter is observed, the groove will be cut exactly in the middle of the workpiece, regardless of thickness.
If it is necessary to shift the groove to the right or left, a sleeve of the size needed for the desired shift is put on the corresponding pin.
Using this design, the router is driven with the pins tightly pressed to both sides of the workpiece.
The same effect is achieved if you use two parallel stops with a router.
Even one stop may be enough. It is necessary to strengthen the workpiece between two surfaces, for example boards, so that all three elements are in the same plane. In this case, the problem of insufficient part width is eliminated.
Milling depth
The next setup step is setting the immersion depth. It is set by a vertical stop, which can have several stages of adjustment. The most popular is the position of the stop itself. Having rested it on the lowest of the legs of the “revolver” (if possible), loosen the clamps of the stop (usually a wing clamp is implemented) and the “head” itself and lower it until the cutter touches the surface.
Note that it is not at all necessary to use a workpiece; it is better to perform this operation on the plane of the workbench, without the risk of damaging the part.
Now you need to fix the movable stop or simply hold it with one hand, and with the other set the movable pointer (it “moves” up and down) opposite the zero division of the measuring scale, thereby calibrating the ruler. That's it, she's ready to go.
By moving the stop and following the pointer, adjust the depth and tighten the screw of the movable stop. If the router is “simple”, then the adjustment is complete. Otherwise, the immersion depth is adjusted more accurately. The position of the movable (already fixed) stop is changed with an accuracy of tenths of a millimeter by turning the adjusting wheel.
It has latches (“clicks” along the divisions) or simply rotates tightly. The first option is better, since the installation will not fail during operation. It is good when such adjustment is implemented within wide limits, and it is very convenient when it can be done directly during operation.
Manufacturing of devices for processing poles and balusters
Each master can independently make accessories for a hand router that will satisfy his personal needs. For example, a milling machine is used to process bodies of revolution—objects that have a round shape. These include pillars, balusters and other wooden elements that have a similar configuration.
But in order to achieve a positive result, it is necessary to prepare a device that makes it easier to cut grooves in the rotating bodies. With its help, it will be possible to make longitudinal grooves and process along a circular contour.
Wood router attachments
The design of such a device consists of the following elements:
Woodworking device in detail
- housings;
- mobile milling carriage;
- disk for setting the rotation angle;
- fixing screws ensuring immobility of the workpiece being processed;
- locking screw.
To get started, you need to place the baluster into the device body, securing it with screws. Using a rotary disk, the part is placed at the desired angle and secured with a locking screw. Next, a carriage with a milling cutter is set in motion, which cuts a groove along the entire length of the workpiece. To cut the next groove, the fixation of the product is loosened and it is again positioned at the desired angle.
It is advisable to perform all these operations with an assistant who will slowly rotate the workpiece. The operation of the device can be automated by equipping it with a drive from an electric drill or the most primitive screwdriver.
Hazardous factors
Milling machines require complete safety and high qualifications of the worker. When using electric machines, accidents may occur due to material ejected during milling. Therefore, the performer of the work must have special work clothes.
If heavy dust is generated during the milling process, you must wear safety glasses. Maximum safety in this situation is provided by special clamps and vices that effectively hold the workpiece, preventing it from being thrown out. Do not hold the workpiece in the rotation zone of the cutter with your hands or directly touch the rotating tool. It is necessary to use special clamping devices to advance the part during milling.
https://youtube.com/watch?v=aDVf2Crm9p8
Originally posted 2018-07-04 07:37:46.
Guide rail
Having a similar purpose to the rip fence, the tire is responsible for the accurate movement of the cutter in a straight line. The time spent on work is noticeably reduced due to the use of the tire. It also allows you to guide the tool on the table at any angle to the edge.
Some mass-produced tires include a separate component - a shoe. It is connected to the router by rods and, passing along the bus, moves the milling head along a given path.
The tire is best combined with a tool whose base stands on retractable legs. This eliminates the height difference between the guide rail and the router.
It happens that the functionality of commercially produced tires is not suitable for the user. You can always create an individual version of the router guides with your own hands. The most elementary one is a long, even beam - in other words, a ruler. The master only needs to provide it with fasteners, and the tire is essentially ready. To make a simple device, you don’t even need a drawing.
Of course, such a homemade version will not be stable. The combination of a plywood base with a board nailed to it will be more stable in operation. The edge of the router base will rest against the board, and the edge of the base will mark the processing area. This design is used when using cutters of the same diameter.
Another option works when wood cutters can be of different sizes. Here the board acting as a ruler is not nailed to the base, but is reinforced with clamps. Thanks to this, it can adjust the distance from the working area according to the diameter of the cutter.
Processing of wooden parts
The first thing you need to learn is to correctly set the milling depth. To do this, you need to set the zero point. It is impossible to set it rigidly, because it changes every time the cutter is changed. The zero point is the position of the tool when the end of the cutter touches the material and is fixed with a special device called a clamp.
It is necessary to pay attention to the fact that each router has a different position when fixed. To control the depth of immersion of the cutting tool into the body of the material, a stop pin with a coarse adjustment scale is used.
When milling with an end mill, the counterforce from the cutting force moves the router to the side. To prevent this from happening, you need to use a rip fence. The milling process is as follows. Place the cutter along the marking line and secure the position of the stop with a special screw. Set the milling depth and turn on the machine. If the rip fence is installed on the left side, you need to pull the router towards you, when on the right side - away from you.
In order to select a quarter on a beam, you need to set the cutting edge of the cutter at the very edge, fix it, set the depth of the quarter, turn on the router and pull it towards you (if the stop is on the left edge of the beam). Milling the surface of narrow bars has its own peculiarity. The problem is that it is very difficult to hold the router on the narrow side of the workpiece. If it wobbles during operation, the groove will be inaccurate.
Working with a hand router can replace working with a planing machine. To do this, you will need several accessories for the milling mechanism. It looks like this: attach a milling mechanism to two equal-sized slats and use it as a planer, where a large-diameter milling cutter is installed instead of a shaft.
DIY accessories for a wood router: stops, templates, guide rails
For accurate operation, a milling cutter requires auxiliary devices; at the same time, the sales package of the device includes a limited set of such items.
The market for milling attachments extends from protractors to numerous attachments. The user, for whom this is not enough, can make auxiliary devices himself.
Preparing for work
To successfully process wooden surfaces with a router, you must undergo preliminary training, starting with simple tasks and easy models.
It is also important to understand the operating principles of the router itself, its capabilities, and the purpose of each type of cutter. A beginner needs to master simple cutters with a small diameter
When sanding wood, they are easier to control because the smaller diameter creates less resistance to the wood being sanded. The choice of tree also matters. Soft wood of poplar, pine or birch is best suited for training. Having mastered simple operations, you can begin to perform more complex ones.
How to make a wood lathe with your own hands: drawings and technology
The easiest way to make a tool yourself at home is to construct a lathe or milling machine from a drill or electric motor removed from another tool. This process is not that complicated, so every master can handle it. To do this, you will need an electric motor, the power of which does not exceed 500 W, and available materials. A drill can also be used as a drive. Of course, making a lathe will require some skill.
The device of the tailstock of a homemade wood lathe
To build the machine, the following elements are required:
- metal frame;
- electric motor;
- handyman;
- tailstock.
It wouldn’t hurt to get a drawing that will help you navigate the dimensions and correctly manufacture all the structural elements for its subsequent assembly.
How to make a homemade drilling machine with your own hands with a motor
First you need to prepare the electric motor shaft. To do this, a faceplate is installed on it; a steel center with a thread is also suitable. Installation of the second center is carried out in the tailstock tube. To make the frame, you will need a pair of corners measuring 5x3 cm, their length is 15 cm. A motor is attached to the frame using a bolted connection.
An example of a homemade drilling machine
At the next stage of making a homemade machine, you assemble the headstock yourself. This element is formed from a pair of horizontal and a pair of vertical corners. A pipe intended for the spindle is attached to it. You need to insert a bolt into it, the diameter of which is 1.2 cm. First, its head is sharpened at a right angle. Thus, the central part of the spindle is designated. After this, the headstock is installed on the bed. On the top post, which connects to the horizontal corners, it is necessary to secure the tube by welding.
To make a tool rest, you need to take a steel rod with a chamfer. This element must also have a hole that will be used to secure the support ruler. It is necessary to vertically weld the tube with the locking screw to the long angle. Then the tool rest rod is inserted into it.
The motor rotor on which the faceplate is attached will be used as the headstock spindle. You need to make several holes in it. A fork will be inserted in the central part. The holes along the edges are intended for fixing the part with screws.
Even with the help of simple tools you can create interesting wooden products; for this you need to study the technology of working with the tool and practice
How to make a wood lathe from a drill with your own hands
Having a workbench with a strong and flat working surface at hand, you can build a lathe without resorting to building a bed. The electric drill in this case will serve as a rotary drive and headstock. According to the simplest drawing of the machine, it is enough to fix this tool on the surface of the workbench through the neck. Clamps and a clamp are suitable for fixing.
Next you need to make a stop that will act as a tailstock.
This element is mounted opposite the drill. To create it, you can take two blocks of wood and an adjusting screw, sharpened at one end to a cone. If you intend to use the machine for processing massive wooden workpieces, then it is advisable to fix the stop on the table using clamps.
To make a tool with your own hands, inexpensive materials are enough. A drill-based lathe can be used to turn various parts:
- door handles;
- structural details of the staircase;
- decorative items, etc.
Using a workbench with a durable and flat working surface, you can make a lathe from a drill with your own hands
To expand the functionality of the tool, its design can be supplemented with attachments and other devices that can improve the quality of work.
Such improvements include:
- winding on transformers;
- applying a coloring composition over a rotating part to create patterns;
- applying spiral notches to the workpiece, etc.
Installing a special attachment in the form of a copier will allow you to use the machine to create a whole series of identical parts or products according to a template.
An example of a multifunctional homemade woodworking machine from a drill
Do-it-yourself carriage for a milling machine – Machine tools, welding, metalworking
We will try to answer this question in our article. For those who make wooden products on their own, a router (especially a manual one) is an indispensable assistant.
The power tool itself, even if equipped with an excellent set of cutters, is completely useless without additional accessories. It is impossible to hold a working milling cutter within a given trajectory with your hands.
The rotating cutter will move chaotically, reacting to the vibrations of the tool and the structure of the material being processed. Even the owner of steel muscles and a hawk's eye will not be able to work with this tool without the use of guides and fixing devices.
This is what a wood router looks like
Basic devices are usually included with power tools, but they can only be used to perform simple tasks. More complex guides and templates have to be purchased for additional money, while many of them can be made by hand.
The main thing is to have an idea of how this device looks and works. There is no need to look for ready-made drawings and complex technical calculations. Any master knows better how to make this or that device. The efficiency and convenience of work will be higher, not to mention the savings.
Mechanical assistants for hand router
The most common device that is included in the basic kit.
Rip fence
Accessory - Rip fence
The design is so simple that making it yourself will not be difficult. A guide plane is selected relative to the line of passage of the cutter (in some cases this may be the smooth edge of the workpiece itself), along which the milling cutter moves.
The stop can be any flat, oblong object connected to the tool with a fixed rod. For reliability, there can be two rods.
The surface of the guide must be smooth for free sliding. The stop needs to be calibrated.
To do this, a control groove is cut in the workpiece, the distance to it relative to the edge of the workpiece is measured, and the zero mark is fixed. By moving the stop along the rod, you can set any distance with high accuracy.
The rip fence is used for milling grooves and processing the edges of the product, including selecting a quarter. It is also possible to cut blanks of the same width.
Compared to an electric jigsaw, the cut obtained with a milling cutter is smoother and of higher quality. Only the cutter should be of small diameter to save material.
The device can be used when processing rounded surfaces. To do this, a gasket with a cutout in the form of an obtuse angle is installed between the stop and the rounded end of the workpiece.
Popular: Types of wood cutters for a hand router
Guide rail
This device is no different in function from a rip fence, and is designed to ensure directed movement of the cutter along a given path.
A useful assistant when working with a router - a guide rail
The main difference is the ability to choose the angle of movement of the router. To do this, the guide is fixed on the surface to be treated using clamps or suction cups. You can make such a device yourself from a profile or corner of a suitable size.
It's good to use an old curtain rod. The main thing is to ensure free movement of the carriage along the guide. For a more stable fixation, it is better to use not one, but two rods. If the width of the workpiece being processed is greater than the length of the rip fence bar, you cannot do without a guide bar.
Using such a device, you can mill grooves along a broken line or trim the edge of a product along a complex trajectory. To do this, the milling cutter stops at the break point, the fastening is given to the guide, which rotates at a given angle relative to the previous direction.
In this case, the cutter remains in the workpiece, acting as an axis of rotation. The guide is then fixed again and milling continues in the new direction.
More advanced models have the ability to change the angle of inclination of the router relative to the vertical. This allows you to significantly expand the possibilities of using power tools.
Compass for router
The purpose of this device is clear from the name. Used for milling grooves in a circle or cutting out circles.
Want to make a perfect circle? You will need a compass for the router
The principle of operation is simple. A guide rod with a groove or a plate with calibrated holes is used as a compass leg, allowing you to cut circles of any diameter. A pin is fixed in the center of the proposed circle, around which the entire structure moves. But at the other end of the guide there is a router.
Factory compasses for a router can have a variety of designs. A rod with a support platform and a hinge (the design with two rods is more stable), a plate with a slot or calibrated holes.
Template for cutting circles
The main thing is to ensure reliable fixation of the central pin, otherwise the structure may shift due to vibration and the workpiece will be damaged. You can make such a device yourself from any durable and smooth material, for example, textolite.
Homemade device for cutting circles
A carriage with a fixing device moves in a sawn groove; holes are provided for attaching the router. There are also more complex devices for forming ovals.
It is based on the same design as the compass, but instead of an axis of rotation, a support with a cross system of grooves is used. Moving along them, the virtual axis constantly shifts, resulting in the formation of a regular oval.
Device for cutting oval holes with a router
Using such a tool, you can make oval cuts both around the nozzle and next to it. The possibilities for choosing the path of movement of the cutter are practically unlimited.
Copy sleeve
Sometimes it becomes necessary to mill a complex pattern or replicate identical cutouts. For convenience and increased speed of work, pre-made templates are used. For example, a template is often used - a tenon cutter.
Copy sleeve or copy ring
Or it becomes necessary to cut several identical recesses for door hinges. Copy rings are used to move the router along the contour of the template. The sleeve rests against the template, and the cutter exactly copies its profile.
Step-by-step instruction
A do-it-yourself wood milling machine requires a ready-made or a drawing of your own design, which shows the dimensions of parts and components. A simple woodworking machine is available in stationary and collapsible versions.
- The first involves using it in one workshop for decades, until the owner of the object and its core activity change. For a stationary one, the place is prepared in such a way that there is no point in changing or refurbishing it.
- The second option is a design that can be carried through the door even with a significant tabletop width, greater than the width of the refrigerator, non-dismountable tables and chairs, sofas and other large-sized equipment and furniture.
Milling devices for processing bodies of revolution
Many accessories for manual milling machines, made by users to suit their needs, do not have serial analogues. One of these devices, the need for which arises quite often, is a device that facilitates the process of cutting grooves in rotating bodies. Using such a device, in particular, you can easily and accurately cut longitudinal grooves on posts, balusters and other wood products of a similar configuration.
Device for cutting flutes in balusters
The design of this device is:
- frame;
- mobile milling carriage;
- a disk used to set the rotation angle;
- screws that secure the workpiece being processed;
- locking screw
Functions and capabilities of the UVK-PROFI universal milling carriage.
The UVK-PROFI universal milling carriage is a unique tool that has no analogues in the world in terms of precision, convenience and versatility.
What kind of fittings does the UVK-PROFI universal carriage fit into:
- Insertion of any interior and entrance locks (plumbing, magnetic, electronic, latches)
- Inserting strikers into a box
- Insertion of all types of hidden and card loops
- Insertion of crossbars
Additional functions:
- Milling of broken, grooves, quarters and T-joints on dovetails.
- Sealing resin pockets and knots.
- Mini copy turning works.
Why do you need a router?
Without a router, it is impossible to make high-quality furniture according to original sketches or intricate wood crafts. Of course, an experienced master will make do with a non-specialized tool, but in this case it will require much more work and time with an unpredictable final result.
The most popular among amateurs, vertical milling cutters are capable of performing many different operations. They cut grooves, edges, splines in wooden products and parts, chamfer, and select quarters. In addition, vertical milling cutters are used for making longitudinal edges and forming complex joints on tenons (straight or dovetail type - we mentioned it in the article “Do it yourself frame”) and tongues.
"Specialists" in milling
Versatility also has a downside. Undoubtedly, vertical milling machines can do a lot, but they are inconvenient to use in cramped conditions. Here you need compact edge routers.
Such tools are easy to hold even with one hand. At the same time, they provide high precision processing - they remove the edge without a hitch and strictly to the specified size. The position of the cutter is changed using a scale and an adjustment wheel.
If you are not sure that there will be a lot of work for an edge router, then you should take a closer look at combination routers. Such machines are equipped with two bases - for plunge milling and edge processing. True, in difficult situations, an edge router is still more convenient.
Furniture maker
Also on sale are dowel milling machines, which are also called filler or lamella milling machines. Such tools are used for milling grooves for flat dowels for corner and edge joints (lamella routers), as well as for making holes for furniture dowels and dowels (filler routers).
This is a standard operation in furniture making. It must be said that making grooves with a conventional tool is a very tedious task. And with an additive milling machine, everything is resolved in the shortest possible time and, moreover, with impeccable quality.
Link on topic: Working with a lamellar router - what can be done with it
Details
Most often, polished shafts are used, which are inexpensive. Purchasing these items will not be difficult. They are subject to mounting and processing. Most often made of durable steel.
After this, the top layers are subject to induction hardening, which has a beneficial effect on the period of use and wear rate. Ideal smoothness makes it possible for the carriage to move over the polished layer extremely successfully. The shafts can be fastened at both ends with two hands without unnecessary problems.
But there are also many counterfeit elements made of low-quality metal on the market, since the likelihood of an accurate on-site inspection is zero.
- The base is not fixed. The shaft can only be supported by two fastening devices. This makes it possible to significantly facilitate installation by hand, but at the same time independent of the table support. Because of this, the possibility of defects during product processing increases. Over time, lathe carriage guides roll and become bent.
- There is sagging at long intervals. Due to sagging, a shaft with a length of more than 100 cm is not used when processing for a machine. The thickness and length of the gross surface also matter. The best option is 0.05, and even more profitable is 0.06 - 0.1.