Manufacturing process of accessories
Manufacturers of milling cutters, taking care of consumers, include in the kit a simple set of tools that make the work of milling cutters easier. You can acquire the rest of the necessary equipment in two ways:
Accessories for wood router
- purchase ready-made;
- make it yourself.
If financial capabilities allow, then there is no need to waste precious time on making tools. But most home craftsmen still prefer to do them themselves. Moreover, the process of their manufacture is not particularly difficult.
Homemade devices do not require preliminary drawing up of drawings. You can make them using a simple drawing, understanding the principle of their operation, and having a minimal set of tools.
Difficulties can only arise in the process of making a table for a manual router. Here you will need to make every effort to make calculations and indicate the dimensions of the table. Therefore, it will hardly be possible to do without a drawing.
This is interesting: Tabletop drilling machine NS-12: characteristics and design
Selecting the right equipment
A manual milling machine is selected according to the type of work and the planned load. There are main types of equipment for woodworking:
- vertical – top type;
- lamellar;
- edge
Horizontal lamellar router. A disk with teeth along the edge moves parallel to the sole and cuts grooves in the side surface for flat keys in the mating parts without marking. The use of the tool is narrow. The lamellar type of tool is in demand in the production of furniture and building wooden structures. It is rarely purchased for a home workshop if the owner is seriously interested in making furniture and has models of universal hand routers available.
The top type router is universal for wood processing. It is he who is capable of performing almost all operations. Its kit includes several devices that allow you to process the ends and work along the plane of the board. Basically this is a parallel fence with rods, milling bushings and a set of cutters of various types. The former guide the machine exactly along a straight cutting line or help make an even circle. The bushings guide the machine along the template, repeating its shape of any complexity.
To make grooves, cuts for locks and canopies, and create beautiful edges of any configuration in wood, a top-type router is suitable.
Manual milling machine - basics of operation
Before you begin, you must complete the following steps:
Scheme for creating a platform for a router
- secure the cutter in the collet;
- make sure that the device matches the power and speed of the hand router;
- adjust the required milling depth;
- If you plan to use cutters for edge processing, you need to install a guide ring or bearing.
It should be remembered that the workpiece must always rest securely against any surface. The immobility of the part must be ensured even before turning on the milling motor.
Step-by-step instructions for making a wooden table
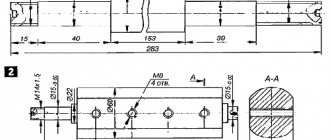
You will need plywood 18 mm thick, the sheet size is standard, you can buy a board of approximately 1.5 × 1.5 m. The table frame is made of 30 × 40 mm wooden blocks. The structure is fixed using ordinary wood screws. The tools you need to prepare are an electric jigsaw or a portable circular saw, a hand router, a drill or a screwdriver.
Standard milling table device
Making a countertop
Step 1. Cut a blank for the tabletop from a sheet of plywood. The size can be arbitrary, but not less than 80x80 cm. It is inconvenient to work on very small ones, the workpieces constantly fall, they have to be supported from the opposite side. Mark the plywood, attach it to the workbench with clamps, install a saw fence and carefully cut off the excess material.
Cut the sheet to the size of the tabletop
Practical advice. We strongly recommend that all work with an electric jigsaw and portable saw be done only under a ruler. You should not hope that you will get an even cut without this device.
Step 2. Mark the location of the hole for the cutter. This is also an arbitrary parameter. Much depends on whether you will subsequently adapt the stop ruler for the router, whether a box is provided for collecting and removing sawdust, what parts are supposed to be processed, etc. As practice shows, it is recommended to place the hole at a distance of 1/3 of the width from the longitudinal edge .
Mark the hole for the cutter
Make a mark and drill a hole. Its diameter should be only a few millimeters larger than the diameter of the largest cutter that will be used on this machine. There is no need to make a hole that is too large for several reasons:
- The larger the gap between the working knives of the cutter and the tabletop, the higher the likelihood that material will get into it. And this provokes the emergence of dangerous situations: the router may jam or fragments flying off at high speed may injure the craftsman;
- If you have to mill thin parts, the ends will vibrate strongly in the cracks - there is no stop. As a result, it is necessary to cut off uneven parts, which increases the consumption of lumber.
The hole is drilled with a special crown of the appropriate diameter.
Drill a hole according to the markings
Step 3. Place the router in the hole, making sure it is positioned correctly. Very carefully draw a line around the perimeter of the base. Make sure that the tool does not move during this process; always hold it with one hand.
Try the router on the hole and carefully trace it with a pencil
Step 4. Set the cutting depth on the router to 5 mm and very carefully cut out the seat along the drawn contour. Check the hole, insert the router into it. It should fit tightly and not wobble. If necessary, adjust the mounting socket to the required parameters. Everything is fine - excellent, remove the burrs with sandpaper and continue working on making the table for the router.
The seat must exactly match the contour of the router
Step 5. Prepare the same mounting nest on another piece of plywood, only now you need to make it through. Cut the part; its dimensions should be approximately 15–20 cm larger than the diameter of the router base.
Make a blank with a cutout of the same shape and size
Step 6. Place the workpiece on the countertop, align the holes and place the router in them. You need to note the location and dimensions of the two parallel guides. A router ruler is installed on them; in our case, it is removed. But you don’t need to touch the guides; they increase the reliability of fixing the router to the table and completely eliminate the possibility of rotating the body. The fact is that over time, the mounting socket may increase slightly in diameter, and the housing with the engine will begin to wobble. The long guides create fairly large arms that handle turning loads well.
The workpieces are combined and the router is inserted
Step 7. Measure the diameter of the metal pins, set the appropriate depth of the cutter and make grooves for them.
Cutting grooves for pins
Step 8. Connect the two table elements, put the router in place. Check the position carefully, turn the rotor manually, it should not touch anything. Everything is fine - screw the plywood.
After adjusting the elements, screw the blanks with self-tapping screws
Important. Be sure to screw the screws into the pre-drilled holes, otherwise cracks may appear. The diameter of the drill for the hole should be several millimeters smaller than the diameter of the threaded part of the hardware.
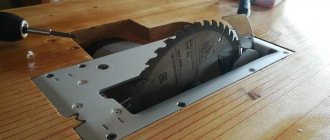
Manufacturing and insertion of the mounting plate
Screw the self-tapping screws around the perimeter of the stand at a distance of approximately 15 cm, secure the sections between the metal pins separately. Sand the surfaces again. This should not be done to improve the appearance, since the elements are located under the table and are invisible. By grinding, the surfaces are leveled, small chips are removed, the parts to be joined fit tightly, and the fixation is more reliable. And this is very important for any machine - vibration appears during operation, weak connections quickly become loose with all the negative consequences.
The entire surface must be sanded thoroughly
Step 9. Use small strips of plywood to secure the router in the working position. Turn on the power and check the operation of the tool. It should not wobble; if there are uncharacteristic noises, it is necessary to find their cause and be sure to eliminate it.
To fix the router, use two plywood strips
Everything is normal - proceed to the next step. Now we need to make a table frame for the tabletop.
Assembling the table frame
Step 1. Nail 30x40 mm slats to the bottom of the tabletop around the perimeter to add strength. Saw off the blanks at an angle of 45°, screw the parts with self-tapping screws of the appropriate length. Do not forget to lubricate the parts with wood glue before screwing. It performs two functions: it glues surfaces and perfectly aligns the cut planes, ensuring maximum stability of the connection.
Wooden blocks are attached along the perimeter of the tabletop
Step 2. Assemble the lower table support frame, it can have the same dimensions as the upper one.
Roll the frame from the bars to the size of the tabletop
Step 3. Attach the legs to it, the height is about 1 m, but adjust the specific values to suit your height, in which position it is most convenient to work, this should be the height of the table for the router. Be sure to install corner braces, otherwise the structure will become loose over time.
The legs are attached to the frame, after which the frame is reinforced with spacers
Step 4. Check the strength of the structure, try to tilt it, bend it, etc. with great effort. If you find any wobbling, install additional spacers and levers, the number depends on the actual need. You don’t need to pay special attention to the appearance; you are not making beautiful furniture for the living room, but a durable machine for the workshop. The difference in requirements is significant. The frame is ready, install the tabletop in place and you can start working.
Putting the tabletop in place
Rip fence
This device is used to create shaped or even slots. The parallel fence is considered a common item that is included in the standard kit for most devices. Its design includes the following parts:
- Guides in the form of rods. They are used for niches on the surface of the router.
- A locking screw that helps fix the required position of the device.
- Screw , which creates the necessary space between the blank and the axis of the tool.
- Contact lips. They help to obtain a stop for the router on the surface of the material.
The parallel fence is used to perform many tasks. To prepare it, proceed according to the following scheme:
- There are small holes on the body of the stop where a special rod should be fixed. When using a locking screw, it is securely secured.
- After fixing, the locking screw is slightly unscrewed, and using the adjustment screw, the position of the stop is changed to the required level.
If you know all the structural elements and the method of operation, then you can create a rip fence with your own hands. For its production, metal parts, bars, and several screws are useful. A huge number of types of rip fences are sold in stores. They are selected in accordance with the characteristics of the router used for milling wood.
Example of a stop drawing:
Processing of wooden parts
The first thing you need to learn is to correctly set the milling depth. To do this, you need to set the zero point. It is impossible to set it rigidly, because it changes every time the cutter is changed. The zero point is the position of the tool when the end of the cutter touches the material and is fixed with a special device called a clamp.
It is necessary to pay attention to the fact that each router has a different position when fixed. To control the depth of immersion of the cutting tool into the body of the material, a stop pin with a coarse adjustment scale is used.
When milling with an end mill, the counterforce from the cutting force moves the router to the side. To prevent this from happening, you need to use a rip fence. The milling process is as follows. Place the cutter along the marking line and secure the position of the stop with a special screw. Set the milling depth and turn on the machine. If the rip fence is installed on the left side, you need to pull the router towards you, when on the right side - away from you.
In order to select a quarter on a beam, you need to set the cutting edge of the cutter at the very edge, fix it, set the depth of the quarter, turn on the router and pull it towards you (if the stop is on the left edge of the beam). Milling the surface of narrow bars has its own peculiarity. The problem is that it is very difficult to hold the router on the narrow side of the workpiece. If it wobbles during operation, the groove will be inaccurate.
Working with a hand router can replace working with a planing machine. To do this, you will need several accessories for the milling mechanism. It looks like this: attach a milling mechanism to two equal-sized slats and use it as a planer, where a large-diameter milling cutter is installed instead of a shaft.
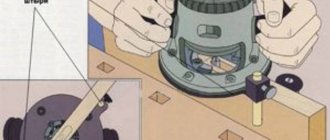
Manufacturing of devices for processing poles and balusters
Each master can independently make accessories for a hand router that will satisfy his personal needs. For example, a milling machine is used to process bodies of revolution—objects that have a round shape. These include pillars, balusters and other wooden elements that have a similar configuration.
But in order to achieve a positive result, it is necessary to prepare a device that makes it easier to cut grooves in the rotating bodies. With its help, it will be possible to make longitudinal grooves and process along a circular contour.
Wood router attachments
The design of such a device consists of the following elements:
Woodworking device in detail
- housings;
- mobile milling carriage;
- disk for setting the rotation angle;
- fixing screws ensuring immobility of the workpiece being processed;
- locking screw.
To get started, you need to place the baluster into the device body, securing it with screws. Using a rotary disk, the part is placed at the desired angle and secured with a locking screw. Next, a carriage with a milling cutter is set in motion, which cuts a groove along the entire length of the workpiece. To cut the next groove, the fixation of the product is loosened and it is again positioned at the desired angle.
It is advisable to perform all these operations with an assistant who will slowly rotate the workpiece. The operation of the device can be automated by equipping it with a drive from an electric drill or the most primitive screwdriver.
Shafts with a cylindrical cross-section
The cylindrical design makes it possible to maintain balance along the entire length, preventing sagging elements due to the weight of the tenoning carriage. This type of guide is also called linear support shafts. They have precise fixation along the mechanism body thanks to threaded holes. Such guides allow you to move carriages with large weights without sagging.
Disadvantages associated with cylindrical machine tool shafts:
- Short period of operation.
- Significant backlash of rods.
If in linear bearings they interact equally with the loads of different guide vectors, then on shafts with a cylindrical cross-section the tenoning carriage is not so stable.
This is a consequence of the closed sleeve surface, which the tenoning carriage does not have. Therefore, it is necessary to take into account the fact that the CNC hardware will function less stably than a similar machine using ordinary round rail movers.
Modern cylindrical rails are produced by both well-known companies and small artisans. This affects the cost of the device and its technical components. It happens that carriages and rails from one manufacturer do not meet general standards.
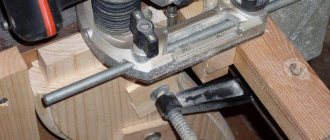
Secrets of milling tenons
“Tongue and groove” is the most reliable way to fasten wooden parts. It is used in the construction of timber houses, flooring and other household needs.
Product for making spikes
To make such a locking connection, it is necessary to maintain high precision when cutting tenons. And the best assistant in this difficult task is a tenon-cutting device for a hand router.
General view of the tool for making a dovetail
Thanks to its versatility, it is possible to mill various joints, including straight and more complex ones, such as dovetails.
The main element of the tenoning device is the copying ring. It ensures the precision of the cutter's movement and moves along the groove in a special template for the router. You can make a copying machine with your own hands. To do this, you need to select groove templates that will be cut using a milling machine.
This is interesting: Drill chuck: how to remove, replace, disassemble - video, photo
Manufacturing Features
A homemade part of this type has certain restrictions on the materials that can be worked with when using it. Creating cutters for a hand router usually involves working with steel, which belongs to the soft category. For this reason, such a device allows you to work perfectly with wood, but if the material is very hard, then the effectiveness of the device is significantly reduced.
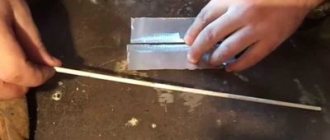
First we need to make the shape of our future cutter.
Using a pencil and ruler we draw knives. If the diagram is not at hand, then you can find examples on the Internet or in the relevant literature, then simply redraw the required profile and follow the further algorithm.
Now you need to directly cut out the shape
Depending on how many knives we need as a result, it is necessary to count out the required number of sheets and, having grabbed them, carefully cut out the shape of the future product, without catching the pair of load-bearing sides of the knife, as well as the tip.
After this you can start making the form. Using an adhesive composition, you will need to glue the template to the workpiece and carefully saw it off using a grinder. It is important to remember that you should preserve not only the tip, but also the side parts. So when working with a grinder, you will need to be as careful as possible and take into account the dimensions of the product.
Special kits
In the woodworking industry, kits designed for special applications are often found. These include, for example, the production of inserts for hinges. This kit is a manufactured, customizable template that is immediately equipped with fasteners for milling.
Craftsmen make most of these parts themselves. It is enough to install a second stop jig on the rods and then a router will be securely attached to the end of the door leaf, which can easily be used to cut holes for hinges or a door lock. This method is useful, but inconvenient, so it is more suitable for one-time use.
Milling work is a great way to earn extra income by processing wooden blanks or just to while away your free time. These works require minimal investment, and most of the devices can be done with your own hands.
Compass for router
When carrying out work in a home workshop, you may often need accessories for a hand router that make it easier to mill a round surface. An example is a special compass that you can make for a router yourself. The main recommendations for carrying out the work are as follows:
- To create a simple design you will need: a bolt with a nut, a small piece of plywood, several self-tapping screws and a wooden wing. In manufacturing, the router itself is used, as well as a saw with a screwdriver.
- On the surface of the piece of plywood used, an area about 50 mm wide and 150 mm long is marked. Note that the width must be greater than the router platform, the length must be greater than the machining radius.
- After marking the working part of the site, holes should be made for the mounting bolts. You can drill with a percussion, the diameter of the resulting holes should be 20-30 mm.
- A through groove is created along the center line. Its width should be less than the width of the axle bolt.
- On the reverse side of the created platform, a recess is created for a nut with a washer, the second nut is attached to a wooden wing.
- The central axis is being assembled. As a stud, you can use a bolt of the required length, the head of which is sawed off.
After creating a homemade compass, it is attached to the router and you can check the device in operation.
Main technical differences and choice of router for home work
Obviously, any electric tool will primarily differ from each other in power. Without going into details unnecessary for this article, let’s say that an instrument from 1000 W and above can already be classified as semi-professional or professional, which can be useful in everyday life very rarely. Such devices can weigh more than 6 kg, their power reaches 2.3 kW.
There are also specialized milling cutters (edging, rod, for certain types of materials), with specified parameters for the production of highly targeted operations. But we, home craftsmen, should first of all be interested in a more universal tool. This is a submersible movable rod milling machine. It would be nice if it has a smooth or step-by-step speed control and works with cutters with a diameter of at least 8 mm.
ruchnoi-frezer-po-derevu-1
ruchnoi-frezer-po-derevu-2
ruchnoi-frezer-po-derevu-3
Such devices are designed to perform a universal set of works:
- edge profiling;
- quarter sample;
- production of tenons and grooves, splines, folds;
- obtaining holes of various configurations;
- preparing seats for furniture and other fittings;
- artistic processing of wood, including spatial processing.
And if you equip them with a certain set of accessories for a hand router, most of which you can make with your own hands in a home workshop, then this already not small list of specialized work can radically increase.
We will try to briefly but meaningfully tell you about this in this article. But first, let's look at the main components of the tool:
- The milling cutter head is structurally much simpler than a similar unit in most power tools. Actually, it is an electric motor with a collet clamp for cutters. Sometimes with a speed controller. The absence of any gearboxes and gears makes it a very reliable tool assembly.
- The sole of the router - also known as its support platform - is made of stamped metal, cast from aluminum alloy or high-quality plastic. The first option is the most inexpensive, but it is better not to waste money on others. The accuracy and quality of all types of work performed by a milling cutter depends on its thoroughness and precision of execution. All stops and guides are attached to it, and places for attaching various devices are located. Including the rod mechanism.
- The rod mechanism is the main functional unit of the milling cutter. It regulates the immersion depth of the cutter. Not only the ease of operation, but also the durability of the router depends on the accuracy and reliability of its execution. This is the most worn unit and requires regular maintenance and lubrication.
ruchnoi-frezer-po-derevu-32
ruchnoi-frezer-po-derevu-31
ruchnoi-frezer-po-derevu-33
Some practical tips when choosing a router:
do not chase high power, but do not take a frankly weak tool, the normal power range of a home router is 800 - 1300 W; pay attention to the actual immersion depth of the cutter - this will determine the maximum depth of the groove that can be obtained using this tool; the best clamp for cutters is a conical collet; the best switch is with a locking button; The length of the power cord should not be short; the absence of backlash and smooth operation of the rod mechanism is the key to the longevity of the tool.
And one more important factor, which we specifically removed from the list of tips in a separate sentence. This is the presence of a good repair base for instruments from a given manufacturer in your region.
What can you do with a wood router depending on its power?
Using a conventional hand router, you can round the corners and ends of furniture panels made of wood and MDF, drill holes, make radii and align corners, mill and groove surfaces. However, the functionality and ease of use of a particular model directly depends on the power. Based on what you plan to do with a router, one or another tool option is selected.
- Low power manual milling machines (500-1200 W). This type of manual milling cutter is designed to work with cutters with a working diameter of about 32mm and shanks of 6-8mm. Suitable for those who make small household items from wood (dishes, hanging shelves, frames, boxes, etc.). Or plans to use it from time to time to solve certain problems.
- Medium power milling cutters (1200-1900 W). The power of a router ultimately determines its weight and size; a larger and heavier tool is more difficult to process small parts. The optimal length of the cutter shank for a medium-power device is 8-12mm.
- High power milling cutter (1900-2400 W). Designed for the manufacture of furniture facades, cutting, processing long edges and other work with dimensional parts. Most often it is fixed with the help of various devices on workbenches and work tables, manually, holding the tool in weight, it is difficult to achieve the required accuracy and precision in processing surfaces and ends.
To equip a small workshop, it is enough to purchase a medium-power milling cutter. If during work you need to use a cutter with a large diameter, it is enough to go over the workpiece several times to reduce the load on the motor and protect it from unnecessary overload.
With large volumes of work, it is not always rational to spend time on several approaches to process each workpiece. Therefore, in this case, it is better to purchase a high-power milling cutter.
Advantages and disadvantages of an electric drill router
A self-made design has obvious advantages, the key among which are the following:
- a home-made machine will cost an order of magnitude cheaper than a factory-made one;
- a router made from an electric drill makes it possible to work with surfaces of various types;
- The work on assembling the device is quite easy to carry out, not counting the moment of connecting the electrical wiring;
- ease of use;
- ease of maintenance.
Homemade equipment has few significant shortcomings. The main shortcomings include the following points.
- A hand router made from scrap materials is not durable.
- The processing speed of parts is too slow.
- The resources of an electric motor taken from an old household device are not enough to operate with difficult materials and surfaces, in particular metal. This shortcoming can be eliminated. To do this, it is advisable to take a high-speed electric motor from a hammer drill. This will allow you to adjust the number of revolutions for different materials.
This is how, following simple tips, you can mount a router from an ordinary electric drill. Customize the elements thoroughly and use only high-quality materials. Don’t try to make a profit on an electric drill, remember: when the device loses its relevance, you can dismantle the machine and use it for its real purpose. Do not rush to throw out the table and the elevator - they can also be dismantled and compactly placed in a box until next time.
To learn how to make a router from a drill with your own hands, see the following video.
The main advantage of such a machine for milling with an electric drill is that it is not necessary to purchase an expensive milling machine to perform single operations. Using a device you made with your own hands, you can easily make several grooves and also process the edge of the shelf. In an electric drill, the drill is inserted into a chuck, but when working on a home-made router, you will need to use a drill bit.
We invite you to familiarize yourself with the codling moth: methods of pest control
The stores have an incredibly large selection:
- Disk.
- Cylindrical.
- Curly.
- End.
- Angular.
- End
All of them are equipped with a shank and are easily attached to the chuck. You can quickly change the tool. But the disadvantage of the chuck is that it can become unscrewed during work, and especially in the presence of high vibration of the tools. You will need to constantly check and tighten the fasteners.
Before you make a manual router from a drill with your own hands, you will need to decide on the amount of work. Homemade milling cutters are suitable for performing home repair work, as well as individual operations for processing wood parts. Milling with a drill for a long time with heavy loads will not work.
The electric motor on a drilling tool is much weaker than a milling one. It is not designed for long-term use, and it will not work for a long time at maximum speed. When milling with a drill, you will need to constantly turn it off so that it can cool down.
Circle milling
To perform tasks at home, a device that can make it easier to cut round blanks may be useful.
For example, a compass is often used, which you can create with your own hands.
This device is made according to the following scheme:
- From available elements, a piece of plywood, self-tapping screws, a wooden wing and a bolt with a nut are used to make the device. You will also need a router, saw and screwdriver.
- A small marking is made on a piece of plywood. A platform is outlined on it, the length of which is 15 cm and the width is 5 cm. It is important that the length exceeds the processing radius, and the width exceeds the size of the router platform.
- Holes are made for the mounting bolts (their diameter is 2-3 cm). Perka is used for drilling.
- A groove is cut through the middle strip. It is necessary to ensure that its width does not exceed the size of the axle bolt.
- A recess is made at the bottom of the plywood sheet to accommodate the nut and washer. Another nut is secured in a wooden wing.
- Now you can assemble the main axis. Instead of a stud, use a bolt with a sufficient length, having first sawed off its head.
- The compass is installed on the router and the functionality is checked.
Important! Instead of a compass, a parallel stop is used, fixed in a groove on the sole. A screw with a sleeve of the same size as the hole is screwed into it, and the diameter is adjusted with a stop.
Spacious milling table on wheels
If you're a fan of Ana White, then you know that she has everything you could ever want to build.
It's no surprise that she has a great plan for helping you build a great router table. It has ample storage and work space. I hope you enjoy it as much as we do.
Templates for the router
Templates have become very widespread. They are manufactured for the production of specific products. That is why the question of how to make a template for a router with your own hands has become quite widespread.
The milling template is characterized by the following features:
- Some versions are designed for milling a workpiece along a straight contour, others at an angle or a rounded shape. Very often a template is used for milling rounded corners of various radii.
- Some models of the equipment in question are equipped with rings or bearings. They are suitable for hand routers. If a ring is used, it should be taken into account that it should not come into contact with the installed cutting tool while milling the workpiece.
- Creating grooves of unusual shape can be called a rather difficult task. Recently, groove milling has been carried out using the equipment in question. For example, you can quickly make a stencil for wood carving with a router or to create a groove that fits door hinges.
Templates for a DIY router are often made of wood. This choice can be attributed to the fact that such a material is characterized by a high degree of workability. That is why it is much easier to obtain patterns on wood with a hand router, since the template will completely repeat the geometry.
On sale you can find a variety of patterns, for example, dovetail. However, almost all craftsmen are faced with the fact that they have to create a similar product with their own hands when making unique parts for furniture or other products.
Preparing for work
In creating beautiful wooden products, it is of great importance to take practical lessons in working with a hand router. You should start with light models and simple operations. It is more convenient to work with a submersible type tool that has columns directed perpendicular to the sole. The housing with the engine and the tool is lowered along them. They make it much easier to adjust the depth of cut and require less effort to control the tool.
First, you should learn how a manual wood router works. A motor is installed in the housing. The rotating moment is transmitted to the spindle and directly to the tool secured by the collet. The manual wood milling machine rests on the sole. It has a window opposite the spindle through which the tool is lowered into the working area. There are notches opposite the cutter axis. The operator is guided by them during manual cutting along the markings.
Milling of wood is carried out by rotating a cutter secured by a collet in the spindle. The tool is manually guided along the marking line or templates and special devices are used to create a beautiful cutting line.
Craftsmen note the wide capabilities of a wood milling machine. The main operations it performs:
- drilling holes;
- sampling of quarters;
- milling of grooves, splines;
- creating spikes of various shapes;
- alignment of side surfaces;
- adjustment of seats;
- edge profiling;
- cutting discs of various sizes;
- decorative wood carving.
Craftsmen independently create devices and increase the number of operations performed with a manual wood milling machine.
Copy ring
Copy rings are devices used as edges.
During the milling process, the ring moves along the template, giving the required position to the tool. To fasten the rings, screws, threaded holes and antennae are used.
The diameter of the ring approximately corresponds to that of the router. The device is made from steel that can withstand heavy loads. Flexible metals are not used because they deform quickly.
To produce a similar device, an angle lever and copying probes will be useful. The angle lever has a scale, each division equals 0.1 mm. It helps center the stop ring under the cutter to create the desired shape of the holes on the blanks. For convenience, chip protection and a support plate are added to the device, which can improve the quality of edge processing.
During cutting, the router does not touch the edges of the ring. In the opposite situation, the cutting tool will be damaged and will soon fail.
Using copy templates and rings
Templates are designed for the production of specific types of products. They help make the shape of finished items more accurate and even. Ready-made templates, which can be purchased in the store, have the following characteristics:
- Some template models are used to create models along a rectilinear contour, while others involve circular or charcoal cutting. Often, for household purposes, a template is used to help round corners at different radii.
- Certain types of templates are supplemented with rings or bearings for manual processing. If the model has a ring, then during processing it does not touch the edges of the router.
- Templates are also used when milling blanks with grooves of unusual shape. For example, you can quickly make a template with your own hands to create grooves for door hinges.
To make templates at home, wooden blanks are used. This is done due to the fact that wood is easy to process, so any patterns can be made on it for future work. And when milling, the template fits perfectly with the processed objects due to its ability to accurately repeat the geometry of the object.
To make a template with your own hands, place a piece of wood under a router and, after marking, cut out fancy shapes. For use in work, the template is attached to the blanks with double-sided tape and pressed with clamps. It is especially convenient to use homemade templates to cut not the entire edge of the material, but only its corners.
Main types of nozzles
A cutter is a rotating part that is dotted with teeth over its entire surface. Such elements can be found in different configurations. Using a cutter, you can process not only wood, but also plastic or metal, but they are still usually used for wood.
There are the following types of products:
- End.
- Edges.
- Grooved.
It should be noted that it is worth periodically applying lubricant to the support bearing. Thus, the parts will last much longer.
End mills
This type of part works not only because of the use of axial load. Such cutters involve the use of side edges, which makes it possible to move the cutting element within the support area. The result is neat selections that are formed in the tree.
The number of cutting edges may vary and this will affect the cleanliness of the cut. Typically, this type of attachment has a monolithic design, but there are also crown attachments that are used for wood drilling. This option should be used in a situation where there is no router at hand.
This category has several varieties:
- Spiral.
- End
- Burrs.
- Conical.
- Profile.
- Spherical.
End ones are used to form grooves that have different configurations and sizes. They can be used not only for processing wood, but also to create a groove/tenon.
A profile cutter can perform certain tasks:
- End processing.
- Creation of grooves with a rather complex configuration.
- Decorative design of ornaments.
Wood edging
Edge cutters for hand routers represent the largest group and are most often used for hand tools. They are used to make edges on wood. This option is often preferred by home craftsmen, since even in the largest sets the bulk of the parts are edging attachments. It is much easier to purchase such a set of cutters than to select everything separately.
This variety includes:
- Profiles, which are used to create complex shapes of the edges of parts.
- Shaped or molded, which are indispensable for rounding and rounding edges.
- Conical, which are used to remove the corner chamfer.
- Disc-type, with the help of which grooves are formed in the edge parts.
- Rebated ones that remove quarters in the edge parts.
- Wood fillet cutter. Typically used to make grooves.
- Figirey, used to create panels.
Typically, edge cutters are equipped with a bearing. This way you can limit the stroke of the tool, and thereby prevent excessive penetration into the surface of the tree. It is worth noting that the cutting edge will not be placed at the same level as the bearing. Using the support platform, you can adjust the depth into which the cutter will plunge.
If the nozzle produces too large cuts, then the work must be done in stages, each time deepening the tool into the material until the desired configuration is achieved.
The figurine cutter has a large weight, as well as a diameter. With the help of such tools you can work on stationary structures.
Grooving equipment
Using a wood groove cutter for a hand router, grooves are created. There are several types of nozzles:
- Fillets, with the help of which semicircular grooves are made.
- Conical, thanks to which you can apply threads to a flat surface.
- T-shaped, creating a corresponding pattern.
- Shaped.
- Elements called “Dovetail”.
- Straight grooves, which are intended for cylindrical parts.
- Combined, with the help of which large-sized wooden panels are connected.
A complete list of what can be done with a hand-held wood router
With the help of a competent approach and home-made devices for securing the router in various positions on a movable carriage, you can do with a manual wood router what expensive machines are capable of. And actually completely replace their functionality.
The main functions of a manual router are as follows:
- Design of ends and edges on workpieces, chamfering using shaped cutters.
- Carving decorative patterns on wood, as well as blanks of various shapes.
- Manufacturing of groove joints of simple and complex shapes (including dovetail).
- Jointing the edge of the board for subsequent gluing (when installing the router on the table).
- Thickening of workpieces of any length and width (when installing the router on the carriage).
- Production of milled furniture facades.
- Drilling holes of different depths and diameters for furniture dowels and grooves, random selection of wood according to the desired template.
All of the above is possible by equipping the tool with special cutters.
Tools used
The creation of tenons and grooves, with the help of which the connection of two wooden blanks will be ensured, involves taking a sample of material on the side surface of a beam or board using a hand router.
In this case, all geometric parameters of the elements of the future connection must be strictly maintained. To perform this operation with a hand router, you can use tools with shanks with a diameter of both 8 and 12 mm. The most universal in this case is a groove cutter, the cutting part of which works as follows:
- the lateral surface forms the walls of the groove and the sides of the tenon;
- the end side processes the bottom of the groove and removes a layer of material of the required thickness from the base of the tenon.
Cutting a tenon with a mortise cutter
Thus, using a tool of this type, it is possible to form both a tenon and a groove on the side surface of a beam or board. Moreover, their sizes can be adjusted within a fairly wide range.
In cases where higher demands are placed on the reliability of the connection of wooden parts, the grooves and tenons are made not of a rectangular shape, but of a shape called “dovetail”. Grooves and tenons of this configuration are created using dovetail cutters. It is also possible to perform the procedure for forming grooves and tenons of this shape with a manual milling cutter, but for these purposes you should use devices of a different design.
Dovetail sampling using a template
So that the question of how to make a groove in a board or beam or a tenon on their side surface does not cause any particular difficulties, it is better to use a power tool equipped with comfortable side handles, a wide guide sole and the option of protecting the spindle from turning during the process of replacing the cutter. In addition, it is desirable that such equipment have a side stopper, due to which the overhang of the cutter used with it will always remain constant.
What can you do with a hand router with different cutters?
A brief overview of cutters will give a complete understanding of what can be done with a hand-held wood router and how it can be used at home and in a carpentry workshop. The main types often used in woodworking include groove, edge and combination cutters.
Types of groove cutters and their purpose
As the name suggests, groove cutters can be used to make grooves using a hand router. And also used for applying decorative milling on the front parts of furniture.
- Straight grooved. A simple cylindrical shape allows you to make a rectangular groove, the width of the groove is determined by the diameter of the cutter. Suitable for thicknessing.
- Disk groove. The width and thickness of the disk determines the depth and width of the groove, which can be made with a hand router. Also used for thicknessing of workpieces.
- Fillet groove . Depending on the shape of the cutter, rounded or V-shaped, you can make a rounded or triangular groove of different widths with a hand-held wood router.
- Structural groove. Provides a stronger and more stable joinery joint, T-joint or dovetail joint depending on the cutter shape.
- Shaped groove. Used for decorative design of facades and other front blanks.
Types of combined cutters and their purpose
In order to make a tongue-and-groove joint with a wood router, you may need two cutters at once, which are called “combined” in the set. There is also an option to make a “tenon and groove” using one cutter, by moving one workpiece relative to the other by the width of the tenon and groove.
Single combination cutters allow you to increase the length of a workpiece from short remains by flipping one part relative to the other (so that the tongue-and-groove joint meets).
Double combination tenon and mortise cutters are used to make wood paneling and other siding panels with specified joinery. The kit comes with a couple of different positions, you should be careful when using it. Some types involve turning the workpiece over, others require working in one plane so that the joint comes together.
Feeder combination cutters are designed for decorative design of the façade of furniture. Using a federation horizontal cutter, you can use a router to make a relief along the plane of the facade, and with a vertical cutter, you can shape the base (plinth) in height. A double-sided horizontal cutter allows you to make decorative carvings for subsequent assembly into a groove with a panel.
Please note that this type is equipped with a bearing so that you can mill not only along a straight line, but also along a radius, a template of any curved shape.
Types of edge cutters and their purpose
Using edge cutters, you can use a router to make any chamfers on the ends of workpieces. As a rule, this type of cutter is almost always equipped with a bearing on the top or bottom of the cutter. This addition helps to work clearly and evenly according to the template and to run the base of the workpiece along any radii and bends, with trimming.
Edge cutters are used to remove edges at right angles. With their help, you can use a router to make wooden blanks for subsequent gluing into a single furniture panel.
Edge rebate cutters are used to make a rectangular or square groove, suitable for thicknessing workpieces.
Edge moulders and taper cutters are designed for chamfering semicircular or beveled edges on workpieces. The moulder allows you to create a chamfer both with a “step” and without it, depending on the position of the router.
Edge shaped and half-rod cutters help to beautifully shape the end of the workpiece throughout its entire thickness, capturing the lower part. You can work with them with a milling cutter power of 1600W or more.
The types of wood cutters are also divided according to other criteria; you can learn more in the video.
To avoid burns on the workpieces, and also to avoid overloading the motor of a low- and medium-power milling cutter, do not try to achieve the desired effect in one pass. It is better to go over the workpiece several times to achieve a neat and clean cut on the end.
With the help of additional devices, fixing the tool on a workbench or a movable carriage in a vertical and horizontal position, you can use a router to manually make truly original and beautiful objects of decoration, decoration and furniture.
How to make a wood lathe with your own hands: drawings and technology
The easiest way to make a tool yourself at home is to construct a lathe or milling machine from a drill or electric motor removed from another tool. This process is not that complicated, so every master can handle it. To do this, you will need an electric motor, the power of which does not exceed 500 W, and available materials. A drill can also be used as a drive. Of course, making a lathe will require some skill.
The device of the tailstock of a homemade wood lathe
To build the machine, the following elements are required:
- metal frame;
- electric motor;
- handyman;
- tailstock.
It wouldn’t hurt to get a drawing that will help you navigate the dimensions and correctly manufacture all the structural elements for its subsequent assembly.
How to make a homemade drilling machine with your own hands with a motor
First you need to prepare the electric motor shaft. To do this, a faceplate is installed on it; a steel center with a thread is also suitable. Installation of the second center is carried out in the tailstock tube. To make the frame, you will need a pair of corners measuring 5x3 cm, their length is 15 cm. A motor is attached to the frame using a bolted connection.
An example of a homemade drilling machine
At the next stage of making a homemade machine, you assemble the headstock yourself. This element is formed from a pair of horizontal and a pair of vertical corners. A pipe intended for the spindle is attached to it. You need to insert a bolt into it, the diameter of which is 1.2 cm. First, its head is sharpened at a right angle. Thus, the central part of the spindle is designated. After this, the headstock is installed on the bed. On the top post, which connects to the horizontal corners, it is necessary to secure the tube by welding.
To make a tool rest, you need to take a steel rod with a chamfer. This element must also have a hole that will be used to secure the support ruler. It is necessary to vertically weld the tube with the locking screw to the long angle. Then the tool rest rod is inserted into it.
The motor rotor on which the faceplate is attached will be used as the headstock spindle. You need to make several holes in it. A fork will be inserted in the central part. The holes along the edges are intended for fixing the part with screws.
Even with the help of simple tools you can create interesting wooden products; for this you need to study the technology of working with the tool and practice
How to make a wood lathe from a drill with your own hands
Having a workbench with a strong and flat working surface at hand, you can build a lathe without resorting to building a bed. The electric drill in this case will serve as a rotary drive and headstock. According to the simplest drawing of the machine, it is enough to fix this tool on the surface of the workbench through the neck. Clamps and a clamp are suitable for fixing.
Next you need to make a stop that will act as a tailstock.
This element is mounted opposite the drill. To create it, you can take two blocks of wood and an adjusting screw, sharpened at one end to a cone. If you intend to use the machine for processing massive wooden workpieces, then it is advisable to fix the stop on the table using clamps.
To make a tool with your own hands, inexpensive materials are enough. A drill-based lathe can be used to turn various parts:
- door handles;
- structural details of the staircase;
- decorative items, etc.
Using a workbench with a durable and flat working surface, you can make a lathe from a drill with your own hands
To expand the functionality of the tool, its design can be supplemented with attachments and other devices that can improve the quality of work.
Such improvements include:
- winding on transformers;
- applying a coloring composition over a rotating part to create patterns;
- applying spiral notches to the workpiece, etc.
Installing a special attachment in the form of a copier will allow you to use the machine to create a whole series of identical parts or products according to a template.
An example of a multifunctional homemade woodworking machine from a drill
What is a rip fence?
A rip fence is a vital device when working with a milling machine, needed to directly move the cutter along the surface of the base (the edge of a workbench or a smooth cut of a part). The stop holds the part very firmly, which makes it possible to process edges and grooves.
Often, when selling a milling machine, the manufacturer also supplies one of the options for this device. But everyday situations may require it to be refined or even remade. There are a variety of designs adapted to solve various problems.
Each design has its own pros and cons, which requires the master to be creative and responsible in making a decision regarding the proposed unique design.
In the detailed description, you can find only two real facts about this functional device - it plays an important role in the performance of certain processes and can be supplied by the manufacturer as part of a kit for hand tools - for example, for a circular saw. The supplied tooling for any rip fence contains:
- rods that fit into the recesses on the cutter;
- fasteners holding a given position, support part;
- materials for the manufacture of the supporting part can be very different - furniture plywood, wood lined with plastic.
This is standard fittings, the manufacture of which you don’t have to worry about, since spring clamps, flywheels and profiles can be purchased in specialized stores. On the back side of the bed there are flywheels for adjusting the gaps with the cutter and fixing the stop on the table. If you want to make the design more functional and reliable, you can add a casing for attaching a vacuum cleaner, which will make the work process cleaner, but will add complexity to assembly and noise.
Small modifications make it possible to make not only straight cuts, but also curly ones. Wooden blocks with one side flat and the other angular or with a notch, inserted between the supporting part and the edge of the material, will help guide the machine along a given route.
The block adds instability, requires greater care in work and complicates the designed structure.
Professional milling table at half the price
This table includes all the best features found in store bought router tables at half the price! We have had the opportunity to study and use most of the router tables available on the market. Based on this experience, we developed our own fully functional and easy to assemble desk. The detailed project can be viewed here.
Guide rail for milling machines
This device for the router is needed to ensure straight movement of the cutting edge. The tire saves significant time by allowing you to guide the tool at any angle to the edge.
The user can create a unique version of the bus for his own needs. The simplest option is a ruler, fixed in any convenient way. To ensure stability, plywood is used by nailing a board or beam to it, against which the edge of the milling base will rest, while the base will provide the processing area. The board does not need to be nailed down, but rather attached with spring clips. This will make it possible to use cutters of different diameters and adjust the distance from the working area depending on the size of the cutter.
Characteristics and Application
Guide bars for routers, offered on the market by leading manufacturers of hand tools, are pieces of high-precision metal profiles of various lengths. Homemade devices of this kind are flat bars made of wood, plywood or chipboard. But regardless of the type and manufacturer, this equipment must have the following qualities:
- straightness within a given accuracy;
- convenience and reliability of fastening to the surface;
- location of clamps outside the working area.
Purpose of copy rings and templates
Precision processing is ensured by the use of copying rings. These are circles with protrusions that move in a pattern. The ring is fixed on the base of the router in any convenient way, the main thing is to make sure that neither the ring nor the template come into contact with the working part of the tool. Templates must be secured to the working material to ensure adherence to the base.
Of course, ready-made options cannot always satisfy all the needs of the master, so templates are made manually for narrow needs. The structure can be supplemented with bearings or rings selected according to the size of the cutter.
Complex grooves, recesses for door hinges, decorative and patterned work can also be done using modified templates and rings.
Other devices
Circular
Among other devices for a wood router, circular ones occupy a special place. All round and oval cuts are made with their help. The compass is a rod with a pin. Simply moving the bar changes the size of the circle. For small radius holes, for example, for inserting hinges, the compass structure is attached directly to the base of the milling machine.
A router for cutting circles can be improved for cutting out ovals. You can do it yourself. You will need a base in which screws or suction cups are used to secure the workpieces; shoes, mounting rods and a bracket for fixing the structure with the tool. Round openings are cut when one shoe is used; inserting a second shoe into the jig makes it possible to cut oval holes.
For making grooves on narrow surfaces
To make this option, of course, you can have some fun with a drill and chisel, and you can even cut out a fairly accurate hole. But how much time will be wasted. The milling cutter will cope with this task faster and more accurately. But this requires certain accessories.
- They can consist of a round or rectangular plate attached to the base of the instrument.
- Two pins on the plate will ensure smooth running of the tool. The axes of the pins are located on the line of the cutter, under this condition the groove will be made in the center of the part, regardless of the thickness.
- When making cuts, it is important to control that the pins are tightly pressed to the workpiece on both sides. A similar result can be achieved using two parallel stops. Even a task with one rip fence is feasible, but the workpiece must be secured between two surfaces.
- If the craftsman constantly deals with cuts on narrow surfaces, you can make a table of two parts, which will make it possible to clamp the material between them.
- The universal use of the copy ring makes it possible to protect the template from the cutting edge.
- A hand cutter with a copy ring will help replace, for example, carpentry tools used when installing door hinges, and reduce the time that will inevitably be wasted if the worker does not have the necessary skills to work with them.
For work on installing door hinges, for example, a template is made from a piece of wood. This is an additional time investment, which then more than pays off - the grooves will be ready in a few seconds. You can often come across advice to buy ready-made templates for a router. And this is reasonable, since they are on sale and are intended for the same type of common activity - for example, installing door hinges or in the manufacture of furniture, where several of the same type of parts are required.
Making a custom template is advisable if a unique product is required. But then it makes no sense to make it from durable material, especially if it will be used one-time - as, for example, for the restoration of antique furniture.
Fastening and clamping devices can be used both universally and designed for the use of a specific type of equipment. Their types are variable - in the form of a block, a shoe with a spring or steel plates.
Clamping machines are distinguished by the fact that they remain motionless during the processing of the workpiece, however, they are also varied and quite complex to manufacture. Therefore, despite the abundance of drawings for craftsmen, they prefer to buy them ready-made, factory-made. There is good balancing of self-braking, the drive can be manual, hydraulic or pneumatic, high-quality metal. It’s easier to purchase a ready-made device and upgrade it to suit your own needs.
For processing bodies of revolution
There are also special, ready-made devices. However, manufacturers of professional instruments are not always able to predict what needs craftsmen may have.
Users willingly share their experiences for processing round railings for wooden stairs, balusters and other things. And these homemade devices are not only not inferior to factory ones, but sometimes even surpass them in processing quality and productivity.
For milling tenons
Special devices are used to cut tenons. Expert advice always refers to industrial devices. They can have several functions at once - for example, making a profile for a blind and through dovetail and a through connection with a straight tenon. Here, the exact trajectory of the cutter, a high-quality template and a copy ring are of great importance.
Devices for copying and reproducing identical parts
An angle lever and a set of tracing probes are needed to produce a series of identical parts. There is a scale on the angular lever (graduation value is 1/10 mm). This allows the thrust ring to be centered under the cutter. When copying, the shape of the part is accurately reproduced by a cutter on a new workpiece. The angle arm can be equipped with a support plate and chip guard. This combination will ensure perfect edge processing.
But copying with a template and a copying ring allows you to professionally cut grooves into furniture or mill holes for handles in drawers.
A very simple and extremely necessary device for a milling machine is a compass. The most suitable material for it is transparent plexiglass. A precise metric scale is printed on its surface. Some models provide a circumference of up to 1.5 m. With this device, any round tabletop is not a problem. By the way, it’s easy to make it yourself.
Copying on the workpiece is provided by an angle lever with a precise adjustment scale and a set of copying probes. You have the opportunity to center the thrust ring exactly under the cutter. The angle arm, complemented by the support plate, also enables advanced edge milling. Complete set of angle lever: set of copying probes, support plate, chip protection.