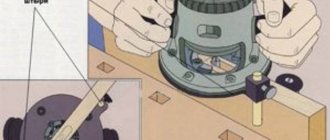
Manufacturing process of accessories
Manufacturers of milling cutters, taking care of consumers, include in the kit a simple set of tools that make the work of milling cutters easier. You can acquire the rest of the necessary equipment in two ways:
Accessories for wood router
- purchase ready-made;
- make it yourself.
If financial capabilities allow, then there is no need to waste precious time on making tools. But most home craftsmen still prefer to do them themselves. Moreover, the process of their manufacture is not particularly difficult.
Homemade devices do not require preliminary drawing up of drawings. You can make them using a simple drawing, understanding the principle of their operation, and having a minimal set of tools.
Difficulties can only arise in the process of making a table for a manual router. Here you will need to make every effort to make calculations and indicate the dimensions of the table. Therefore, it will hardly be possible to do without a drawing.
This is interesting: Tabletop drilling machine NS-12: characteristics and design
Manual milling machine - basics of operation
Before you begin, you must complete the following steps:
Scheme for creating a platform for a router
- secure the cutter in the collet;
- make sure that the device matches the power and speed of the hand router;
- adjust the required milling depth;
- If you plan to use cutters for edge processing, you need to install a guide ring or bearing.
It should be remembered that the workpiece must always rest securely against any surface. The immobility of the part must be ensured even before turning on the milling motor.
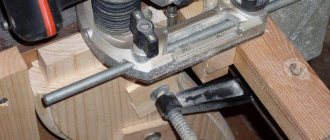
Rip fence
This device is used to create shaped or even slots. The parallel fence is considered a common item that is included in the standard kit for most devices. Its design includes the following parts:
- Guides in the form of rods. They are used for niches on the surface of the router.
- A locking screw that helps fix the required position of the device.
- Screw , which creates the necessary space between the blank and the axis of the tool.
- Contact lips. They help to obtain a stop for the router on the surface of the material.
The parallel fence is used to perform many tasks. To prepare it, proceed according to the following scheme:
- There are small holes on the body of the stop where a special rod should be fixed. When using a locking screw, it is securely secured.
- After fixing, the locking screw is slightly unscrewed, and using the adjustment screw, the position of the stop is changed to the required level.
If you know all the structural elements and the method of operation, then you can create a rip fence with your own hands. For its production, metal parts, bars, and several screws are useful. A huge number of types of rip fences are sold in stores. They are selected in accordance with the characteristics of the router used for milling wood.
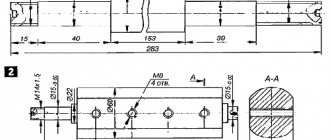
Example of a stop drawing:
Accessories for the router: rip fence, guides, compass, table, rings
Any products made from natural wood are highly valued due to their environmental friendliness and uniqueness. To create real masterpieces from such natural material with your own hands, you need to have a hand router and have the necessary skills to use it.
In addition, additional accessories for the router are also important, allowing the production of parts of any complexity exactly as they were intended by the author. Homemade devices for such woodworking tools are fairly simple designs, the execution of which does not require special skills or material resources, the main thing is to have the desire. But thanks to their use, processing a variety of parts will become much easier.
Tool table
The very first necessary device that makes it possible to conveniently work with such hand tools is a milling table.
The simplest table design consists of a table top, which can be a sheet of chipboard or other similar material with holes for installing tools, as well as a guide that is attached to the table with clamps.
Having made ordinary legs, we get the main device for our hand tools - a table on which we can install any other devices.
Rip fence
A similar device for a manual wood milling machine is often included in the equipment set. But there is always the opportunity to do it yourself. Why is this being done? The stop itself makes it possible to cut the material in a straight line. But it often happens that the cut needs to be made not straight, but, for example, arched.
In this case, it is advisable to make a milling stop, one of the sides of which will be straight, and the other will repeat the shape of the part. In this case, it will be possible to cut wood in different ways. Each master creates templates for such stops with his own hands “for himself”, depending on the purpose of using the milling machine.
Router guides
One of the main components of a manual wood carving machine is its guides. You can make them yourself from ordinary bars.
If one guide is used, it must be tightly attached to the base on which all necessary work will be carried out. To make the entire structure more reliable, while eliminating the possibility of the template shifting, it can be additionally secured with side stops.
If you use such a device for a manual machine, which we made with our own hands, you can always make additional grooves in several products.
Homemade guides are:
- T-shaped;
- On hinges, can be folded like a book;
- L-shaped.
The guides, which look like skis, are quite convenient to use. They can be used with any type of hand router, making work with wooden workpieces as precise and clean as possible.
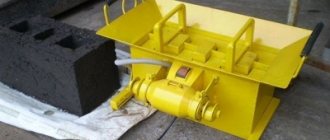
Devices for processing bodies of rotation
If, when working with such a machine, you have to process certain bodies of rotation, for example, balusters, pillars, and the like, then in this case the process of processing them with a manual milling cutter will become much easier when using another device. It consists of:
- housings;
- a movable carriage on which the tool itself is mounted;
- disks with which you can set the required angle of rotation;
- screws that securely fasten the workpieces.
Using such a device, the products will rotate slowly, which will make the processing process more convenient. Thus, you can make a device with your own hands that will become a full-fledged replacement for a lathe.
Compasses
Such devices for a manual milling machine ensure its movement along the required circle. The design of a self-made compass is very simple, it consists of a main part - a rod, which is attached at one end to the base of the tool, and a secondary part - a screw, which is inserted into the hole of a hand router.
A compass with two rods is more efficient in use. By making it from some transparent material, for example, plexiglass, a metric scale can be applied to the surface of the device, which will make its use even more convenient.
Using an angular lever with a scale, copying is carried out on the workpiece being processed. In this case, it will be possible to center the ring on the cutter with your own hands during work. The angle arm with support plate will ensure precise processing of the edges of the part. The design of such a device for working with hand tools consists of a set of probes, a support plate, and protection from chips.
Small extras
Usually, the set of the hand tool itself contains some minor devices that make it easy and convenient to work with parts of non-standard shape. You can always make such devices yourself or slightly improve existing ones to suit your needs and requirements.
Copy rings. Such accessories are ordinary round plates that determine the movement of the device along the workpiece that is installed on a table or other base. The diameter of such rings is selected depending on the diameter of the cutters.
The diameter of the template will also depend on the selected ring. They are selected in inverse proportion - if the diameter of the cutter is larger than the diameter of the ring, then the template is smaller than the finished product, and vice versa.
Devices for working with a manual machine on narrow surfaces will not allow the router to move to the sides, passing exactly in the center of the products.
Manufacturing of devices for processing poles and balusters
Each master can independently make accessories for a hand router that will satisfy his personal needs. For example, a milling machine is used to process bodies of revolution—objects that have a round shape. These include pillars, balusters and other wooden elements that have a similar configuration.
But in order to achieve a positive result, it is necessary to prepare a device that makes it easier to cut grooves in the rotating bodies. With its help, it will be possible to make longitudinal grooves and process along a circular contour.
Wood router attachments
The design of such a device consists of the following elements:
Woodworking device in detail
- housings;
- mobile milling carriage;
- disk for setting the rotation angle;
- fixing screws ensuring immobility of the workpiece being processed;
- locking screw.
To get started, you need to place the baluster into the device body, securing it with screws. Using a rotary disk, the part is placed at the desired angle and secured with a locking screw. Next, a carriage with a milling cutter is set in motion, which cuts a groove along the entire length of the workpiece. To cut the next groove, the fixation of the product is loosened and it is again positioned at the desired angle.
It is advisable to perform all these operations with an assistant who will slowly rotate the workpiece. The operation of the device can be automated by equipping it with a drive from an electric drill or the most primitive screwdriver.
What is needed for a router
The tool is used to perform various operations: facing, cutting grooves and holes, incl. on curved surfaces.
For each case there is a special device.
Rip fence for cutting
Due to frequent use, this product is included with all hand-held milling cutters. It allows you to guide the tool along the base surface, which is most often played by:
- edge of the table;
- side face of the workpiece;
- guide rail.
The emphasis consists of the following parts:
- Metal rods. They are inserted into special holes on the router.
- Set screw. Clamps the rods in the holes.
- Fine adjustment screw. It is used to set the distance between the cutting edge of the tool and the base surface.
- Support pads. This is the main part of the stop: when performing an operation, it slides along the base surface.
The rip fence allows you to guide the tool along the reference surface.
In some models, the distance between the support pads can be changed.
To make curved cuts, a block with a round or angular notch on one side is placed between the base surface and the stop. It is oriented so that the straight edge is pressed against the support pads. This method does not provide a firm grip on the tool, so use it with caution.
Guide rails
This type of equipment is used in situations where the tool needs to be moved in a straight line at an angle to the edge of the workpiece. The guide can be equipped with additional structural elements:
- Markings and fasteners. They are used for milling several holes with equal spacing.
- Adapter (shoe). Before performing the operation, the router is screwed to this part; it is embedded in the guide so that it can slide along it.
- Clamps for fastening to a workbench or workpiece. In their absence, clamps are used.
Copy rings and templates
The copy ring is a sleeve that is screwed into the router base or screwed to it so that the cutting tool is inside. This device is used in conjunction with templates. The sleeve is guided along the edge of the pattern, as a result of which the cutter follows its outline.
Copy rings are bushings that are screwed into the base of the router.
The closer the diameters of the cutting tool and the ring are to each other, the more accurately the groove follows the shape of the template. But the sleeve should not touch the cutter. If their diameters are very different, the pattern is cut out to adjust for this difference.
Using a copy sleeve, it is convenient to make curved grooves and also round corners.
The template is attached to the workpiece with clamps or double-sided tape.
Compass
This device is designed for cutting a groove in a circle or ellipse. In its simplest form, it is a narrow plate with a through channel in the middle. A pin with a fixing screw is threaded into it.
At one end the plate is attached to the router. Next, fix the pin at the required distance and insert it into the hole that serves as the center of the future circle.
A design with 2 “legs”, reminiscent of a school compass, is more convenient to use.
If the radius of the circle along which the groove needs to be cut is less than half the width of the router, use another product. It is screwed to the base of the instrument with screws.
The compass is designed for cutting a groove in a circle.
For milling along an elliptical or oval path, a mechanism with the following components is used:
- A fastening screw or suction cup for fixing to the workpiece.
- Two intersecting guides with shoes.
- "Legs."
- Bracket for mounting the router.
Nozzles and tenoning devices
The router allows you to quickly create structural elements for the tongue-and-groove connection. Special devices are also used for this. Among them, the most practical are universal ones - capable of making a groove with a dovetail, straight, T-shaped, etc. profile. They have a copy ring and a template in which it moves.
For fast and high-quality slot milling
There are attachments that allow you to cut grooves with a router on narrow edges, for example, for door hinges or lock elements. The product consists of a plate (screwed to the tool) and 2 guide rods, between which the workpiece is placed. If it is necessary to cut a groove offset from the midline, a sleeve of the required diameter is put on the corresponding pin.
There are attachments for fast and high-quality milling of grooves.
In the absence of a nozzle, bars are attached on both sides of the workpiece so that the edges of all 3 elements lie in the same plane. This will turn the narrow surface into a wide one, allowing you to cut the groove using the rip fence.
Secrets of milling tenons
“Tongue and groove” is the most reliable way to fasten wooden parts. It is used in the construction of timber houses, flooring and other household needs.
Product for making spikes
To make such a locking connection, it is necessary to maintain high precision when cutting tenons. And the best assistant in this difficult task is a tenon-cutting device for a hand router.
General view of the tool for making a dovetail
Thanks to its versatility, it is possible to mill various joints, including straight and more complex ones, such as dovetails.
The main element of the tenoning device is the copying ring. It ensures the precision of the cutter's movement and moves along the groove in a special template for the router. You can make a copying machine with your own hands. To do this, you need to select groove templates that will be cut using a milling machine.
This is interesting: Drill chuck: how to remove, replace, disassemble - video, photo
Special kits
In the woodworking industry, kits designed for special applications are often found. These include, for example, the production of inserts for hinges. This kit is a manufactured, customizable template that is immediately equipped with fasteners for milling.
Craftsmen make most of these parts themselves. It is enough to install a second stop jig on the rods and then a router will be securely attached to the end of the door leaf, which can easily be used to cut holes for hinges or a door lock. This method is useful, but inconvenient, so it is more suitable for one-time use.
Milling work is a great way to earn extra income by processing wooden blanks or just to while away your free time. These works require minimal investment, and most of the devices can be done with your own hands.
Compass for router
When carrying out work in a home workshop, you may often need accessories for a hand router that make it easier to mill a round surface. An example is a special compass that you can make for a router yourself. The main recommendations for carrying out the work are as follows:
- To create a simple design you will need: a bolt with a nut, a small piece of plywood, several self-tapping screws and a wooden wing. In manufacturing, the router itself is used, as well as a saw with a screwdriver.
- On the surface of the piece of plywood used, an area about 50 mm wide and 150 mm long is marked. Note that the width must be greater than the router platform, the length must be greater than the machining radius.
- After marking the working part of the site, holes should be made for the mounting bolts. You can drill with a percussion, the diameter of the resulting holes should be 20-30 mm.
- A through groove is created along the center line. Its width should be less than the width of the axle bolt.
- On the reverse side of the created platform, a recess is created for a nut with a washer, the second nut is attached to a wooden wing.
- The central axis is being assembled. As a stud, you can use a bolt of the required length, the head of which is sawed off.
After creating a homemade compass, it is attached to the router and you can check the device in operation.
What can you do with a wood router depending on its power?
Using a conventional hand router, you can round the corners and ends of furniture panels made of wood and MDF, drill holes, make radii and align corners, mill and groove surfaces. However, the functionality and ease of use of a particular model directly depends on the power. Based on what you plan to do with a router, one or another tool option is selected.
- Low power manual milling machines (500-1200 W). This type of manual milling cutter is designed to work with cutters with a working diameter of about 32mm and shanks of 6-8mm. Suitable for those who make small household items from wood (dishes, hanging shelves, frames, boxes, etc.). Or plans to use it from time to time to solve certain problems.
- Medium power milling cutters (1200-1900 W). The power of a router ultimately determines its weight and size; a larger and heavier tool is more difficult to process small parts. The optimal length of the cutter shank for a medium-power device is 8-12mm.
- High power milling cutter (1900-2400 W). Designed for the manufacture of furniture facades, cutting, processing long edges and other work with dimensional parts. Most often it is fixed with the help of various devices on workbenches and work tables, manually, holding the tool in weight, it is difficult to achieve the required accuracy and precision in processing surfaces and ends.
To equip a small workshop, it is enough to purchase a medium-power milling cutter. If during work you need to use a cutter with a large diameter, it is enough to go over the workpiece several times to reduce the load on the motor and protect it from unnecessary overload.
With large volumes of work, it is not always rational to spend time on several approaches to process each workpiece. Therefore, in this case, it is better to purchase a high-power milling cutter.
DIY accessories for a router
Most products can be made independently. The manufacturing procedure for the most popular ones is outlined below.
Tenoner
Proceed like this:
- On both sides of the plywood strip, install identical racks of blocks with notches in the middle.
- Attach router guides equipped with stops to them on the top, bottom and sides.
- Install a movable element on the plywood base to regulate the size of the edge of the part, equipped with a wing nut or other lock.
Tenoners are used to perform precise operations.
An alternative device is a conductor.
It consists of the following parts:
- grounds;
- stops;
- movable slide.
The product is used to perform small operations that require high precision.
Copy sleeve
The preferred material is tool steel. But in private workshops, due to the lack of professional metalworking equipment, bushings are most often made of simple steel or duralumin.
Procedure:
- Cut a circle from a metal plate with the same diameter as the hole in the router base.
- Take a piece of pipe with an internal cross-section 2–4 mm larger than the cutter and cut it off.
- Sand the bushing with oil sandpaper.
- In a metal circle, cut a hole in the middle with such a diameter that the sleeve fits tightly into it.
- Weld the flange to the sleeve or connect them by riveting the ends and pre-seating them with glue.
Another option is practiced, for which you need:
- steel or duralumin washer;
- plumbing extension cord;
- nut with the same thread as the extension.
The copying sleeve is made of tool steel.
They do this:
- Cut the nut to make a ring and grind it through.
- A circle is cut out of steel or aluminum 2 mm thick.
- The metal is removed along the edge on a sharpening machine.
- Place the circle on the base of the router.
- Place the tool vertically.
- Markings for fastenings are applied through the holes in the sole.
- Drill holes with a thin drill, then enlarge them with a tool of the required diameter.
- Put on the washer and screw in the nut.
- Holding the workpiece in a vice, gradually remove the thread with a grinder so that it is flush with the nut.
- The product is trimmed.
- Align the bushing on the grinding wheel and attach it to the router base.
Guides for working with a router
The simplest homemade guide looks like a rail attached to the workpiece with clamps. You can fix several parts at once and make a groove in them in 1 pass.
A more complex option is a structure made from a board and a sheet of plywood that serves as a base. With this design, it is easier to accurately fix the guide on the cutting line.
If milling cutters of different sizes are needed to process the workpiece, use the option with a folding bar. It is attached to the board base using door hinges.
Circle milling
To perform tasks at home, a device that can make it easier to cut round blanks may be useful.
For example, a compass is often used, which you can create with your own hands.
This device is made according to the following scheme:
- From available elements, a piece of plywood, self-tapping screws, a wooden wing and a bolt with a nut are used to make the device. You will also need a router, saw and screwdriver.
- A small marking is made on a piece of plywood. A platform is outlined on it, the length of which is 15 cm and the width is 5 cm. It is important that the length exceeds the processing radius, and the width exceeds the size of the router platform.
- Holes are made for the mounting bolts (their diameter is 2-3 cm). Perka is used for drilling.
- A groove is cut through the middle strip. It is necessary to ensure that its width does not exceed the size of the axle bolt.
- A recess is made at the bottom of the plywood sheet to accommodate the nut and washer. Another nut is secured in a wooden wing.
- Now you can assemble the main axis. Instead of a stud, use a bolt with a sufficient length, having first sawed off its head.
- The compass is installed on the router and the functionality is checked.
Important! Instead of a compass, a parallel stop is used, fixed in a groove on the sole. A screw with a sleeve of the same size as the hole is screwed into it, and the diameter is adjusted with a stop.
Templates for the router
Templates have become very widespread. They are manufactured for the production of specific products. That is why the question of how to make a template for a router with your own hands has become quite widespread.
The milling template is characterized by the following features:
- Some versions are designed for milling a workpiece along a straight contour, others at an angle or a rounded shape. Very often a template is used for milling rounded corners of various radii.
- Some models of the equipment in question are equipped with rings or bearings. They are suitable for hand routers. If a ring is used, it should be taken into account that it should not come into contact with the installed cutting tool while milling the workpiece.
- Creating grooves of unusual shape can be called a rather difficult task. Recently, groove milling has been carried out using the equipment in question. For example, you can quickly make a stencil for wood carving with a router or to create a groove that fits door hinges.
Templates for a DIY router are often made of wood. This choice can be attributed to the fact that such a material is characterized by a high degree of workability. That is why it is much easier to obtain patterns on wood with a hand router, since the template will completely repeat the geometry.
On sale you can find a variety of patterns, for example, dovetail. However, almost all craftsmen are faced with the fact that they have to create a similar product with their own hands when making unique parts for furniture or other products.
Copy ring
Copy rings are devices used as edges.
During the milling process, the ring moves along the template, giving the required position to the tool. To fasten the rings, screws, threaded holes and antennae are used.
The diameter of the ring approximately corresponds to that of the router. The device is made from steel that can withstand heavy loads. Flexible metals are not used because they deform quickly.
To produce a similar device, an angle lever and copying probes will be useful. The angle lever has a scale, each division equals 0.1 mm. It helps center the stop ring under the cutter to create the desired shape of the holes on the blanks. For convenience, chip protection and a support plate are added to the device, which can improve the quality of edge processing.
During cutting, the router does not touch the edges of the ring. In the opposite situation, the cutting tool will be damaged and will soon fail.
Using copy templates and rings
Templates are designed for the production of specific types of products. They help make the shape of finished items more accurate and even. Ready-made templates, which can be purchased in the store, have the following characteristics:
- Some template models are used to create models along a rectilinear contour, while others involve circular or charcoal cutting. Often, for household purposes, a template is used to help round corners at different radii.
- Certain types of templates are supplemented with rings or bearings for manual processing. If the model has a ring, then during processing it does not touch the edges of the router.
- Templates are also used when milling blanks with grooves of unusual shape. For example, you can quickly make a template with your own hands to create grooves for door hinges.
To make templates at home, wooden blanks are used. This is done due to the fact that wood is easy to process, so any patterns can be made on it for future work. And when milling, the template fits perfectly with the processed objects due to its ability to accurately repeat the geometry of the object.
To make a template with your own hands, place a piece of wood under a router and, after marking, cut out fancy shapes. For use in work, the template is attached to the blanks with double-sided tape and pressed with clamps. It is especially convenient to use homemade templates to cut not the entire edge of the material, but only its corners.
Making a carriage for a router
In order to design a CNC machine, it is necessary to use several variants of units. Non-factory-made devices often have rails from the carriage of a printing machine, as well as a printer. The main quality indicators irreversibly affect the processing performance and devices based on a milling machine with a tenoning carriage, so excessive savings can only do harm.
Details
Most often, polished shafts are used, which are inexpensive. Purchasing these items will not be difficult. They are subject to mounting and processing. Most often made of durable steel.
After this, the top layers are subject to induction hardening, which has a beneficial effect on the period of use and wear rate. Ideal smoothness makes it possible for the carriage to move over the polished layer extremely successfully. The shafts can be fastened at both ends with two hands without unnecessary problems.
But there are also many counterfeit elements made of low-quality metal on the market, since the likelihood of an accurate on-site inspection is zero.
Flaws:
- The base is not fixed. The shaft can only be supported by two fastening devices. This makes it possible to significantly facilitate installation by hand, but at the same time independent of the table support. Because of this, the possibility of defects during product processing increases. Over time, lathe carriage guides roll and become bent.
- There is sagging at long intervals. Due to sagging, a shaft with a length of more than 100 cm is not used when processing for a machine. The thickness and length of the gross surface also matter. The best option is 0.05, and even more profitable is 0.06 - 0.1.
Bearings in the carriage for a router
There are two types of bearings when installing guides:
- Bushings for ball elements.
- Bearings to provide a sliding surface.
Ball cylindrical fairings, as well as parts for ensuring rolling, have two significant disadvantages compared to rail carriages: an insignificant level of load capacity and a rather large backlash. To ensure weight support, the tenoning carriage is installed on a guide line with several shafts.
Disadvantages of this type of bearings:
- Withstands light load.
- Formation of high pressure due to low operating life. The need to periodically replace the shaft due to the formation of a groove.
- Sawdust and sticky dust clog the slots.
Bearings to ensure sliding on the surface are made from non-hard metals such as caprolon. If all tolerances are maintained, the load-carrying capacity and precision of the sliding bearing are quite high. However, sawdust and dirt cannot harm the unit. But this only applies to bronze parts that are well processed.
Over time, wear occurs on the product, which requires periodic adjustment to get rid of gaps. As a rule, more affordable bearings are used for making them yourself.
Shafts for splined bushings
Certain bushing balls move inside the longitudinal shaft. The design has a high level of rigidity, much stiffer than conventional shafts after grinding. They also have a longer period of use. Torsion shaft reinforcements are of additional importance. They can be very successfully installed on the shaft mounting structure.
A significant disadvantage of the spline guide is its high cost. This is the reason for the rare use of CNC in standard units.
The cylindrical design makes it possible to maintain balance along the entire length, preventing sagging elements due to the weight of the tenoning carriage. This type of guide is also called linear support shafts. They have precise fixation along the mechanism body thanks to threaded holes. Such guides allow you to move carriages with large weights without sagging.
Disadvantages associated with cylindrical machine tool shafts:
- Short period of operation.
- Significant backlash of rods.
If in linear bearings they interact equally with the loads of different guide vectors, then on shafts with a cylindrical cross-section the tenoning carriage is not so stable.
This is a consequence of the closed sleeve surface, which the tenoning carriage does not have. Therefore, it is necessary to take into account the fact that the CNC hardware will function less stably than a similar machine using ordinary round rail movers.
Modern cylindrical rails are produced by both well-known companies and small artisans. This affects the cost of the device and its technical components. It happens that carriages and rails from one manufacturer do not meet general standards.
This type of guides is installed in high-precision CNC metal-cutting machines.
Main varieties: with balls and rollers.
Guides with configurations
Standard guides have a track on which special carriages are installed. This makes it possible to distribute the load along the entire length of the track - the ball is attached to the rail mover along an arc with a high degree of accuracy. Heavy weight carriages do not stop moving in a straight line. They have high durability with low backlash.
Disadvantages of ball rails:
- The attachment points must be straight and without any roughness.
- Difficult process of mounting on the machine.
There are many models of carriages on the open market that are very ambiguous in terms of load capacity and tension elements. For this reason, their production is not homemade, but rather high quality market products. The best guide elements are produced under the TNK brand, as well as Khivin.
One of the best guides that has flat rocking grooves. Instead of balls, there are built-in rollers.
This affects the efficiency of the guide modules. They are best suited for stone, as well as metals such as steel and cast iron.
Rails with prismatic section
Primary installation location: manufacturing industry. The rails cannot be dismantled; they are part of the structure of the frame.
Very difficult to manufacture and repair. Cannot be dismantled by hand. Usage: CNC-based equipment for professionals.
: Precision carriage for milling table.
How to make a carriage for a router with your own hands
What can be used to make a homemade carriage or sled at home:
- corners;
- bearings;
- nuts;
- bolts.
Only steel angles are used, never aluminum. Steel or round timber can be further hardened or nothing can be changed. But be sure to polish it. For installation, you do not need to choose wide bearings; narrow ones, but with a high degree of friction, are better. The diameter of the bolts cannot be larger than the internal diameter of its roller.
Source: https://metmastanki.ru/karetka-dlya-frezera-svoimi-rukami
A complete list of what can be done with a hand-held wood router
With the help of a competent approach and home-made devices for securing the router in various positions on a movable carriage, you can do with a manual wood router what expensive machines are capable of. And actually completely replace their functionality.
The main functions of a manual router are as follows:
- Design of ends and edges on workpieces, chamfering using shaped cutters.
- Carving decorative patterns on wood, as well as blanks of various shapes.
- Manufacturing of groove joints of simple and complex shapes (including dovetail).
- Jointing the edge of the board for subsequent gluing (when installing the router on the table).
- Thickening of workpieces of any length and width (when installing the router on the carriage).
- Production of milled furniture facades.
- Drilling holes of different depths and diameters for furniture dowels and grooves, random selection of wood according to the desired template.
All of the above is possible by equipping the tool with special cutters.
Devices and capabilities of a hand router
Router guide
The devices that will be discussed not only make working with a hand router , but turn it into a universal machine that both professionals and amateurs can only dream of. Many devices can work as part of your other tool, for example, a circular saw or a jigsaw.
For more experienced specialists who are already well acquainted with the capabilities of hand routers, it will perhaps be more interesting to look at an example of the practical use of a hand router in a separate article dedicated to the manufacture of a wooden interior arch.
Guide rails for hand router
Guide bars not only make it easier to control the router, but also ensure precision machining. They are quite unique systems. As can be seen from the large photograph of this article, they can be used in combination with various hand-held power tools, are easily extended in length, complemented with other devices, and can even be of a specialized nature, for example, as a guide rail for milling holes in furniture making.
The guide rail provides high precision when processing furniture boards. It guides the router easily and directly with its rip fence.
Guide bars and a number of other devices not only improve the quality of processing, but also make it simple and convenient. The accuracy of dimensions and their reproducibility on any number of processed parts simply amazes even experienced craftsmen. Regardless of their purpose, any of them has an elastic plastic protector on the bottom, which prevents slipping on the surface being treated and damaging it.
Milling is carried out at any angle to the edge of the workpiece. The guide bar makes this operation simple. Secured with a clamp, it will never slip even from the edge of the part.
In addition, the guides can be easily installed directly on a workbench with an angle stop. In this case, guides of short length are used. Many guides are equipped with very practical equipment. Thus, a limiting tab installed on the tire fixes the boundaries of the stroke of a hand-held router. By installing it in a given position, you can easily reproduce grooves of identical size on various parts.
The limiting tab of the guide rail allows you to fix the boundaries of the grooves and reproduce them automatically on identical workpieces.
Of course, each master independently determines the priority of one or another device for his own machine, but they usually start with a guide bar and dust removal. The guide rail, as you will see later, also serves as the basic structure for installing many other devices on an electric wood router.
The protective protector of the guide bar prevents it from sliding on the material being processed and does not scratch its surface.
Long guides are used to cut drywall sheets to size.
The guides are easy to extend to the desired length. The cutter, cutting the sheets, simultaneously prepares their edges. This cutting eliminates the labor-intensive process of sealing joints: they turn out smooth and neat.
| The guide rail can be easily mounted on a modern workbench and provides new processing capabilities. The result is profiles of any complexity with high accuracy. | The milling work table is equipped with an angular stop. The guide rail installed on it is height adjustable. The table stand folds easily. |
|
A high level of reproducibility of complex grooves is ensured by the guide rail. Making this classic carpentry joint takes a lot of skill and makes it fun.
What can you do with a hand router with different cutters?
A brief overview of cutters will give a complete understanding of what can be done with a hand-held wood router and how it can be used at home and in a carpentry workshop. The main types often used in woodworking include groove, edge and combination cutters.
Types of groove cutters and their purpose
As the name suggests, groove cutters can be used to make grooves using a hand router. And also used for applying decorative milling on the front parts of furniture.
- Straight grooved. A simple cylindrical shape allows you to make a rectangular groove, the width of the groove is determined by the diameter of the cutter. Suitable for thicknessing.
- Disk groove. The width and thickness of the disk determines the depth and width of the groove, which can be made with a hand router. Also used for thicknessing of workpieces.
- Fillet groove . Depending on the shape of the cutter, rounded or V-shaped, you can make a rounded or triangular groove of different widths with a hand-held wood router.
- Structural groove. Provides a stronger and more stable joinery joint, T-joint or dovetail joint depending on the cutter shape.
- Shaped groove. Used for decorative design of facades and other front blanks.
Types of combined cutters and their purpose
In order to make a tongue-and-groove joint with a wood router, you may need two cutters at once, which are called “combined” in the set. There is also an option to make a “tenon and groove” using one cutter, by moving one workpiece relative to the other by the width of the tenon and groove.
Single combination cutters allow you to increase the length of a workpiece from short remains by flipping one part relative to the other (so that the tongue-and-groove joint meets).
Double combination tenon and mortise cutters are used to make wood paneling and other siding panels with specified joinery. The kit comes with a couple of different positions, you should be careful when using it. Some types involve turning the workpiece over, others require working in one plane so that the joint comes together.
Feeder combination cutters are designed for decorative design of the façade of furniture. Using a federation horizontal cutter, you can use a router to make a relief along the plane of the facade, and with a vertical cutter, you can shape the base (plinth) in height. A double-sided horizontal cutter allows you to make decorative carvings for subsequent assembly into a groove with a panel.
Please note that this type is equipped with a bearing so that you can mill not only along a straight line, but also along a radius, a template of any curved shape.
Types of edge cutters and their purpose
Using edge cutters, you can use a router to make any chamfers on the ends of workpieces. As a rule, this type of cutter is almost always equipped with a bearing on the top or bottom of the cutter. This addition helps to work clearly and evenly according to the template and to run the base of the workpiece along any radii and bends, with trimming.
Edge cutters are used to remove edges at right angles. With their help, you can use a router to make wooden blanks for subsequent gluing into a single furniture panel.
Edge rebate cutters are used to make a rectangular or square groove, suitable for thicknessing workpieces.
Edge moulders and taper cutters are designed for chamfering semicircular or beveled edges on workpieces. The moulder allows you to create a chamfer both with a “step” and without it, depending on the position of the router.
Edge shaped and half-rod cutters help to beautifully shape the end of the workpiece throughout its entire thickness, capturing the lower part. You can work with them with a milling cutter power of 1600W or more.
The types of wood cutters are also divided according to other criteria; you can learn more in the video.
To avoid burns on the workpieces, and also to avoid overloading the motor of a low- and medium-power milling cutter, do not try to achieve the desired effect in one pass. It is better to go over the workpiece several times to achieve a neat and clean cut on the end.
With the help of additional devices, fixing the tool on a workbench or a movable carriage in a vertical and horizontal position, you can use a router to manually make truly original and beautiful objects of decoration, decoration and furniture.
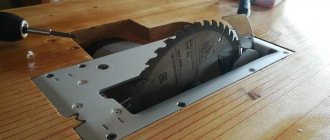
DIY milling table: drawings and diagrams
When milling any parts using a manual milling machine (we don’t remember industrial machines, they have completely different dimensions and capabilities), it is necessary to move the device along the surface of the stationary part.
If the router has guides for the task of moving, the task becomes a little easier, but their length does not usually allow working with any large parts.
Therefore, there is a need for a special milling table.
What is a milling table?
This is a fairly large plane, made of durable material that can withstand loads well. The horizontality of the surface and the absence of unevenness are important - otherwise the work will be very difficult. Typically, the countertop is made of wood or its derivatives.
This is due to the fact that wood (plywood, chipboard and similar materials), produced in the form of a slab, already has a flat and smooth surface and dampens vibrations well during operation. A cutout (hatch) is made in the tabletop, and a manual router is attached to the bottom.
Standard models provide for fastening to a horizontal plane, and which side to do this on – top or bottom – is left to the user’s discretion.
In addition to the tabletop, supports are needed - strong, stable, capable of withstanding significant loads. Suitable for them are massive timber (section from 40x40 mm), flat panels, metal racks or a welded metal frame (assembled on corners and plates).
In addition to the already listed mandatory elements of a do-it-yourself milling table, there are additional ones that significantly facilitate the work:
A metal plate placed on the tabletop at the cutout location
It protects wood from excessive loads and mechanical damage, and simplifies work with cutters. Another important advantage is the reduction in the thickness of the table, that is, providing a larger working stroke of the cutter compared to a thick tabletop.
When using a plate with a thickness of 2...3 mm, you can use almost the entire stroke of the cutter (35...70 mm, depending on the model), and for a tabletop with a thickness of 20 mm, all these millimeters are “subtracted” from the possible processing depth.
The plate is attached to the tabletop with screws (self-tapping screws) and must be quickly removed if necessary, so it is better to reinforce the mounting sockets with nuts or other elements with an internal thread of a suitable diameter driven into the wood.
In this case, the router itself is attached from below to the plate, and not to the tabletop, and can rise with it - this is convenient if you need, for example, to replace the router with an electric jigsaw or drill for drilling numerous holes in a long part.
The plate for a router for a table with your own hands must be made of high-quality, preferably non-rusting steel, rigid and durable, at least 2 mm thick (depending on the weight of the router and the properties of the steel).
The hole for the cutter must be processed along the edges, since the cutters will have to be changed quite often and it would be stupid to remove the device for this each time.
I feel sorry for my fingers; they don’t need wounds from metal burrs.
Guides
Designed for uniform, smooth displacement of the workpiece along a given direction. The simplest guides are a flat beam screwed/nailed/glued to the tabletop at the required distance from the cutter. A more “advanced” option is guides with the ability to shift and/or rotate.
The easiest way to do this is to fasten the guide to the table with clamps, but this option does not guarantee a strong fastening - under the influence of vibration, the threads on the clamps “relax” and the guide begins to move out of the given position.
Therefore, it is better to provide a number of fastenings for the guides - with the ability to move the guide relative to the cutter axis, with the ability to rotate by a given degree.
By gluing (cutting) markings in the form of a regular measuring tape along the side edges of the tabletop and providing latches at the ends of the longitudinal guide for tight fastening, you can quickly change the distance from the working tool to the extreme plane of the workpiece.
You can also make a parallel stop for a milling machine with your own hands using screw fastenings, but then you can only move it with a certain pitch corresponding to the pitch of the threaded holes for fastening in the tabletop.
Another convenient option is to fasten aluminum (steel) guides along the end sides of the tabletop and equip the parallel stop with sidewalls with screw fastenings for these guides.
Then smooth movement is possible.
If you make a horizontal insert from an aluminum (steel) profile with vertical stops moving along it in a displaceable guide, it will be easier to secure the workpiece.
You will still have to press it with your hands, but at least initial fixation can be ensured. Also, these stops can be end stops, that is, they limit the movement of the part from and to - for the entire milling length.
You can make your own guides for a milling table using ready-made elements (from other machines, purchased at a hardware store) - for example, a factory-made clamping stop with grooves for vertical movement, or even the entire upper part, mounting only the support.
Another important point: in the rip fence, in the place where it will be closest to the working cutter, it is worth making a rectangular or rectangular cut with a rounding at the top of the shape. On the reverse side, a vacuum cleaner hose or at least just a dust bag is attached to it.
Vacuum cleaner
A very useful addition when milling. A pipe attached to the work area helps remove small chips and dust directly to the receptacle without polluting the atmosphere of the workshop.
Additional switch
It is better to mount it on the side surface of the table (on a support) under the right hand (under the left for left-handers). Believe me, crawling under the table every time to turn off the router is extremely inconvenient; the switch allows you to get rid of this need. It’s good to make fastenings for the wire there so that it doesn’t get tangled underfoot, and perhaps an additional outlet at a stationary workplace.
Folding wings
They will help to significantly increase the table area if you need to mill large/long parts. They are mounted on special folding brackets or on piano (furniture) hinges with supports.
Drawers and shelves
It is better to arrange them below, under the tabletop, since the upper plane of the table should not be occupied. Boxes can be made with additional plates - holders for replaceable cutters, small equipment, and other things.
Important: the location of shelves and drawers should not interfere with comfortable seating at the milling table! If the width of the tabletop is not sufficient for this, it is better to move the fastenings for the shelves outside, securing them on the side supports of the table in a cantilever manner. If the master is standing while working, this parameter is not important; you can place the boxes as you like.
Wheels on legs will be very useful for a mobile table for a hand-held router - you never know, you will have to move the device from one part of the workshop to another. If the floor is uneven, they can - and should - be replaced with adjustable supports in order to be able to make the tabletop exactly horizontal.
Basic design principles
After the master has roughly decided on the model diagram, it is necessary to draw a drawing of the milling table. In this case, the sequence of actions is as follows:
- choosing a location for installation - the dimensions will depend on this;
- determination of the diagram and approximate dimensions of the parts of the device - length/width of the tabletop, dimensions of the insert plate, height of the tabletop (respectively, the height of the supports with or without wheels or adjustable legs), location of drawers/shelves, switch (if any), guides;
- select suitable materials – their thickness and properties;
- create a future workplace;
- choose the mounting locations for the plate, guides, supports, taking into account the requirements of strength, ease of use and direct manufacturing of the table for the router with your own hands.
Important: if a ready-made table is used as a base, you need to focus on its dimensions and the possibility of correcting them for ease of milling.
Below are several options for milling table drawings.
Desktop version, for a compact router. Although, if the side supports are extended, it may well become a stationary workplace.
A milling table with a homemade lift for securing the tool at the top and the ability to lift it to a given height. Here, instead of the usual rectangular plate, a ring is used, embedded in the tabletop - it protects the panel from accidental damage.
DIY table for a router with drawings and manufacturing tips
Below are step-by-step instructions “in pictures” on how to make a milling table for a manual router with your own hands, using available materials:
- MDF board, chipboard or plywood 19 mm thick, dimensions 1000x1800 mm - 2 pieces;
- steel plate size 30x30 mm (depending on the router model), thickness 2...3 mm;
- aluminum guides, approximately 2.3...2.5 m;
- matching wheelset with brake – 4 pieces.
A diagram of the tabletop and stops with a pipe for a vacuum cleaner is presented below.
The following parts are cut from MDF sheets (chipboard, plywood):
1. work surface; 2. support base; 3. stop wall; 4. headscarf (4 pieces); 5. drawer (2 pieces); 6. side bar (2 pieces); 7. connecting strip (4 pieces).
Next, markings are made on the main part (working surface) for the future support plate. The dimensions of the plate are chosen so that the sole of the router can be placed on it freely (with gaps of at least 20 mm at the edges) and there is room left for resting on the tabletop.
First, the internal contour is cut out (for installation of the router), then a selection is made for mounting the plate “flush” with the tabletop.
Accordingly, the sampling depth is equal to the thickness of the plate. Before installation on the tabletop, the attachment points for the router and the hatch for the working cutter are marked on the plate; the sole of the tool is used as a template.
Additionally, holes are made in the corners of the plate for fastening to the tabletop. As shown in the diagram, the places for attaching the plate in the tabletop are reinforced with nuts.
Taking into account the position of the mounting plate on the tabletop, select a place to install guides and stops, assembling them according to the diagram.
1. side bar for fixing to the base; 2. drawer; 3. guide holes, they need to be countersunk; 4. front wall of the stop; 5. self-tapping screws with a countersunk head; 6. headscarves; 7. support base.
Do-it-yourself parts for the base of the table for the router are made and assembled.
1. outer side stand; 2. internal side stand; 3. rear support; 4. bottom of the table.
The video will help you understand in more detail how to make a table for a manual router with your own hands according to this diagram.
This is roughly what a finished homemade table looks like from the side with a connected rigid pipe for a dust collector/vacuum cleaner.
Conclusion
If for such a homemade workbench you organize not one, but several mounting plates (possibly of an increased size), it can also be used for cutting boards and beams with an electric jigsaw or circular saw, and with due imagination - for other work.
What is a rip fence?
A rip fence is a vital device when working with a milling machine, needed to directly move the cutter along the surface of the base (the edge of a workbench or a smooth cut of a part). The stop holds the part very firmly, which makes it possible to process edges and grooves.
Often, when selling a milling machine, the manufacturer also supplies one of the options for this device. But everyday situations may require it to be refined or even remade. There are a variety of designs adapted to solve various problems.
Each design has its own pros and cons, which requires the master to be creative and responsible in making a decision regarding the proposed unique design.
In the detailed description, you can find only two real facts about this functional device - it plays an important role in the performance of certain processes and can be supplied by the manufacturer as part of a kit for hand tools - for example, for a circular saw. The supplied tooling for any rip fence contains:
- rods that fit into the recesses on the cutter;
- fasteners holding a given position, support part;
- materials for the manufacture of the supporting part can be very different - furniture plywood, wood lined with plastic.
This is standard fittings, the manufacture of which you don’t have to worry about, since spring clamps, flywheels and profiles can be purchased in specialized stores. On the back side of the bed there are flywheels for adjusting the gaps with the cutter and fixing the stop on the table. If you want to make the design more functional and reliable, you can add a casing for attaching a vacuum cleaner, which will make the work process cleaner, but will add complexity to assembly and noise.
Small modifications make it possible to make not only straight cuts, but also curly ones. Wooden blocks with one side flat and the other angular or with a notch, inserted between the supporting part and the edge of the material, will help guide the machine along a given route.
The block adds instability, requires greater care in work and complicates the designed structure.
Tips and tricks
When choosing a device for a lathe, you should decide on the volume and type of work performed, and their accuracy. Then select the appropriate model according to the size of the equipment.
To produce single parts for repairing cars and home appliances, a simple device that fixes the part and moves it relative to the rotating chuck with the tool is suitable.
For a private workshop engaged in the manufacture of parts and simple products, it is worth buying a milling head and making complex parts with high productivity and accuracy.
When the workload is low, a milling device can replace a machine. At the same time, it does not require space for placing equipment, and saves time on reinstalling the workpiece from one operation to another.
Guide rail for milling machines
This device for the router is needed to ensure straight movement of the cutting edge. The tire saves significant time by allowing you to guide the tool at any angle to the edge.
The user can create a unique version of the bus for his own needs. The simplest option is a ruler, fixed in any convenient way. To ensure stability, plywood is used by nailing a board or beam to it, against which the edge of the milling base will rest, while the base will provide the processing area. The board does not need to be nailed down, but rather attached with spring clips. This will make it possible to use cutters of different diameters and adjust the distance from the working area depending on the size of the cutter.
Purpose of copy rings and templates
Precision processing is ensured by the use of copying rings. These are circles with protrusions that move in a pattern. The ring is fixed on the base of the router in any convenient way, the main thing is to make sure that neither the ring nor the template come into contact with the working part of the tool. Templates must be secured to the working material to ensure adherence to the base.
Of course, ready-made options cannot always satisfy all the needs of the master, so templates are made manually for narrow needs. The structure can be supplemented with bearings or rings selected according to the size of the cutter.
Complex grooves, recesses for door hinges, decorative and patterned work can also be done using modified templates and rings.
Additional details
The use of milling fixtures on a lathe is impossible without the use of additional parts. To mount the unit on the caliper body, you have to make holes and secure the base of the device with bolts.
Additional supports - rests, will reduce the deflection of a long shaft during processing. The center holds a long piece. Collets are necessary for securing cutters in the lathe chuck and fixture spindle. They rigidly fix the tool shank, center it and increase processing accuracy.
The use of a machine rotary vice increases the angle of rotation of the part without reinstallation, increasing the capabilities of the equipment. When working according to the template, a copy sleeve or bearing is installed. It accurately guides the tool along a given path.
Other devices
Circular
Among other devices for a wood router, circular ones occupy a special place. All round and oval cuts are made with their help. The compass is a rod with a pin. Simply moving the bar changes the size of the circle. For small radius holes, for example, for inserting hinges, the compass structure is attached directly to the base of the milling machine.
A router for cutting circles can be improved for cutting out ovals. You can do it yourself. You will need a base in which screws or suction cups are used to secure the workpieces; shoes, mounting rods and a bracket for fixing the structure with the tool. Round openings are cut when one shoe is used; inserting a second shoe into the jig makes it possible to cut oval holes.
For making grooves on narrow surfaces
To make this option, of course, you can have some fun with a drill and chisel, and you can even cut out a fairly accurate hole. But how much time will be wasted. The milling cutter will cope with this task faster and more accurately. But this requires certain accessories.
- They can consist of a round or rectangular plate attached to the base of the instrument.
- Two pins on the plate will ensure smooth running of the tool. The axes of the pins are located on the line of the cutter, under this condition the groove will be made in the center of the part, regardless of the thickness.
- When making cuts, it is important to control that the pins are tightly pressed to the workpiece on both sides. A similar result can be achieved using two parallel stops. Even a task with one rip fence is feasible, but the workpiece must be secured between two surfaces.
- If the craftsman constantly deals with cuts on narrow surfaces, you can make a table of two parts, which will make it possible to clamp the material between them.
- The universal use of the copy ring makes it possible to protect the template from the cutting edge.
- A hand cutter with a copy ring will help replace, for example, carpentry tools used when installing door hinges, and reduce the time that will inevitably be wasted if the worker does not have the necessary skills to work with them.
For work on installing door hinges, for example, a template is made from a piece of wood. This is an additional time investment, which then more than pays off - the grooves will be ready in a few seconds. You can often come across advice to buy ready-made templates for a router. And this is reasonable, since they are on sale and are intended for the same type of common activity - for example, installing door hinges or in the manufacture of furniture, where several of the same type of parts are required.
Making a custom template is advisable if a unique product is required. But then it makes no sense to make it from durable material, especially if it will be used one-time - as, for example, for the restoration of antique furniture.
Fastening and clamping devices can be used both universally and designed for the use of a specific type of equipment. Their types are variable - in the form of a block, a shoe with a spring or steel plates.
Clamping machines are distinguished by the fact that they remain motionless during the processing of the workpiece, however, they are also varied and quite complex to manufacture. Therefore, despite the abundance of drawings for craftsmen, they prefer to buy them ready-made, factory-made. There is good balancing of self-braking, the drive can be manual, hydraulic or pneumatic, high-quality metal. It’s easier to purchase a ready-made device and upgrade it to suit your own needs.
For processing bodies of revolution
There are also special, ready-made devices. However, manufacturers of professional instruments are not always able to predict what needs craftsmen may have.
Users willingly share their experiences for processing round railings for wooden stairs, balusters and other things. And these homemade devices are not only not inferior to factory ones, but sometimes even surpass them in processing quality and productivity.
For milling tenons
Special devices are used to cut tenons. Expert advice always refers to industrial devices. They can have several functions at once - for example, making a profile for a blind and through dovetail and a through connection with a straight tenon. Here, the exact trajectory of the cutter, a high-quality template and a copy ring are of great importance.
How to make templates with your own hands
The pattern is a flat part. Its dimensions are selected taking into account the difference in the radii of the cutter and the copy ring.
Ready drawings
There are many patterns posted on the Internet for different tasks and sizes of the copy sleeve. Most publications are provided with formulas into which you need to substitute the dimensions of your workpiece. All that remains is to calculate the dimensions of the template, draw it on graph paper and transfer it to sheet material.
Drawing of a copy sleeve.
Examples of drawings are shown below.
What you need
Stencils are made from the following materials:
- tool steel (the most durable option);
- duralumin;
- plastics;
- plywood;
- plexiglass.
Sheet thickness – from 2 to 10 mm.
Tools needed:
- drill with a set of drills;
- jigsaw or hacksaw;
- file;
- grinding wheel.
To make stencils you need a drill with a set of drills.
Manufacturing process
Proceed in this order:
- Draw the outer contour of the groove on the sheet stock.
- Calculate the difference between the diameters of the cutter and bushing and divide it by 2.
- From the drawn outline, retreat a distance equal to the number obtained in step 2 and draw a parallel line.
- Cut out a template using it.
- File and sand the edges of the product.
A curved template is cut in this way: first, a series of small holes are drilled along the contour, then the material between them is removed with wire cutters or another suitable tool.