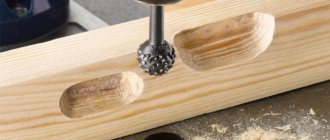
There are often cases when you need to carefully process the edge of a board, create a connecting groove, or cut out a part of a rather complex shape. This operation is done using a milling cutter. You can buy such a tool at an electronics store or make it yourself. The article will give detailed instructions on how to make a router from a drill.
Homemade router
What is a homemade drill machine?
In this case, a hand drill (or screwdriver) will act as a drive for all equipment. You will need to clamp a drill or cutter into the chuck, which will be used to process the wood. The body of the drill on a homemade device is mounted on a base or a special mechanism, with the help of which the cutting part of the device can be positioned in the desired direction relative to the workpiece.
The operating principle of a homemade product will differ little from the factory version. The home design resembles the elements of a standard device, not made in handicraft workshops. The only exception is that the drill mounting parts are made independently, and the design of the unit itself will depend on the material that needs to be processed.
If you have to perform simple operations with a milling cutter, then there is no point in making a complex device, so you can use a minimum number of components.
For reference! If the need arises, you can always modify the unit by making a more complex design. It all depends on the capabilities of the master, as well as his needs.
Electronic snowmobile
With the help of a screwdriver, they not only perform transport in motion, but also a real snowmobile. It is necessary to use an electric vehicle for this purpose, having carried out a number of appropriate upgrades. It is necessary to improve the electric vehicle frame to install the drive wheel on its surface. Instead of driven wheels, it is necessary to install skis, and replace the plastic steering wheel of the car with an iron bicycle steering wheel. The drive wheel is driven through a chain transmission from a screwdriver.
Assembling such a miracle technology will not take much time or money. For our client, the costs will be paid off by the joy of the baby, for whom a vehicle with an electric drive will be a real gift.
Design of a milling cutter from a drill
A drill is not the most powerful tool, and therefore at home you can only make a lightweight machine for milling.
In order to process wood efficiently, it is necessary to securely fix the drill on the tabletop, as well as the workpiece itself: it should not move during operation. If you create a structure with an overhead drill, you can process fairly durable wood and create a complex configuration.
Important! You can make different types of milling cutters from a screwdriver. More on this below.
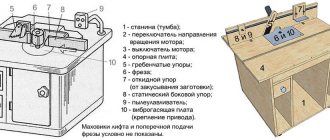
Table with router
If you have to mill regular grooves or form a tenon-mortise, then it is advisable to use a design with a protruding working element (cutter). This is a fairly simple assembly diagram to install on a small workbench.
The cover must be turned over during operation, a hole for the tool cutter is cut there. The size is approximately 5 mm larger than the diameter of the cutter used. It is necessary to install a strong strip perpendicular to the tabletop so that the spindle axis coincides with the created hole.
One of the possible forms of a milling machine
Using stops and clamps, the power tool is attached to the workbench. In working condition, the chuck is located under the cover, and the drill protrudes. As soon as the processing of the wood surface begins, the part will move along the table, without leaving a certain area, which is limited by the template.
You can use any other fastening method - it all depends on the available tools and the imagination of the master. In this situation, the main thing is that the axis of the cutter used exactly coincides with the center of the hole.
Important! All parts of the machine must be securely fastened; if distortions appear, the equipment needs to be modified.
Simple machine
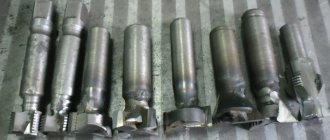
How to make a milling machine from a drill - three main parts:
- Sole.
- Rack.
- Kerchief.
All this is made from plywood. The parts must be perpendicular. You need to make a hole under the sole through which the cutter will come out.
The stand should be equal in width to the body of the electric drill and be approximately 20 mm longer. The drill is fixed to it with clamps (just above the chuck). It is advisable to use an additional stop for more reliable fixation. Thus, the back side of the housing on the opposite side of the spindle will be securely fastened.
The gusset is necessary to increase the rigidity of the device. One part of it is adjacent to the sole, the other to the counter.
The sole is the base of the structure. To manufacture, you first need to make a drawing: draw (or print on a printer) a square, where the sides should be equal to the body of the electric drill. Next, add one strip at a time (on two adjacent sides), which are equal to the thickness of the plywood. Mark the center on the sole so that you can later make a hole there with a drill.
The sole is cut along the contour. It is advisable to round the corners so as not to hit them during operation. On the reverse side you need to make a 4 mm hole, as well as several recesses into which the countersunk heads of the screws will fit.
Important! A piece of rubber or linoleum is attached to the bottom of the sole to achieve smooth gliding.
If necessary, the stand can also be assembled from metal.
The stand is placed in the selected location and screwed in place. The gusset must be placed in such a way that on one side it rests against the base, and on the other against the stand. Thus, the structure will be as rigid as possible. It is necessary to fix the position of the drill when it falls below the sole. For this purpose, a stop and a clamp are used.
Machine with vertical movement of the cutter
In this case, the sole must be lengthened. You need to screw a large board with a U-shaped vertical profile (2 pieces) to it. They will serve as guides.
A drill will be installed on the bar on one side, and two slats in a metal profile on the other. It is necessary to screw a screw into the base from below, which will act as a stop when moving the body of the drill used down.
The router can be placed on the side cylindrical stands. And attach a spring to the bottom, which will return the tool to its original position. For fixation, metal corners, screws or staples are used. The milling depth can be changed using stop screws.
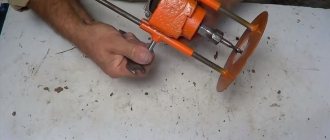
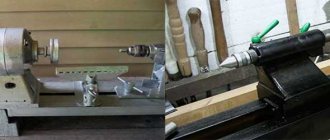
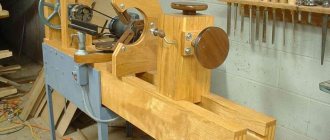
Wood lathe
In the process of making wooden products, it is difficult to do without a lathe. Of course, you can design it yourself . A flat wooden workbench is perfect for the bed. A screwdriver is used as a headstock and rotation drive. It is necessary to place the tool in a wooden bed made from a block in the shape of a screwdriver and secure it with a clamp. There is an option to secure the block with a clamp, and if you always use the machine, screw it with screws. You need to insert a tooth mandrel into the chuck. The tailstock is made from two bars with an adjusting screw, which is sharpened to a cone. It is installed opposite the fixed screwdriver so that the axis of the tool coincides with the axis of the tailstock adjusting screw. The back support structure is secured with a clamp. If you plan to process large parts, then the fastening must be made more reliable. The tool rest can also be made from a block, securing it to the workbench with a clamp. A simple lathe for the home workshop is ready.
Materials and tools
List of tools and materials required for assembly:
- Chipboard or a sheet of plywood approximately 12 mm thick is suitable for making a tabletop (the exact dimensions are selected individually).
- Boards of suitable thickness.
- Several wooden blocks.
- Self-tapping screws, screwdriver or screwdriver.
- Ruler and pencil for marking.
Important! If the design should ultimately be as reliable as possible, you can use metal (pipes, corners) instead of wood.
It is advisable to coat the wood with construction glue or PVA. To secure the moving units, studs or bolts with a diameter of 8 mm are used. You need to select nuts for them (regular and wing nuts).
Option 5. Small benchtop router table
A small tabletop milling table and a detailed analysis of its manufacture are shown in the photo.
How to make a top clamp
To process large parts and create safe working conditions on the machine, the so-called top clamp is used. Its production is based on the use of a roller. Before constructing this device, develop a drawing of it.
The roller can be a ball bearing. Its installation is carried out on a special device, which makes it possible to fix the workpiece at any distance from the working surface.
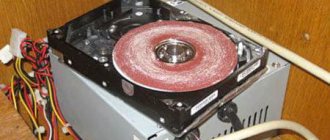
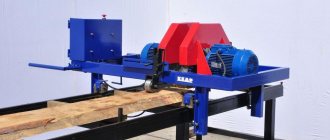
Milling machine drive power
As a drive for a milling machine, it is most advisable to use an electric motor with a power of 1.1-2 kW and a speed of 3000 per minute. When using a low-power electric motor, it will not be possible to use any cutter; the machine will not have enough power. If the speed is too low, a poor-quality cut will be obtained.
You have familiarized yourself with several options for solving the issue; how to get a milling table. Which one you like is your choice. We will be glad if we were able to help you
Manufacturing process
A simple design option
How to make a router from a drill or screwdriver? For household needs, you can assemble a vertical router; it has a fairly simple design and is easy to make at home.
Make a foundation
The sole (or base) should be oval or round with a hole for the cutter to pass through (done in advance). It should be offset relative to the center of the workpiece, taking into account the thickness of the stand, which is located on the side.
The size of the base is selected individually.
Install drill
Next, you will need to place the drill on the created base to mark its position. Using stops and clamps, secure it to the work area.
Attach to workbench
Having placed them exactly at right angles, fix the gusset and stand to the tabletop. Securely secure the tool body to the base. After installation, it is important to make sure that there are no backlashes or distortions on the created unit.
Electric car
To produce an electric car you will need:
- Frame made of metal profile pipe. There is an option to do it yourself .
- Wheels can be used from a garden cart with rubber wheels.
- Of course, take the body from an old pedal car, as it is also called, and come up with some creative solution. For example, soldering from plastic pipes.
- As an electric drive, you need to use two motors from screwdrivers and a gearbox from the same power tool. They make separate housings in which the output shaft is mounted on 201 bearings.
- Battery. An ordinary 6ST60 car is used.
When all that remains to be done is for our client, the components are prepared, all that remains is to assemble the electric car. The myth is an easy process and is possible for every man who has even a superficial understanding of plumbing.
Advantages and disadvantages of a router
The main advantages of a do-it-yourself router from a drill:
- if single operations are to be performed, there is no need to spend money on purchasing special equipment;
- to make the device at home, you will have to spend about half an hour;
- if necessary, you can quickly change the bit (attachment), which will be adapted for a specific task.
There are also disadvantages:
- the drill cannot gain a large number of revolutions, so working with dense materials will be problematic.
- the operator's work area is severely limited by the small size of the router;
- The drill engine is much weaker than that of a professional milling machine, and therefore it is not possible to work for a long time on a homemade machine with maximum power.
In addition, we must not forget that the drill gets very hot when used for a long time, so the tool must be given time to “rest.”
How to make a powered screwdriver
DIY chair restoration: step-by-step instructions
A powered screwdriver is the dream of many home craftsmen. In principle, it happens that in a home workshop there is no need for a cordless tool. You can have access to an outlet at any time. Of course, having a cordless screwdriver in your hands is convenient. But when working, you also hold in your hands, in addition to the tool itself, a battery. And it will be harder.
Also, batteries often get damaged and break. And since you are unlikely to buy a battery separately from a screwdriver on sale, you will have to puzzle over how you can provide your screwdriver with the necessary power from an outlet, bypassing battery devices.
Advantages of cordless screwdrivers
Cordless screwdrivers are very convenient at construction sites - it’s very easy to work with them on the roof, in difficult conditions, where trailing wires will only get in the way and create unnecessary danger. But this is where battery failure most often occurs - the screwdriver fell, the battery broke, and you will have to look for a new one.
Let's figure out how to make a powered screwdriver.
Replacing a screwdriver with a conventional drill
The easiest option is to use a regular small drill as a screwdriver. You just take the bit and clamp it into the chuck instead of the drill. Working with a drill as a screwdriver will require some skill. The fact is that the drill does not have a “ratchet” - in a screwdriver, the ratchet will work as a fuse when the fasteners are tightened. Therefore, you need to clearly feel this moment and release the button. Otherwise, broken screw heads, damaged bits and bad mood are guaranteed. Another difference between a drill and a screwdriver is the rotation speed.
If the torque in a drill is small and the rotation speed is high, then the opposite is true with a screwdriver. Some even have the ability to adjust the rotation speed. Without a high torque, it is unlikely that you will be able to tighten a large self-tapping screw - you will have to resort to using a screwdriver. Therefore, small screws are usually tightened with a drill.
It is not recommended to use a hammer drill as a screwdriver, although its operating parameters of torque and rotation are more acceptable. The hammer drill has a large radial runout, making it difficult to tighten screws with its help.
Just a corded screwdriver
The second option is to purchase a corded screwdriver at the store. They come in several types. The first, cheapest ones are the same electric drill with a ratchet installed on it. They are not positioned as a professional tool, and can only be used to tighten small fasteners. However, having a ratchet will save the screw heads, your bits and your nerves.
A more expensive screwdriver is a specialized network one. Such a tool has a built-in gearbox, most often of the planetary type.
They are positioned as a professional tool, and are much more expensive.
Often such screwdrivers have the ability to tighten large nuts, bolts, and have a magazine for small screws. This option is the best, although the most expensive.
Converting a cordless screwdriver to a corded one with your own hands
The third option is to convert the cordless screwdriver to work on mains power. You will need knowledge of electronics and circuit design, so it's not for everyone. In addition, you will need to know the operating parameters of your battery.
If the battery is broken, you can ask people on DIY forums to measure the current and voltage parameters of the battery. This will help you make a network power supply. In principle, if you have good knowledge of electronics, you can simply disassemble the battery. Its design will contain chemical batteries connected in a certain way. Knowing their type, from the name of the battery, as well as the connection diagram, you can quickly estimate the battery parameters. And then assemble a rectifier with the necessary operating parameters. Or even replace the elements in a failed battery. And then you won’t have to assemble the rectifier.
Features of working with a homemade milling device
It is important to pay attention to the speed of rotation of the shaft. The engine of a professional machine can reach 20,000 revolutions per minute. The drill's performance is much more modest - approximately 3000 rpm. Therefore, cutters designed for low speed operation may not be suitable. The rotation speed regulator must be set to the maximum position.
A similar situation is observed with engine power. This means that a home-made milling machine can only process soft wood or plastic workpieces.
For reference! The machining accuracy of a home machine will not be ideal, since a gear is used to transmit rotation.
During operation, slight play may be observed, which will affect vibration and beating. This affects the final result of the work.
The information provided is enough to understand how to make a wood router from a drill at home without much expense.
How to make a generator?
With minor improvements, a screwdriver can be used as a generator, and you won’t need much effort:
- First, remove the battery, attach the corresponding wire to each terminal using alligator clips and connect it to the consuming device;
- Before connecting, you must use a multimeter to test the correct polarity of the connection;
- an allen key is clamped in the chuck, which is used when assembling furniture; a convenient handle is attached to it, since it will take quite a long time to generate current;
- current will be produced, but the voltage will be so insignificant that it will only be enough to charge a mobile phone, and for lighting with a small low-power LED lamp.
You can also use wind energy - this will be called a wind generator. True, the disadvantage of such a circuit is also low voltage.
Unless it is possible to install such a wind generator in a constant wind somewhere on the seashore or in a lighthouse.