When making major repairs or finishing a new building, all craftsmen are faced with the need to supply communications and disguise wires. The best way to lay utility networks is to place them in the wall. The work is quite labor-intensive and requires certain skills and special tools.
We will tell you how and what to use to tap walls for wiring, when you can get by with improvised equipment, and when it is better to use professional equipment. We will also describe the features of preparing grooves on different walls, and provide a step-by-step guide to grooves and sealing channels.
Basic rules for gating walls for wiring
To tap walls, you will need the following tools:
- Roulette,
- Level. It is needed so that the grooves go strictly vertically or horizontally.
- A probe or tester to detect old wires inside walls.
- Tools (manual or electric) for cutting grooves.
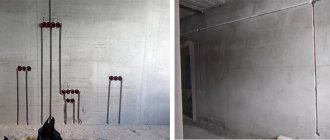
When the plaster is soft enough, you can use an ordinary knife to cut grooves in it, and make grooves for the cable with a hammer. They will house an ordinary electrical cable on special plastic fasteners. You will have to drill holes in the wall for them.
The cable is not laid in pipes, but is clamped so that it sits rigidly in the grooves. It should not sway or dangle so that it can be puttied or plastered without worry. This is rule number 1. Fastenings can be single or double.
A double cable requires a groove at least 2 cm wide. This is rule No. 2. A regular hammer has just the same width of the chisel.
And rule No. 3 - wiring should be laid strictly vertically or horizontally. No corners are allowed.
The wiring is laid strictly vertically or horizontally.
Finishing
After completion of all noisy work, it is necessary to close the highway. There are two options: either the entire wall is leveled with putty, or only the channel itself is closed.
To do this you need:
- clean the groove from a layer of dirt and dust;
- prime, wait until completely dry;
- putty, laying the solution into the channel (to prevent subsidence of the layer, you can lay a reinforcing mesh);
- remove excess plaster and smooth with a trowel.
Choosing a tool for gating walls for wiring
Lime and gypsum plaster is quite soft, and it is quite convenient to process it, even without power tools.
Chisel and hammer
The ability to use these tools is an old-fashioned way to cope with a task when there is not much work to be done (a few linear meters) and for other reasons. A chisel is taken in the left hand, a hammer in the right. The chisel is moved along the wall along the marked line, and it is hit with a hammer until a sufficient amount of content is knocked out of the groove. In this way they move from bottom to top. The method is good because it does not require electricity, expensive tools, and little dust is generated.
The method is good because it does not require electricity, expensive tools, and little dust is generated.
Wall chaser
Tool with a power of 3000 W - for chipping solid and hollow bricks, monolithic concrete and aerated concrete. Useful for cutting channels during electrical and plumbing work. The wall chaser can make passes between walls or between a wall and the floor at an angle of 900. The result is a wide and deep furrow from which the cut material does not need to be removed. The channel comes out smooth, without chips or nicks. The built-in laser cut pointer ensures maximum precision. The basic set with a modern tool includes 5 115mm diamond discs, but you can also install 125mm discs. This increases the cutting depth to 40mm. The width of the furrow is adjusted using the arrangement of discs.
The built-in laser cut pointer ensures maximum precision.
Hand circular saw
This power tool is distinguished by its rather modest dimensions and weight, which makes it easy to transport it from site to site. Those. This is a professional, powerful tool that can cope with the most complex, durable walls. The main alloying element on a circular saw is a round disk with sharp teeth that rotates at high speed. The design includes a motor, gearbox, protective casing, limitation and guide devices. You don't need to be a professional to understand and operate this power tool. Modern circular saws are easy to use and can be adjusted depending on the task at hand. They set the required depth and angles of the cut (90 or 45 degrees), as well as, thanks to the guide ruler, the width of the cut. Instead of a circular saw, a grinder is often used.
A professional, powerful tool that can cope with the most complex, durable walls.
Hammer
It can be used anywhere. Works with attachments:
- Drill,
- Chisel,
- Round nozzle for cutting out socket boxes.
The principle of operation is the same as with a pair of chisels and hammers, only a power tool does everything much faster.
The principle of operation is the same as with a pair of chisels and hammers, only a power tool does everything much faster.
Drill
This power tool can be used on softer walls in the same way as a hammer drill. Or you can buy a special cutter for cutting grooves for 300 rubles. You can also attach a disc to the drill and use it like a grinder. Only there will be much less dust.
This power tool can be used on softer walls in the same way as a hammer drill.
How to groove any wall without dust?
- There is a folk method, for which you will need:
- Construction vacuum cleaner,
- Bulgarian,
- A piece of plastic pipe 50 cm long, 50 cm in diameter,
- Concrete disc for grinder.
A sewer pipe is taken, a cut is made in it or a hole is cut with a knife for the disk so that it rotates directly in the pipe itself. And in such a way that all the dust knocked out of the wall gets into the pipe. A disc for concrete surfaces is installed on a grinder. Then the pipe is attached to the grinder with masking tape so that it holds securely. Then a hose from a construction vacuum cleaner is also attached to this pipe with masking tape.
There will be much less dust.
Features of working with various materials
If you have a correctly made diagram and suitable tools, it is not difficult for even a beginner in the construction business to perform wall gating. But this is the case if the wall is not load-bearing and is covered with a thick layer of pliable plaster.
But what if the internal partitions are made of high-strength concrete, lightweight aerated concrete or even wood? Let's consider the nuances of working with various materials.
Grooves in concrete and brick
On brickwork fastened with a mixture of sand and cement, you can even gouge out horizontal grooves with a chisel and hammer if you “get” into the seam. For vertical grooves, it would be better to use a power tool - an angle grinder, a hammer drill or a wall chaser.
If the masonry is covered with plaster, you can do it with primitive manual equipment, although the process will take a lot of time.
Rules for marking grooves for wiring on brickwork: horizontal channels are knocked out at the junction of rows, vertical channels - between rows of bricks
In principle, there is nothing difficult in working with concrete - although the material is quite strong, grooves on it can be made with any tool suitable for slitting, with the exception, perhaps, of a hammer and chisel.
But the best choice would still be a hammer drill, although the evenness of its grooves leaves much to be desired (however, plaster will correct all the nuances).
The noise level from the hammer drill exceeds 60 dB, and in order not to injure neighbors, work with it is allowed only on weekdays and during the daytime, taking periodic breaks for 1-2 hours
This impact tool has high power, so it can handle any hard surface. It does not create such a large dust cloud as an angle grinder, and does not require additional tools to clean out the remaining material inside the furrow.
A hammer drill and a hammer drill are suitable for forming round holes, although for this the master will need experience:
Image gallery
Photo from
Step 1: Marking the hole for the socket box
Step 2: Outlining the contour of the future recess
Step 3: Connecting the Dots to Form a Solid Circle
Step 4: Remove excess with a regular chisel
In addition, on high-strength concrete walls, using a grinder (and its analogues - a circular saw, an angle grinder) is unsafe - the wheel may break if pressed hard.
How to work with wood and aerated concrete
You can make grooves in walls made of aerated concrete or foam blocks using a grinder, drill, hammer drill or circular saw. But if you want to minimize the amount of dust, use a special manual wall chaser designed for working with pliable material.
Its pointed arc easily cuts a neat groove, and the desired depth can be achieved in just 3-4 passes.
By the way, it’s easy to make such a tool with your own hands from a plate sharpened on one side or hard punched paper tape. To do this, you need to bend a small piece of improvised material into an arc and secure the edges with wire or electrical tape.
For small volumes, such a device is quite sufficient, but if you need to install a network of channels with a total length of more than 20 m, it is worth equipping the device with a convenient pipe handle.
If there is no suitable material for a wall chaser, you can buy a ready-made tool in a store - a simple model will cost between 500-1000 rubles
As for walls made of profiled timber or rounded logs, according to fire safety rules, it is recommended to install open electrical wiring so that in the event of force majeure the source of ignition can be quickly neutralized.
As a last resort, for wooden walls you can use a special router, a grinder with a circular disk for wood and a chisel, with which you can remove the material remaining between the cuts.
But, we repeat, it is better not to take risks with masking the wires and carry out the installation without violating the PUE standards and the integrity of the wooden covering.
Nuances with load-bearing walls
As already mentioned, it is prohibited to ditch load-bearing structures - if the top layer in the wall is damaged, the reinforcement is exposed, which can result in corrosion that will weaken the entire frame of the building. But what about the owners of apartments in a building where some of the partitions are made of reinforced concrete or most of the walls are load-bearing?
There are several options here:
- Official approval - obtain permission to carry out gating work from the local building department. You can try if you can prove that the depth of the grooves will not affect or damage the reinforcing mesh, the deformation of which leads to softening of the load-bearing structures. But if we are talking about a panel house, the chances are almost zero, but for a frame-brick building, a permit will most likely be issued.
- Apply a layer of plaster to the wall and carry out gating without delving into the structure of the slab itself. Typically, the reinforcement lies under a 1.5-2 centimeter layer of concrete, so if you level the wall with a plaster mixture, the depth of the grooves will not affect the metal.
And the last way that will help solve the problem with any problematic wall is to hide the wires behind drywall or in special electrical skirting boards.
Preparing walls for gating for wiring
Before cutting the boundaries of the groove, they need to be marked with a construction pencil. If this is not a new building, then before marking you need to use a probe or tester to make sure that there is no old electrical wiring in this place. To avoid accidentally damaging it.
What else should you pay attention to? All grooves and electrical wiring are laid either strictly vertically or horizontally. Why is this being done? When we place switches, sockets or some other element on the wall, we must always know for sure that electrical cables go from this place, either strictly vertically upward or vertically downwards. Under the ceiling, the wire runs only horizontally, at a height of 10-15 cm from it. Often sockets are placed close to the floor. Consequently, after many years you will understand that you definitely cannot drill into the wall above it, nor hang shelves, nor attach pictures, etc. And so on throughout the house. This rule is mandatory for everyone, everywhere.
Before cutting the boundaries of the groove, they need to be marked with a construction pencil.
How to groove concrete
Concrete slabs are an invariable element of modern construction. With their help, you can assemble a house like a constructor, and thereby speed up the construction process. Such elements consist of concrete and metal reinforcement.
For gating, it is recommended to use the following tool:
- Grinder with a diamond blade.
- Wall chaser.
- Rotary hammer (for short sections).
Not a big life hack - install two diamond discs on the grinder at once, thereby reducing the time for making the grooves by at least half.
The process of slitting with various tools
To groove walls for wiring you will need:
- Construction pencil;
- Roulette;
- Hydraulic level;
- Wall chaser with a metal disc and a connected vacuum cleaner;
- Jackhammer.
Wall gating begins only after the electrical wiring plan has been approved. The first stage is marking the locations of sockets with switches according to the apartment plan. Wiring is also carried out separately for household appliances: TV, intercom, ventilation, alarm, etc. The height of the outlet from the floor is noted, then the distance from the slope of the door or window, or the corner of the room. Future points of sockets with switches and vertical places where the wall will be cut are marked strictly according to level. All electrical wiring runs along the ceilings:
- In monolithic-filled houses: under a false ceiling,
- In panel houses - in technical pipes that are already built into the wall.
You need to be very responsible when it comes to wiring in the kitchen, due to the large number of household appliances connected to the electrical network. Sockets must match the height and placement of kitchen furniture and connected appliances.
The first stage is marking the locations of sockets with switches according to the apartment plan.
They ditch the wall either with a wall chaser or a circular saw with a grinder with a metal disc and a connected construction vacuum cleaner to a depth equal to the diameter of the pipe + 10 mm and a width of approximately 30-40 mm for a socket or switch. If one channel carries several wires, for example, electricity to a TV, telephone, intercom, then it can be made wider. You can also put not one, but 2-3 tubes in it.
During work, we must not forget about safety precautions. When the groove is completed, places for socket boxes with switches are marked. If the hole is a little larger than the box, that's okay. After the wires are brought out into the box, it is walled up in the wall.
After tracks have been cut on both sides of the channel, the gap between them is processed with a jackhammer or hammer drill. Excess concrete is cleaned from the canal. You should not hollow out the wall too much.
When all the channels are cut, you can lay wiring in them.
During work, we must not forget about safety precautions.
Requirements and standards for grooves
Before choosing a tool and getting to work, you need to draw up a drawing of the electrical wiring in an apartment or private house, taking into account building codes (the requirements are regulated by SNiP 3.05.06-85).
The diagram must indicate the location of all lighting fixtures, junction boxes, sockets, switches and the route along which the connecting wires will pass.
Be sure to save the wiring diagram for the future, so that if you need to drive a nail into the wall, you don’t have to guess whether you will hit the wire or not (+)
Important details:
- The depth of the furrows should not exceed 2-3 cm, and the width - 3 cm.
- The maximum length of one channel from the junction box to the switch or device is 3 m.
- Wires and, accordingly, grooves under them can only be routed vertically and horizontally, checking the level for parallelism with the main structures of the building. But it is impossible to reduce the distance “directly” with the help of oblique and especially wavy lines. The only exception to this rule can be the wiring in the attic room - in this case, the grooves are punched parallel to the slope lines of the walls.
- The minimum distance from floor slabs to horizontal grooves must be at least 15 cm, and from heating and gas mains - at least 40 cm.
- Vertical wiring should run at a distance of 10 cm or more from door and window openings.
- It is important to plan the wiring so that the wires have as few bends as possible on the way from junction boxes to lighting fixtures or outlets. Ideally, you should lead the path in a straight line from the box or use no more than one transition at a right angle.
- It is impossible to tap on load-bearing walls, floor slabs and corners - this can weaken the strength of the structures of the entire building and lead to an accident.
The following photo selection will clearly demonstrate the restrictions specified in the PUE:
Image gallery
Photo from
Grilling only interior partitions
Permissible depth for hidden wiring
Violation of hidden wiring rules
Forming grooves in a layer of plaster
If you carry out the drawing and subsequent gating in compliance with these rules, hidden wiring will work without problems or failures.
The nuances of chipping a concrete wall
It is very difficult to work with a conventional wall chaser with two discs in such conditions. On concrete walls, soft metal plasticines quickly heat up. A regular grinder with one disc can cut concrete, and the grooves themselves are knocked out with a hammer drill or jackhammer. You can watch how to drill walls for wiring with a hammer drill from numerous videos on the Internet.
Don't forget to use safety glasses, because... During operation, sparks and abrasive particles fly with great speed and force.
Don't forget to use safety glasses, because... During operation, sparks and abrasive particles fly with great speed and force.
Hammer
The method of forming a recess with a hammer drill has also proven itself to be quite good. By the way, when using this tool, less dust is generated. To work, you need two attachments: a drill and a spatula. A mark is glued to the drill, moving away from the tip, in order to control the depth of the holes.
Let's look at how to make a groove for wiring with this unit:
- According to the markings, holes are drilled at a distance of 1-1.5 cm from each other;
- the blade attachment is changed;
- in the “no drilling” mode, the “jumpers” between the holes are removed;
- The side bevels are leveled.
By the way, holes for distribution boxes, switches and sockets are also made with a hammer drill. In this case, a special attachment is used - a crown.
It should be noted that the work will be quite long and noisy, and the quality of the grooves is not entirely good: there will be unevenness and chips. However, this is not a reason to refuse to use a hammer drill. All defects can be corrected with plaster.
What to do after finishing gating the wall for wiring
The final stage is sealing the grooves with electrical wiring. There are 2 methods of sealing, and we will analyze both.
Electrics can be installed before plastering, or after, and everyone chooses their own method. It is impossible to say which one is more correct.
Many electricians hide the wiring in a corrugated protective tube, but this is unnecessary reinsurance, and you can do without it. This increases the estimate, and there is no meaning for residential premises in this.
It is better to seal the grooves with the same mortar that was used to plaster the walls. Then the density at the place where the groove is embedded will not differ from the wall. Otherwise, moisture absorption will be slightly different, which may have a negative impact after painting or wallpapering.
Before plastering, the grooves must be thoroughly vacuumed, brushed over them, and then thoroughly primed. The primer needs to be given time to dry, after which you can seal them. Often, instead of special fastenings for cables, painters use a life hack - when the wires stick out, they can be secured with pieces of corrugated tube in which the wires are hidden. A piece of tube is placed across the groove, and it rests against its walls like a spring. This is a great tool that is easy to insert and remove while still holding the wiring securely in place. The main thing is that nothing sticks out.
It is better to seal the grooves with the same mortar that was used to plaster the walls.
When nothing sticks out of the groove, it can be sealed with plaster. Experienced finishing craftsmen recommend using a hard spatula for this, preferably a façade one. Sealing is carried out in two ways. Let's describe both.
Method number 1, which can be called classic. It consists in the fact that the plaster mortar is clogged across the grooves in excess, and immediately, while it has not yet set, it is cut off with a scraper moving along the grooves. The spatula is held at an angle of 45 degrees to the surface. This method has a significant drawback. Any mixture, be it polymer, cement or gypsum, shrinks when setting, just to varying degrees. Therefore, if you simply filled the groove with fresh mortar, pulled it through and left, then the next day the plaster will retract in some places. And before applying the finishing putty under the wallpaper or for painting, you will have to putty this place separately.
But there is a second way that will save you from unnecessary fuss. Filling the groove with plaster is carried out in the same way as in the first case. You just need to make sure that the filling is uniform along the entire length, and the layer sticks out like a “hump.” Then the mixture is given 1-2 hours to shrink and begin to set. When the plaster has dried a little, it changes color, and this is a signal of readiness. You can take a spatula or a construction rule, and, moving along the groove, cut off the excess plaster, comparing the surface of the groove with the surface of the wall. Experienced finishers prefer this method of sealing grooves, because... It allows you to complete the job in one go, in 1 day.
When nothing sticks out of the groove, it can be sealed with plaster.
This is where the work with the grooves ends. By the way, grooves for water supply and heating pipes are cut in the same way.