Content:
Remember? Seven times measure cut once! Popular wisdom accurately describes any repair and construction work. Glue wallpaper, lay tiles in the bathroom or pour the foundation of a future home - you will perform any task perfectly with a laser level. It will help you achieve aesthetics in your work and avoid costly mistakes.
Already thinking about purchasing? Stop! Let's decide what kind of level we need. What to look for when choosing? Which device will help you hang wallpaper, and which one will be needed at the construction site? What additional features will really make your job easier? You will find answers to these and other questions in our article.
Let's start with the basics: let's understand the characteristics of the device
Today there is a huge selection of laser levels on the market. There are more than 200 models in stock on our website alone. Moreover, the cost starts from 699 rubles and reaches 113,139 rubles. It’s difficult even for a professional to choose. And we will help!
Do you want a multifunctional level? Then choose a model with a large number of rays, for example 5 - 7. It is important that their direction is both vertical and horizontal. If the amount of work is small, then you can get by with a simple model with one beam, for example, horizontal. Remember: the more lines are displayed, the faster the power supply drains. Therefore, it would not be superfluous to be able to include the projection of specific rays.
Affects the quality of markings and measurements. Most often, household appliances are not very accurate, usually 0.5 - 1.5 mm. But for professional levels for construction, the error should not be more than 0.5 mm.
This is the maximum distance at which the beam projection will be visible. For indoor work, for example, when finishing, a device with a range of 10 - 15 m is sufficient. But for the street, you should choose a device that can work with a range of 20 m.
Everything is very simple here. The level can be powered by batteries or a battery. Professional craftsmen and builders prefer the second option. It is designed to last longer and is more reliable. For domestic use, you can purchase a battery-powered device. But it’s better to immediately take care of an emergency and put a spare set in your toolbox.
Preparing for work
Choosing a level
[email protected] _tmn
Evenness of surfaces and accuracy of measurements are important in any installation. However, during the construction of a building, an error of 10 millimeters is acceptable, while during renovations in an apartment it can lead to a fatal error.
Therefore, for each case there is a separate device that will help to avoid troubles. They are divided into groups based on their accuracy and operating principles.
- Highly accurate - allow an error of no more than a millimeter
- Accurate - their average error is already two millimeters
- Technical - they can have the largest offset in measurements, which is 10 millimeters.
Based on the operating principle, the levels can be divided into three groups.
Optical
Their main component is an optical tube that magnifies the image by almost 30 times. With the help of specially marked slats and directional light, it helps to align the structure in the horizontal plane.
Digital
They not only read information, but also remember it. Therefore, they can be called the most accurate among analogues. However, they have two disadvantages - their high price and susceptibility to damage.
Laser
These are the most frequently used devices. They are easy to use and do not require special training to operate.
[email protected] _win
Instruments of this type project radiation onto the surface and allow you to work with entire planes. In addition, they are easy to use and install. Since this type is one of the most popular and well-known on the market, we will discuss it further.
There are several types of these devices
Rotary
They are distinguished by the presence of a rotating head. It rotates 60 times per minute and uses two lasers to project light stripes onto a plane. The lower the rotation speed, the better the emission band will be visible.
Spot
As their name suggests, they can only display points. One of the advantages of such levels is their ability to work both on walls and on floors and ceilings.
Linear
They can build horizontal, vertical and diagonal beams in different planes. Most often used to construct fastening lines.
Laser level ADA instruments CUBE MINI Basic
Installation
[email protected]
Before you start taking measurements, you need to install the device. First, check its power supply type. If necessary, charge it or insert batteries.
Step-by-step preparation of the tool for use
- Check the room for obstacles to the sensor, otherwise the laid line will be interrupted
- Select the most flat area for placement and place the device on a special holder or tripod. After this, securely fasten the structure. It is worth noting that it is prohibited to move the level during work.
- Observe the distance specified in the instructions at which the device must be placed from the object being measured.
- Be sure to protect your eyes. Use special glasses and take care of children and animals. Since the radiation is very powerful, it can harm them.
Video lessons with instructions on how to use a laser level can be found on the Internet. Here, for example, is one of the bottom
Settings
For most models, the instructions are always almost the same, but sometimes there are features in setting up devices of certain brands. If we talk about the simplest levels, then their body usually has two bubble levels and screws. You can align the beam by gently twisting them.
If the device has a self-leveling function, then you should not rely entirely on it. You will have to recheck the horizon and, if necessary, tighten the handle again. It is better to set the indicators to 0 when setting up. This figure means the distance from the floor to the instrument beam. This method simplifies the search for a laser line when working outdoors.
Some models can project multiple light bars. Customize the display of exactly the one you need. This way you can align them by looking at how many degrees there are between each guide. But we still do not recommend using all functions at the same time, as they may confuse you.
Additional devices
Sometimes adjustments and proper installation of the device are not enough to accurately determine irregularities.
Unsplash
Therefore, additional tools such as a staff, a target and a beam receiver can be used to improve the quality of work.
1. The need for a rail arises in cases where it is necessary to lay several parallel guides on the surface, located at the same distance from each other.
2. The target is sold directly with the device. This is a plastic plate on which several concentric circles are drawn. This device is suitable for those who use the level in a large room and will increase the accuracy of projection transfer.
3. The emission of the device can be almost doubled if a successor is installed on it. With it, the projection will be visible even in sunny weather outside. It is worth noting that you need to think in advance about purchasing a successor of the same brand as the main tool. This way you will avoid troubles due to incompatible mechanisms.
Laser level BOSCH GLL 2 Professional + MM 2
Spot levels for home work
| The principle of operation of a point level is similar to a laser pointer. The only difference is that several points are displayed on the surface at once. The device costs up to 3000 rubles. It is easy to use and lacks additional options. Popular among ordinary users. |
The number of rays and their direction - the device projects points, not lines. Usually this is from three to five points on one surface. This is quite enough to make markings for cosmetic repairs or determine the location for drilling holes.
The permissible error does not exceed ±1 mm. For domestic use, accuracy down to a tenth of a millimeter is not important. Therefore, deviations of non-professional instruments can reach several millimeters.
Measurement range – does not exceed 5 m indoors. For home use, a long beam is rarely required.
Power type: AA batteries. There are devices that operate for up to 30 hours on one set. Agree that a device with a battery would be more expensive.
A point level is useful for independent repairs in an apartment or house. For example, you can use it to make markings for wallpapering, fastening shelves or installing kitchen units. It is useful for plastering work, including leveling corners.
How to make a laser level with your own hands step by step diagram
: Pointer upgrade
First of all, remove the part of the laser pointer that does not have inserts with pictures. Cover the hole with cardboard and punch a small hole right in the center. Return the cap to its place.
: Making a support
We use a bar, handle, tripod or tripod as a support. We will sharpen the lower part of the plank and drive it into the ground, and attach plywood, a board, or a sheet of plastic to the upper part strictly at a right angle as a platform.
: Bubble level base
We select a bar equal in length to the bubble building level we have, and use a screw to fasten it in the center of our site so that it can be turned in the desired direction.
: Attach the laser pointer
At the final stage, we need to attach a laser pointer to our bubble level. First, we will place porous rubber under it, this will provide the necessary shock absorption when adjusting the inclination level.
Linear levels for repair and construction work
Screeding a floor, installing a ceiling or laying tiles in a bathroom - any finishing work requires high precision from a craftsman. A mistake will lead to downtime, expensive rework and customer dissatisfaction. A linear level will help you perform the work efficiently .
| Users call the linear level a static plotter. The device projects lines on the wall by splitting the beam through a prism. This is the main difference from the point device. The direction of the lines can be either horizontal or vertical. |
The number of rays and their direction depends on the model. Simple devices project only one beam onto the surface. Advanced ones can display two beams - horizontal and vertical. Some models are capable of producing three beams: a line on the ceiling and a cross on the floor.
Permissible error – should not be more than ±0.5 mm. For finishing, construction and installation work, it is worth choosing a device with minimal deviations. For example, for installers of built-in furniture, any error can become fatal: a small discrepancy at first can eventually turn into a gap several centimeters in size.
The measurement range reaches 20 m. This indicator will be enough, for example, to make a floor screed. But you can always expand the area of use: with a receiver, the level can work at a distance of 30 m.
Power type – depends on the model. Among linear levels you can find models that operate on both batteries and a battery. The first option is cheaper, but you should always have a spare set. The cost of a device with a battery is much higher. But the work duration is longer. And you don't have to think about batteries.
A linear level is useful in both repair and construction work: from laying tiles to marking beacons when screeding a concrete floor. The device is also used for installation, for example, of suspended ceilings or facade cladding.
Plane builders
Most of the problems that are solved with the help of a level come down to constructing marks that are on the same horizontal or vertical. Laser plane builders are best suited for this application. Devices of this type produce two or three beams, deployed into sectors located in mutually perpendicular planes.
Most of these devices have scanning angles ranging from 60 to 120, but there are models with circular scanning, 360 in each plane. Light sectors draw vertical and horizontal lines intersecting at right angles on walls, floors, ceilings and other objects. These lines become the basic or working markings, which are needed for construction, repairs, installation of furniture, installation of equipment or communications, for laying tiles, etc.
Beginning of work
Let's not dwell on the need to charge the battery, insert batteries, turn on the device or not forget it at home.
Before starting work, the laser level is installed on a flat, stable platform, or better yet, on a tripod or bracket, which are often included with the device or offered with it.
Most modern models are capable of independently orienting laser markings vertically and horizontally. But only if the body tilt is not too great. Typically the self-leveling range is limited to 4 in each direction. If the inclination is greater, the laser flashes and a beep sounds. This means that the light planes are positioned incorrectly and the device needs to be leveled horizontally.
You can level according to the bubble spirit level, if there is one, or simply until the signal stops. Some models are equipped with tripod stands, the legs of which have screw adjusters. If they are not there, you have to use manual tripod adjustment or improvised means. In any case, the initial installation of the laser level in the working position should not cause significant difficulties.
Using Light Lines
A laser cross drawn with a level on a wall or ceiling can be used in two ways - as reference lines for constructing a working marking or directly as a working marking.
The first method is better if it is not possible to use the device constantly or quickly move it to the desired position. It is also used in cases where it is necessary to create a general “global” markup with a rigid binding of its different elements to each other or to base objects. In this case, the laser lines are duplicated with clearly visible marks, which are used as a basis for further work.
The second method is convenient when laying tiles or other cladding, for orienting and aligning interior parts or design elements that are not closely related to each other. This method is good if the level can be easily installed in any convenient position and just as quickly rearranged when changing places of work. With “floating” markings, the laser level is constantly in operation, so you need to make sure that its battery has sufficient charge.
Using planes
In construction and building repairs, work related to the formation of smooth surfaces is often encountered. For example:
- plastering walls;
- installation of a frame for a partition or false wall;
- gluing drywall to walls;
- laying and leveling the screed.
A flat scan laser is suitable for these tasks. In most cases, the desired plane cannot be lined up directly along the beam. But you can install point beacons, on the tops of which a light line will be displayed. Another way is to use a measuring stick.
An example of using a measuring rod when laying screed.
- Place the level in a position in which it will remain until the end of work.
- Make a measuring stick of a suitable length, convenient for work.
- Place the measuring rod vertically, with the lower end in the position of the designed height of the screed.
- Turn on the level and make a clear mark on the staff where the beam hits.
- Check the height of the screed with a rack: if the mark is above the light line, lower the screed in this place; if below, add the mixture.
Slanted markings
There are many jobs that require orthogonal markings, but not vertical-horizontal, but inclined at an arbitrary angle. These are cases of installation or finishing of staircases, diagonal laying of tiles, marking or finishing along the attic roof.
To obtain an inclined cross, you just need to tilt the level to the desired angle. Before doing this, you need to lock (catch) the auto-leveling system to firmly fix the laser planes and turn off the tilt alarm. Lines are usually aligned to certain objects (stairs) or to existing markings and complement it.
Rotary levels for geodetic work
Any construction requires serious preparatory work from a professional. First of all, this is a thorough study of the topography, existing communications and other features of the future construction site. For example, to ensure that hidden problems are not revealed during the pouring of the foundation, or to install windows or doors accurately and accurately. A rotary laser level will help you make markings, take measurements and perform geodetic work .
| Unlike a linear device, a rotary device projects a plane by rotating the LED, and not through a prism. Thanks to this, the measurement range is several times greater. Plus the projection goes 360°, and not just on one side. The device costs much more than a point or linear device, but it is indispensable in professional construction. |
The number of rays and their direction are considered differently. The device has a rotating rotary head. The result is a sliding line that is projected 360°. There may be more than one such line. Many modern models produce both horizontal and vertical beams.
The permissible error is in the range from ±0.1 to ±0.2 mm. Select a device with the highest possible accuracy. Then it will not lead to errors in readings.
Measurement range – minimum 50 m, maximum 600 m. The device is intended for professional use at large objects. Therefore, the range of work plays a big role.
Power type – choose battery-powered devices; batteries will have to be constantly changed. And pay attention to the operating time on one charge. From 8 to 10 hours will be the optimal solution.
The device is indispensable during construction work: from pouring the foundation to setting the exact position of the roof slopes. Useful when installing suspended ceilings, doors or windows.
Step-by-step photo instructions for leveling with an optical device
To properly install and configure an optical level, we will need: the level itself, a tripod and a measuring rod.
How to set up a tripod
The main task when installing a tripod is to maintain the correct horizontal base.
| Illustration | Description of action |
| We take out the tripod, fold back the clips, and extend the tripod legs to the height we need. Each of the three legs, thanks to special sliding sliders, extends and is tightly fixed at the required height, and the difference can be either significant or insignificant. We fix the height by clamping the clips. | |
| In order for the tripod to be fixed as rigidly as possible in the ground, we need to press a special footrest with our foot. | |
| We take the level out of the box, place it on a tripod and fix it to the base using a special fastening screw. |
This design allows you to install the level on a tripod evenly, firmly and steadily even on a bumpy surface.
Installation and adjustment of the level
Illustration Description of action
To level the level, we rotate it so that two lifting screws are to the right and left of the device, and the third is located on the front of it.
By rotating the two side screws in opposite directions, we ensure that the air “bubble” is located on the central axis of the level mark.
Now we begin to rotate the screw located on the front of the level and move the air bubble already in the vertical level of the device
When setting up each subsequent bubble level, pay attention to how the previous one behaves.
Setting the device focus
Before you start working with the device, you must correctly focus the optics. Each person adjusts it to their own vision. The stages are as follows:
| Illustration | Description of action |
| We ask your partner to stand with the staff on the first measured point. When taking measurements, the staff must be kept strictly vertical. To do this, we focus on the bubble level that comes with the level. | |
| And now, using the collimator, which is located in the upper part of the level, we aim at it. |
Measuring and recording values
When the device is installed accurately enough, focused and level, you can proceed to measuring data and recording it.
| Illustration | Description of action |
| We adjust the level until we can clearly see the checkers. We look at where the horizontal strip of threads is depicted on the rail. This is our first countdown on the staff. | |
| We record the data. | |
| After this, we measure the next point according to the same principle as the first. We record data and compare indicators. Thus, we know exactly which point is higher and which is lower and by how much. |
Additional options to consider
Now we know about the main technical characteristics of laser levels. What additional options will be useful in your work? What else affects task completion?
Self-leveling. The device reacts to any displacement from a level position and produces a signal - an audible signal or a flashing beam. This way the user understands that it is necessary to return it to its original position. This function is found in many levels, both domestic and professional. Note that the ability to disable the self-leveling option will also be useful. This is useful for creating markings at an angle.
Self-shutdown. If you do not use the device for a while, for example, 15 minutes, the device will signal or turn off on its own. This will save energy and will be useful if you forgot to turn off the equipment.
Dust and moisture protection. Find out the protection class of the device. After all, if it rains or snows outside, the device must be reliably protected. And not only from moisture, but also from dust, dirt and sand. For professional levels, this indicator should be at least IP54.
Examples of laser levels
We present in the table several models for domestic and professional use. Choose the right device!
| Models | Specifications | ||||||
| Number of rays | Error, mm/m | Measurement range with/without receiver, m | Power type | Self-leveling | Protection class | Sphere | |
| Enkor UL-5 | 1 | ±2,5 | 30/– | 2 AAA batteries | No | — | For household use |
| RGK LP-64 | 5 | ±0,2 | 10/– | 3 AA batteries/rechargeable batteries | Eat | IP54 | For repair and construction work |
| DeWALT DCE0811D1G | 2 | ±3 | 35/60 | Battery | Eat | IP65 | For geodetic work |
Carefully hung wallpaper will delight you. Children will have fun running on the flat floor. And the house you build will last for decades. A laser level will help you avoid additional investments and remorse. On our website you will find a device for any job. Which one will you choose?
Source
How to choose a laser level or level for home and renovation?
Eldoblog tells what a laser level is and which one to choose for your home, renovation or construction.
Operating principle
The building level helps control the verticality and horizontality of structures, on which the stability and durability of the building depends. It shows whether there are errors in the construction or repair of the floor, ceiling or walls. This is important when finishing - installing beacons for filling the floor, installing plasterboard sheets or laying wiring through grooves (grooves) in the walls. The level is even used when laying automobile and railway tracks, installing bridges and overpasses.
A laser level is more convenient than hydraulic systems or rope plumbs. Unlike them, it takes up little space and can be set up in seconds. Even 30 minutes will be enough for you to build lines and planes, the length of which reaches tens of meters. In classical instruments there is also a limitation on measurements - 2-3 m. Some levels can set a specific angle of inclination - 15, 30, 45 or 60°. This is necessary for working with arches, vaulted ceilings, roofs and other similar structures.
A laser level is often called a level, but this is not entirely true. A level measures the difference in height between two points, while a level simply creates a line or plane. In everyday life such a name is acceptable, but for capital construction you need a level.
Leveling mechanism
To know how to choose a laser level, you need to understand exactly how vertical and horizontal planes are constructed.
Manual
After installing the device, you need to adjust it vertically and horizontally using the adjustment screws. This is done using small bubble levels in the base. Preparing for work takes about 1.5–2 minutes. The error depends on the skills of the builder and even visual acuity. But laser levels with manual settings are the most budget-friendly - from 1000 rubles.
Magnetic
The laser emitter is suspended on a pendulum that swings to the sides. It is stabilized by the planet's gravity. Setting this level after installation takes only 10–15 seconds. The error does not exceed 1.5 mm per meter. The cost of the device is from 2500 rubles.
Electronic
Measures the deviation of the laser level axis from the center of gravity. This design allows for maximum accuracy - up to 0.05 mm per meter. Electronic levels are adjusted in 5-10 seconds. However, they are bulky (more than 10x10x10 cm) and heavy (up to 1.5 kg). Their cost is from 5,000 rubles.
Projection method
Linear
When it comes to buying a laser level, which one is best for DIY repairs? Definitely a linear model. It projects a line ranging in length from a few centimeters to a couple of meters. Such devices are ideal for cutting grooves, pouring screed and laying bricks. They build lines in only two projections - vertically and horizontally. Cost - from 2500 rubles.
Spot
Projects 2-5 points in one plane. In its design there is no prism that builds a line. Therefore, the beam can be directed up, down, straight, back and to the sides. Top models project points in 5-6 directions and diagonally. Cost - from 5000 rubles.
Rotary
It works only in one plane - horizontal. Rotational levels allow you to build planes at a large distance - 50-1000 m, which depends on the power of the emitter. They weigh up to 3–4 kg and cost from 10,000 rubles, so they are in demand among professionals.
Main characteristics
Maximum range
For independent repairs in an apartment, 15–20 m is enough, and for a house - 50 m. In construction, levels with a range of up to 150 m are used. At a greater distance, it is impossible to see a point or line - then highly sensitive receiving antennas come to the rescue.
Error
When pouring the foundation of a private house or working with a rough screed, deviations of up to 1.5–2 mm per meter are allowed. When finishing work, it is better to focus on a figure of no more than 1 mm per meter. When constructing a plane over a long distance, the errors add up, so you need maximum accuracy - less than 0.5 mm per meter.
Number of rays
Alignment in two planes is suitable for the house - vertical and horizontal. In professional construction, the number of rays increases to 4–5 - they can be projected up, down, back and to the sides. Top models show dots and lines with a fixed slope and diagonally.
Plane construction angle
For leveling furniture and decor, 30° is enough, for finishing work - 60°, for cutting grooves and laying pipes - 90°. When pouring screed, installing concrete structures and laying bricks, you may need a half-plane - 180° or a full plane - 360°.
Power supply
It is better to take models with a battery - it charges in 2-3 hours.
Mounting type
Household appliances are placed on any flat surface. For construction, you should choose a laser level with a tripod socket. Compact models weighing up to 300–500 g use a 1/4-inch thread, and heavy ones (from 0.5 kg) use a 5/8-inch thread.
Safety class
To find out how to choose a laser level, pay attention to the power of the emitter. Grade 2 is completely safe for the eyes. Safety glasses are required when working with class 2M laser levels. If you look at their rays for more than 5 seconds, a burn will remain on the retina. Class 3R levels project beams over a distance of more than 150 m. If they are used on a construction site, all people within range must wear goggles and protective clothing. 30–40 seconds is enough for the beam to leave a slight burn on bare skin.
Battery life
The simplest models costing up to 2,000 rubles project rays and dots for an hour. Middle-class devices from 5 thousand rubles - up to 2.5-3 hours, and levels from 8-10 thousand rubles - up to 5-7 hours.
Protection class
Pay attention to the temperature regime. Available levels costing up to 2.5–3 thousand rubles can only work in heated rooms - from +10 to +40°. In an unheated building, the range should be wider - from 0 or −10°. Some construction projects do not stop even in winter. They require levels with an operating mode from −20 to +50°.
Equipment
A tripod will make it easier to install and adjust the level. The cover will protect the device from dust and splashes of water, and the hard case will protect it from shock during transportation. A laser tape measure (rangefinder) will help you perform all the necessary measurements and calculations on site. A contrasting color target will improve the visibility of the beam at a distance of more than 10 m.
Laser level: how to choose a model for your home or construction site
For DIY repairs
A linear level with two planes - vertical and horizontal - is suitable. It is best to choose a device with a magnetic stabilization method. Its error is up to 1–1.5 mm per meter, projection range is up to 20 m, battery life is from 1 hour. The cost of this model is from 2000 rubles.
For finishing work
you need a linear level with electronic stabilization, giving an error of no more than 0.5 mm per meter. The projection range may not exceed 15–20 m. What is more important is the beam angle - from 90 to 180°, as well as battery life - from 2.5 hours or more. Cost - from 5000 rubles.
For the construction of a private house
, extension, bathhouse or barn, you need a more powerful point level capable of projecting the beam up and to the sides. The error can reach 1.5–2 mm. Range - at least 50 m. Battery life - from 2.5 hours. Price - from 5-6 thousand rubles.
At large sites
use rotary levels powered by batteries. They project a beam over 100–150 m with an error of up to 1 mm per meter. Such devices are expensive - from 10,000 rubles.
Source
Laser level Bosch PLL 360
The second on our list is a laser level from Bosch. On sale this level is presented in two sets of configurations. In the first one, it comes with a collapsible rod. The second option is a level with a magnetic holder. This holder securely fixes the device on any vertical metal surface. Both models come with a nice fabric case.
In terms of characteristics, this copy is not inferior to the previous device. Its beam range is the same 10 meters. But, given its 360-degree horizontal plane coverage, it easily expands to 20 meters. The reading error of this level is 0.4 mm/m, which is quite good for its price. This device is powered by 4 AA batteries, this is due to the projection radius of 360 degrees.
Another distinctive feature of this level is the minimum distance from the top edge of the device to the beam of the horizontal plane. But with all its advantages, it also has a small drawback: large dimensions. Even compared to the Stabila Lax 50, it is quite massive. In addition, this is the “green” Bosch series, aimed at beginners and semi-professionals. It is not so resistant to falls and long-term use, and the appearance of errors in readings after a couple of years is an established norm for it. But it is not bad for aligning mortgages for lamps and chandeliers in one plane
- Minimum distance from top edge to plane
- 360° horizon coverage area
- Convenient magnetic stand
Video on the topic:
Fast, simple, precise: laser levels for interior finishing work
The box placed under the roof is, in fact, only the skeleton of the future house, and it will turn into a comfortable and presentable housing during the interior work. And this stage requires significantly more money, and often more effort and time, especially if the construction is carried out independently. The pace of work is greatly influenced by the technical base - with a good tool you don’t have to spend extra time on preparation and compromise between speed and quality. With the participation of a BOSCH specialist, we will look at why both professionals and private owners choose high-tech measuring equipment - laser levels.
Content:
Why do you need a laser level?
The basis of most operations, whether when laying communications or when roughing and finishing the interior, is accurate marking. Relatively recently, not even all professionals used laser measuring tools, and from a private trader one could only find a bubble level, a rule and a tap, or, at most, a hydraulic level. And although these simple devices are quite functional, their use is far from convenient, and all the tricks for finding and fixing the desired angles, lines and drawing planes waste a lot of time, effort and nerves.
Time is one of the most expensive resources; it is inappropriate to spend it on “dancing with tambourines” when you can use a laser level and in a few minutes prepare for installing a window or door block, leveling walls, pouring screed, laying tiles or installing frame partitions. It is important that the laser beam will not be erased or deviated and will help control the accuracy of the work until the very end without additional manipulations.
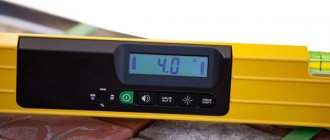
How to determine the error of a laser level - measure seven times...
Error is an important indicator, without which it is impossible to make accurate markings. The magnitude of the deviations is often indicated in the instructions for the tool. It is taken into account and a tool with a permissible deviation from the norm is selected. Regardless of the type of work being carried out, before starting you should definitely check the laser level for accuracy. The procedure is simple and does not require much time, so there is no reason to avoid it. It will save you from working with a faulty tool. How to correctly check the error of a laser level using the FUBAG CRYSTAL 20R VH as an example:
- Install the laser level so that it is at a distance of up to a meter from the wall and more than 2 meters from the opposite (parallel) wall.
- Turn on the laser level and fix the marks on two parallel walls using a marker or pencil.
- Carefully move the device to the far wall.
- Align the beam with the marked point and project to the opposite side.
- Does it coincide with the previously noted position? If “yes” - the instrument error is insignificant, “no” - the error is high.
Experienced craftsmen often use adjusting screws to reduce deviations. However, without the proper skills, you should not do this yourself, so as not to damage the measuring device. After checking that the deviation is within normal limits, you can proceed to work.
What is a laser level
A laser level is an optical, electromechanical instrument that projects points, lines and planes onto a surface with a clear horizontal, vertical or specified oblique orientation. Designed for a wide variety of external and internal construction work on measuring and marking surfaces with an accuracy of a fraction of a millimeter. Its use greatly simplifies all marking activities and reduces the time spent on them (up to 60%). Household and professional laser levels are divided into four categories.
For interior work, linear laser levels or combined laser levels are used, with the projection of beams and points - this is the optimal combination of functionality and cost.
The simplest point level will not be enough for all operations, and a rotary level is redundant.
Using combined laser levels that project lines and points, you can perform the entire range of standard finishing work. The combination of the precision of laser lines and the practicality of plumb points gives the versatility of one device for horizontal alignment and checking the correct installation of window and door units or the evenness of walls, as well as transferring points from the floor to the ceiling. And the self-leveling function in these construction lasers makes working with the tool as easy as possible, ensuring accurate results.
Laser level for the floor: rules for working with the device
Before you start pouring, you must make the following settings. The device is installed in the middle of the room and the level of constructing horizontal planes is turned on. A line will immediately appear on the wall, indicating future markings.
The laser beam will also be reflected on any object placed in its path.
Using a ruler, you can easily find the most protruding or recessed part of the room. This data is used to determine the level of the screed on the floor. Knowing the required height, beacons are installed. Then, after finishing the work, you can use the device to see whether the screed is made correctly and whether there are any unevenness on it, and if there are any, then level it.
Advantages of a laser level with a green beam
The laser level uses a powerful laser diode as a radiation source; initially it was only red in color with radiation in the range of 635-670 nm. And for quite a long time there was no alternative, but several years ago levels with a green beam appeared on sale. Their main difference is greater efficiency - under equal conditions, the green beam is visible better, which allows you to work unhindered in bright sunlight. Considering that the majority of construction projects occur during the summer season, good visibility of the beam in a sunny room is a necessity. But there is a rather significant nuance - the energy efficiency of the tool.
This is how it always happens: everything is beautiful in theory, but how is it in practice?
In eight years of close work with laser devices, I have not come across a single energy-efficient linear level with a green beam. When compared, two similar crosses, one green, the other red, differed by 2-3 times in energy consumption and price, and as you might guess, not in favor of the green one. At the same time, on the street, even a green laser still needed a receiver. Therefore, I doubt that the game is worth the candle.
Indeed, a similar problem exists, but only when the green beam is simulated and not generated by a green LED.
It has been confirmed that, all other things being equal, green is better perceived by the human eye. This is not a specific feature of levels with a green beam, it is a feature of the structure of our eye and the waves that we catch. We offer our clients a choice between a red and a green beam, depending on the tasks they face and the conditions in which they work.
I would like to note that some companies practice old technology, selling it for a real green diode, which the portal participant may have become a user of. Older green beam products use color conversion technology that generates a green laser beam from the emission of a red laser diode. In simple terms, the beam of such a level is colored green only due to green-colored glass.
We recommend purchasing products with a true green laser diode, which improves performance, improves reliability and offers better laser line visibility. This technology is certainly more expensive, but at the same time more effective in all respects.
And this is the opinion of not only experts.
Levels with a green beam do not have any light filters and there is nothing red. There, an 808 nm diode IR laser pumps a 1064 nm neodymium solid-state IR laser, and then a nonlinear crystal converts that 1064 nm infrared into 532 nm green. The efficiency of this whole thing ultimately turns out to be not much worse than that of a red diode laser (with an important amendment: if the crystals are of high quality, which is not always the case with the Chinese). And taking into account the fact that the sensitivity of the eye to 532 nm is 4 times higher than to 635-660 nm of red diode lasers, green is many times more effective at equal brightness.
Choosing a laser level: comparison of several popular models from Aliexpress
What to look for when choosing a laser level (level)? In the article you will find answers to questions and examples of current models, as well as methods for checking for accuracy, examples of configurations and functionality. A correctly selected laser level will ensure quick “tapping” of the level of walls and ceilings during repair and installation, will greatly simplify your work and save you time. The operating principle is based on a self-leveling magnetically suspended pendulum. Typically the self-leveling angle is 3...4°. On the pendulum itself there is a system for projecting mutually perpendicular planes, based on laser emitters and prisms that unfold the beam. There are levels on 2 or more planes: one or more horizontal, one or more vertical planes. Installation of the laser level is allowed both on a flat surface and on a tripod (with 1/4″ or 5/8″ thread) or magnetic suspension.
Greetings, dear friends. It became possible to compare several current models of laser levels that were purchased at different times. Reason: the appearance on sale of an updated model of the level from GROSAM - an advanced device with two vertical planes and two horizontal ones (one main plane and one auxiliary). The model is in stock (choose “Express delivery”), with a rich set of equipment. The delivery includes: the level itself, a case for storage and carrying, two lithium batteries, a charger for them, a magnetic bracket, a profile bracket, a microlift, and a remote control. The scope of delivery of the level is quite an important point. Recently, richly equipped models have become available at regular prices. Not everything offered is useful. On the other hand, you won’t need to run around and look for additional fasteners if you already have them included in the package. And the organizer case in which all this will be stored is very important, especially considering the fragility of the device’s lens system.
As I said above, GROSAM has a magnetic pendulum installed inside, which allows for alignment of the planes within a range of ± 3°. For projection, 4 prisms are provided that turn the laser beams into a plane. A total of 4 planes are projected (2V2H). It is possible to work with a fixed pendulum (switch on the body), which is used to project inclined planes, for example, using a rotating tripod.
A special feature of this model is the presence of an additional horizontal plane, which can be used when installing parallel profiles or tile borders.
Control is carried out both from the panel and from the remote control. You can separately turn on and off horizontal and vertical planes.
An example of packing a kit in a case: everything is laid out in its own compartments, nothing is loose inside. When choosing a level, pay attention to the thread for mounting on a tripod or suspension. This is usually 5/8″ for large building levels. To work with conventional photo tripods, you need a level with a 1/4″ thread. However, GROSAM already includes a suspension with a magnetic mount, which is convenient to install on the profile, as well as a spring clamp directly on the profile.
The microlift allows you to achieve high accuracy of height installation. GROSAM comes with a compact, simple metal microlift.
For example, the previous (compact) GROSAM model included a plastic elevator. In principle, this one works, too, but metal is more reliable in rough use, for example, when installing tiles in the bathroom, there is a risk of the adhesive solution getting on the level itself and its suspension.
The remote control allows you to switch planes directly during operation, on an already installed level, without touching it or changing the setting. Very convenient, especially if you are busy. Turning off unnecessary planes saves energy, extending battery life. By the way, recently levels have become available equipped with a rechargeable lithium battery, which is much more convenient than working from a mains power source or constantly changing batteries.
The level's power consumption is quite decent (several powerful laser LEDs), and a set of AA batteries can be used up in a few hours. In this regard, the two batteries included in GROSAM ensure almost continuous operation over a long period of time.
A few words about the projection scheme. The image below shows a schematic diagram of the projection of two (vertical and horizontal) mutually perpendicular planes. Modern laser levels have 3 planes (12 lines) or 4 planes (16 lines).
Upon receipt of the laser level, we must check the functionality and projection of all declared lines/planes in order to avoid defects. It happens that during delivery the device may be severely dropped, the settings of the emitters may be lost, or the factory settings may be initially incorrect (this is typical for budget Pracmanu and other “no name” devices - don’t save money). In this case, the check is performed with a simple plumb line, after the level has self-leveled.
Another interesting point. Depending on the model, the laser beams projected by the device may differ. Better quality are levels with green spectrum emitters 510...530 nm. But more common levels are with red spectrum emitters 630...640 nm due to their low cost. It is with red lasers that cheaper optics are more often found, producing a wider beam. It is possible to work with a wide beam, but it is inconvenient, since the error value increases at large distances. To check the accuracy, you can measure the width of the projected beam at a certain distance, for example, 4-5-10 meters from the installed level. For example, a width of ± 3 mm at a distance of 10 m is considered a good indicator. Closer it may be less (~ 2 mm).
I usually have several proven models of laser levels on hand. One of these is the previous generation from GROSAM, a compact model of a laser level on 4 planes, lithium batteries and with good equipment. Both models are in stock from the supplier (with “express delivery”).
I carried out most of the profile installation with an advanced model of the SW333G level from SNDWAY. A detailed review and testing can be found at the link: Laser level-level Sndway SW333G: high-power green laser, self-leveling, 12 lines. Unlike GROSAM, this SNDWAY model has fewer prisms, but is somewhat more compact. The advantages of both models are increased emitter power and, as a result, a decent projection range of planes.
The tool bag contains a compact model of the laser level SNDWAY SW311 - a simple level on 2 planes (1H1V), with a minimum of settings, and runs on 2xAA batteries. The SNDWAY SW311 level is available in two versions: red SW311R and green SW311G. The photo shows just a green model, or rather a model of a level based on laser emitters of the green spectrum. A detailed review of the green model SNDWAY SW311G is available here.
By the way, the brightness of the laser beam affects when working in a brightly lit room, or in large areas, when the beams noticeably weaken at a great distance. In such cases, special targets are used that increase the projection contrast. The targets for the red and green laser beams are different.
Since we are talking about red laser levels, I will give an example of one model with red laser emitters in the range of 630...640 nm. The photo shows an old model from LOMVUM - a common “Chinese”. This model is no longer sold, but there are similar ones, for example, Deko or Pracmanu. This is a fairly budget option, suitable in cases of “so that you don’t mind.”
Due to the nature of vision, the green beam appears brighter and has more contrast on the surface.
The difference is especially noticeable at a considerable distance from installed levels. In bright sunlight, the red beam dims noticeably faster than the green beam. Given the similar prices, I don’t see any point in choosing levels with red emitters, unless for a specific situation.
A couple of usage examples. The photo shows the SNDWAY level installed on the supplied bracket. As I said above, the bracket is magnetic and is installed on a metal profile without unnecessary movements. For other cases, you will need to mount it on the wall.
A laser level allows you to quickly mark the level in a room on all walls and ceilings, mark beacon points, and evaluate the quality of work performed. Such a device is much more convenient than a plumb line, bubble or water level. As an example, assessing the angles of finishing (wallpaper, tiles).
In general, the new generation of laser levels from GROSAM turned out to be very convenient to work with. When compared with similar devices from SNDWAY, GROSAM turned out to be no worse in quality, but noticeably cheaper, especially with the discount code: GROSAM500 . And if we compare with models of other brands (Pracmanu, Deko), then GROSAM clearly wins in terms of build quality, projection accuracy and the equipment supplied in the database. I liked that the basic package comes with two batteries at once - it’s really convenient and you don’t have to worry about where to find a spare one. It's up to you to decide whether to take it or not. For myself, I concluded that such a level is a very useful thing at home, even a simple (1V1H) model will help out when you need to quickly “beat off” the horizon and hang a shelf/bracket, etc.
You can find other reviews and tests of smartphones, tools and gadgets in my profile and on the links below. Thank you for your attention!
Tips for choosing a tool
Laser levels are presented on the market as widely as possible, both in retail and in online stores, which often only complicates the task of choice. And a typical question asked in profile threads on the forum, with minor variations, looks something like this.
We are going to do major renovations in our house, we need to buy some additional tools, in particular, a laser level. We are planning: leveling and cladding/painting the walls, installing spotlights on the ceiling, installing frame partitions, remodeling the stairs to the attic. What level would you recommend taking into account the scope of work?
The tasks posed are quite typical, so in this case I would recommend a level that projects a laser cross, has plumb points and a tilt function.
Now let’s take a closer look at each of the functions and why they are needed.
Projection of mutually perpendicular laser lines – allows for both horizontal and vertical alignment indoors. Also in some models it is possible to adjust the number of laser lines depending on what is your priority at the stage of work being performed.
Projection of plumb points is a function that significantly expands the functionality of the level. The points are used as a laser plumb line and allow you to check the correct installation of window blocks, doorways or the evenness of walls, as well as transfer points from the floor to the ceiling, for example, for marking for lighting. How it works? Making markings on the floor is much easier than on the ceiling, agree. Therefore, to install spots with a certain pitch, you make an initial marking on the floor, after which, by setting the lower plumb point of the level to the mark, it will automatically project the upper one to the desired place on the ceiling.
For tasks such as installing stair railings, the level should have a function for projecting lines in an inclined position. The laser level will project a line at the desired angle, which will allow you to install railings or other operations that require constructing an inclined line.
When purchasing a level, the specialist recommends paying special attention to the accessories it comes with.
Very often, a user who is just deciding to buy a level pays attention exclusively to the instrument itself and, given the equal functions of the two levels, often makes a choice in favor of the most budget option, believing that the difference in price is due only to the presence of the brand. In fact, holders in professional levels are the key not only to fast and high-quality work, but also to saving your nerves. When developing accessories, our design engineers pay no less attention to mounts and turntables than when creating the laser level itself.
Simplicity and ease of fastening, safe placement of the tool on metal profiles under the ceiling or on the wall, the presence of a rotating platform that allows you to change the position of the laser lines without moving the level relative to its original location - all this not only ensures maximum accuracy of the work performed, but also makes the work enjoyable and maximum effective. Nowadays, wasting time is an unaffordable luxury, so choose only high-quality tools for yourself.
Participants of our portal also advise taking service into account - the presence of service centers makes life easier if the device fails during the warranty period. And naturally, the longer the guarantee and the more cases it covers, the better.
Most models of laser levels from our company are covered by a special “Super Warranty” service (in addition to the existing 3-year warranty): in the event of a breakdown of the instrument (even if there is mechanical damage), the user will have the level repaired free of charge. Or they will exchange it for a new one when you contact an official service center within the first year after purchase. This service is free and operates automatically after purchase.
How to properly use a laser level for various purposes
A level can be called a very useful thing in the household. You can use it for any purpose related to the design of your home, from building a house to decorating.
Alignment of walls
The biggest challenge when renovating a house is leveling the walls. Here he can cope with any problems flawlessly. To do this, you need to direct the beam along the wall.
Then take a ruler and place it perpendicular to the emitted line. Using the measuring scale, look carefully at which of these points there is a deviation from the norm. After this, you will calculate the required layer of material required to level the wall.
How to use a laser level to level a floor
To level the floor, using a laser level, as for walls, is extremely simple.
It is important to level the tool from the very beginning, then turn on the horizontal line and mark its extreme points. Then turn the device and do the same across the entire floor plane, connecting the points to each other. After this, you will have a perfectly even straight line ready, which will show the height of the required report or fill of material.
- Floor
9 materials for leveling the floor for finishing
Wallpapering
The device will also be useful when wallpapering rooms. The vertical beam will help to perfectly align the joints, and the horizontal beam will be necessary for gluing borders or other decorative elements. You can also use it to check the quality of the work that the construction team has done for you. If any deviations are identified, you may request that the wallpaper be re-pasted or the cost of the services provided be reduced.
Furniture installation
Foter
The bubble leveler and all kinds of rulers have long become irrelevant in this matter. Modular furniture is a very complex design that requires a lot of calculations.
Therefore, to ensure that your shelves and cabinets are level, create a horizontal laser line. Now, focusing on it, you can attach everything you need to the walls.
Redevelopment
Redevelopment of rooms can also be easily done using a level. It helps to evenly install metal profiles for attaching drywall. To do this, you need to install the device so that it projects vertical and horizontal lines on the floor, walls and ceiling where the future partition will be located.
Construction of the foundation
In this case, using the installation, you can build a vertical along which the monolithic frame will then be erected. After the final measurements, in addition to the vertical beam, adjust the horizontal one. It will show on the walls the height to which the concrete mixture needs to be poured.
Laying tiles
The level helps to position the tiles at a strictly right angle.
Unsplash
To do this, turn on the cross plane construction mode. The radiation is converted into a grid, where the center of the crossed lines coincides with the center of the seams between the tiles. Next, use the guide strips to align each side of the tile.
Inclined planes
All modern devices have the ability to disable automatic alignment. In addition, in some models you can change the beam angle or lock the compensator. After you install the device at the required angle, you will receive inclined laser lines.
Laser level ELITECH LN 360/1
Conclusion
Laser levels are high-precision measuring equipment that simplifies and speeds up marking and finishing work, as well as improving their quality. And laser levels with a green beam also provide the ability to work in bright daylight without overvoltage.
The forum has a whole section dedicated to measuring equipment, where you can find useful information, ask questions and discuss different types of instruments. One of the most popular types of flooring is porcelain stoneware, the installation of which will be made much easier with a laser level. The video shows interior solutions for a cube house.
Source