Angle grinders (angle grinders, angle grinders) under the German brand Bosch are distinguished by high quality, reliability and durability. The main competitive advantage of Bosch angle grinders lies in the widespread use of innovative technologies in the manufacture of the product.
But German quality cannot resist Russian negligence. Incorrect use of the tool, untimely replacement of lubricant, carbon brushes, bearings leads to tool failure.
In order to repair a Bosch angle grinder, you can go in two ways: take the angle grinder to a service center or repair the Bosch angle grinder yourself.
The first option is more expensive and not always of high quality. The second option can only be implemented if the consumer has a strong desire to figure everything out on their own.
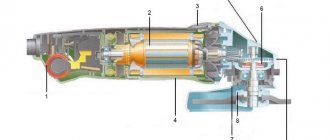
The Bosch angle grinder diagram will help you carry out the repair yourself.
Bosch grinders are conventionally divided into low-power ones up to 1000 W, and powerful ones over 1000 W and are marked GWS 7-125, GWS 20-230 or others.
Deciphered
The first number 20 or more indicates the power of the instrument is more than 1000 W. The second number 230 certifies that this is the maximum diameter of the cutting wheel.
The first number up to 20 indicates the power of the tool up to 1000 W, and the second indicates the maximum diameter of the cutting wheel up to 125 mm.
What are the reasons why an angle grinder fails?
The grinder has a mechanism that bears the heaviest load - the rotor. It is also called an anchor. The damage it suffers is varied. These include temperature loads, electromagnetic, and, of course, mechanical problems.
As a result, do not be surprised that the angle grinder does not work precisely because the rotor is faulty. The armature winding overheats and burns out, this will cause a short circuit. So many owners of this tool often carry out all repair work themselves.
A worn commutator causes increased vibration in parts such as brushes. They burn, causing the mechanism to spark strongly. The main function of such brushes is to transmit current to the commutator.
The bearings in the rotor wear out very often. If you do not carry out timely diagnostics and prevention of bearings, they are completely destroyed. If during operation of the angle grinder you hear a noise that was not there before, be sure to check the condition of the bearings.
The stator is a stationary component in an electric motor; it contains a winding. The angle grinder very rarely breaks directly because of the stator.
The gearbox is responsible for rotating the gear . It needs to be cleaned and lubricated on time.
Most often, brushes are changed in a grinding machine, because the basis for their manufacture is graphite. Replacing these parts is not difficult.
How to remove a bearing from a power tool armature: some practical tips
Today, many home craftsmen and professional craftsmen have a whole arsenal of power tools that help them cope with household and repair and construction tasks. Hammers, jigsaws, grinders, drills - all of them significantly simplify and speed up work. However, it happens that a power tool breaks down. Don't rush and throw it in the trash because of this. Due to intensive use, parts wear out, and therefore the equipment cannot operate in normal mode. If you know how to remove
bearing from the armature of a power tool, you can extend the life of your “assistant”. Timely replacement and lubrication of parts allows you to operate the device for a longer time.
The main task of the motor of a power tool. this is rotation. The armature is the important part of the device that causes the working mechanism to rotate. The service life of the part depends on the power and rotation speed, as well as the activity of using the equipment. To reduce friction during the movement of parts, bearings are needed. They ensure smooth rotation and improve the running of the working mechanism of the power tool. If you take care of the bearings and lubricate them in a timely manner, their service life increases several times.
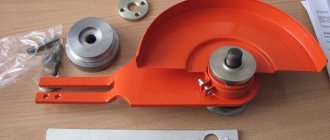
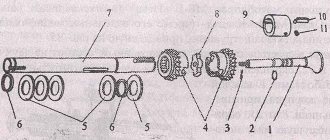
How to disassemble an angle grinder and remove bearings. Step by step steps
After disassembling this device, you can replace broken bearings, re-lubricate all parts, dismantle damaged brushes and install new ones.
In order to separate the rotor and stator housings, it is necessary to first remove the handle housing in the machine. This is done so that it is possible to remove the carbon brushes. They hold the rotary manifold.
The second step is to unscrew the four screws that secure both housings - rotor and stator.
Take out the gearbox along with the starter and start disassembling it. There are also screws on the gearbox that need to be removed. There are four of them in total. This procedure will require some effort on your part, since the factory assembly involves the use of sealant.
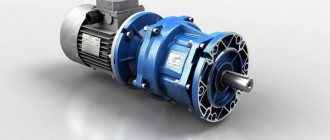
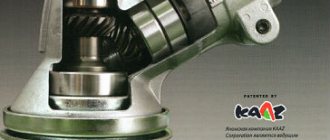
Grinders of different models have different types of gears. In low-power models, spur gears are used. With a power of more than a thousand watts - the use of helical gears.
Once you remove the gear cover, you will be able to remove the assembly that houses the helical gear. To remove it, use a press or puller.
To do this, you will have to use special thin tubes. For this reason, it will be inconvenient to use the puller.
Before removing the gear, it is necessary to check the play in the gear connection. Also check that all teeth are intact. And the contact patch is checked.
If you have identified the following signs in a bearing that is located on the spindle shaft:
Replacing the bearing in a HITACHI G 13SS2 angle grinder
- when you scroll it, a characteristic noise is heard;
- noticed the appearance of backlash;
- no lubrication.
If all these signs are present, it is necessary to replace the old part with a new one. To do this, the bearing must be removed. How to do it?
First of all, remove the gear along with the retaining ring. After this, you can easily remove the worn element. When you remove the rotor shaft assembly, the bearing may remain in the gearbox, inside the housing. In this case, use a hammer with a soft tip on top.
To remove the drive gear in an angle grinder, do the following:
- clamp the rotor, unscrew the nut with an open-end wrench;
- the washer is removed;
- Now take out the gear itself.
After checking the appearance of the gear, decide whether this part needs to be replaced. Keep in mind that both gears need to be changed at the same time.
Low-power angle grinders are equipped with a needle bearing, which serves as a support bearing.
Dismantle this part only when it is completely destroyed. There is a proven way to remove a destroyed clip.
1.Choose a tap diameter larger than the inner diameter of the cage.
2.Place and secure it into the screwdriver chuck. Gradually, at low speeds, tighten it into the cage. When the tap hits the housing bottom in the gearbox, the cage will rise.
The rotor shaft has two more bearings, in addition to needle bearings. To remove them from the rotor, I would recommend using a puller.
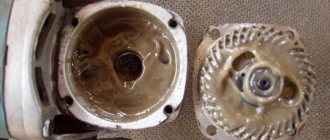
The bearing attached to the manifold is quite easy to remove. The impeller is also equipped with a bearing, which will take a little more time and skill to remove. Both bearings are covered for protection with special rubber caps.
To remove and replace these parts, the nuts are unscrewed, the spur gear is removed, as well as the plastic protection. You can now freely remove the bearing from the rotor shaft using a puller.
If you don't have a puller in your tool kit, there is one method, take note of it. Remove the bearing with a vice along with two metal strips and a hammer with a special metal attachment.
Bulgarian, don't growl!
I’ll tell you a secret - everything in this blog made of iron was cut with one single grinder, my favorite Hitachi G13SR3.
Today I already have three of them, separately for stripping and cutting, but I started with one, and let’s talk about it: Small, light, with quite sufficient power for my tasks, it did just about anything, it didn’t cut anything, and in whose I haven’t been in my hands but... But nothing lasts forever under the sun and recently the machine began to make some unnatural sounds that tended to intensify. I decided to open it and make a defect before the gearbox finally jams and chews, after all, a correct rebuild is always preferable to replacement