Types of cartridges
Drill chucks differ in barrel size. The designs of individual models themselves are also different. In total, there are 7 types of fittings for drilling tools.
Cam type
The collet design is highly efficient. Chucks can be used to secure hex or cylindrical shank versions. The rotation of the clamping sleeve or sleeve is carried out on the surface. The cams are threaded together. Steel for the manufacture of spare parts must undergo heat treatment. Inside the mechanisms, cams move clamping couplings. Toe-in is accomplished by moving the adjusting wheel.
Key
A common type of clamp. Tightened with a separate key. It is quite durable. It's inexpensive. The key clip lasts much longer than other types. Disadvantages of this type:
- longer drill replacement procedure;
- the key is often lost.
Helpful advice. It is recommended to attach the key to the tool cord. Thanks to this, the part will no longer get lost often.
Threaded
It differs in that it can be removed very easily. Wrapped in a non-standard way.
Step-by-step instructions on how to properly remove a threaded cartridge:
- Open the inside of the element.
- When unscrewing, turn the screw to the left.
- Turn on the lamp to accurately determine what shape the cap is.
- Change the regulator indicator to the most final mode.
- Disconnect the fitting from the drill.
Quick-release
The second name is self-clamping. Quite a common type. Installed in rotary hammers of the Zubr, Makita, Diold brands. The absence of teeth reduces the likelihood of injury. You can clamp or open the part using palm pressure. Disadvantages of the quick-release type:
- more expensive price;
- low durability;
Frequent replacement of drills or prolonged use cause loosening of the fasteners. The result from using the device ceases to be effective. The work is often dangerous.
Keyless chuck
Single coupling
These chucks must have a spindle lock feature. The fastener is screwed onto the part with one hand. This type of pressure provides quite powerful pressure. Single-coupling products are made from metal or hard plastic.
Note. Metal single-sleeve chucks are manufactured for drilling devices of high-end models.
Double coupling
Accommodates two couplings. Tighten with both hands. They are considered less convenient to use. Gives less effort. Cartridges of this type are made of metal or plastic.
Type SDS
Most often found in the design of various modifications of the Metabo company. Fixation with the tool is more reliable. 90% of all rotary hammers are equipped with these products. The design of the spare part is simple. The tool must be lubricated every time after use.
Causes of problems with the clamping mechanism
The drill, the instructions for use of which must be studied by the master before starting work, requires proper operation. In this case, many problems will be avoided.
Read also: Emery wheel for sharpening carbide cutters
Today, most electrical varieties of such equipment are equipped with an SDS type cartridge. It was developed by . This device is not very accurate. However, this mechanism allows you to drill holes even in hard materials. In this case, the tool operates with impact. In this case, drilling accuracy cannot be achieved. A special adapter is used for this.
If it is necessary to drill a precise hole in wood, metal, or plastic, a special nozzle is used. It is produced for both quick-release and jaw chucks.
It should be remembered that milling cannot be done with a drill. In this case, the cartridge will not be able to withstand the lateral load. You also need to pay attention to the correct choice of drill, sharpening it, and marking the center of the drill (using a core).
How to remove chucks from electric drills
First, the drill is removed. The keys can be unlocked if the shank is inserted correctly inside. The key itself is not used for this.
Dismantling with conical mating
There are no difficulties in disassembling. The first step is to unscrew the existing fixing screw. The drill must be turned with the drill down. Remove the cartridge with light blows of a hammer on the body.
Note. The easiest option is to use a special bearing removal tool.
If there is a threaded connection
Disassembly instructions:
- Place your fists as low as possible.
- Use a screwdriver clockwise to unscrew the screw from the spindle.
- Remove the part.
Advice. Two keys can be used. The horn fixes the spindle. The gas guy unscrews the spare part. It is also quite acceptable to use a hexagon.
Unscrewing direction
Before changing the chuck on a damaged drill, unscrew it from the tool strictly clockwise.
User manual
Working with a drill requires that the technician has carefully read the operating instructions for this tool. This will prevent many breakdowns. The type of tool should also be considered. Hand and electric drills are on sale today. They may differ in size, power and additional features.
Before work, using a drill, it is necessary to examine the wall for the presence of communications hidden in its thickness. These could be electrical wires or pipes. A metal detector will help detect such objects. The hole will always be slightly larger than the diameter of the drill. This must be taken into account when choosing fasteners.
Make sure that when drilling (especially metal) the drill does not slip. This will prevent it from breaking. For ceramic surfaces, it is recommended to use adhesive tape at the drilling site. The drill should be positioned perpendicular to the wall.
Features of removing cartridges from different companies
Spare parts from different companies differ in the types of fastening. Main designation parameters:
- drill shank diameter;
- thread pitch;
- D metric thread.
Imported drills are marked with inch values of the above indicators. The connecting cone is designated by the letter B. To indicate the type of tool, the marking is applied. The letter F is used to write the values of additional capabilities.
Marking
Soviet type drill
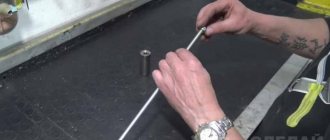
The drill is removed from an outdated Soviet drill using two plumbing wrenches. One of them secures the hammer drill shaft. Before removing the chuck from a Soviet electric drill, it is slowly unscrewed with another key. A stuck loosening device must be struck with a hammer.
Helpful advice. To prevent the drill attachment from jamming, it is recommended to regularly lubricate the cams with technical grade oil.
Interskol
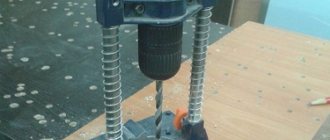
The drill has an ergonomic handle. Another advantage of the tool is its low cost. A step-by-step guide on how to correctly change the old cartridge on Interskol models:
- Unscrew the locking screw using a heavy-duty Phillips screwdriver. Before starting work, pour a couple of drops of lubricant under the screw. The WD-40 solution will neutralize existing rust fragments. It is necessary to drill the screw without the slightest damage to the thread.
- An L-shaped hex key with a size of 10 millimeters or more is clamped inside the chuck with the short side.
- A sudden blow to the long part of the key breaks off the stuck thread. The element can then be easily unscrewed by hand.
Hitting the part with a hammer will break it or deform the spindle. After this, in order to repair the drill, you will need to take it to a repairman.
Note. Some modifications of this company already have a chuck on the spindle. There are also grooves for a wrench. The presence of these elements makes it possible to fix the part. The absence of flats makes it necessary to partially disassemble the drill - to remove the body you will have to unscrew all the screws.
Makita
The standard instructions on how to remove a chuck from a Makita drill are also relevant for Decker rotary hammers:
- Push the cams in all the way.
- The head of the detected screw is unscrewed with a hardened Phillips screwdriver.
- Squeeze the hex key between the jaws.
- Suddenly strike counterclockwise.
- Unscrew the torn fitting.
Drill Makita
Bosch
The production of this world-famous company is distinguished by the production of high quality products. They provide the ability to disassemble and replace any faulty part. To remove chucks on Bosch drills you will need the following tools:
- Phillips screwdriver;
- L-shaped key;
- durable hammer.
Step-by-step instruction:
- Unscrew the locking screw.
- Clamp the L-shaped hex key inside the chuck with the short side.
- Place the drill on the edge of the workbench.
- Strike the unclamped hexagon sharply with a hammer counterclockwise.
Diold
The main feature of the fittings of devices from this company is the presence of a left-hand thread for the fixing screw. It is designed to allow the cartridge to be attached more tightly. To remove the self-clamping chuck, it must be rotated counterclockwise. In this case, the body must be firmly held. Tight threads are loosened with a few blows with a hammer.
Briefly about the main thing
For drills and hammer drills, chucks of different designs are used.
Attaching chucks to the shaft of a mechanical tool is carried out in two ways: threaded or conical connection (Morse taper).
Dismantling of clamping devices is carried out in the same sequence as installation.
Knowing the procedure is necessary not only for replacing or repairing a faulty cartridge, but for its periodic maintenance and inspection.
Ratings 0
Disassembling an obsolete cartridge
Not every type can be analyzed in detail. It is easiest to unwind a cone sample. Step-by-step guide on how to disassemble a cartridge without sawing with a grinder:
- Bring the side walls inward.
- The front side is clamped with a polystyrene foam sheet.
- Place a strong board on the sheet.
- The hand should firmly press the board with the polystyrene foam sheet underneath.
- Place the drill level on a workbench or table.
- Turn on shock mode for 15 seconds.
- Start directly disassembling the spare part - unscrew it clockwise.
Possible difficulties when working with a drill
Most often, craftsmen have to eliminate the three most common malfunctions when working with a drill.
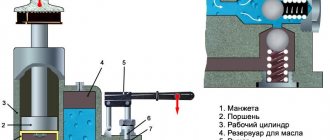
Diagram of the cartridge device
The tool flies off
When deep drilling, this problem occurs even on newly purchased devices. Especially if the type of fit of the spare part is conical.
To eliminate the failure, you need to lift the drill up. After this, the part is cleared of accumulated chips. The next step is to increase the tension of the cone mating. The spare part should be heated to 110 °C. The hot part is placed on the cold frame of the hammer drill.
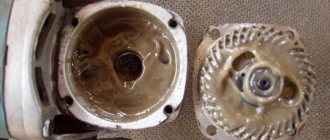
The clamping jaws have stopped moving
This happens when it becomes clogged with debris. The disassembled cartridge is cleaned. All moving parts must be washed thoroughly. Before assembly, all moving parts are coated with lithol.
Method of fastening the element
The cartridge is attached to the drill shaft using two methods - a conical combination and a thread. In practice, there are devices with metric or inch thread, and on the body of the product, even the smallest one, there is certainly a marking. This type of pointer is considered a key international one and is used in all devices of foreign manufacturers.
The second method uses the Morse taper , which today is often called instrumental. The rod has a conical part at its end on which the device is attached and it is only necessary to add a slight tension for a tight connection.
The marking is as follows: B10, where the letter indicates the application of the cone, and the figure shows the diameter of the tail of the cutting device. This type of fastening is the same for all drills.