A screwdriver is one of those tools that every man needs. The device can operate both from the mains and from special chargers. Therefore, it is recommended that every owner of such a product know how to replace batteries in a screwdriver. The process is simple, but some models may have certain features.
For each product, the number of cans in the battery may be different
Troubleshooting
Before you can fix the problem, you need to find out if it really is present. For this purpose, the following actions are performed:
- Disconnect the battery from the product; it must be fully charged.
- Disassemble the battery housing using a screwdriver.
- Remove all cans from the product.
- Using a voltmeter, the voltage is measured on each bank. For nickel-cadmium products, 1.2 Volts is considered normal, for lithium products - from 3.6 to 3.8 Volts.
- After taking measurements, it is determined on which part the stress is the least, and it is this part that will be of poor quality.
- The battery must be assembled and installed in the tool, and then completely discharged.
- After this, you need to disassemble the part again, and then take measurements again. The element with the lowest performance needs to be changed.
Important! Replacing low-quality elements is quite simple; they are connected in the usual sequence, taking into account the pros and cons. This applies to all models of Makita, Bosch, Zubr, Metabo, Dewalt, Interskol, Diold, AEG.
What does the battery consist of?
The battery in a car is responsible for starting the engine, the proper operation of all the car’s electrics, and also “smoothes out” voltage surges. Inside the housing, it consists of 6 series-connected elements consisting of positive and negative conductive plates. These elements are filled with electrolyte, interaction with which ensures the result of the work.
The liquid itself consists of distilled water and acid mixed in a certain proportion. The norms of proportions change depending on the required density of the mixture, and the norms of mixture density, in turn, depend on the temperature and climatic characteristics of the area where the car is used.
General recommendations for repairs
Regarding nickel-cadmium batteries, the following features are distinguished:
- Such elements have an element of memory. According to the classical scheme, they need to be charged three times and discharged the same number of times. For a new part the rules are exactly the same.
- An absolutely similar one is chosen as a replacement so as not to disrupt the operation of the entire device.
You need to prepare the necessary tools.
Regarding lithium batteries, there are also certain rules that need to be taken into account:
- Soldering must not be used. Such parts cannot withstand high temperatures and quickly fail. It is permissible to use only a very powerful soldering iron, but at the same time you need to work very quickly.
- It is easier to select such elements, because there are both foreign and domestic products on the market, the batteries of which are the same.
Ways to check fluid level
Currently, two types of batteries are most widespread: serviced and maintenance-free. In maintenance-free models, there is no way to check the electrolyte level; therefore, there is no need to add fluid. In serviced batteries, the plugs will be unscrewed, and many models have a special window for checking the fluid level. Car battery maintenance, including checking the electrolyte level, must be performed at least once a year .
It is best to carry out this work in the fall before the onset of cold weather, while simultaneously recharging the battery, which will eliminate any problems with starting the engine at subzero temperatures, when there is an increased load on the motor and power system.
Replacing nickel-cadmium batteries in a screwdriver with lithium ones
Replacing screwdriver batteries with lithium ones yourself is carried out by calculating their number, provided that 3.7 V is required per element. For example, for a product with a power of 14.4 V, it is necessary to prepare 4 Li-Ion banks of the 18650 standard.
It is also worth considering the difference in size. To change the battery, you will need to purchase a charge-discharge controller, which is additionally installed in the case with the banks. In addition, it is possible that the charger will have to be replaced.
Commissioning
How to put a dry-charged battery into operation? Step-by-step instruction.
- Purchase or make your own electrolyte. You need exactly the density that is best suited for a specific battery model. For passenger cars this is usually 1.27 g/cm3. It is not recommended to greatly exceed the nominal density - a battery with a solution not intended for it will not work for a long time.
- Open the hole for air access.
- If there is protective tape over the battery fill holes, remove it. Unscrew the plugs; if there is foil or another film under the plugs, then remove it too.
- Fill each jar one by one. It is convenient to do this through a funnel. The liquid level should be such that it is 5 mm above the level of the plates.
- After introducing the electrolyte solution, leave the battery open for about an hour so that the plates are saturated with the reagent and the chemical reaction begins. Then check the fluid level, adding it if necessary. Next, close the plugs and air access holes (if any).
- The voltage at the terminals is checked; normal should be within 12-12.5V.
- It is also possible, after filling the liquid, that the battery may heat up. You need to let it cool before using it.
- Do I need to charge the battery after filling? If the charge is below normal, then yes.
- Next, classically, the oxide is removed from the contacts (with sandpaper or a file) and the battery can be used.
Technology for replacing Ni-Cd with Li-ion in a screwdriver
Lithium elements are durable, so many screwdriver owners are thinking about replacing nickel-cadmium products with them.
The replacement technology includes several steps that must be followed.
Determining the number of Li-ion batteries
Basically, the battery parameters are marked on the battery itself or on a screwdriver. To determine the number of required elements, you need to divide the voltage indicated on the tool by 1.2V (this is the nominal voltage of one nickel can).
To find out how many lithium parts will be required for replacement, the division is carried out by 3.7 V - this is a normal indicator for this type of cans.
It is recommended to round up the result obtained; this will not have a negative effect on the instrument, but will simply increase its power a little.
It is necessary to correctly select all the necessary elements for replacement
Selecting a Li-ion battery
Manufacturers offer lithium-ion and lithium-polymer cells. The latter are smaller and safer, but they are more expensive. However, they are not capable of delivering large currents. Therefore, experts recommend using regular lithium-ion banks.
It is better if the element has welded flexible bends, because such parts do not like elevated temperatures and unnecessary soldering. It is recommended to look at several options in stores to choose the most suitable model.
How does the battery voltage affect the operating time of a screwdriver?
The question of how the battery voltage affects the operating time of the product is of interest to many. To understand how much power a product has, you need to multiply the voltage by the battery capacity.
For reference! For example, a screwdriver with a 14.4 V battery with a capacity of 1.5 Ah will have a power of 21.6 W.
Ready-made 18650 battery assemblies
As a replacement, it is better to purchase ready-made 18650 battery assemblies. You can do this on Chinese online trading platforms or in other online stores.
BMS Protection Board Selection
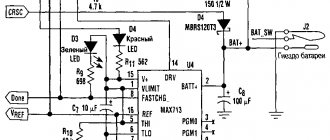
Lithium-ion batteries require careful handling and compliance with certain requirements. The role of protection is performed by the BMS board. It is this element that does not allow the voltage to exceed more than 4.2 V and decrease below 2.55 V per battery during charging. In addition, the element keeps the maximum permissible current under control and maintains the necessary balance between the batteries.
The main parameters when choosing are the number of elements connected in series. On the Internet you can look at a table that shows all the necessary parameters and use it to select a suitable board.
You can make a replacement even at home, the main thing is to follow the sequence
Power supply for charging
For lithium-ion batteries, chargers are selected based on the number of batteries connected in series in the battery. The more there are, the higher the output voltage should be.
Charging batteries with a standard charger from a screwdriver
If desired, you can purchase a special universal board for a lithium battery. It is installed in the original charger. However, experts recommend using suitable chargers for this type of battery rather than modifications.
Lithium battery capacity indicator
Indicators are LED and digital. The latter are cheaper, but not convenient to use. It is better to choose LED options based on the number of batteries connected in series.
18650 battery holder
It is also better to purchase ready-made holders for 18650 batteries. If you wish, you can find good options at reasonable prices in online stores.
Closer to practice
If everything is clear with the definition of the problem, then the question arises: what is added to the battery - water or electrolyte? The result of measurements with a hydrometer will help with the answer: if the solution is too dense, then adding water will solve the problem. If the solution has too low a density, then you cannot do without an electrolyte.
Let's deal with water. Why is it so important to add distilled or, in extreme cases, melt water? The fact is that bottled water or tap water contains impurities that, when interacting with electricity, will at least produce sediment, and in worst cases will lead to complete deterioration of the battery. Therefore, the most purified water is necessary.
Advantages and disadvantages
One of the biggest advantages of dry-charged batteries is their low price. Even if you buy additional electrolyte, it turns out to be much cheaper than those already refilled. Among other things, you can buy a battery for later use, as a reserve. It has a very long shelf life without electrolyte. In general, the absence of liquid also makes it possible for easier transportation (the battery weighs less and there is no risk of chemical leakage).
There is actually only one minus - you need to spend a certain time preparing for use. Although if you buy one already filled, you may also be faced with the need to increase the electrolyte density or recharge.
Solder the batteries
It can be done in different ways, for example with thick wires. I decided to solder some torn metal strip taken from old cans. First, I tinned the tapes in the places of future contacts on both sides. Then, using a well-heated soldering iron with a drop of solder, I tinned the battery contacts. But so that they do not heat up too much - let them cool. Then I pressed the tape to the contacts of the cans and soldered the tape, again without severe overheating.
The most difficult thing to solder is the negative terminals, but it goes very quickly. True, it is better to wash the flux later to clean the insides of the battery.
Now the most important thing. What batteries were used when repairing the battery of the Interskol DA-10/10.8 ER screwdriver, you ask? Well, I won’t hide it. These were the most Chinese of the cheap cans that the owner of the device honestly bought in the store. from Bailong with a fictitious capacity of 8800 mAh. This is of course a laugh and God forbid they have 2200 mAh. Judging by how long the screwdriver worked after the repair on a full charge. I would reduce this figure by half. But nevertheless, the screwdriver was urgently repaired and it makes the owner happy.
When assembling, do not forget to return the cardboard spacer between the cans and the board. This is so that fresh soldering does not short-circuit anything on the board.
This completes the repair and restoration of the lithium-ion battery of the Interskol DA-10/10.8 ER screwdriver. Almost all batteries from popular screwdriver manufacturers are repaired in approximately the same way :. This concludes my story about repairing a screwdriver battery. Ask questions in the comments. Better yet, in the corresponding thread on our forum or write to the Soldering Master personally by email.
Sincerely, Master Pike. Happy renovations!
Disassembly and repair of coupling Interskol DA-12ER-01
We eliminate the problem of switching, first gear slipping.
- the instrument does not turn on;
- no reverse mode switching;
- There is no speed control.
The tool does not turn on
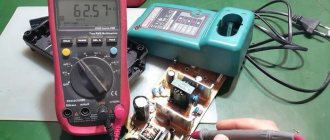
The first thing you should pay attention to when repairing a Skil screwdriver is the battery. If you put it on charge, and it didn’t even help, then we arm ourselves with a multimeter and don’t start troubleshooting
First, we measure the voltage on the battery; the oil should more or less correspond to that indicated on the battery case. If there is a passage of low voltage, it is necessary to determine the faulty element: the battery in a different way.
Determine the serviceability of the charger, of course, with a multimeter; for you, we plug it into the network and do not measure the voltage at the terminals. It must be done a few volts, not just from the nominal value indicated on the device. If there is no voltage, the charging unit is faulty. For such repairs of an Interskol screwdriver, knowledge of electronics will be required, otherwise it is easier to buy a new one.
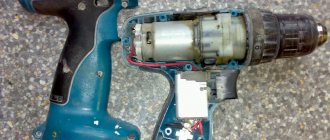
If the problem is with the battery, then to repair the Makita screwdriver yourself, you need to open the block with the cells. When the block has been disassembled, you need to carefully examine what remains to be done
Our client can’t check the quality of the soldering at the wire connection point to see if any of them have come off.
If the integrity of all connections passes, we take a multimeter and do not measure the voltage on each element. The voltage on each element is not lower than 0.9 - 1V. If an element with a lower voltage is detected, it must be replaced. The main thing is that the capacity and type of element correspond to the others (i.e. if NiCd, then NiCd is also needed). You can learn more about it from the article: “Battery repair by hand
.”
For which the design is intended, if charging and the battery are working properly, and the screwdriver does not turn on, it is necessary to disassemble the screwdriver. There are two wires going from the battery terminals to the button, take a multimeter and measure the voltage at the input of the button (the battery is inserted). If there is voltage at the input, then remove the battery without using alligator clips and short-circuit the wires from the battery. We set the device to measure resistance in Ohms. We press the button in full and do not measure at the exit from the button. The device should show a resistance value tending to be absent; if this is not the case, the button is working properly, the problem is either in the brushes or in other elements of the electric motor. If the tester shows a break, replacement or repair of the button is necessary. You can try to repair it yourself, since it often happens that there is no contact at the terminals due to burning; it is necessary to clean it with sandpaper rather than reassemble it. The main thing when disassembling the button is not to rush and not to act carefully, otherwise the parts will fly apart for the client; you won’t have to spend a lot of time poring over how to assemble it.
How to calculate the charging current and why does it depend on the battery capacity?
Also, the boiling process begins when recharging, i.e. when the battery is supplied with a charging current greater than that required for the normal operation of the electrolysis process.
How is charging current calculated? The nominal capacity, say 60 A/h, must be divided by 10. More details can be found here. For a battery with this rated capacity, the charging current will be considered 6 A.
Why did they accept this value?
For the normal operation of the electrochemical process of dissolving sulfate crystals, a certain amount of current is required. This amount is directly related to the area of the active plates of the battery, i.e. its capacity.
Battery capacity is calculated based on the total area of active areas in the battery. The battery charging current directly depends on the battery capacity.
Sulfation refers to a chemical process when, under normal charging conditions, sulfate crystals stop dissolving, which causes a sharp decrease in the active area of the battery plates. This is followed by a chain reaction: the battery capacity decreases, therefore, the starting current decreases.
When charging a battery, we use the charging current calculated based on the nominal capacity (for 60 batteries - 6 A). And if the capacity is reduced to 40 A/h, then 2 A turns out to be unnecessary.
These 2 extra amperes begin to participate in the decomposition reaction of water during the electrolysis process. The battery begins to “boil”.
How to disassemble
Disassembling the screwdriver is performed on a table or other flat surface to avoid loss of parts or fasteners.
Screwdriver
To disassemble the screwdriver, you first need to remove the battery and then unscrew all the screws
Then the case is carefully opened, trying not to damage the structure. If difficulties arise, you need to inspect the device again. There may be fasteners left somewhere or parts are connected by staples that need to be removed
There may be fasteners left somewhere or the parts are connected by staples that need to be removed.
After the case is opened, remove the parts one by one and lay them out on the table in the order in which they were removed. You can take several photographs so as not to make mistakes during the assembly process of the equipment.
Gearbox
A breakdown of this unit is indicated by strong vibration during operation, unusual noises or other signs. For repairs, you will need to disassemble the screwdriver gearbox. It includes ring gears, satellite gears, and carriers. All parts are removed from the housing one by one, then thoroughly cleaned and lubricated.
The procedure is carried out on a flat surface, removing all the parts, laying them out in the correct order so as not to experience problems during reassembly.
The disassembly itself looks like this: the cartridge is removed, the housing is disassembled, the gearbox is separated from the engine. Next, the plate is removed, all parts are removed from the housing, and the bolts connecting the halves of the gearbox are unscrewed. Use pliers to adjust the diameter of the spring to improve gear engagement. Next, the coupling is disassembled - the retaining ring, washers, and bulk bearing are removed. The shaft is removed.
After disassembly, faulty elements are replaced with new ones. Sometimes, for example, when a shaft is bent, it is necessary to purchase a new gearbox.
Engine
If the motor does not work, the problem is usually associated with the brushes, or less often with the armature winding. In the first case, the brushes are replaced with new ones. In the second, you will need to change the engine itself. The gear pressed onto the shaft of this unit remains intact; it must be disconnected with a special puller or improvised tools. The part is then placed onto the new engine using a hammer and a hard surface.
button
Repairing a screwdriver button is usually impractical, but sometimes it is enough to simply disassemble it and thoroughly clean it. Conventionally, it includes three nodes:
- control button for turning on and off, as well as speed adjustment;
- soft start lever;
- reverse button.
If the part is collapsible, to separate it, you need to find the plastic latches and bend them. The button that cannot be disassembled is replaced with a new one.
What's the voltage?
First, let's look at the voltage - this is a small cell or jar that, when charged, has a voltage of 2.1 Volts. Of course, if it is discharged, it can drop to zero. However, this is detrimental to a lead battery - a deep discharge will simply kill it, why we read here .
If we talk about capacity or “amperage”, then even on a single cell it is equal to the capacity of your large battery. Because the connection is serial, not parallel.
And from physics we know that in order to increase the capacity, you need to connect the batteries in parallel, but then the voltage will not increase.
To increase the voltage, we connect the batteries in series, but then the capacity or amperage will not increase (as you like).