Are your nickel-cadmium batteries no longer holding a charge or not wanting to charge at all? Is it possible to restore a screwdriver battery?
What do you do with batteries when they die? Do you just throw them in the trash (which is harmful to the environment), or do you recycle them?
The best solution would be to bring dead batteries back to life, which will save you from unnecessary expenses and the environment from pollution.
One way to restore nickel-cadmium batteries is using a welding machine. But not everyone has such a device... Therefore, we need to choose another way to repair a screwdriver battery at home.
ATTENTION! You will have to open the device, which has a dangerous voltage of 300 volts. Therefore, you must be very careful and follow safety precautions when repairing a screwdriver battery with your own hands.
Troubleshooting
Finding the sources of problems involves using several methods:
- using a multimeter - helps to diagnose the condition of devices placed on charge;
- load - a twelve-volt car light bulb with a power of 35 W is used.
These methods allow you to carry out diagnostics without opening the battery. An additional test method is to release gas from the devices by opening the housing. The latter technique restores functionality for a short time.
Checking with a multimeter
Reasons for complete discharge
Resetting elements to zero is associated with storage features:
- in a cold room;
- at home.
Important! The problem with new tools is related to violations of storage rules by the seller using unheated warehouses.
Features of the conversion
Most models, at least Interskol, Makita, Hitachi, feature universal mechanisms. This means that the charger is designed to power Ni-Mh and Li-Ion batteries.
Features are related to battery power. New and replaced products must match each other. Otherwise, a failure or circuit break will occur, as indicated by the indicator. When overloaded or broken, the red and green lights flash simultaneously.
In a situation where the charger is not universal, it will need modification, as well as the power supply. The process depends on the type of charger and the manufacturer, implying almost complete desoldering of the board elements, installation of a capacitor, resistors and their subsequent adjustment.
Along with this, there is a universal method for transforming the memory. It involves the use of a BMS board that stabilizes the input voltage and current. On the market it is designated DC-DC StepDown, and trimming resistors are present directly on the board. The module is soldered into the charger circuit using the P+ and P- connections on the board and the old charging terminals.
Conversion to 12 volt lithium batteries
The above method applies to all batteries. The voltage is determined by the parameters of the power supply. The differences are related to the number of batteries. The bulk of the transformation manuals refer to 14 V units, where 4 18650 lithium batteries are used for replacement. For a 12 V device, this amount is too much. 3 18650 batteries will be enough here.
Conversion to 18 volt lithium batteries
A similar approach applies to 18 volt products. The differences here are also related to the number of batteries. The battery consists of 5 18650 units, which ensures super efficient operation. If the work process is too intense, the screwdriver even produces burnt marks. Therefore, subsequently the 5th battery is often removed.
First stage of testing
Checking the screwdriver battery at the first stage is the simplest; current and voltage readings are taken from the battery while it is charging.
Readings are taken several times, at certain time intervals:
- 30 minutes after charging has started, U will be about 13 volts;
- after another 30 minutes U will increase to 13.5 volts;
- two hours after the start of the process - 14 volts;
- a fully charged battery will produce a voltage of 17 volts.
As for the increase in current (amperage) during charging, if the operating condition of the battery is in order, then the current increases steadily during the first hour. In addition to the voltage, measure the current an hour after the start of the process. If the indicator has passed the “mark” of 1 ampere, your battery is in good health and does not need to be disassembled and repaired.
Improved battery recovery method
The author of the method disassembled several battery cans during the process and noticed a break in the positive contact with the negative case. He assumed that this was caused by electrolyte degradation and he was right. As mentioned above, during operation there is an oxidation process with water consumption.
As a result of the decrease in water in the composition of the alkaline electrolyte, its operational characteristics also changed. What was suggested:
- before carrying out any manipulations with the supply of pulsed current and charging, the author of the method selected elements from the assembly whose voltage was zero;
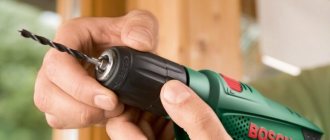
- a hole was made in their body with a microdrill and a thin drill;
- a cubic centimeter of distilled water was pumped into the hole of each element;
- After this, the batteries stood for some time and their voltage was measured. Elements with zero voltage were “invigorated” with a pulsed current;
- then the cells were charged;
- After this, it is recommended to leave them for a few days and then check the voltage again;
- if the elements are alive, then the holes are sealed with sealant or sealed. The battery is assembled, charged and the screwdriver is ready for use;
- if the voltage is again zero, then another “cube” of distilled water is added, and the process is repeated until successful completion.
You might be interested in an article on how to check your phone's battery capacity. Below you can see what the process looked like:
A hole is being drilled
Distilled water is added
The hole is sealed.
With this method, restoration of the Ni─Cd battery is more effective and long-term. You can read a separate article about restoring a Ni─Cd battery for a screwdriver. On the Internet you can also find recommendations for restoring nickel-cadmium batteries by freezing. In this case, alkaline batteries are placed in the freezer for a couple of hours, and then quickly and sharply knocked on the battery case. The idea here is that dendrites in a frozen state become brittle and are destroyed by impact. The comments on this recovery method say that it is recommended if the electric shock method does not help. However, I could not find any reviews about the results of its use.
What is the problem when using Ni-Cd batteries?
Nickel-cadmium batteries are intended for installation in equipment characterized by increased discharge currents. During operation, there is a transfer of active mass between the electrode plates, which leads to a decrease in the strength and volume of the positive electrode. The element is a paste consisting of nickel hydroxide and electrically conductive material, which is applied to a steel mesh base.
Degradation occurs due to overcharging of the battery, causing the formation of crystals from the active mass at the positive pole. On the negative electrode, tree-like needles of cadmium are formed, which pass through a layer of thickened electrolyte to the negative plates. Crystal growth occurs when charged cells are stored for a long time or when batteries are constantly recharged.
An additional disadvantage of batteries is the consumption of distilled water, which is absorbed and decomposed by the chemicals that make up the positive electrode. Foreign impurities appear in the electrolyte, worsening the characteristics of the solution.
Why reanimate the battery?
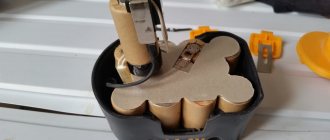
Restoring a Ni-Cd cell will save you the cost of purchasing a new battery. Some battery models are also built into electrical equipment, for example, screwdrivers. They are difficult to find on sale at the appropriate voltage and with good capacity. So, to assemble a new battery, you will need several components with a power of 1.2 V and a capacity of 2000 mAh or more. In this case, you will have to carry out the assembly yourself, in a sequential way. Therefore, it will be easier and cheaper to restore a broken Ni-Cd battery.
Nickel-cadmium battery for screwdriver.
Checking circuit breaker functions
In production, differential automatic machines are tested by specialized laboratories, which ultimately give a conclusion about whether the device can be serviced or not. It is unlikely to be possible to check a differential circuit breaker for overload characteristics or protection against short circuits, and even more so for the time of operation of these protections, when purchasing; this requires special laboratory instruments. We talked in detail about how to check a circuit breaker in a separate article. Unfortunately, it is unlikely that it will be possible to carry out tests at home, especially for home craftsmen.
However, the main difference between a conventional circuit breaker and a differential circuit breaker is a protective shutdown device that responds to deterioration of insulation resistance. It is this unique ability of the device that is recommended to be checked before installation in an electrical distribution panel. This must be done at regular intervals, since it is the operation of the mechanism that is aimed at preserving human life and health.