Repair / From Vladimir
- How can I restore functionality?
- Ball restoration options
- Making a serviceable cover
Plug: do it yourself
- Repair glass: everything ingenious is simple
- Welding as an alternative to replacement
- Flaring as a repair method
- Consultations from a practitioner on video
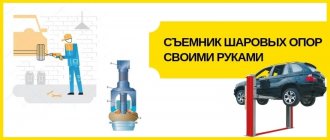
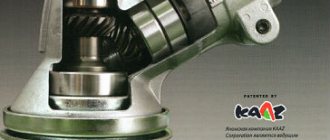
The ball joints carry the load of the front end of the vehicle, including the weight of the engine. At the same time, when moving, they receive constant impacts from the wheels in any direction. No matter what durable material these parts are made of, their service life is limited. It’s good that in many cases restoration with your own hands is possible.
Is it possible to drive with faulty ball joints?
Of course not, this is directly related to security.
- When the ball joint is dismembered, the wheel breaks and its rotation is blocked. The car instantly leaves the trajectory. The consequences can be fatal.
Weak ball joints pose a real safety hazard! - Moving with play in the ball joint leads to loss of controllability. At the right moment, you may not have time to make a maneuver.
- At the first signs of wear on these components, it is necessary to undergo suspension diagnostics.
Thus, having determined the symptoms of a malfunction, conclusions are drawn about the repairability of the part. Once critical wear is detected, the ball joints must be replaced. However, their cost is quite high, especially if they are integral with the suspension arm. Therefore, many car enthusiasts prefer to make repairs.
Useful tips
As practice shows, restoring ball joints and other suspension components using the methods discussed above is a solution that should be used only in extreme cases.
In other words, it is necessary to restore balls or ends only when, for one reason or another, it is not possible to immediately replace the faulty part with a new one.
However, in this case, the opportunity to save money through repairs is not a plus. It doesn’t matter which car has problems (the ball parts of a premium car require replacement or the ball parts of a VAZ 2107 have failed), it is better to immediately look towards new original parts or high-quality analogues.
We also recommend reading the article about what a silent block is in a car suspension. From this article you will learn about the design and purpose of silent blocks, the main symptoms of their malfunctions and the replacement of these parts if necessary.
The reason is that any repair is initially working with a faulty part and there is no warranty. It is also necessary to separately take into account that ball joints experience heavy loads, and safety on the road directly depends on their structural condition.
It is quite logical that no repair can completely restore the performance and reliability of a part compared to a new unit of the same quality.
How can I restore functionality?
It is important to know! After repair, the ball is not restored to the condition of a new part. The service life will be shorter. But you don’t have to worry about operational safety.
There are many recovery methods. A fairly popular repair method is the SJR technology, when molten polymer is pumped into the cavity between the holder and the ball.
We will consider repairs with disassembly of this unit.
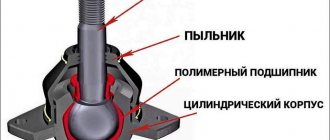
To understand the mechanism of operation of the support, look at the diagram:
Often the problem occurs due to damage to the boot, and not to the metal itself
Only the polymer liner is subject to wear. It is when it is abraded that backlash appears. If you continue to drive with a loose ball joint, the top of the cylinder will also break, and then the pin may fly out of the race.
Inserts are sold in car dealerships as consumables. If your ball joint is collapsible, you can easily pull out the bottom and replace the polymer inside the product.
Consumables can be sold in a store at a more reasonable price than buying a new spare part
Do-it-yourself restoration with liquid fluoroplastic
This can be done, but it is difficult. You will need special equipment and polymer (fluoroplastic). The principle is this: we simply drill a hole in the bottom of the ball, then cut a thread so that we can screw in a special metal “receiver”.
A “receiver tube” from a special press (extruder) is screwed into this thread, which supplies molten fluoroplastic under pressure. It should be noted that it melts at temperatures of 170 - 200 degrees Celsius.
Then we heat the tube, usually the press itself with the “liquid mass”. Inside the spherical fluoroplastic also melts + mixes with the mass that enters through the tube, the process occurs under a pressure of 2 atmospheres.
After filling, the tube is disconnected and the press with the polymer is removed. The polymer hardens and forms a monolith that envelops the “ball”; all knocks and vibrations pass - after all, the broken place is filled with polymer. A special valve or “grease fitting” is screwed into the hole that has been drilled.
After such a repair, the ball joint can run for a very long time, sometimes even no less than a new one. Let's watch a detailed video.
However, it is worth noting that if the boot is broken and a lot of dirt gets inside the “ball”, then you should first clean it, otherwise the wear will be very great. Cleaning should be up to the mirror.
Also useful video.
That's all. In conclusion, I would like to say that if it is possible to change and install a new original support, it is better to do it. After all, a new one, I emphasize ORIGINAL (not China), will always be better than a restored one. It will last you for many thousands of kilometers.
Read our website, sincerely your AUTOBLOGGER.
Similar news
- Power steering (hydraulic power steering) or EUR (electric power steering). What's better …
- Front or rear wheel drive. Which is better and more reliable, the main differences…
- Types (types) of steering racks. How they work, review article
Add a comment Cancel reply
Ball restoration options
First of all, the assembly must be removed correctly. The finger sticks so tightly to the suspension arm that it is practically one piece with it. Beforehand, preferably one day before, the joint is treated generously with penetrating liquid. Use WD-40 or regular kerosene. There are two ways to remove your finger from the eyelet:
- Press out with a ball joint remover. This is the most painless and reliable method, but a puller is not always at hand. There are no universal devices, and the designs for fastening the ball joint are different.
Example of a ball joint remover - The second method is more universal, but there is a risk of damaging the thread on the support pin. It is necessary to screw a nut made of strong steel (hardness 9.8) onto the tip of the ball and knock the ball out of the eye with precise short blows of a hammer.
Important! Do not hit the finger directly. You will rivet the threaded connection, and it will be impossible to screw on the working fastening nut.
So, the ball joint is in your hands. The outer cylinder (cage) is a monolithic structure. It is impossible to remove the finger.
Ball joint options for different car models
Diagnostics
If you hear knocking or creaking noises from the suspension while driving your car on rough roads, these sounds may be coming from worn ball joints. It is better to determine the source of unpleasant sounds together: one person goes down into the inspection hole and puts his hand on the ball, and the other rocks the car. When you feel the sound with your own hands, remove the support, clamp it in a yew, and check the hinge play. The finger should not move from slight efforts, but it should not bite either, otherwise the unit will require repair or replacement.
This check must also be carried out in the following cases:
- Creaking sound when turning the steering wheel.
- Spontaneous wobbling when driving in a straight line.
- Tight steering wheel.
Making a serviceable cover
The blind part of the support body is made removable. At the same time, you can change the plastic inserts many times, each time restoring the functionality of the support. The removable bottom allows for routine inspection without removing the ball joint from the suspension.
Plug: do it yourself
- A hole the size of a finger ball is drilled in the bottom (with a small gap, of course). It is drilled out - it is said conditionally. A milling machine is required. Don’t be afraid to damage the plastic liner when boring, you will still need to change it. The thread is cut inside. This is a rather complicated procedure due to the large diameter. But in any tool shop they will do this kind of work for a nominal fee.
Entrust the work to professionals if you are not one yourself - Then a threaded plug is made for this hole, repeating the shape of the standard bottom.
Tip: To make the plug accurately, use two ball joints. Cut the bottom off one using a grinder and use it as a template for the shape.
- On the manufactured bottom, you must cut slots for the key, otherwise it will be impossible to firmly tighten the repair unit.
Replace on a clean surface, otherwise the meaning of the work is lost. - Now for repairs it will be enough to unscrew the plug, remove the pin (checking its geometry) and replace the plastic inserts.
Important! It is necessary to ensure that the thread is locked, otherwise the bottom may unscrew during operation.
Repair glass: everything ingenious is simple
The principle is the same as in the first case - to make a replacement bottom. Only the execution is different. If the bottom of the support is too thin to make a full threaded connection, it is necessary to make a repair cup. It is turned on a lathe from a steel circle of suitable diameter. The same hole is made in the bottom of the glass and a thread is cut. And finally, the support replacement bottom is made.
Then the bottom of the cylinder is cut off from the ball joint using a grinder or a hacksaw. A repair glass is welded in its place. The method is more labor-intensive, but it does not allow the finger to heat up during the dismantling process.
Scheme for manufacturing a product variant
Further operation follows the same scheme: when play appears, unscrew the repair plug, remove the pin, change the plastic inserts.
It is worth noting that spare parts manufacturers produce many options for repair ball joints. Replacement inserts and new pins are sold for these collapsible housings. However, in our article we are considering self-production.
Welding as an alternative to replacement
The fastest option for restoring a ball joint. The rear (supporting) part of the cylinder is simply cut off. The method doesn’t matter - you can use a hacksaw, or you can use a grinder, but there will still be a temperature effect afterwards.
Having gained access to the cylinder cavity, you can change the polymer liners.
Important! Before installing new liners, be sure to remove any burrs formed during cutting. Torn metal edges will quickly split the liners during use.
After installing the new liners, the bottom is carefully welded. In this case, it is necessary to compensate for the production of metal formed during cutting with the thickness of the seam. Usually it is 1.5–2 mm.
Welding is one of the most painstaking options
Important! Use a welding method that minimizes temperature effects. The polymer liner inside may reach the melting point. Therefore, until it cools completely, do not apply any loads to the finger to avoid deformation of the liner.
Flaring as a repair method
This technology requires professional equipment, so it is impossible to flare a ball in a garage. A crimp ring is cut to fit the diameter of the finger ball.
Turning work will find its place here too
The seat and ball are cleaned of dirt and polished. New liners and a crimp ring are selected or machined from caprolon.
It happens that caprolon is not available, but replacing it with steel is not recommended. It’s better to spend money on this material once than to replace it more often than it could be
After assembly, the crimp ring is pressed in and rolled on a press. When crimping, special inserts-clips are used according to the diameter of the ring.
Inserts can also be found in car dealerships.
Removal and installation
If after carrying out diagnostic measures it becomes clear that the unit is worn out, it must be repaired. Many novice car owners cope with all the work and restore the ball joints with their own hands. To remove and install the support after repair, you will need several tools:
- Special puller for supports.
- Car stand.
- Jack.
- Mount.
- Pliers.
- A set of keys.
Most often, ball joint pullers are not universal. If you cannot find the required tool, you can solve the problem using a hammer. Moreover, its weight should be about 600 grams. In addition, you need to know the place where you should strike so as not to damage the node.
There is no need to try to knock your finger out of the seat. The blow should be directed perpendicular to the finger along the eyelet. To remove the ball joint, you first need to loosen the front wheels and jack up the car. After this, the wheel is removed.
If the nut on the pin has a cotter pin, it should be removed using pliers. This will allow you to unscrew the nut and use a puller or hammer to squeeze out the pin. After this, you should unscrew the housing mount and, using a pry bar, press the lower lever to remove the support.
To install the unit after repair, you first need to attach the housing to the lower arm. After tightening the fasteners, use a pry bar to release the lever and return the pin to the socket. Then the nut is screwed onto it and tightened. If after this the finger rotates, then the lower lever must be pulled up. The last step will be to install the cotter pin on the nut or replace the old one with a self-locking one.
Which restoration method is better?
- The threaded plug looks preferable since there is no temperature effect on the support. However, this method requires a thick bottom, which is not always present on compact parts.
- A glass with thread is the golden mean. Welding occurs without affecting the plastic, but the strength characteristics of the metal deteriorate.
- Welding is the simplest, but ineffective method. After treatment at high temperatures, new polymer inserts lose their properties and their service life is reduced.
- Flaring is an ideal method from a quality point of view. You actually get a new ball joint, manufactured using factory technology. However, this technique does not work at home.