When repairing the chassis of any car, it becomes necessary to remove steering rods or ball joints. In both cases, their tip has a conical shape, which ensures optimal fit of the products in the socket. During operation, they become very compact, and if moisture gets between them, then corrosion forms at their joints. It makes it even more difficult to separate these parts.
To make repair work easier, a do-it-yourself ball joint remover would be an excellent option, which will greatly simplify the repair and help remove the tip with little effort.
Puller drawings. Repair equipment. Tool
This topic will provide drawings of pullers and devices for car repairs, as well as drawings of special tools.
The following drawings are currently available:
Drawing of the front suspension strut rod nut remover.
Drawing of a universal screw puller for steering rod pins.
Drawing of spring ties for front and rear suspensions.
Drawing of a puller for pressing out the silent block of the rear suspension shock absorber.
Drawing of a puller for pressing in the silent block of the rear suspension shock absorber.
Drawing of a wheel bearing puller for the front and rear wheels.
Drills for knocking out wheel bearings
Photo of drifts for knocking out a wheel bearing
Mandrels for pressing in wheel bearings
Photo of mandrels for pressing in the wheel bearing of the front and rear wheels of VAZ-2108, VAZ-2109, VAZ-21099, VAZ-2113, VAZ-2114, VAZ-2115. The photo also shows rings from old wheel bearings, they also help with pressing.
Drawing of a puller for replacing rubber-metal hinges of the rear beam.
Replacement of rubber-metal hinges of the rear beam
Photo of the puller
Drawing of a puller for replacing the silent blocks of the front suspension arm.
Photos of the puller
Puller for replacing silent blocks of the front suspension arm
Device for compressing brake cylinders.
The brake cylinder compressor is made from old brake pads. Everything seems to be visible in the photo.
Photo of a device for compressing brake cylinders.
Drawing of brake cylinder compression device
Source
DIY ball joint remover: instructions and materials
When repairing the chassis of any car, it becomes necessary to remove steering rods or ball joints. In both cases, their tip has a conical shape, which ensures optimal fit of the products in the socket. During operation, they become very compact, and if moisture gets between them, then corrosion forms at their joints. It makes it even more difficult to separate these parts.
To make repair work easier, a do-it-yourself ball joint remover would be an excellent option, which will greatly simplify the repair and help remove the tip with little effort.
Exclusive
Replacing ball joints on Renault Logan with removal without removing the lever
Each manufacturer of special tools and equipment has its own original developments that make it possible to simplify the most common operations for the repair and maintenance of rolling stock. This reduces their execution time and ensures high productivity. For example, Kukko engineers designed the KS-204-30 puller, designed for dismantling brake ratchets with automatic clearance adjustment manufactured by well-known companies. They are installed on most models of commercial vehicles. The peculiarity of the device is the presence of a transverse adjustable clamp designed for rigid fixation of the gripping paws. It allows you to clearly fix the ratchet before dismantling, which lasts a matter of seconds, despite the absence of a hydraulic drive. The latter, by the way, is included in the list of options for this device, but, as practice shows, it is absolutely not needed.
Why do you need a ball joint remover?
Without it, it is difficult to dismantle and carry out repair work on the chassis of the car; a puller may also be needed to disassemble the steering joints . It can be used for ball joints of different diameters. When choosing its design, they rely on the technical characteristics of a particular car.
Theoretically, the dismantling of ball joints can be carried out with any available tool, using a sledgehammer or hammer, but such repairs are classified as “stressful”.
What does a puller look like?
There are three types of pullers :
They differ in appearance, but their operating principle is the same. The finger is twisted out of its seat using a hammer or by turning the nut . The puller is designed in such a way that it fills the space between the connected parts and after turning it you can hear a click, indicating that the connection has loosened and you can remove the ball joint from its seat.
The puller helps even a novice in auto repair work to dismantle it.
Symptoms of a problem
One of the main signs of failure is uneven tire wear. An experienced car enthusiast knows that in order to wear tires evenly, it is necessary to periodically change places - right to left, front to rear, but if the tire on one wheel “goes bald” noticeably faster, you need to check the ball joints of that wheel. Other signs of damage include:
- suspicious knocking in the wheel area;
- strange squeaks when turning;
- the wheel wobbles from side to side even when driving in a straight line;
- It became much more difficult to turn the steering wheel (on cars without power steering).
At the slightest suspicion, you need to check, since a breakdown of the support can even lead to the loss of a wheel, which will create an emergency situation on the road.
Which puller is better?
In the video you can see several options for ball pullers , among them the screw one , but only it must be made with high quality.
Its analogue in the form of a fork is universal, since it can be used not only for ball joints, it also helps when removing steering ends. However, its work can negatively affect the anthers.
There are difficult cases when you have to work with a puller and a hammer in pairs: first, the supports are pushed apart with a screw, and then you need to strike with a sledgehammer.
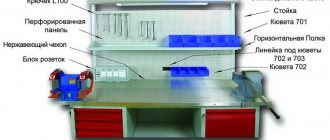
2.3. Equipment placement
When arranging equipment, you need to take into account its features, observe safety precautions, and ensure easy access to it for workers.
All equipment must be located in the places allocated to it according to the plan and be returned to them if the type of work involved their use with movement. There must be sufficient distance between the equipment so as not to impede the movement of personnel around the site and to provide easy and safe access for using the equipment. Equipment with electric, pneumatic, hydraulic drives must be connected to the appropriate networks, lines or devices.
In addition, the area must be equipped with exhaust ventilation and well lit.
Step-by-step manufacturing instructions
The device for removing ball joints is quite complicated, but if you follow the step-by-step instructions, you can do it yourself:
The finished device is suitable for emergency and planned replacement of ball joints on Zhiguli and Lanos, as well as some brands of foreign manufacturers.
The manufactured puller is not universal and cannot be used for different components, but if you succeeded in doing it the first time, then subsequent versions will be much easier.
For 15 years I have been repairing various types of cars, including brands such as VAZ, UAZ, Chevrolet, Mazda, Kia and many others. Everything related to the gearbox, engine or chassis. You can write me your question below in the comments and I will try to answer it in detail.
Source
We buy spare parts
The selection of spare parts is carried out according to the VIN code of your car, which eliminates selection errors
But it wouldn’t hurt to play it safe and pay attention to the ball joint during diagnostics. On some vehicles, the left support is different from the right
When choosing a manufacturer, we listen to the seller’s recommendations. The price-quality ratio must be satisfactory. The ball joint is an important suspension element that affects driving safety, so you should not skimp on it.
Front left and right ball joints on Toyota Corolla EE90
Depending on the manufacturer, a set of new mounting bolts and nuts may be included with the ball joint.
A very important point! Old fasteners quite often “sour”, which causes difficulties during dismantling. Sometimes, you can only unscrew them by deforming them. Cut threads, broken bolts, and torn edges can force you to go to the store in the middle of repair work, leaving the car disassembled. If the kit does not include new hardware, we ask where they can be purchased and whether it is possible to return the product if it is no longer needed.
Tools for work.
To replace the ball, you will need to prepare. To do this you need:
- Keys and gates.
- Liquid WD-40.
- Litol or ShRB lubricant.
- Puller.
- Hammer and crowbar.
The ball joint connects the lever and the steering knuckle.
It is used to attach the lever to the hub.
Replacement time
When driving a car on a bad road, you will need to change the ball joints often.
- Initially, when it fails, a knock will be heard.
- Then the car will begin to pull to the side even when driving on a good road.
- Then the tires will begin to wear unevenly.
- When turning the steering wheel, squeaks may appear.
- It will become more difficult to turn the wheels.
If the finger moves freely with little hand force, the ball joint requires replacement.
Replacement
The whole process is carried out in the following stages:
- Removal. Hang the wheel, unscrew the nut on the pin, then knock the rod out of the socket.
Unscrew the 2 bolts securing the ball to the knuckle.
If there is no puller, insert the assembly and knock out the lever with a hammer.
Installation
Before installation, fill the case with lubricant.
You just need to insert your finger into the socket and tighten the nut on it. You should definitely lubricate the ball inside under the boot.
How to make a ball joint remover with your own hands
When carrying out repairs to the chassis and steering, there is almost always a need to remove ball joints or tie rod ends.
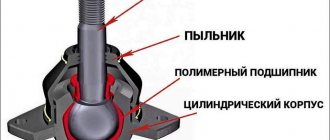
The peculiarity of these structural elements is that the support pin or tip has a conical shape, with which it fits into the seat.
During operation, the fit density increases so much that the surfaces of this joint practically stick to each other.
Additionally, moisture can get between the finger and the socket, causing pockets of corrosion that further seal the connection.
Therefore, to remove ball joints or tips, special pullers are used that allow you to press out the pin with minimal effort.
Video.
Ball joints are consumables that are difficult to dismantle without special equipment.
The landing unit is constantly under force pressure, as a result of which the metal parts literally stick to each other. Universal pullers are not always suitable; the design of suspensions on different cars differs from each other.
Even in the same vehicle, different mounting designs may be used on each suspension arm. Buying several sets of equipment is too expensive, so many craftsmen prefer to make a ball joint remover with their own hands.
Types of pullers
The auto tools market offers a wide selection of such removable mechanisms, which can be divided into two types:
Screw pullers are considered universal and are suitable for working with almost any car.
The force in them is created by screwing the bolt into the puller body. The housing itself is put on the support eye, and when tightened, the bolt rests against the support pin and presses it out of the socket.
Lever removable mechanisms are no less effective, but they are larger in size, so they may not be suitable for every car.
For example, with such a puller on a VAZ-2107 you can still remove the upper ball joint, but you won’t be able to get to the lower one due to very limited space.
For these purposes, a special puller is used.
The essence of a lever puller comes down to the presence of two levers connected in the middle.
On the one hand, holes are made in them and a coupling bolt is installed.
To press out, one lever is installed between the eye and the support, while the second lever is placed under the finger.
When the bolt is unscrewed, due to the existing connecting axis, the ends of the levers begin to converge and the pin is pushed out.
But it is not necessary to purchase a removable mechanism; it can easily be made at home from improvised materials.
Next, we’ll look at several types of ball joint and steering wheel pullers that you can make yourself.
Lever
A lever puller for ball joints is no less effective. However, these instruments are large in size. Therefore, they are not suitable for every car. For example, using a lever tool on a VAZ-2107 you can dismantle the upper ball joint, but removing the lower one will no longer work - the working space is too limited. To do this, it is best to use a special tool.
You don’t have to purchase such a device - it’s easy to make a ball joint remover with your own hands. It is assembled from improvised means. Let's look at other tools that you can either buy or make yourself.
This is the simplest and yet quite effective puller. It cannot be classified as any type of mechanism, but in matters of pressing out it is a good choice. To make it, you only need a grinder or a machine with an abrasive wheel. The blank is a metal plate, the dimensions of which are similar to a box of matches.
Then a rod is welded to this bracket. This will allow you to use a ball joint remover. Working with a wedge is quite simple. It is installed in the gap that exists between the eyelet and the body of the ball pore. Then, using a hammer, the wedge is driven in, which leads to the pin being pressed out.
But there is a significant drawback when working with this tool. During the process of pressing out the support, the boot is damaged. That is why the wedge is used only when replacing tips or supports. It is better to avoid repairs using such a device.
Screw release mechanism
The second type of removable mechanism, which can be made from improvised means, is a screw release mechanism. It is perfect for replacing ball joints of classic VAZ models.
A special feature of the suspension design of these cars is that the upper and lower supports are located symmetrically to each other and the distance between them is not large.
It can be made at home only if you have a drilling machine, or you will have to go to a lathe. This puller consists of only two parts.
To make it, you will need a square or hexagonal rod with 17 or 19 key edges, the length of which is 7 cm. Using a drilling machine, we make a hole in this rod and cut a thread for a bolt of 8. Screw in the bolt and that’s it - the puller is ready.
Let's look at how it works using the VAZ-2107 as an example. To press out the upper support, you need to unscrew the lock nut, but not completely, you do not need to remove it. Then we install the manufactured puller between the pins of the supports with the bolt screwed in until it stops.
To squeeze out the finger, we take two keys - with one we hold the manufactured body, and with the second we unscrew the bolt until the finger falls off the socket. After replacing the upper support, we do the same, but with the lower one.
Unpopular reasons for knocking
It would be a good idea to check the anti-roll bar bracket. This part consists of bushings based on metal and rubber, which are turned in different directions and connected by a thin isthmus. Most often it is he who breaks down. On rough roads, on small bumps and on turns, you can hear a knocking sound.
For a correct diagnosis, you need to pull the end of the stabilizer with one hand. This will work better if the wheels are turned to the right.
It happens that the motor mounts wear out. The engine moves actively at increasing speeds and on uneven surfaces. At certain moments, he reaches the body with the generator and oil pan. The result is a knock. This source of knocking is rarely guessed at. Many people change the suspension, but replacing the front suspension does nothing in this case.
Anything can knock in cars. For example, washer barrels. If it is poorly secured in place, the race will knock. There are also many other mysterious culprits behind such sounds.
Screw L-shaped
The third type of removable mechanism, which you can make yourself, is also a screw mechanism, but it has shown itself to be excellent and allows you to work on any car.
To make it you will need a round metal rod with a diameter of at least 10 mm and a length of 15-17 cm.
From it you need to make an L-shaped blank with a shoulder length of 5 cm. That is, we take a rod, measure 5 cm on it, clamp it in a vice and use a hammer to bend it 90 degrees.
We cut a thread on the long part of the workpiece and select a nut.
All that remains is to make the thrust bar. It can be made in the likeness of the wedge described above. That is, we take a plate, but 0.5 cm thick. On one side we make a cut for the support pin.
If necessary, you can reduce the thickness of the plate on the cut side by grinding off the metal layer. The main thing is that the plate fits into the gap between the support body and the eye, but it is not too thin, otherwise it will bend during the pressing process.
On the other hand, from the cut we make a hole for the L-shaped workpiece. All that remains is to put the plate on the long part of the rod. If the thread is not long enough to squeeze out the finger, you can place several washers under the nut.
Screw made from angle
Another screw puller can be made from a metal angle and a welding machine.
To do this, take a corner with sides 7-8 cm and the same length, and a thickness of 0.3-0.5 cm.
We make a cut in one of the sides to secure the mechanism to the eye. From sheet metal 0.3 cm thick we cut out two triangles that will act as braces. They need to be welded on the sides to the corner. This will significantly increase the strength of the structure.
We take a 17 nut and a long bolt for it. We weld the nut itself perpendicular to the cut so that its hole faces the cut.
So that in the future the bolt can be easily positioned on the same axis with the pin, before securing the nut by welding, a spacer must first be welded onto the corner.
All that remains is to screw in the bolt and the puller can be used.
These are the simplest types of removable mechanisms that you can make yourself.
In general, there are a lot of options, and with a little imagination and basic knowledge of plumbing, you can easily come up with and make your own puller.
We offer some drawings for viewing.
Tool for unscrewing the support
We will consider another type, which is used not for pressing out the finger, but for removing the support itself.
The fact is that on a number of cars (Peugeot, Citroen) the ball joint is screwed into the lever. Over time, the threaded connection sours, and it is quite difficult to unscrew this suspension element without a special tool.
But you can make the necessary puller yourself, rather than spending money on a factory one.
It is made from a thick-walled pipe 2\'\' 8-9 cm long.
At the end of this pipe it is necessary to make 4 spikes with a width of 5 mm and a height of 7 mm, located at an angle of 90 degrees relative to each other.
That is, you should get 4 protrusions at the end of the pipe, evenly distributed around the circumference. This can be done using a hacksaw and a file, or with a grinder.
From the other end we make slits to a depth of 3 cm, dividing the circumference of the pipe into 8 parts.
Then we bend these petals to the center using a hammer, significantly reducing the diameter.
We take a 24mm nut and screw it to the end part, and then use a welding machine to seal the slots made.
It is quite convenient to work with such a puller - we put it on the support so that the spikes fit into special grooves on the support body.
In this case, the finger will pass through the manufactured tool, which will allow the locking nut to be screwed onto it, thereby securing the puller. All that remains is to use a 24mm wrench to unscrew the support using the welded nut.
Alternative method
Finally, we note that it is possible to press out the support pin or tip even if it is not possible to make a removable mechanism. But this method should be used only in extreme cases. To remove the finger you will need a pry bar and a hammer.
The pry bar is used as a lever and must be installed in such a way as to create a force to press the support or tip, for example, place it between the steering rod and the rack eye.
After creating force with the mount, it is necessary to apply powerful blows to the body of the eye with a hammer. If everything is done correctly, then after 2-3 hits the finger will pop out.
The disadvantage of this method is that the eye can be damaged due to shock loads, so it is advisable to use pullers rather than knock out the support.
Source
Some tips and tricks
In conclusion, I would like to say a few very important points. Remember that if you have the opportunity or desire to entrust all manipulations to specialists, then you should do so. Your safety and the safety of your passengers will depend on this decision. You cannot save any money on your security. History has many examples when people, due to their carelessness, got into accidents, which sometimes ended in failure. But if you still decide to do everything yourself, then double-check that you have tightened all the bolts and nuts all the way. After all, there is nothing more scary than an out-of-control car rushing at high speed.
Also, do not buy extremely cheap spare parts. As you know, original spare parts are used by the manufacturer himself when assembling a car. These parts are best suited for your car, since the manufacturer always tests its products for wear resistance under extreme conditions, and, most importantly, they are designed specifically for your car. If it is possible to get original spare parts, this should be done. Original spare parts have special markings that you will not find at the auto market seller in your city. All these spare parts were created at the automaker’s own plant, which naturally speaks of the quality of the products. Although they are expensive, they are durable, since the manufacturer himself is interested in their high quality. Each manufacturer of such parts always provides a guarantee on them.
It is recommended to use only original parts instead of inexpensive Chinese analogues
Duplicates or non-original spare parts are also produced by factories, but not by the manufacturer, which indicates questionable quality in most cases. They are made by other companies that may not even be licensed by the original manufacturer. Usually this is all due to the fact that the manufacturer either does not have time for their own production, and they order parts from the outside, or they are completely satisfied with this policy. At the same time, there is always a risk that, under the guise of a duplicate made at the factory, parts simply made in a garage will go on sale. Of course, you cannot buy such parts; always try to make purchases from reliable sellers.